
Origami cubes are the tiny paper miracles that make you question everything you thought you knew about flat objects. Onea 3D cube that sits on your desk like it pays rent. The best part? You do not need glue, scissors, tape, a secret craft degree, or a dramatic montage. You just need paper, patience, and the willingness to tell one stubborn crease, “Not today.”
In this guide, you will learn how to fold an origami cube using two simple beginner-friendly methods. The first is the classic origami waterbomb cube, also called an origami balloon cube. It uses one square sheet of paper and inflates into a soft, rounded cube. The second is a modular origami cube made from six Sonobe-style units. This version is sturdier, more geometric, and perfect if you like your paper projects with a side of “wow, I made architecture.”
Both methods are fun for kids, adults, teachers, classroom activities, math lessons, handmade decorations, and anyone who has ever bought origami paper and thought, “Surely I can do more than fold another crane.” Let’s turn flat paper into cube-shaped happiness.
Before You Start: What You Need
Origami is wonderfully low-maintenance. It does not require fancy equipment, though good paper makes the process smoother. For both cube methods, choose paper that is thin enough to crease sharply but strong enough not to tear when you reverse a fold or tuck a flap.
Supplies for Method 1: One-Sheet Waterbomb Cube
- 1 square sheet of origami paper
- Recommended size: 6 x 6 inches for beginners
- A flat table or desk
- Optional: a bone folder, ruler edge, or fingernail for crisp creases
Supplies for Method 2: Six-Piece Modular Origami Cube
- 6 square sheets of paper, all the same size
- Recommended size: 4 x 4 inches or 6 x 6 inches
- Two or three colors for easier assembly
- A little patience during the final locking step
If you are teaching children, start with larger paper. Small paper looks cute, but it can make the folds feel like tiny paper wrestling. Printer paper cut into squares works in a pinch, but standard origami paper is easier because one side is often colored and the other side is white. That contrast helps you follow folds more clearly.
Basic Origami Terms You Should Know
Before jumping into the cube folds, it helps to understand a few simple origami terms. A valley fold means folding the paper toward you so the crease dips like a valley. A mountain fold means folding the paper away from you so the crease rises like a mountain. A crease is the line made by folding and unfolding paper. A flap is a loose section that can be tucked or moved. A pocket is an opening where a flap can slide in.
For origami cubes, neat creases matter. You do not need perfection, but sloppy folds can make the final cube look like it survived a paper thunderstorm. Line up edges carefully, press creases firmly, and avoid rushing the collapse or assembly steps.
Method 1: How to Fold a One-Sheet Origami Waterbomb Cube
The waterbomb cube is one of the most satisfying origami cube designs because it transforms from a flat folded form into a puffy 3D shape. This cube is traditionally related to the origami waterbomb or paper balloon. It is light, playful, and fun to inflate. It is also a great introduction to collapsible origami bases.
Step 1: Start With the Colored Side Down
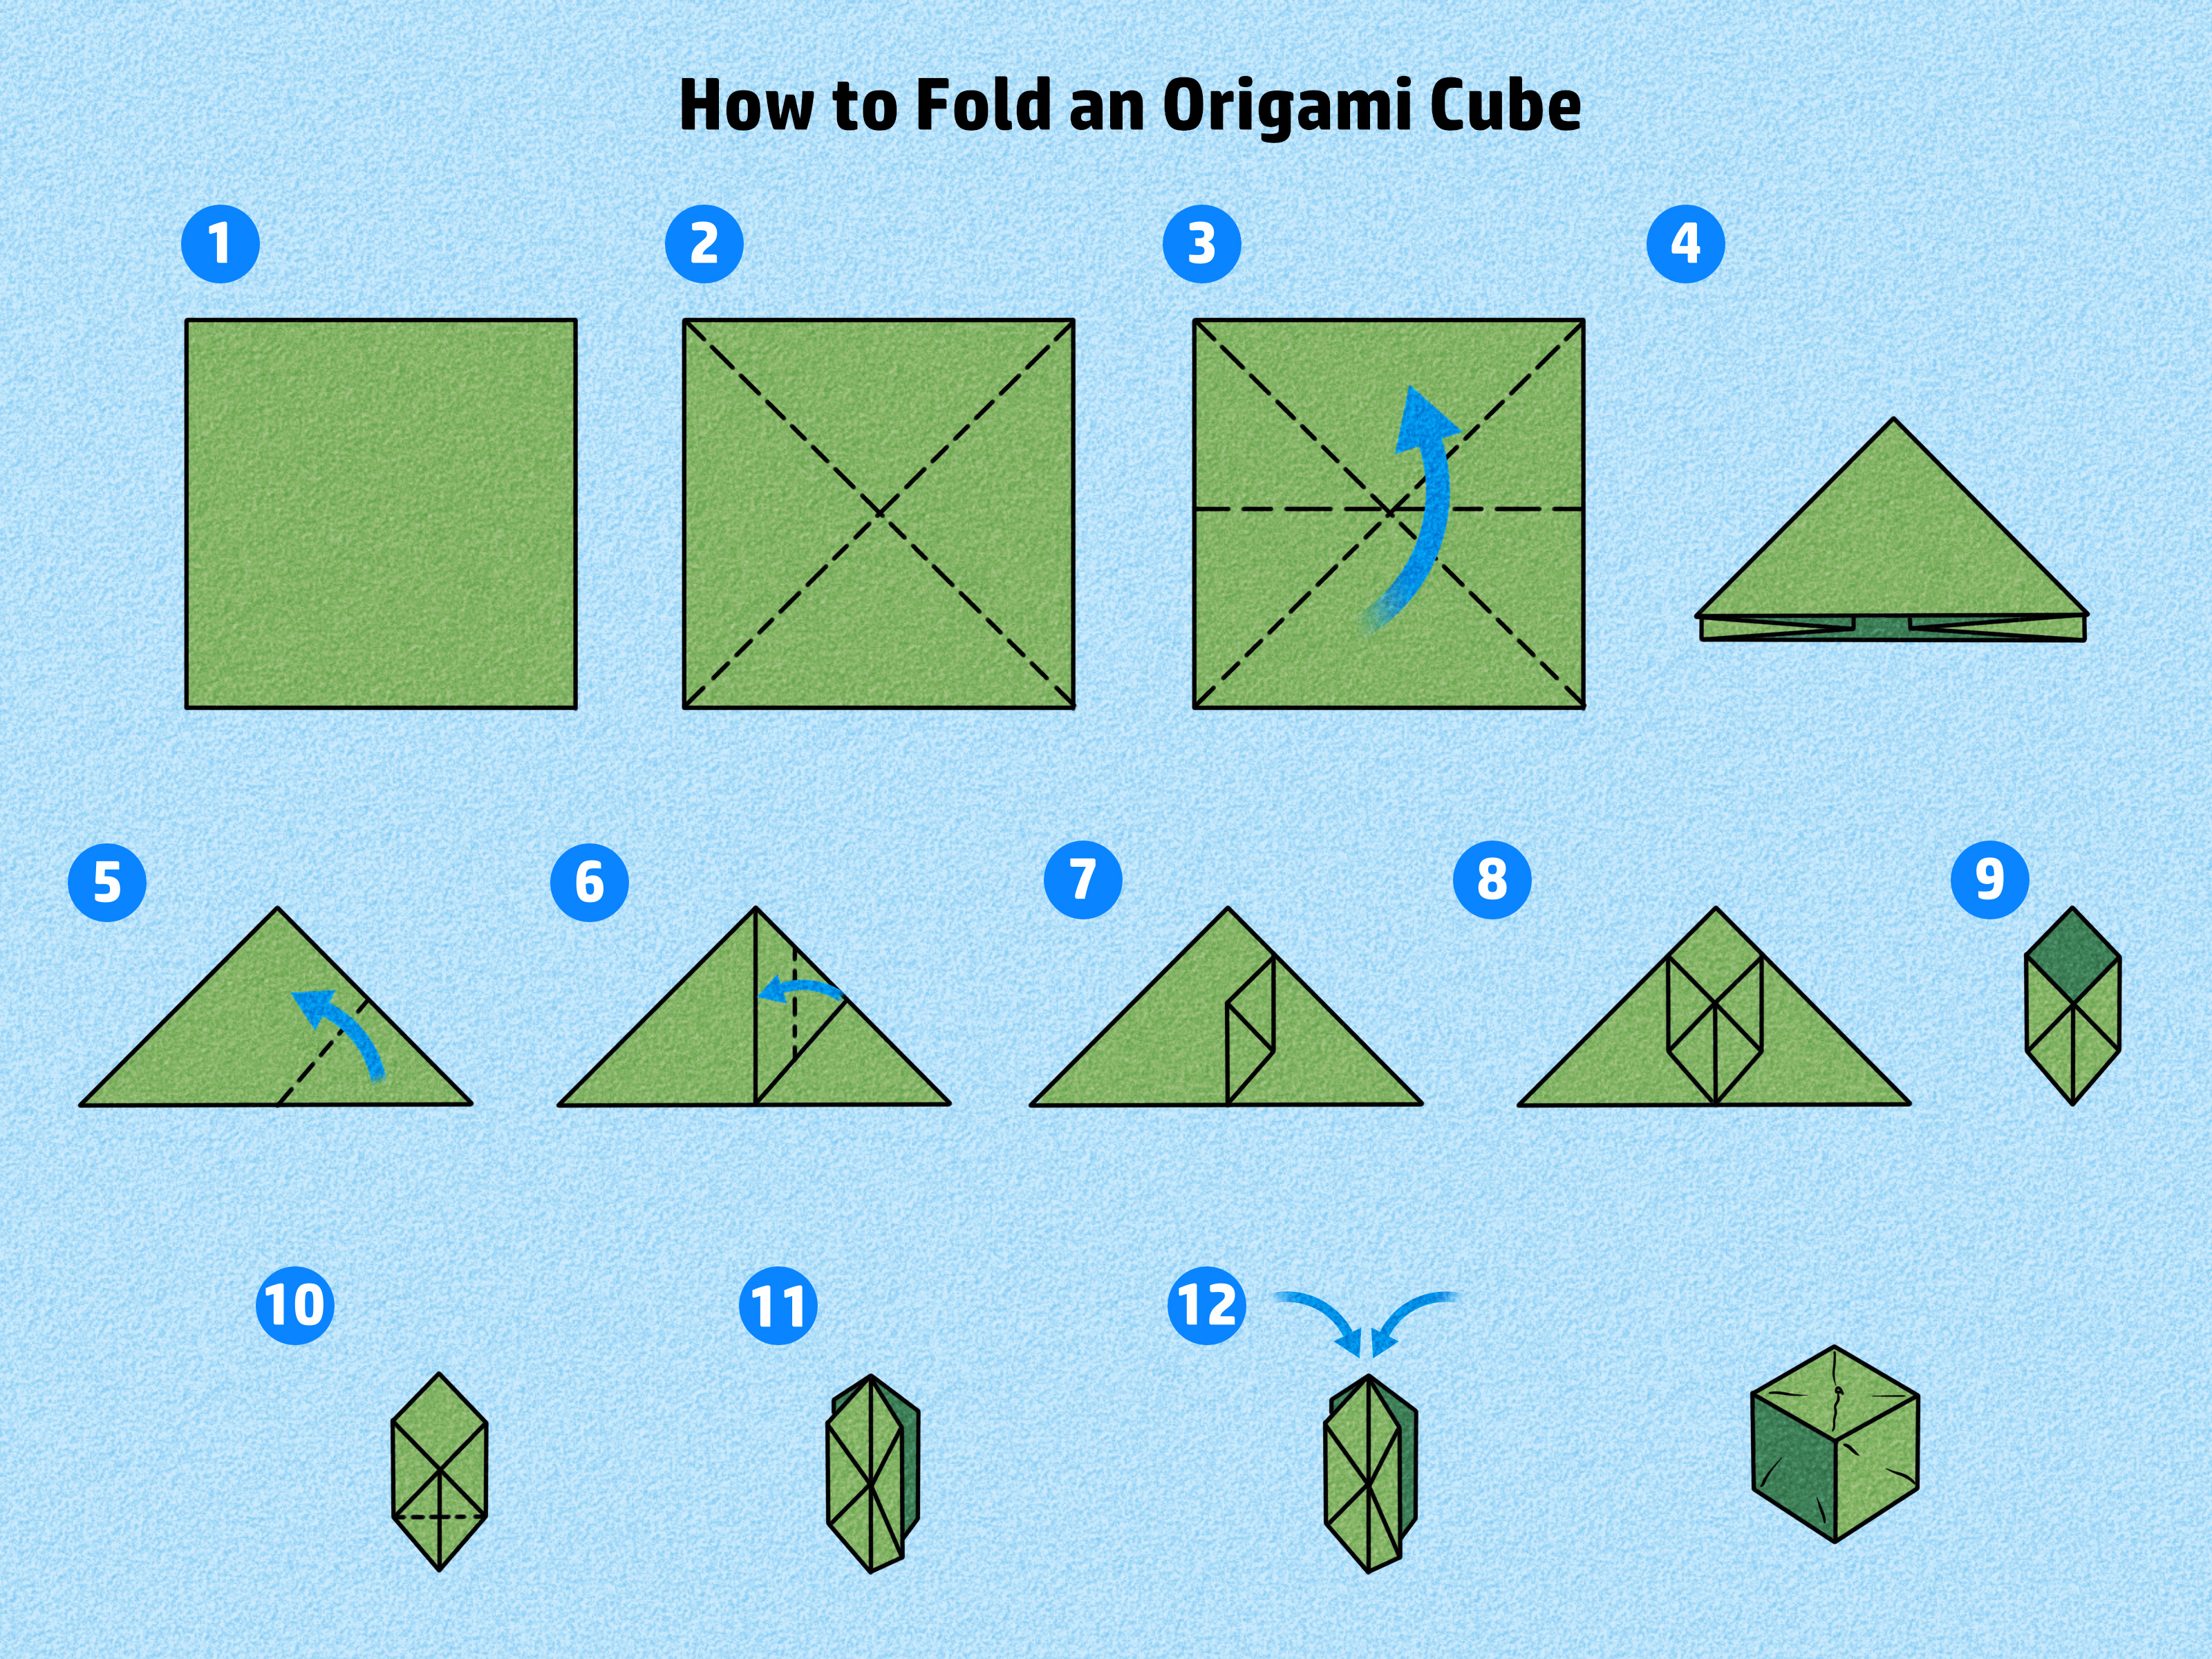
Place your square paper on the table with the colored side facing down and the white side facing up. Fold the paper in half horizontally, edge to edge. Crease well, then unfold. Next, fold it in half vertically. Crease and unfold again. You should now see a cross-shaped crease pattern.
Step 2: Make the Diagonal Creases
Turn the paper over so the colored side faces up. Fold the paper diagonally from one corner to the opposite corner. Crease and unfold. Repeat with the other two corners. When you unfold the paper, you should see an X crease crossing through the center, along with the straight horizontal and vertical creases.
Step 3: Collapse Into a Waterbomb Base
Hold the paper lightly at the left and right sides. Push the side creases inward while bringing the top edge down toward the bottom edge. The paper should naturally collapse into a triangle shape with two flaps on each side. This is the waterbomb base. If the paper resists, do not force it. Recheck your creases and gently guide the folds into place.
Step 4: Fold the Bottom Corners Up
Place the triangle with the point facing up. Take the bottom-left corner of the top layer and fold it up to meet the top point. Do the same with the bottom-right corner. Flip the model over and repeat on the other side. You should now have a diamond shape with loose flaps.
Step 5: Fold the Side Corners to the Center
Take the left corner of the top layer and fold it toward the center line. Repeat with the right corner. Flip the model and repeat on the other side. The shape should now look narrower, almost like a kite or tiny paper house that forgot its roof plans.
Step 6: Tuck the Small Flaps Into the Pockets
At the top of your model, you will see small triangular flaps. Fold each flap downward and tuck it into the pocket below it. This locking step helps the cube hold its shape when inflated. Flip the paper over and repeat on the other side. Press the folds gently but firmly.
Step 7: Inflate the Cube
Look for the small opening at one end of the model. Hold the folded paper loosely between your fingers and blow gently into the opening. The model should puff up into a cube-like balloon. Use your fingers to shape the corners and flatten the sides slightly. Congratulations: you have made an origami waterbomb cube.
Troubleshooting the Waterbomb Cube
If your cube will not inflate, the flaps may not be tucked securely, or the paper may be too thick. If air leaks out, check that the pockets are tight. If the cube looks rounded rather than sharp, that is normal. The waterbomb cube has a soft balloon-like form, not the crisp edges of a modular cube.
Method 2: How to Fold a Modular Origami Cube With Six Units
The modular origami cube is built from six folded units that slide together. This method is excellent for people who enjoy clean geometric shapes. It also works beautifully as a classroom math craft because it shows how individual faces combine to form a cube. Each paper square becomes one unit, and each unit contributes to the structure.
This cube does not need glue or tape. The tension of the paper and the interlocking flaps hold everything together. It may feel a little wobbly during assembly, but once the final flap locks in, the cube becomes surprisingly sturdy. It is the paper version of a group project where everyone actually does their part.
Step 1: Fold One Square in Half
Start with one square sheet, colored side down if your paper has two sides. Fold it in half from left to right, crease, and unfold. This center line will guide the next folds.
Step 2: Fold Both Edges to the Center
Fold the left edge in to meet the center crease. Then fold the right edge in to meet the center crease. Your paper should now look like a long rectangle with two doors closing toward the middle. This is often called a cupboard fold.
Step 3: Create Diagonal Corner Folds
With the rectangle positioned horizontally, fold the bottom-left corner upward so its edge lines up with the top edge of the rectangle. Crease well. Then fold the top-right corner downward so its edge lines up with the bottom edge. The unit should begin to show a slanted parallelogram shape.
Step 4: Fold the Remaining Corners Under
Now fold the top-left corner behind the model and the bottom-right corner behind the model, following the existing diagonal edges. The goal is to create a clean parallelogram with two triangular flaps. Press every crease sharply because these flaps will become the locking tabs during assembly.
Step 5: Fold the Unit in Half Along the Center
Fold the unit gently along its original center line so it has a slight bend. Do not flatten it into a completely closed strip. A little flexibility helps the units slide together later.
Step 6: Make Five More Units
Repeat the same steps until you have six identical units. If you are new to modular origami, use three colors and make two units of each color. This makes it easier to see which flap goes into which pocket during assembly.
Step 7: Connect the First Three Units
Take three units. Slide the triangular flap of one unit into the pocket of another unit. Add the third unit so the three pieces meet at one corner. You are forming the first corner of the cube. It may not feel stable yet, and that is fine. Modular origami often looks suspiciously chaotic right before it becomes brilliant.
Step 8: Add the Remaining Units
Continue adding units one at a time. Each flap should slide into a pocket on a neighboring unit. Think of each paper unit as one face of the cube, with its flaps connecting to adjacent faces. Work slowly around the shape, keeping the edges aligned and the corners square.
Step 9: Lock the Final Flaps
The last few flaps are usually the trickiest because the cube is nearly closed. Gently flex the paper, open the pocket slightly, and tuck the flap inside. Avoid crushing the cube. Once the final flap is tucked, press along the edges to sharpen the cube shape.
Tips for a Strong Modular Cube
- Use paper of the same size and thickness for all six units.
- Make every unit as identical as possible.
- Choose medium-weight origami paper, not cardstock.
- Crease sharply, especially on the diagonal flaps.
- Assemble on a flat surface to keep the cube square.
Which Origami Cube Method Is Better?
The best method depends on what you want from the project. The one-sheet waterbomb cube is faster and more playful. It is ideal for beginners, quick crafts, party decorations, and anyone who enjoys the fun moment of blowing air into paper. It is also easier to teach in a short session because every folder needs only one sheet.
The modular Sonobe-style cube takes more time, but the result is cleaner and more durable. It is better for display, math activities, color patterns, STEM lessons, and handmade gifts. Because it uses six sheets, it also offers more design possibilities. You can make each face a different color, create opposite-color pairs, or use patterned paper for a decorative cube.
If you are completely new to origami, start with the waterbomb cube. It teaches important folding skills such as diagonal creases, collapsing a base, and tucking flaps. Once you feel comfortable, move on to the modular cube. It introduces modular construction, spatial thinking, and the satisfying click-in-place feeling of paper engineering.
Creative Ways to Use Origami Cubes
Origami cubes are not just “fold it and forget it” crafts. You can turn them into decorations, learning tools, or small handmade gifts. String several waterbomb cubes together to make a lightweight garland. Use modular cubes as desk decor, party favors, or color-coded classroom models. Write numbers, letters, or prompts on each face and use them as learning dice. Just remember that origami cubes are made of paper, so they are not built for aggressive board-game rolling unless you enjoy rebuilding things.
Teachers can use origami cubes to explain geometry concepts such as faces, edges, vertices, symmetry, and volume. Parents can use them for rainy-day crafts. Artists can combine cubes into larger modular sculptures. Even office workers can make one during a break and place it next to the keyboard as a tiny symbol of productivity. Is it necessary? No. Is it charming? Absolutely.
Common Mistakes to Avoid
Using Paper That Is Too Thick
Thick paper makes tucking difficult and can prevent the waterbomb cube from inflating. Save cardstock for other crafts. Origami paper, lightweight printer paper, or thin craft paper works better.
Skipping the Crease Quality
Weak creases cause messy shapes. Origami is not about brute force; it is about convincing paper to remember where it should bend. Press each fold carefully.
Forcing the Final Assembly
With modular cubes, forcing flaps can tear the paper or bend the cube out of shape. Open pockets gently and slide tabs in slowly.
Mixing Different Paper Sizes
For modular cubes, all six sheets must be the same size. Even a small difference can make the final cube uneven.
Experience Notes: What Folding Origami Cubes Teaches You
Folding an origami cube sounds simple until you actually sit down with the paper and realize the paper has opinions. The first waterbomb cube often teaches the biggest lesson: creases are everything. When the starting folds are accurate, the collapse into the waterbomb base feels almost magical. When the folds are crooked, the model still collapses, but it may look like it woke up late and missed half its coffee. That is part of the charm. Origami rewards careful work, but it also gives you permission to try again with another square.
The inflatable cube is especially satisfying because the final step feels like a reveal. You fold, tuck, flatten, and stare at a shape that does not look very cube-like. Then you blow into the opening, and suddenly the paper expands. It is a tiny moment of craft theater. Children love this part, but adults do too, even if they pretend to be very serious about it. The first successful puff usually leads to an immediate second attempt, because now you want sharper corners, cleaner pockets, and a cube that looks slightly less like a dumpling.
The modular cube offers a different kind of experience. Instead of one dramatic inflation, it gives you a slow build. Folding six units can feel repetitive at first, but the repetition becomes calming. By the third unit, your hands know what to do. By the sixth, you may start wondering what else you can build from the same pieces. That is the quiet power of modular origami: one simple unit can become a cube, a larger polyhedron, a decoration, or a classroom model.
The assembly stage teaches patience and spatial awareness. The first three units usually connect easily, but the last two can test your optimism. The cube may open, wobble, or pretend it has no intention of becoming a cube today. The trick is to hold it lightly. Paper needs guidance, not panic. Once the final flap slides into place, the structure tightens, and the cube suddenly makes sense. That little click of understanding is one of the best parts of the project.
In practice, origami cubes are excellent for beginners because they provide quick feedback. If a corner is uneven, you can see why. If a flap will not tuck, you can trace the mistake back to a fold. If the cube collapses, you learn how tension holds modular models together. These lessons are useful beyond paper craft. Origami encourages focus, problem-solving, fine motor control, and patience. It also reminds you that beautiful things can come from ordinary materials, including the scrap paper beside your printer.
For the best experience, make your first cube with practice paper. Then make a second cube with nicer paper after you understand the sequence. Try one solid-color cube, one rainbow cube, and one patterned cube. Compare how they look and feel. You may find that the “mistake” cube becomes your favorite because it has personality. Origami is like that. It is precise, but it is not soulless. Every fold records the hands that made it.
Note: This guide is designed for web publication and focuses on practical folding instructions, beginner-friendly analysis, and real craft experience. For best results, practice each cube method once with scrap paper before using decorative origami paper.














