Kitchen demolition has a funny way of looking delightfully simple from across the room. You see an old sink, a few granite slabs, and perhaps one suspicious bead of caulk. How difficult could removing them be? Then you crawl into the sink cabinet, meet fifteen years of plumbing decisions, and discover that someone apparently installed the countertop as if preparing it for a hurricane.
Removing a kitchen sink and old granite counters is manageable when the project is approached in the correct order. The sink, faucet, garbage disposal, dishwasher brackets, caulk, backsplash, countertop seams, and cabinet fasteners may all be connected. Pulling on the granite before disconnecting everything is a reliable way to damage cabinets, plumbing, walls, or your relationship with the person helping you.
Our goal was to remove the existing kitchen sink and granite countertops while preserving the base cabinets and keeping the surrounding backsplash damage to a minimum. Here is the process, including the tools, safety precautions, mistakes, and real-life lessons that mattered most.
Why We Decided to Remove the Old Sink and Granite
Granite is durable, attractive, and capable of surviving years of hot pans, spilled coffee, and questionable cooking experiments. However, even a strong countertop can stop working for a particular kitchen.
Our old granite had a busy pattern that made every crumb appear to be either invisible or part of the design. The sink was divided into two small bowls, neither of which could comfortably hold a large baking sheet. The countertop layout also limited our options for installing a larger single-bowl sink.
Replacing the sink alone was possible, but modifying an installed granite opening can be risky. Stone is strong under normal use but may chip or crack when subjected to concentrated pressure, vibration, or impact. Professional fabrication is often recommended when an existing granite cutout must be enlarged.
Because we already planned to update the counters, removing the sink and granite together made more sense than trying to force a new sink into the old opening.
Planning the Removal Before Picking Up a Tool
Identify the Sink Type
Start by determining whether the kitchen sink is drop-in, undermount, or farmhouse-style.
A drop-in sink has a visible rim resting on top of the counter. It is typically held by clips underneath and sealed around the rim. An undermount sink is attached below the countertop with clips, brackets, adhesive, epoxy, or some combination of these. A farmhouse sink may be supported by framing inside the cabinet and can require additional disassembly.
Drop-in sinks are generally easier for a homeowner to remove because the rim helps support the sink from above. Undermount sinks require more caution because they can fall when the final brackets or adhesive release.
Determine How the Granite Is Attached
Look inside the base cabinets with a flashlight. Granite counters may sit directly on the cabinets, rest on plywood underlayment, or be secured with adhesive, silicone, construction adhesive, shims, screws, or metal brackets.
Also inspect every seam. A long run of granite may look like one continuous surface but actually consist of multiple pieces joined with epoxy. Marking each section with painter’s tape can help you plan how the pieces will leave the room.
Granite bonded with strong construction adhesive or epoxy can be extremely difficult to remove without breaking the stone or damaging the cabinets. HGTV advises considering professional help when these adhesives make nondestructive removal impractical.
Decide Whether the Granite Will Be Reused
There is a major difference between demolition and salvage.
If the granite is going directly into a disposal container, controlled breakage may make removal easier. If you hope to sell, donate, or reinstall it, every seam and adhesive point must be separated gradually. Granite is heavy but brittle; a slab can appear completely stable until one unsupported corner decides to become several smaller corners.
Measure doors, hallways, stairways, and exterior exits before lifting anything. A countertop that came into the house before a wall, island, or appliance was installed may not leave through the same route without additional work.
Tools and Safety Equipment We Used
- Safety glasses
- Heavy-duty work gloves
- Long sleeves, work pants, and closed-toe shoes
- Adjustable wrench and tongue-and-groove pliers
- Basin wrench
- Screwdrivers and cordless drill
- Utility knife with fresh blades
- Plastic and metal putty knives
- Small flat pry bar
- Wood shims
- Rubber mallet
- Buckets, towels, and absorbent pads
- Painter’s tape and permanent marker
- Moving blankets or thick cardboard
- Shop vacuum
- A sturdy support board for an undermount sink
Countertop removal is demolition work, even when you are trying to be gentle. Lowe’s recommends shutting off nearby utilities, clearing cabinets, protecting the floor, and wearing eye protection, gloves, long clothing, and sturdy footwear before beginning.
Avoid cutting, grinding, or drilling granite indoors as part of a casual DIY removal. Those activities can create respirable crystalline silica dust. OSHA and NIOSH identify stone cutting, grinding, edging, and contouring as tasks requiring effective dust controls and appropriate worker protection.
How We Removed the Kitchen Sink
Step 1: Shut Off Water and Electricity
We turned off both hot- and cold-water shutoff valves beneath the sink, then opened the faucet to relieve pressure. If the valves are missing, leaking, or frozen in place, the main water supply should be shut off instead.
We also switched off the circuit serving the garbage disposal and verified that the disposal would not run. Unplugging it is not enough when hardwired equipment or nearby wiring may still be energized.
Before disconnecting anything, we photographed the plumbing from several angles. That ten-second step can save an hour later when every plastic fitting suddenly looks like it belongs somewhere else. Lowe’s specifically recommends photographing the plumbing configuration before removal.
Step 2: Disconnect the Garbage Disposal
We placed a bucket beneath the plumbing and disconnected the disposal’s drain connection. If a dishwasher drain hose feeds into the disposal, that hose must also be removed.
After supporting the disposal from below, we released it from the sink mounting assembly. Garbage disposals are heavier than they look, particularly when you are lying sideways inside a cabinet and attempting to catch one with your forearms.
Anyone uncomfortable with electrical wiring should have an electrician or plumber disconnect a hardwired disposal.
Step 3: Remove the Drain and Water Connections
We loosened the slip nuts on the P-trap, allowed the remaining water to drain into the bucket, and removed the trap. Next, we disconnected the faucet supply lines.
Older shutoff valves and pipes should be supported while loosening fittings so the twisting force does not damage weak plumbing. This Old House recommends bracing older valves while turning supply-line nuts.
We temporarily covered the open drain pipe with a rag to limit sewer odors, taking care not to push the rag into the pipe.
Step 4: Remove the Faucet and Accessories
With the water lines disconnected, we removed the faucet mounting nuts using a basin wrench. We also detached the soap dispenser, filtered-water faucet, and any other accessories passing through the sink or granite.
Removing these items first reduced the weight and eliminated protruding parts that could catch on the countertop during lifting.
Step 5: Support and Release the Sink
Because our sink was undermounted, we placed a board across the cabinet opening and supported the sink before loosening its mounting hardware. Sink clips, brackets, and old epoxy were removed from below.
We then cut through the silicone seal between the sink rim and granite using a sharp utility knife. This required several careful passes. Home Depot recommends removing clips and slicing through the caulk before attempting to lift or lower a sink.
Once the seal released, we lowered the sink slowly. We did not pry aggressively against the granite edge because the narrow stone surrounding a sink opening is one of the most vulnerable parts of the countertop.
How We Removed the Old Granite Counters
Step 1: Clear the Countertop Perimeter
We emptied every base cabinet, removed drawers, and pulled nearby appliances forward. The dishwasher was not fully disconnected, but its mounting screws were removed from the underside of the countertop.
We protected the flooring with moving blankets and taped cardboard over vulnerable cabinet faces. Granite removal involves awkward lifting, and belt buckles, tools, and slab edges can scratch finished surfaces surprisingly quickly.
Step 2: Cut the Caulk at the Wall and Backsplash
Using painter’s tape as a guide, we cut through the silicone where the granite met the backsplash and walls. Several light passes were safer than one enthusiastic slash.
Lowe’s recommends cutting the caulk before separating the countertop or backsplash and using care to protect the surrounding wall and tile.
Where the backsplash sat directly on the granite, we removed it first whenever possible. Trying to lift a countertop while it remains bonded to the backsplash can tear drywall paper, crack tile, or bring an unexpected section of wall along for the adventure.
Step 3: Find Every Fastener and Adhesive Point
We inspected the cabinet corners, front rails, plywood underlayment, sink supports, and dishwasher area. Any screws or brackets connecting the countertop to the cabinets were removed.
We also checked beneath each granite seam. Some installers reinforce seams with plywood strips or brackets that are not visible from above.
Step 4: Loosen the Granite Gradually
At an accessible corner, we worked a thin putty knife between the granite support and cabinet. Once a small gap appeared, we inserted a wooden shim. Additional shims were placed every few inches rather than concentrating pressure in one spot.
The goal was to separate the adhesive slowly, not to launch the countertop into the ceiling. Angi recommends cutting adhesive or caulk first and applying gentle pressure with a pry bar to avoid damaging cabinets, backsplashes, or the countertop.
We never used the finished cabinet edge as the direct fulcrum for a metal pry bar. A scrap block of wood spread the pressure and protected the cabinet frame.
Step 5: Separate the Seams
Once the sections were loose from the cabinets, we addressed the granite seams. We supported both sides before applying any lifting force. An unsupported seam can crack suddenly, especially near a sink or cooktop opening.
When a seam would not release without excessive pressure, we treated that as a warning rather than a personal challenge. A fabricator can often separate or transport a difficult slab more safely than a homeowner with a pry bar and misplaced optimism.
Step 6: Lift With Enough Help
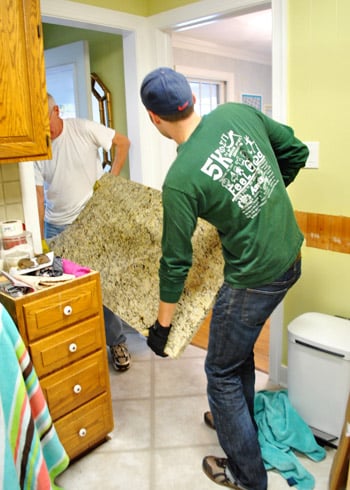
We planned the route, opened the doors, removed obstacles, and assigned each helper a position before lifting. Nobody walked backward without a spotter.
The slabs stayed vertical while being carried, similar to moving a large sheet of glass. Holding a long stone section flat can place excessive stress on narrow areas and cutouts.
We set each piece on padded supports away from foot traffic. Granite should never be leaned casually against a wall where it can slide or tip.
Step 7: Inspect and Prepare the Cabinets
After the counters were removed, we scraped away remaining silicone and adhesive. We checked the cabinet tops for water damage, loose joints, uneven rails, and deteriorated plywood.
This was also the best opportunity to verify that the cabinets were level. New stone countertops require stable, adequately supported cabinets. Small cabinet problems are much easier to correct before the new counter arrives than while an installation crew is standing in the kitchen.
Problems We Encountered and How We Solved Them
Stubborn Silicone
Old silicone stretched instead of cutting cleanly. Fresh utility-knife blades and a plastic putty knife worked better than brute force. We removed residue only after the slab was safely supported.
A Hidden Dishwasher Bracket
One bracket was concealed behind insulation at the top of the dishwasher. The countertop would lift slightly and then stop. Instead of pulling harder, we inspected the area again and found the forgotten screw.
Water Where We Did Not Expect It
Even after draining the faucet and P-trap, water remained in the disposal, supply hoses, and sink channels. Towels and a shallow container were more useful than expected. Kitchen plumbing apparently saves a farewell splash for every remodel.
Adhesive Pulling at the Cabinet Finish
In one section, the adhesive bonded more strongly to the cabinet finish than anticipated. We stopped prying and used a thin scraper to separate the bond gradually. Protecting the cabinets was more valuable than saving five minutes.
Can Old Granite Countertops Be Reused?
Yes, provided the slabs come out intact and fit a new location. Reuse is easiest when the granite has simple rectangular sections, limited seams, and no fragile sink cutouts.
Potential reuse options include a laundry-room counter, outdoor serving station, workbench surface, bathroom vanity, tabletop, or smaller accent shelves fabricated by a stone shop.
Before offering granite for sale or donation, record the exact dimensions, thickness, finished-edge locations, sink cutout measurements, seam positions, and backsplash pieces. Photographs are essential. A buyer needs to know whether the existing configuration will work before arranging transportation for several hundred pounds of extremely unforgiving décor.
Broken granite may still be accepted by some stone recyclers, landscape suppliers, salvage yards, or construction-waste facilities. Disposal rules vary by location, so confirm requirements before loading a truck.
Preparing for the New Sink and Countertops
With the old materials gone, we confirmed the new sink specifications before countertop templating. Sink model numbers, templates, reveal preferences, faucet-hole locations, and accessory openings should be finalized early.
We also checked the dishwasher clearance, cabinet width, plumbing alignment, and disposal position. Keeping major appliances and plumbing in their existing locations can reduce the cost and complexity of a kitchen renovation.
If the replacement sink is deeper than the old model, the existing drain connection may be too high. A deeper basin combined with a garbage disposal can lower the outlet enough to create a drainage problem. Measuring this before installation prevents an unpleasant discovery after the new stone is permanently in place.
Our Experience Removing the Sink and Granite Counters
The most surprising part of the project was not the weight of the granite. We expected it to be heavy. The surprise was how many tiny connections had to be discovered before anything large could move.
At first, the countertop seemed ready to lift after we removed the visible caulk and loosened the sink. One corner rose about a quarter inch, which felt like victory. The opposite side did not move at all. Our first instinct was to apply more pressure. Fortunately, we stopped and looked underneath again.
That second inspection revealed a screw driven through a narrow cabinet rail into the plywood underlayment. It was hidden behind a drawer slide and covered with enough sawdust to qualify as camouflage. Had we continued prying, we probably would have cracked the rail or damaged the cabinet box. That moment established our main rule for the day: when something refuses to move, assume it is still attached.
Removing the undermount sink was another memorable stage. We supported it carefully, removed the clips, and cut through the silicone. Nothing happened. The sink remained attached with the determination of a barnacle.
We cut the sealant again from several angles and used a plastic scraper to work into the joint. Then the adhesive released all at once. Because the sink was supported, it moved only slightly. Without that support, it would have dropped directly onto the cabinet floor, taking the disposal mount and possibly a few fingers with it.
The granite itself required coordination rather than strength alone. Four people trying to lift at different times are less useful than three people lifting together. Before moving each slab, we discussed who would lead, where the slab would turn, and where it would be placed. We cleared children, pets, tools, and one deeply curious houseplant from the route.
Carrying the longest section through the doorway was the tensest part. The slab included the sink cutout, which made the center weaker. We kept it upright, supported both sides of the opening, and moved slowly. Nobody tried to rotate it while another person was still walking. It was less like carrying a countertop and more like escorting a very expensive, very irritable guest out of the house.
Once the counters were gone, we found evidence of an old leak around the sink cabinet. The damage was not severe, but the top edge of one cabinet panel had swollen. We allowed the area to dry, repaired the panel, and added reinforcement before the new countertop template was created.
This discovery reinforced another lesson: countertop removal is not merely destruction. It is an inspection opportunity. Years of hidden leaks, loose cabinet joints, deteriorated caulk, and unsupported appliance openings become visible for the first time.
We also learned that cleanup should happen continuously. Small screws, dried adhesive, sharp stone fragments, and wet plumbing parts quickly turn a kitchen floor into an obstacle course. Keeping one container for hardware and another for debris made the project safer and reduced the chance of losing reusable sink components.
Would we remove granite counters ourselves again? Yes, but only under similar conditions: accessible fasteners, manageable sections, adequate helpers, and no need for indoor stone cutting. We would hire a professional for a large island slab, heavily epoxied seams, complicated stone fabrication, or any situation where preserving expensive granite was essential.
The project took longer than the dramatic demolition scenes shown on television, but the cabinets survived, the walls needed only minor patching, and every person finished with the same number of fingers they started with. In home renovation, that qualifies as an excellent day.
Conclusion
Removing a kitchen sink and old granite counters is less about swinging tools and more about careful sequencing. Shut off the utilities, photograph the plumbing, disconnect every fixture, support the sink, cut the caulk, locate hidden fasteners, loosen adhesive gradually, and recruit enough help for the stone.
Patience protects the cabinets, backsplash, plumbing, and granite. When the countertop will not move, investigate instead of forcing it. When cutting or grinding stone becomes necessary, bring in a qualified professional with proper dust-control equipment.
Once the old sink and counters are gone, the kitchen may look temporarily alarming. That empty cabinet line, however, is also a clean starting pointready for better storage, a more useful sink, updated countertops, and considerably fewer mysterious crumbs hiding in the granite pattern.