
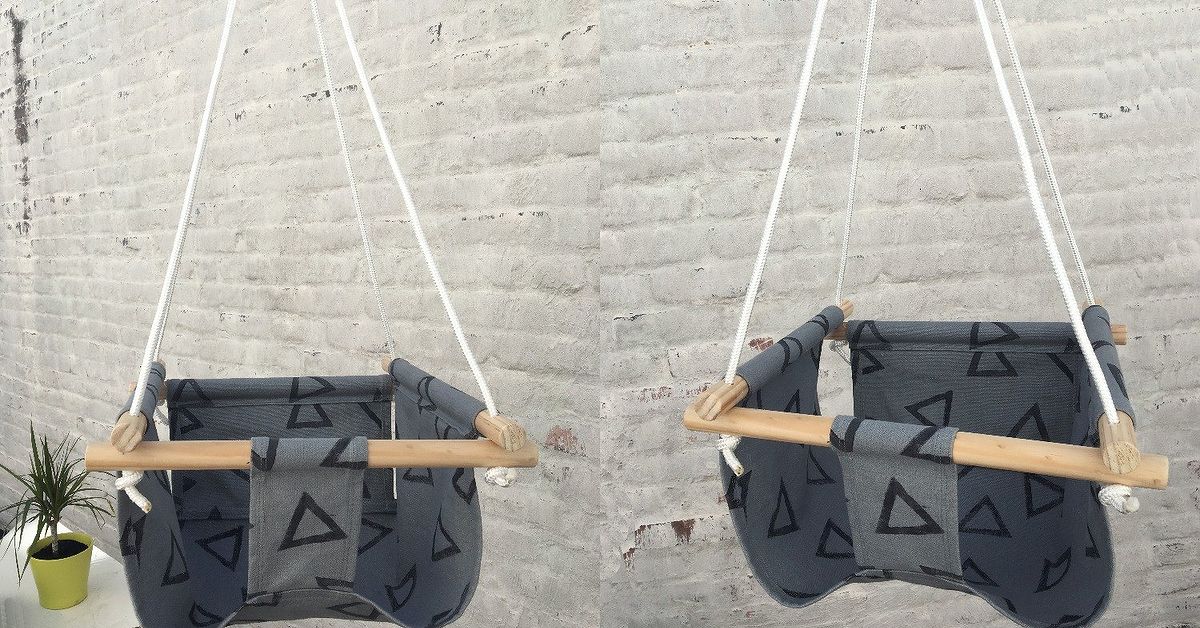
A handmade baby swing can turn an ordinary nursery corner or covered patio into something that looks as though it wandered out of a designer catalog. Soft fabric, natural wood, and a thoughtfully chosen color palette create plenty of charm. Unfortunately, charm does not possess an engineering degree.
Any seat that lifts a baby off the floor must be treated as safety equipment, not merely a craft project. The responsible DIY approach is to customize the appearance of a commercially manufactured, age-rated swing seat and restraint system rather than inventing the load-bearing seat, harness, and suspension system from scratch. You still get a beautiful handmade result, but the most safety-critical components are not being held together by optimism and a decorative bow.
Understand What You Are Building
A stylish DIY baby swing should be understood as a customized swing system with three separate layers:
- A commercially manufactured seat and restraint system
- A professionally evaluated suspension or freestanding support structure
- Handmade decorative elements, such as a removable fabric cover
The third layer is where your creativity can run around barefoot. The first two layers require published weight limits, reliable hardware, correct installation, and regular inspection.
Current infant swing safety standards examine matters such as structural integrity, stability, restraints, openings, seat angles, folding mechanisms, sharp edges, and pinching hazards. ASTM F2088-25 establishes performance, testing, and labeling requirements for powered infant and cradle swings, while the Consumer Product Safety Commission identifies many of the same hazard categories in its federal guidance. A one-off homemade product has not undergone those laboratory tests, so it should never be advertised or assumed to be standards-compliant.
Choose a Safe Design Strategy
Start With a Manufactured Swing Seat
Look for a replacement bucket-style seat or complete manual swing seat from a reputable manufacturer. The product should include permanent labeling, installation instructions, an age or developmental limit, a maximum occupant weight, and a built-in restraint system.
Do not drill holes through the seat, remove straps, replace buckles, add thick cushions, or change the seat angle. These alterations can change how a child is positioned or how forces travel through the product. Your handmade cover should fit around the existing design without blocking labels, attachment points, ventilation areas, or harness slots.
Before beginning, search the model number in the CPSC recall database. Stop using the seat if it is cracked, distorted, missing hardware, or accompanied by instructions that are incomplete or impossible to verify.
Keep the Swing Low
A low swing reduces the distance of a potential fall. For indoor use, position the bottom of the occupied seat close to the floor while still allowing the swing to move freely. Place a firm, clear floor area below it rather than a bed, couch, table, countertop, or other elevated surface.
The surrounding area should remain free of stairs, fireplaces, blind cords, curtain cords, lamps, furniture corners, plants, and decorations the baby could grab. A stylish macramé wall hanging may look adorable nearby, but a dangling cord within reach is not décor anymore; it is a hazard with excellent branding.
Use Structural Support, Not Decorative Support
Never hang a swing from drywall anchors, ceiling panels, curtain rods, decorative beams, tree branches of unknown condition, or ordinary cup hooks. The suspension must connect to verified structural framing or to a freestanding frame engineered for swinging loads.
A qualified contractor should inspect concealed ceiling framing, especially in an older house. Wood may contain cracks, decay, excessive knots, previous drilling damage, or poorly reinforced joints. Professional swing-installation guidance consistently emphasizes attaching hangers to sound structural members and using connectors with published working load limits.
Materials and Tools
The exact supplies depend on the manufactured seat you select, but a typical customization project may use the following:
- A commercially manufactured swing seat with its original harness
- Manufacturer-approved ropes, chains, connectors, or suspension kit
- Heavy cotton canvas, upholstery fabric, or washable outdoor fabric
- Polyester upholstery thread
- Bias binding or folded fabric strips
- Hook-and-loop tape or snaps positioned outside the baby’s reach
- Pattern paper, kraft paper, or clean wrapping paper
- Fabric scissors or a rotary cutter
- A sewing machine capable of handling multiple fabric layers
- Heavy-duty sewing needles
- A tape measure, ruler, marking pencil, and clips
- Optional water-based fabric protector approved for the selected textile
Avoid buttons, beads, bells, tassels, pom-poms, loose fringe, exposed zippers, and glued decorations. Small embellishments can detach, while long trim can wrap around fingers, wrists, or clothing.
How to Make the Handmade Swing Cover
Step 1: Inspect and Clean the Seat
Read every page of the manufacturer’s instructions before measuring anything. Confirm where the harness emerges, where the seat connects to the suspension, and which surfaces must remain uncovered.
Clean the seat according to the manufacturer’s directions and allow it to dry. Test the original restraint, buckle, and attachment points. If anything sticks, frays, bends, or fails to lock consistently, replace the product instead of trying to repair it with household parts.
Step 2: Create a Paper Pattern
Place pattern paper over the seat and gently press it into the curves. Mark the seat base, backrest, side edges, harness openings, and any areas that must remain exposed. Work in sections rather than forcing one enormous piece of paper to behave like a tiny fitted sheet.
Add a seam allowance of approximately 1/2 inch around sewn edges. Add extra width only where the cover must wrap around an outer edge. A slipcover should fit smoothly without compressing the seat, changing its shape, or creating deep folds around the baby.
Label every pattern piece with its orientation, such as “seat front,” “upper back,” and “left side.” Also draw arrows showing the fabric grain. Those tiny notes will save you from holding a backward panel at midnight and wondering whether sewing has always been this judgmental.
Step 3: Make a Test Version
Cut the pattern from inexpensive cotton muslin or an old clean sheet. Sew the test cover with long temporary stitches and fit it over the empty seat.
Check that the cover:
- Does not cover warning labels
- Does not interfere with the harness or buckle
- Cannot slide upward over the baby’s face
- Contains no bulky padding or pillow-like sections
- Leaves the original seat angle unchanged
- Can be removed without disassembling safety hardware
Revise the paper pattern until the muslin version lies flat. Do not skip this step. Designer fabric is much more enjoyable when it is not being sacrificed to your first guess.
Step 4: Cut the Final Fabric
Prewash and dry washable fabric so it shrinks before construction rather than after the first applesauce emergency. Press the material, place the pattern pieces along the grain, and cut carefully.
Choose tightly woven fabric that does not stretch dramatically when pulled. Breathability and washability are more useful than thick quilting. Added padding can alter the fit of the restraint and create soft surfaces around the baby’s face, so keep the cover thin.
Step 5: Sew the Main Panels
Join the seat and back panels with the right sides facing each other. Use a short, consistent stitch and reinforce the beginning and end of each seam. Trim bulky seam allowances and finish raw edges with a serger, zigzag stitch, or binding.
Topstitching can give the cover a polished, store-bought appearance. It also helps seam allowances lie flat, which reduces uncomfortable ridges. Use matching thread for a quiet minimalist look or contrasting thread for a tailored style.
Step 6: Finish the Harness Openings
Harness openings should be just large enough for the original straps to pass through without twisting. Finish each opening with tightly stitched binding or a reinforced facing. Never cut or sew through the harness itself.
The cover must remain independent from the restraint system. A decorative fabric loop is not a safety strap, regardless of how many encouraging comments it received on social media.
Step 7: Add Removable Fasteners
Secure the cover using flat fasteners placed on the outside or underside of the seat, beyond the child’s reach. Hook-and-loop tape can work well if it does not interfere with the seat’s attachment points. Covered snaps may also be appropriate when they are firmly installed and inaccessible.
Do not depend on tied bows to hold the cover in place. Bows loosen, ends dangle, and babies possess a mysterious ability to locate the one object you hoped they would ignore.
Step 8: Reinforce Only Non-Safety Attachments
Where decorative straps attach to the removable cover, a box-X stitching pattern can distribute force in multiple directions. This construction method is widely used when joining webbing, but strong-looking stitching does not turn a homemade strap into a tested infant restraint. Use the original manufacturer’s harness for securing the baby.
Selecting Colors and Details
Modern Neutral
Combine natural canvas with warm white, beige, taupe, or muted gray. Add visual interest through topstitching rather than loose accessories. This style works well in Scandinavian, minimalist, and modern farmhouse interiors.
Soft Botanical
Choose a small-scale leaf print in sage, olive, or dusty blue. Keep the pattern subtle so the swing complements the room instead of looking as though a greenhouse exploded beside the crib.
Playful Geometric
Simple checks, narrow stripes, arches, or abstract shapes add personality without requiring attached ornaments. Align stripes and repeating patterns across the center seam for a professional result.
Vintage-Inspired
Use washed linen-look fabric, tiny florals, or muted gingham. Actual loose lace and long ribbons should be avoided, but a securely sewn printed border can create a similar visual effect.
Installation and Testing
Follow the swing seat and suspension manufacturers’ instructions exactly. Use only connectors that are compatible with the system and have a clearly published working load limit. Do not mix random hooks, ropes, chains, and carabiners simply because they fit together.
Wood behaves differently depending on species, grain direction, moisture, defects, and fastener placement. The USDA Wood Handbook emphasizes that successful fastening requires joint designs suited to the material’s properties and expected movement. That complexity is one reason structural installation deserves professional evaluation rather than a quick guess with a stud finder.
Before placing a child in the seat:
- Inspect every connector, attachment point, seam, and restraint.
- Confirm that the seat hangs level and cannot contact a wall or object.
- Apply a controlled test load using secured, nonliving weight.
- Observe the complete range of motion for twisting or rubbing.
- Repeat the inspection after testing.
- Have another adult review the setup before first use.
A successful static test does not prove long-term safety. Swinging creates dynamic forces, repeated movement can loosen connections, and fabric can wear gradually. Inspect the system before every session and perform a more thorough check regularly.
Rules for Everyday Use
- Use the swing only while a responsible adult is within arm’s reach.
- Fasten and adjust the original restraint every time.
- Use gentle movement rather than forceful pushing.
- Allow only one child in the swing.
- Keep siblings and pets outside the swing’s path.
- Stop using it when the child reaches any stated age, weight, or developmental limit.
- Discontinue use immediately if the child can climb, lean dangerously, or defeat the restraint.
- Remove the child if they become sleepy.
- Never use the swing as a crib, bassinet, feeding chair, or unattended holding space.
Safe infant sleep requires a firm, flat surface, and the AAP advises moving a sleeping baby out of a swing as soon as possible. An inclined or suspended seat should not become a “temporary” nap location, even when the nap has finally delivered the silence every exhausted parent dreams about.
Cleaning and Maintenance
Remove the handmade cover and wash it according to the fabric manufacturer’s directions. Close hook-and-loop fasteners before washing so they do not collect every sock, washcloth, and mysterious thread in the machine.
Allow all fabric to dry completely before reinstalling it. Check seams for broken stitches, stretched openings, discoloration, mildew, and thinning fabric. Inspect ropes for fuzzing, chains for corrosion, connectors for distortion, and wooden framing for cracks or moisture damage.
Do not repair structural parts using glue, tape, wire, zip ties, or substitute hardware. Retire damaged components and replace them with approved parts. When a baby product begins to look “probably fine,” that is usually the moment to stop negotiating with it.
Experience-Based Lessons From a Careful Trial Build
The following build diary is a realistic composite of lessons commonly encountered by DIY sewists, woodworkers, and caregivers. It is included to show how a project that appears simple on a mood board becomes more complicated once safety, cleaning, fit, and daily use enter the room.
The First Pattern Is Rarely the Final Pattern
The initial idea was a single elegant piece of fabric that would wrap around the seat with almost no visible seams. On paper, it looked wonderfully simple. In practice, the seat curved in several directions, the harness openings refused to line up, and the fabric gathered near the buckle.
Making a muslin prototype solved the problem. The one-piece design became three panels: a back, a seat, and a narrow joining section. That added two seams but produced a much flatter fit. The experience reinforced an important lesson: fewer pieces do not always mean a better or safer design.
Washability Quickly Becomes More Important Than Luxury
A beautiful linen-blend fabric seemed perfect until it was tested with water. It wrinkled dramatically, dried slowly, and showed every mark. A tightly woven washable canvas was less glamorous on the cutting table but much better in daily life.
The final choice survived machine washing, dried predictably, and returned to the seat without shrinking. That practical success was far more satisfying than owning a cover that looked spectacular for eleven minutes and then met a banana.
Extra Padding Was Not an Upgrade
The first concept included a soft quilted layer. Once fitted, however, the padding pushed the child’s body forward and changed how the harness lay across the seat. It also created deeper folds near the hips.
The padding was removed, leaving only two thin fabric layers. The finished cover still looked polished, but the original seat shape and restraint path remained intact. This became one of the biggest takeaways from the project: comfort additions are not automatically harmless additions.
Decorations Caused More Problems Than They Solved
Tassels, wooden beads, and long ties appeared in almost every inspiration photo. During a test fitting, even a short decorative tie drifted toward the seat opening as the swing moved. The accessories were removed before a child ever used the setup.
The final design relied on color, pattern alignment, piping, and topstitching instead. It still looked handmade, but nothing dangled near small hands. Good design often improves when unnecessary details are edited out, especially when the client is famous for pulling, chewing, and throwing things.
Installation Was the Moment to Call a Professional
The ceiling location appeared to contain a suitable joist, but the framing direction could not be confirmed through the finished surface. Rather than drilling and hoping, a contractor inspected the location and recommended a different attachment point with additional blocking.
That decision cost more than a package of hooks but removed a major unknown. It also demonstrated the difference between crafting and structural work. Sewing a removable cover is reversible. Drilling into an unidentified ceiling member while planning to place a baby underneath it is a different category of decision.
The Best Feature Was Easy Removal
The most useful element was not the fabric print or the neat topstitching. It was the ability to remove the entire cover without touching the suspension or dismantling the harness.
After a spill, the cover came off in less than a minute. A second washable cover could be installed while the first was being cleaned. That experience changed the definition of stylish: a genuinely well-designed baby product should look attractive, work predictably, and recover gracefully from yogurt.
Conclusion
Making a stylish baby swing by hand is best approached as a careful customization project, not an experiment in homemade infant engineering. Begin with an age-rated commercial seat and its original restraint system. Have the support and suspension evaluated by a qualified professional, then concentrate your DIY skills on a thin, washable, removable cover that does not change the seat’s fit or function.
Keep the swing low, inspect it frequently, use it only for supervised awake time, and move the baby to a firm, flat sleep space whenever drowsiness appears. The finished project can still be beautiful, personal, and full of handmade character. It simply needs a little less improvisation and a little more respect for gravity.
Research and publishing note: This educational article draws on current guidance and technical material from the U.S. Consumer Product Safety Commission, the American Academy of Pediatrics, ASTM International, the National Institutes of Health, the U.S. Forest Products Laboratory, Consumer Reports, Baby Safety Alliance resources, and established sewing and home-improvement references. It does not certify any homemade product or replace the instructions supplied by a swing manufacturer, pediatrician, engineer, or qualified installer.














