
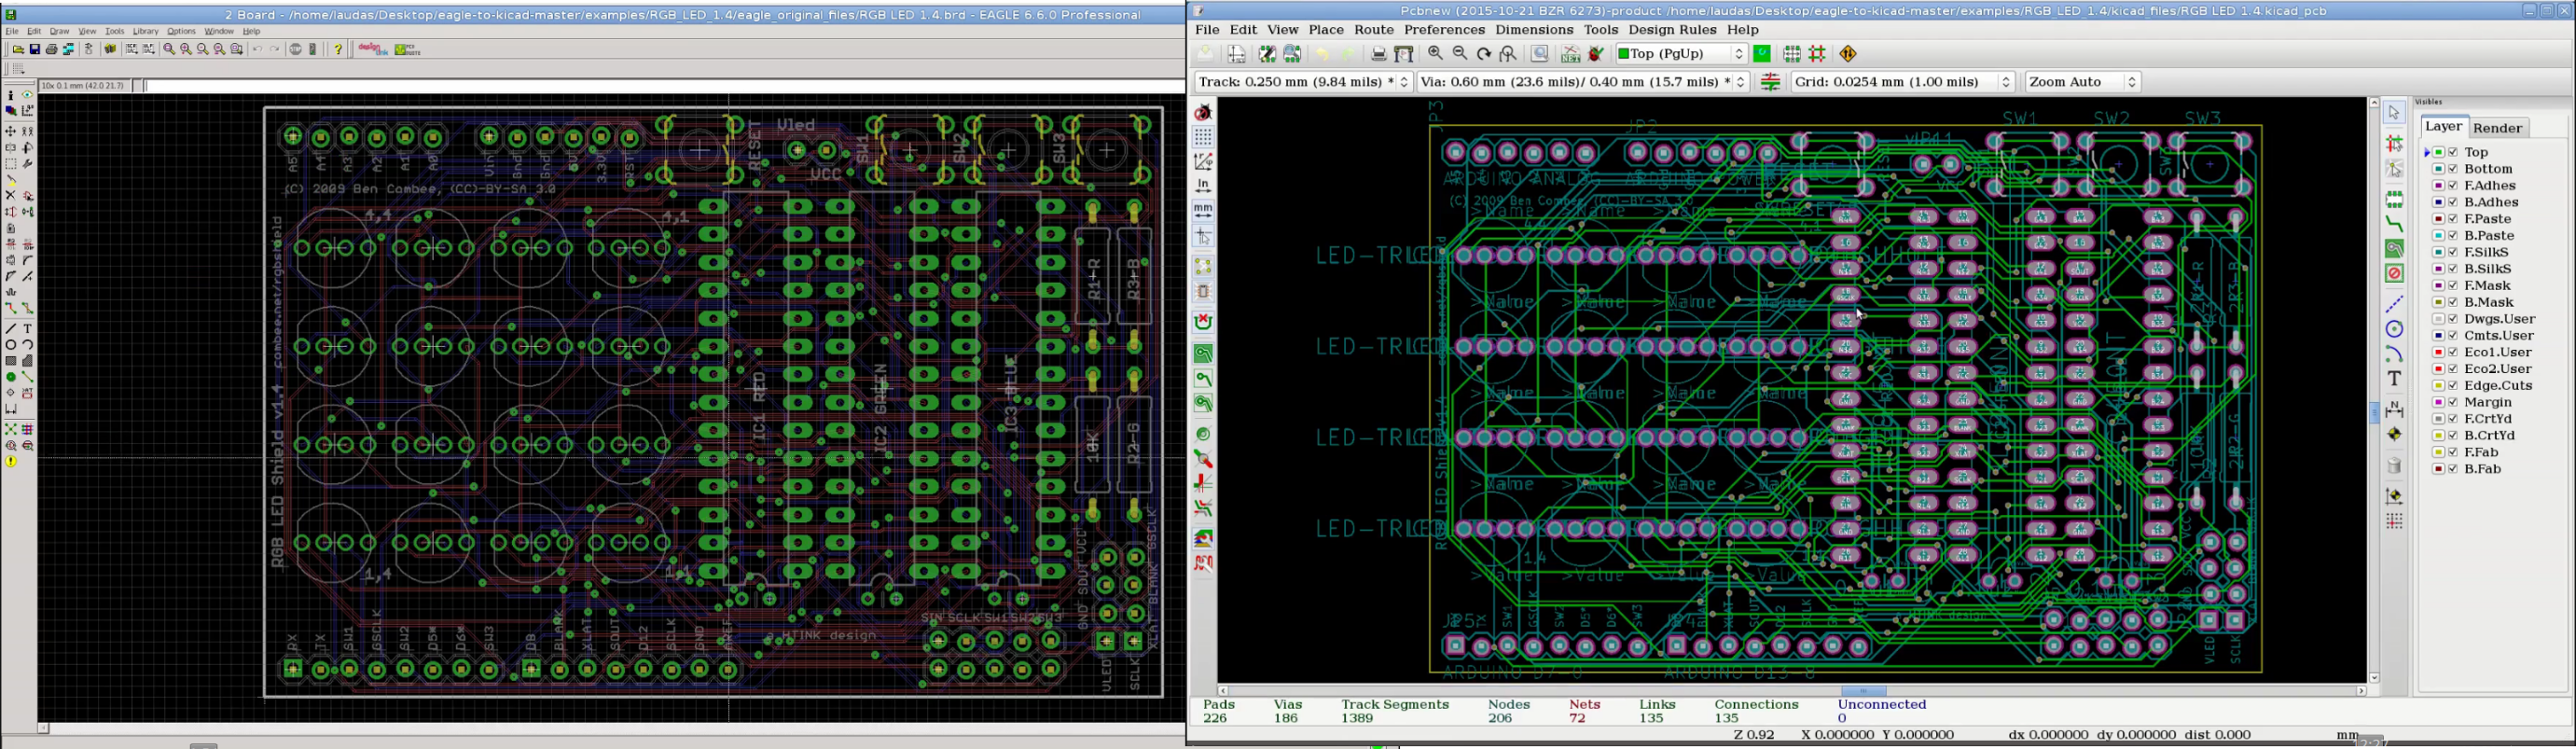
Moving a PCB project from Autodesk EAGLE to KiCad sounds, at first, like asking a cat to file taxes: possible in theory, dramatic in practice. But the good news is that the process is far less scary than it looks. KiCad has matured into a powerful, modern, open-source PCB design suite, and its EAGLE import tools can bring over many schematic and board files with surprisingly little fuss.
Whether you are a hobbyist rescuing old Arduino shield files, a startup escaping subscription fatigue, or an engineer cleaning up a decade of legacy hardware designs, learning how to convert EAGLE to KiCad is a practical skill. It protects your work, modernizes your workflow, and gives your future self one fewer reason to mutter at a monitor at 1:17 a.m.
This guide walks through the migration process in plain American English: what files you need, how to import EAGLE projects into KiCad, what to check after conversion, and how to avoid the tiny gremlins that love hiding inside PCB libraries.
Why Move From EAGLE to KiCad?
EAGLE earned its place in electronics history. For years, it was a favorite among makers, open-source hardware designers, students, and small engineering teams. Its .sch, .brd, and .lbr files became common across countless published hardware projects.
But the PCB world has changed. Autodesk has shifted its electronics focus toward Fusion, while KiCad has grown into a serious EDA platform with schematic capture, PCB layout, 3D viewing, design rule checking, manufacturing outputs, and a large component library. KiCad is also free and open source, which matters when you want long-term access to your designs without wondering what your software license will do next.
The Practical Benefits of KiCad
KiCad gives designers a modern workflow without locking projects behind a subscription gate. It runs on Windows, macOS, and Linux. It supports professional PCB features, integrates schematic and board editing, and generates the standard fabrication files manufacturers expect, including Gerbers, drill files, position files, and bill of materials exports.
For teams, KiCad also plays nicely with version control because its newer project files are text-based. That means Git can show meaningful changes instead of shrugging at a mysterious binary blob like it just found a sandwich in the server rack.
What You Need Before Converting EAGLE to KiCad
Before you import anything, collect your EAGLE project files in one folder. A typical EAGLE project includes a schematic file, a board file, and sometimes separate library files.
.sch— the EAGLE schematic file.brd— the EAGLE PCB layout file.lbr— EAGLE library files for symbols, packages, and devices- CAM, BOM, or assembly files, if the project was already manufactured
- PDF schematic prints or Gerber files, if available, for comparison
If your EAGLE files are very old, open them in a compatible EAGLE version and save them again before importing. Modern EAGLE versions use XML-style files, which are easier for other tools to interpret. Very old pre-XML files may need this extra “save as modern format” step before KiCad can read them cleanly.
How to Import an EAGLE Project Into KiCad
The basic process is refreshingly direct. Open KiCad, choose the option to import a non-KiCad project, select the EAGLE project type, and point KiCad to the EAGLE schematic file. In many cases, KiCad will find the matching board file automatically if it has the same base name and lives in the same folder.
Step 1: Back Up the Original EAGLE Project
Never begin a migration on your only copy. Make a clean backup folder first. Name it something obvious, such as ProjectName_EAGLE_Original_Backup. This is not paranoia; this is engineering hygiene. Paranoia is labeling your coffee mug “calibrated instrument.”
Step 2: Install the Latest Stable KiCad Version
Use the latest stable KiCad release available for your operating system. Newer versions usually include better importers, improved rule checking, better library tools, and fewer weird behaviors. If you are working inside a company, test the migration on one or two projects before standardizing the whole team on a version.
Step 3: Keep Matching File Names Together
For best results, keep the EAGLE schematic and board files together in the same folder. Ideally, they should share the same base name, such as motor_driver.sch and motor_driver.brd. This helps KiCad understand that the schematic and PCB belong to the same design.
Step 4: Run the EAGLE Project Importer
In KiCad, use the import command for a non-KiCad project and choose the EAGLE project option. Select the .sch file when prompted. KiCad will create a new KiCad project, convert the schematic, and then convert the matching board layout when available.
During import, KiCad may ask you to map EAGLE layers to KiCad layers. Most simple two-layer boards are easy. More complex boards with custom documentation, milling, tRestrict, bRestrict, or user-defined layers deserve careful attention.
What Usually Converts Well
For many EAGLE designs, the essentials come across well: parts, nets, board outline, copper traces, vias, pads, labels, and common layers. Simple hobby boards often import with minimal drama. The PCB may look a little different visually because KiCad and EAGLE display objects in different ways, but the electrical intent can remain intact.
Two-layer boards, microcontroller breakout boards, LED drivers, small sensor boards, and basic power circuits are usually good candidates for quick conversion. If the original design used standard EAGLE libraries and avoided exotic tricks, KiCad often handles the migration smoothly.
What Needs Care After Import
No EDA migration should be treated like a toaster: push button, wait, trust breakfast. Always inspect the imported design. The goal is not merely to open the file. The goal is to prove the converted KiCad project still represents the same electrical and mechanical design.
Check Symbols and Footprints
Open the schematic and review every component. Confirm that symbols are readable, pin names make sense, and reference designators are intact. Then open the PCB and inspect footprints. Pay special attention to connectors, polarized capacitors, diodes, voltage regulators, USB ports, RF parts, and anything with a non-symmetric footprint. A rotated resistor is boring. A mirrored connector is a tiny plastic tragedy.
Run ERC and DRC
Run KiCad’s electrical rules check on the schematic and design rules check on the PCB. Expect warnings. Some may be harmless differences between EAGLE and KiCad conventions, but others may reveal missing power flags, unconnected pins, clearance issues, or footprint mismatches.
Do not blindly click “ignore” like you are accepting cookie banners. Read the warnings, fix the real issues, and document any intentional exceptions.
Compare Against the Original Board
If you still have EAGLE installed, open the original project side by side with the KiCad version. Compare board dimensions, mounting holes, connector positions, net names, filled zones, silkscreen markings, and layer usage. If you have original Gerbers or fabrication drawings, use those as a reference too.
Handling EAGLE Libraries in KiCad
EAGLE libraries combine symbols, packages, and device mappings in a way that differs from KiCad’s symbol-and-footprint workflow. During import, KiCad may generate project-specific libraries from the EAGLE design. This is useful because it preserves the components used in the project, even if the original global library is missing.
For long-term cleanup, however, consider replacing imported parts with official KiCad library components or your own controlled company libraries. Imported libraries are great for preserving history. Clean KiCad libraries are better for future designs.
When to Keep Imported Libraries
Keep imported libraries when you are maintaining an old board, making a small revision, or preserving a known-manufactured design. If the board has already been built and tested, changing footprints just to make the library look prettier can introduce risk. In hardware, “small cleanup” has occasionally been the opening sentence of a horror story.
When to Rebuild Parts
Rebuild or replace parts when you are using the project as a starting point for a new design, when footprints are messy, when 3D models are missing, or when component metadata is inconsistent. This is especially important for production workflows that need accurate BOM fields, manufacturer part numbers, assembly data, and sourcing information.
Layer Mapping: The Quietly Important Step
Layer mapping determines where EAGLE objects land inside KiCad. Copper layers usually map clearly, but documentation and manufacturing layers can be more subtle. EAGLE layers such as tPlace, bPlace, tNames, bNames, tValues, bValues, tStop, bStop, tCream, bCream, Dimension, Milling, and Restrict layers may need review.
After import, inspect solder mask openings, paste layers, edge cuts, silkscreen, courtyard-like information, and mechanical notes. A board outline on the wrong layer can confuse fabrication. A paste aperture in the wrong place can make assembly exciting in the worst possible meaning of the word.
Common EAGLE to KiCad Migration Problems
Problem: The Board Does Not Import With the Schematic
Make sure the .sch and .brd files are in the same directory and share the same base name. If the board still does not appear, try importing the board separately, then compare net connectivity carefully.
Problem: The Design Opens, But Nets Look Strange
Check labels, supply symbols, and net ties. EAGLE and KiCad may interpret certain naming conventions differently. Power symbols and implicit connections deserve special attention because they can create invisible problems that only become visible when smoke appears, which is not the preferred debugging interface.
Problem: Fonts and Text Look Different
This is common. Text size, alignment, stroke width, and font rendering may change between tools. Review silkscreen carefully, especially reference designators near pads, polarity marks, logos, and certification text.
Problem: Filled Zones Need Updating
After import, refill copper zones in KiCad and run DRC. Confirm thermal reliefs, clearances, isolated islands, and pour priorities. Do not assume imported zones are production-ready until KiCad recalculates them.
Problem: Board Dimensions Look Slightly Off
Check units, grids, board edge layers, milling slots, and mounting holes. Measure critical connector spacing and mechanical outlines. For enclosures, compare the imported KiCad board with the original mechanical requirements before ordering new prototypes.
Best Practices for a Clean Migration
A clean EAGLE to KiCad migration is part software conversion, part design audit. Use the moment to organize the project properly. Create a clear folder structure for KiCad files, datasheets, fabrication outputs, assembly notes, and exported reference PDFs.
Then create a migration checklist. Include imported schematic review, footprint verification, ERC, DRC, zone refill, layer inspection, 3D viewer check, Gerber generation, Gerber comparison, BOM review, and final peer review. It sounds like a lot, but it is cheaper than discovering that your USB connector moved half a millimeter after 200 boards arrive.
Example: Migrating a Small Microcontroller Board
Imagine you have an old EAGLE design for a small ATmega-based sensor board. The project includes sensor_node.sch, sensor_node.brd, and a custom library. You copy everything into a backup folder, install KiCad, and import the EAGLE schematic.
KiCad converts the schematic and board. You open the schematic first and check the microcontroller pins, power labels, programming header, voltage regulator, sensor connector, and decoupling capacitors. Then you open the PCB and inspect the board outline, mounting holes, connector orientation, and copper pours.
After running ERC, you find a few power input warnings. After running DRC, you spot two silkscreen items touching pads and one clearance warning near a mounting hole. You fix those, refill zones, generate Gerbers, and compare them against the original exported EAGLE Gerbers. The project is now KiCad-native, easier to maintain, and no longer dependent on the old EAGLE workflow.
Should You Redesign Instead of Import?
Sometimes importing is the right move. Sometimes a redesign is cleaner. If the EAGLE project is simple, already proven, and only needs a small update, import it. If the project is messy, poorly documented, full of mystery libraries, or headed for serious production, consider rebuilding the schematic and layout in KiCad using the original design as a reference.
Redesigning takes longer upfront, but it can produce a cleaner library structure, better documentation, improved design rules, and a more maintainable PCB. The right choice depends on risk. If a board controls a blinking desk toy, import and inspect. If it controls expensive equipment, medical hardware, industrial power, or anything that makes lawyers appear, be more conservative.
Experience Notes: What Real Migrations Teach You
The first thing you learn when moving from EAGLE to KiCad is that conversion is not the hard part. Trust is the hard part. Clicking import takes minutes. Becoming confident that every connector, zone, footprint, layer, and net survived the trip takes discipline.
One useful habit is to treat the imported KiCad project as a new revision, not as a magical duplicate. Give it a version number. Write a short migration log. Note the original EAGLE file names, KiCad version, date of conversion, known warnings, and fixes made after import. This small document can save hours later when someone asks why the silkscreen changed or why a footprint was replaced.
Another lesson is to respect old libraries. EAGLE projects from the maker era often include custom parts copied from forums, vendor downloads, or ancient ZIP files that feel like they were compressed during the Bronze Age. Some parts work perfectly. Others have incorrect pin numbering, strange origins, unclear pad sizes, or missing metadata. Never assume a footprint is correct because it has a familiar name. Always compare it against the datasheet.
In production environments, the biggest win is usually library cleanup. Once an EAGLE project is safely imported, replace risky one-off parts with approved KiCad symbols and footprints. Add manufacturer part numbers, supplier fields, tolerance data, voltage ratings, package notes, and assembly details. This turns a converted project into a maintainable engineering asset rather than a museum exhibit with copper traces.
For hobbyists, the best advice is simpler: start with one small board. Do not begin your KiCad journey by importing a twelve-layer mixed-signal monster with controlled impedance, blind vias, and emotional baggage. Pick a two-layer board, import it, run checks, generate Gerbers, and learn how KiCad thinks. After that, larger projects feel much less intimidating.
Expect the user interface to feel different. EAGLE users often need time to adjust to KiCad’s hotkeys, library model, project structure, and board setup panels. That discomfort does not mean KiCad is harder. It means your hands memorized another tool. Give yourself a few evenings, customize shortcuts if needed, and keep a test project around for harmless experimentation.
A final experience-based tip: use the 3D viewer. It is not just for pretty screenshots. It helps catch connector orientation mistakes, tall component conflicts, missing models, reversed footprints, and enclosure issues. When a barrel jack points inward instead of outward, the 3D viewer tattles immediately. It is the friend who tells you spinach is in your teeth before the meeting.
Successful EAGLE to KiCad migration is not about perfection on the first import. It is about a reliable process: back up, import, inspect, verify, clean up, document, and only then manufacture. Follow that rhythm, and the move becomes less like crossing a canyon and more like moving apartments with labeled boxes. Still annoying, yes, but nobody loses the oscilloscope.
Conclusion
Eagle to KiCad migration is absolutely manageable when you approach it methodically. KiCad’s importer can handle many EAGLE schematic and board files, especially when the original files are modern, well organized, and stored together. The real work comes after import: checking libraries, verifying footprints, reviewing layers, running ERC and DRC, refilling zones, and comparing the result against the original design.
For makers, KiCad offers freedom and long-term access. For engineering teams, it offers a maintainable open-source workflow with professional capabilities. For anyone sitting on a pile of legacy EAGLE projects, it offers a practical path forward. Back up your files, import carefully, inspect everything, and let KiCad become the new home for your PCB designs.














