
Note: This original article is written in standard American English for web publishing, based on real sim racing DIY practices, USB controller behavior, arcade encoder builds, Arduino Pro Micro HID projects, and common button-box use cases in modern racing simulators.
Why a Sim Racing Button Box Makes Your Rig Feel Instantly More Serious
There is a special moment in every sim racer’s life when the keyboard starts to feel less like a useful tool and more like a suspicious plastic tray full of tiny panic buttons. You are heading into Turn 1, your tires are arguing with physics, your spotter is yelling something dramatic, and suddenly you need to adjust brake bias, flash headlights, toggle traction control, request a pit stop, or find the wiper button before the virtual rain turns your windshield into a watercolor painting. That is when a handsome sim racing button box stops being a luxury and starts looking like a very good life decision.
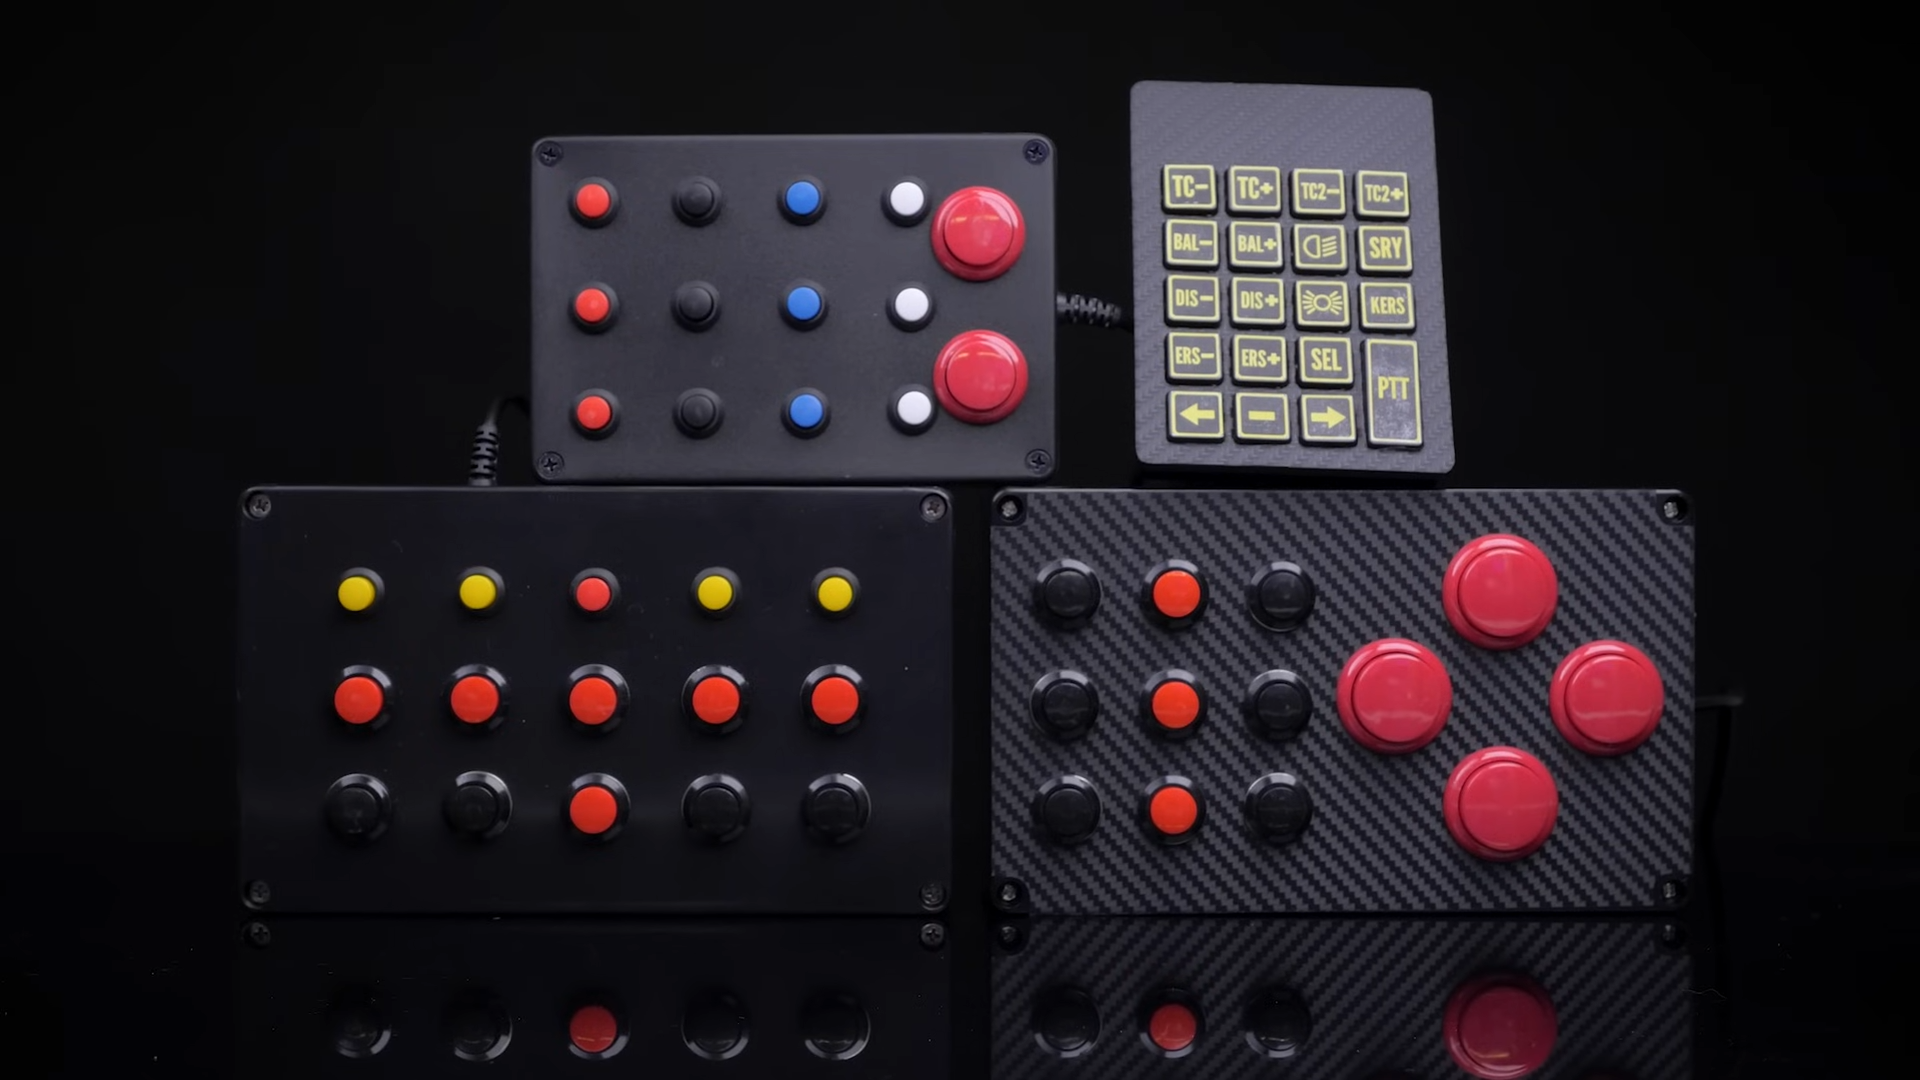
The best part? A great-looking sim racing button box can be a super easy build. You do not need a machine shop, a degree in electrical engineering, or a secret handshake from a Formula 1 garage. With a project box, arcade buttons, a USB encoder board, labels, a few switches, and a little patience, you can build a custom control panel that looks like it belongs in a GT3 cockpit. It will not make you Max Verstappen overnight, but it might stop you from accidentally turning on your headlights instead of changing your fuel map.
For many DIY sim racing setups, the magic is not in complexity. It is in smart simplicity. A button box gives you dedicated physical controls for functions that are annoying to reach on a keyboard or wheel. The build can be as basic as a USB numpad with custom labels and carbon-fiber vinyl wrap, or as involved as an Arduino Pro Micro project with rotary encoders, toggle switches, guarded buttons, and gamepad-style HID inputs. Either way, the goal is the same: less fumbling, more driving, and a cockpit that looks less like a desk and more like a tiny command center for questionable overtakes.
What Is a Sim Racing Button Box?
A sim racing button box is a physical panel filled with buttons, switches, knobs, and sometimes rotary encoders that connect to your PC and act as extra controls for racing games. Think of it as a customizable dashboard extension. Instead of memorizing twenty keyboard shortcuts, you map each button to a racing function: pit limiter, ignition, starter, brake bias, ABS, traction control, fuel mixture, radio, black box navigation, wipers, headlights, look left, look right, or even “please stop spinning, car.”
In games and simulators such as iRacing, Assetto Corsa Competizione, rFactor 2, Automobilista 2, and truck or flight simulators, button boxes are useful because many advanced vehicles have more adjustable systems than a basic wheel can comfortably handle. Real race cars often place critical controls on the wheel or dashboard. A DIY sim racing button box copies that idea in a budget-friendly way.
The simplest versions use a plug-and-play arcade USB encoder. These boards are popular in DIY arcade cabinets because they translate button presses into joystick-style inputs recognized by a computer. Many kits include pre-terminated wires, so you can connect buttons without soldering. More advanced builds use an Arduino Micro, Leonardo, or Pro Micro because ATmega32U4-based boards can act as USB HID devices, such as keyboards, mice, or game controllers. Dedicated interface boards from companies like Leo Bodnar offer another polished route, especially when you want many inputs and a driver-free plug-in experience.
Why This Build Is So Easy
The reason a handsome sim racing button box is such an easy build is that most of the hard work has already been solved by inexpensive parts. A USB encoder board handles the computer communication. Arcade buttons are designed to be mounted through holes and connected with quick-disconnect terminals. Plastic project boxes are cheap, sturdy, and easy to drill. Label makers and printed decals turn a plain black box into something that looks suspiciously expensive.
You can build a basic version with no coding at all. That is a huge advantage for beginners. If you use a zero-delay arcade USB encoder, the process is almost refreshingly old-fashioned: drill holes, install buttons, connect wires, plug in USB, open your sim, map controls, and enjoy the smug satisfaction of pressing a real button labeled “PIT” like you are running a team radio operation from your spare bedroom.
For builders who want rotary encoders or more flexible software behavior, an Arduino-based button box is still approachable. The Arduino Pro Micro is popular because it can show up to the computer as a game controller or keyboard-style device. With the right library or firmware, your physical buttons and encoders can send joystick inputs, keyboard commands, or custom signals. It takes more setup than an arcade encoder, but it also opens the door to cleaner layouts and more advanced controls.
Parts You Need for a Good-Looking DIY Button Box
A basic sim racing button box does not require exotic hardware. You can build a handsome version with parts that are easy to find online or at electronics suppliers. The exact list depends on whether you choose the ultra-simple USB encoder route or the more customizable Arduino route.
For the easiest plug-and-play build
- Plastic project enclosure or small electronics box
- Zero-delay arcade USB encoder board
- Arcade push buttons, usually 24 mm or 30 mm
- Pre-made wiring harnesses, often included with encoder kits
- USB cable
- Printed labels, vinyl decals, or label tape
- Carbon-fiber vinyl wrap, matte black wrap, or paint for styling
- Drill, step bit, ruler, masking tape, and marker
For a more advanced Arduino build
- Arduino Pro Micro, Arduino Micro, or similar ATmega32U4 board
- Momentary push buttons
- Rotary encoders for brake bias, ABS, or traction control adjustments
- Toggle switches or guarded switches for immersion
- Wires, soldering iron, heat shrink, and crimp connectors
- USB cable
- Enclosure, labels, mounting hardware, and optional LEDs
The arcade encoder version is the fastest. The Arduino version gives you more control. The dedicated interface board version sits somewhere in the middle: more expensive, very tidy, and usually excellent for larger builds. For a first project, a zero-delay arcade encoder is hard to beat because it removes the scariest word in DIY electronics: troubleshooting. Well, it removes some of it. You may still drill one hole slightly crooked and stare at it for ten minutes like it has betrayed your family.
Planning the Layout Before You Drill
The difference between a classy sim racing button box and a mysterious plastic porcupine is layout planning. Before drilling anything, decide what each button should do. Group related controls together. Put high-priority functions in easy reach. Place less urgent functions toward the top or sides. Leave enough space between buttons so you can hit them quickly without launching your thumb into three commands at once.
A strong beginner layout might include one row for race functions, one row for car adjustments, and one row for view or menu controls. For example, the bottom row could hold ignition, starter, pit limiter, and radio. The middle row could handle brake bias, ABS, traction control, and fuel map. The top row could manage headlights, wipers, black box navigation, and reset view. If you use rotary encoders, place them where your hand naturally lands. Encoders are excellent for “increase/decrease” functions like brake bias forward or rearward, traction control up or down, and menu scrolling.
Use masking tape on the enclosure and mark your button centers with a pencil. Measure twice, drill once, and then measure again because the first two measurements were probably influenced by optimism. A step drill bit is very helpful for clean round holes in plastic project boxes. Drill slowly to avoid cracking the enclosure. Deburr the edges with a hobby knife or sandpaper. This is not glamorous work, but it is where the final look is born.
The Zero-Delay Encoder Method: Fast, Cheap, and Surprisingly Effective
The zero-delay arcade encoder method is the “let’s get racing today” option. These boards are designed for arcade sticks and DIY game controllers. They usually include several two-wire button harnesses and a USB cable. Each button connects to a port on the encoder board, and the board appears to your PC as a generic USB controller. In your simulator, you simply bind each button to the function you want.
This approach is ideal if you want a simple button box for iRacing, Assetto Corsa, American Truck Simulator, Euro Truck Simulator 2, or similar games. It is also forgiving. If one button does not behave as expected, you can move the connector to another input or remap the command in-game. There is no firmware to compile, no code to upload, and no late-night search history involving “why is my Arduino now a brick.”
The tradeoff is flexibility. Basic zero-delay boards are great for push buttons, but they are not always the best choice for rotary encoders or complex switch behavior. Some games may see the device as a joystick with numbered buttons, which is fine for most mapping tasks. However, if your build requires many encoders, custom key combinations, LED feedback, or special modes, an Arduino or purpose-built button-box interface will be a better long-term option.
The Arduino Pro Micro Method: More Control, More Possibilities
An Arduino Pro Micro-based sim racing button box is popular because it can function as a USB HID device. That means the computer can recognize it as an input device rather than a random board shouting serial data into the void. With libraries and sketches, you can create a button box that sends joystick buttons, keyboard presses, or other commands.
This method is especially attractive for builders who want rotary encoders. A rotary encoder is a knob that sends pulses as it turns. In sim racing, that makes it perfect for controls where you want one click to increase a setting and another click to decrease it. Brake bias, ABS, traction control, fuel mixture, engine map, and black box navigation are natural fits. Many encoders also include a push-button action when pressed, giving you even more control in the same space.
Arduino builds can use direct wiring or matrix wiring. Direct wiring is easier to understand: each button connects to a pin and ground. Matrix wiring allows more buttons with fewer pins, but it adds complexity and can have limitations with simultaneous button presses depending on the design. Momentary push buttons are usually easier to manage than latching toggle switches. If you want toggle switches, make sure your firmware or software handles them correctly so the simulator does not get confused by an input that stays on.
Making It Handsome: Design Details That Matter
A button box does not need to look homemade in the “garage goblin” sense of the word. With a few low-cost finishing touches, it can look sharp enough to make your rig feel brand new. Black enclosures are a great start because they match most wheels, pedals, and cockpits. Carbon-fiber vinyl wrap adds instant race-car drama without requiring actual carbon fiber or a racing team budget. Printed labels under clear tape or laminated overlays can look clean and durable.
Use consistent fonts and short labels. “PIT,” “WIPER,” “TC+,” “TC-,” “ABS+,” “ABS-,” “BB FWD,” and “BB REAR” are easier to read mid-race than tiny paragraphs. Color can help too. Red for ignition or emergency functions, blue for wipers or lights, yellow for caution or pit controls, and black for general commands. Just do not overdo it. A button box should look intentional, not like a birthday cake that got sponsored by a wiring diagram.
Guarded toggle switches add a wonderful race-car feel. An engine start button with a cover is deeply satisfying, even if it only starts a digital car in your socks. Knurled aluminum knobs on rotary encoders make the box feel more premium. Rubber feet keep it from sliding around. A clean USB cable route makes the whole setup look better and prevents the cable from tugging on the board inside the enclosure.
What Controls Should You Map?
The best button mapping depends on what you race. A GT3 driver may care about brake bias, ABS, traction control, engine maps, headlights, wipers, and pit limiter. An oval racer may want black box navigation, fuel adjustments, tear-off, push-to-talk, and relative display controls. A rally driver may prefer wipers, lights, reset, handbrake support, and camera controls. Truck simulator fans may use a similar button box for lights, engine brake, cruise control, horn, differential lock, and trailer functions.
Start with controls you actually use. Many beginners build a giant panel and map every function imaginable, only to realize they regularly press about six buttons. That is fine. Empty buttons are future-proofing. But the most useful sim racing button box is organized around real driving needs, not a fantasy of becoming mission control for a moon landing.
Recommended starter mapping
- Pit limiter
- Ignition
- Starter
- Brake bias forward and rearward
- Traction control up and down
- ABS up and down
- Headlights or flash headlights
- Wipers
- Push-to-talk
- Black box or menu navigation
- Look left and look right
- Reset VR or center view
After a few races, revise the layout. The first version of any DIY sim racing button box is a prototype wearing nice clothes. You will quickly learn which controls deserve prime real estate and which ones can move to the corner where forgotten buttons go to think about their choices.
Common Mistakes and How to Avoid Them
The most common mistake is building before planning. It is tempting to drill holes as soon as the parts arrive, but slow down. Print a paper layout, tape it to the enclosure, and place your hand over it as if you are racing. Can you reach the buttons comfortably? Are the knobs too close together? Is the emergency-looking toggle switch accidentally assigned to windshield wipers? These are questions best answered before making permanent holes.
Another mistake is ignoring labels. In the first hour, you will remember every function. Two days later, under race pressure, every black button will look like every other black button. Labels are not decoration; they are survival tools. Use clear, durable labels, and keep abbreviations consistent.
Cheap buttons can work well, but quality varies. If a button feels mushy, unreliable, or fragile during testing, replace it before closing the box. Testing matters. Open the Windows game controller panel or your simulator’s input screen and press every button several times. Turn every encoder. Flip every switch. Wiggle the USB cable gently. Fix problems while the box is still open, because reopening it later will feel like admitting defeat to a sandwich container full of wires.
How Much Does a DIY Sim Racing Button Box Cost?
A very simple DIY button box can be built for surprisingly little money. A small project enclosure, zero-delay USB encoder, arcade buttons, wire harnesses, labels, and vinyl wrap can often come in far below the price of a commercial sim racing button box. Costs vary based on parts, shipping, tools, and how fancy you get. Add rotary encoders, aluminum knobs, premium switches, LED buttons, custom faceplates, or a dedicated interface board, and the price rises quickly.
That said, the value of a DIY build is not only financial. You get the exact layout you want. You learn how your controls work. You can repair or modify it later. You can make it match your rig. And, perhaps most importantly, you gain the right to casually say, “Oh, that? I built it,” while pretending not to be extremely proud of yourself.
Is a DIY Button Box Better Than a Stream Deck?
A Stream Deck or tablet dashboard can be a fantastic alternative. Digital buttons are flexible, easy to relabel, and great for streamers or multi-game setups. Apps and dashboard software can display telemetry, switch profiles, and create beautiful virtual panels. For some racers, that is the smarter choice.
However, a physical sim racing button box has one major advantage: tactile certainty. You can feel a real switch without looking. You can find a knob by touch. You can slap the pit limiter button with confidence. In racing, that matters. A touchscreen is flexible, but it offers less physical feedback. A real button box feels mechanical, immediate, and wonderfully unnecessary in exactly the way hobbies are supposed to be.
Build Experience: What It Feels Like to Make One Yourself
Building a handsome sim racing button box is one of those projects that begins with “this should be simple” and ends with you holding a finished device like you just invented electricity. The experience is part crafting, part cockpit design, part problem solving, and part comedy routine performed by drill bits.
The first satisfying moment comes during layout. You place the enclosure on your desk, line up the buttons, and suddenly the project becomes real. At this stage, it is easy to get carried away. You imagine a full endurance racing panel with ignition guards, dual rotary encoders, labeled systems, and maybe a button that says “SEND IT.” This is normal. The key is to remember that good design is not about adding everything. It is about making the right things easy to reach.
Drilling is the most nerve-wracking step. A clean enclosure looks perfect until you introduce it to spinning metal. Masking tape helps prevent slipping and gives you a surface for measurements. A step bit is your friend because it lets you gradually open each hole to the exact size. Go slowly. Plastic melts if you attack it like you are qualifying at Monza. When the buttons finally snap or screw into place, the box instantly looks more professional. It is a magical transformation: five minutes earlier it was a plastic shell; now it is clearly racing equipment, at least emotionally.
Wiring is where the simple build really shines. With a zero-delay encoder, the pre-made harnesses make everything feel almost suspiciously easy. Each button gets a pair of wires. The connectors go to the board. The board gets a USB cable. You tidy the wires with small zip ties and suddenly you are doing cable management like a person who has watched one too many PC build videos. If you are soldering an Arduino version, the process is slower but more rewarding. Good solder joints feel like tiny victories. Bad solder joints look like metallic oatmeal and should be redone immediately.
Testing is the part that separates decoration from usefulness. Plug the box into your PC and check whether every button registers. Do not close the enclosure until you test everything. Press each button repeatedly. Turn each encoder both directions. Flip each switch. If one input fails, check the connector, ground, solder joint, or software mapping. Most problems are simple, but they are much easier to fix before all the screws are installed.
The final stage is labeling and styling. This is where the button box earns the word “handsome.” Carbon-style wrap can hide minor scratches and gives the faceplate a motorsport look. Clean labels make the box practical. A consistent visual style makes it look intentional. The first time you mount it beside your wheel and bind controls in your simulator, the whole rig feels upgraded. Even a budget wheel setup gains personality. Suddenly, starting the car is no longer a keyboard command. It is a ritual.
On track, the improvement is immediate. Instead of reaching for random keys, you build muscle memory. Brake bias changes become quick. Pit limiter activation becomes reliable. Wipers are available when rain arrives. Push-to-talk is where your hand expects it. The button box does not drive the car for you, but it removes little moments of distraction. In sim racing, fewer distractions often mean fewer mistakes, and fewer mistakes mean you can blame your lap times on setup instead of keyboard chaos.
The best part of the experience is that the project remains open-ended. You may start with ten buttons and later add encoders. You may swap labels after changing sims. You may build a second box for a different rig or a friend. You may decide the first version was “just a prototype,” which is the traditional DIY phrase for “I already want to build another one.” That is the charm of a DIY sim racing button box: it is useful, affordable, personal, and just technical enough to feel impressive without requiring you to become a full-time electronics wizard.
Conclusion
A handsome sim racing button box is one of the most satisfying upgrades you can build for a racing simulator. It improves control access, adds immersion, cleans up your workflow, and gives your rig a professional cockpit vibe without demanding a professional racing budget. The easiest path is a project box, arcade buttons, and a zero-delay USB encoder. The more flexible path is an Arduino Pro Micro or dedicated input board with rotary encoders and custom mappings. Both can produce excellent results.
The secret is not complexity. The secret is thoughtful layout, reliable parts, clear labels, and a finish that makes the box look like it belongs beside your wheel. Whether you are adjusting brake bias in a GT3 car, toggling headlights at night, or simply trying to stop using your keyboard like a panicked raccoon, a DIY sim racing button box is a smart, fun, and surprisingly easy build.














