
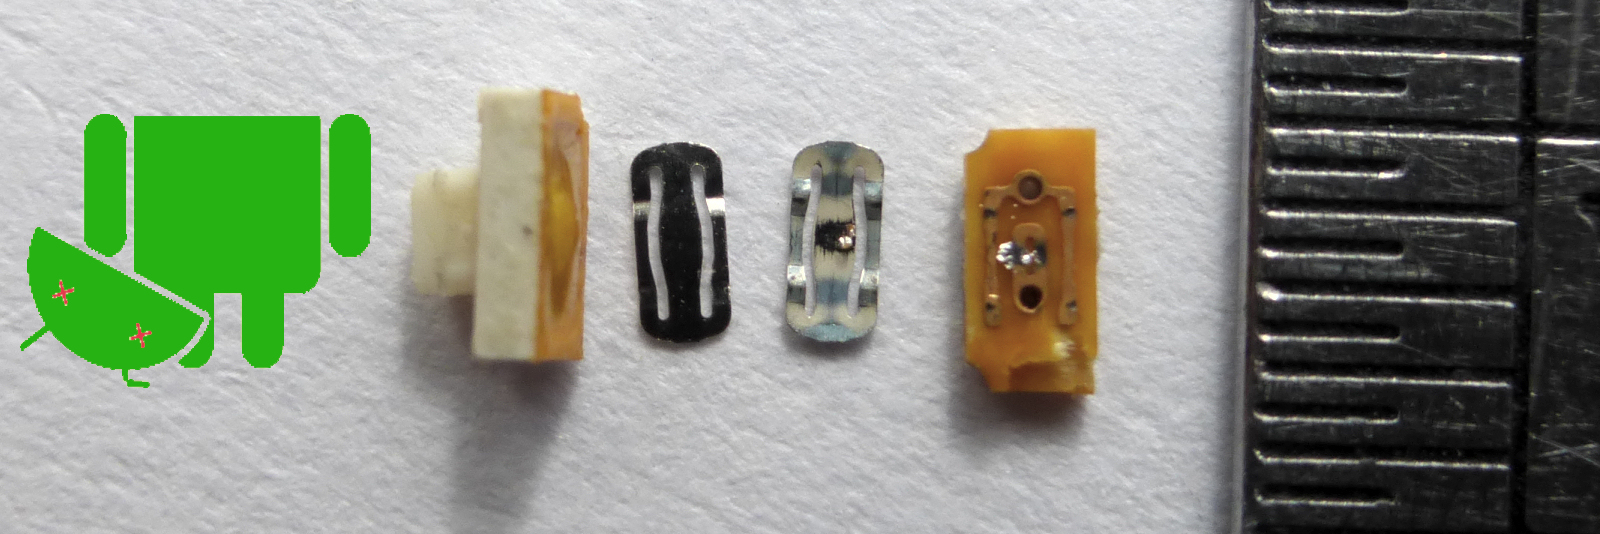
A switch is one of those tiny parts we trust with absurd confidence. We press it, click it, flip it, mash it during a frozen app crisis, and expect the universe to obey. Lights turn on. Phones wake up. Keyboards shout letters into documents. Machines start, stop, and occasionally pretend they did not hear us. But inside that humble click lives a surprisingly dramatic world of metal domes, contact pads, solder blobs, spring tension, bounce, oxidation, arcing, and wear. Welcome to the interesting switch autopsy: where a dead button becomes a tiny crime scene and the suspect is often smaller than a breadcrumb.
The phrase “switch autopsy” sounds like something a bored electronics technician invented at 2 a.m. while surrounded by flux fumes and bad coffee. But it is actually a useful way to understand why electronic devices fail. A switch may look fine from the outside. It may even click with the confidence of a luxury car door. Yet electrically, it can be stuck, shorted, oxidized, welded, contaminated, or simply worn out. That is the lesson behind one famous small-device failure: a smartphone power button that continued to feel normal while secretly pulling the circuit to ground and forcing the phone into reboot chaos. In other words, the button was smiling in public and committing electrical treason in private.
What Is a Switch Autopsy?
A switch autopsy is the careful teardown and inspection of a failed switch to determine why it stopped working correctly. The process borrows the logic of forensic examination: observe symptoms, isolate the component, remove it safely, open it, inspect its internal structure, and connect physical evidence to the failure. The “body” in this case is not a person, thankfully, but a tactile switch, rocker switch, microswitch, relay contact, keyboard switch, limit switch, or power button.
For electronics repair, a switch autopsy matters because many switch failures are deceptive. A tactile switch can produce a satisfying click while its electrical contacts remain permanently closed. A wall switch can appear normal while loose internal contact creates heat and buzzing. A relay may still move, but its contacts may be pitted by arcing. A mechanical keyboard switch may actuate inconsistently because of contact bounce, dirt, or worn metal leaves. The outer behavior tells part of the story; the inside tells the truth.
The Famous Tiny Failure: A Phone Power Button Gone Rogue
One of the best examples of an interesting switch autopsy involved a smartphone with a recurring reboot problem. The device would act as if the power button were being held down. At first glance, this looked like a software issue, battery issue, or general “the phone has chosen violence” issue. But the root cause was mechanical and microscopic: the power switch was shorting to ground even though it still clicked normally.
When the tiny surface-mount tactile switch was removed and opened, its internal design told a fascinating story. A tactile switch commonly contains a housing, a flexible metal dome or buckle, fixed contacts on the base, and a small actuator or nub that gives the finger that crisp click. When pressed, the dome collapses or deflects, bridging contacts and completing a circuit. When released, the dome springs back and opens the circuit. Simple, elegant, cheap, and when built well, extremely reliable.
In the failed switch, the trouble came from a small blob of solder placed on one of the internal metal pieces. The idea may have been practical: improve contact behavior, soften the impact, or prevent steel from wearing against copper. But the placement was not precise enough. Over repeated presses, material transferred where it should not have gone. Eventually, conductive residue built up and formed an unintended electrical path. The result was a power button that mechanically clicked but electrically behaved like it was always pressed. The phone did not have a mood disorder. It had a microscopic short.
Inside a Tactile Switch: The Tiny Theater of Clicks
The actuator
The actuator is the part your finger indirectly presses. In a phone, it may sit beneath an external plastic or metal button. In a keyboard, it may be the stem. In a small tactile switch, it may be a rubber or plastic nub. Its job is to transfer force from the outside world to the internal contact mechanism. It sounds boring, but actuator geometry controls feel, travel, pressure point, and long-term wear. A badly aligned actuator can press the dome off-center, which is like poking a trampoline in one corner and expecting Olympic results.
The dome or spring contact
The metal dome is the drama queen of the tactile switch. It flexes, snaps, clicks, and returns. This snap action gives tactile feedback and helps create a fast transition between open and closed states. The dome also contributes to contact force, which matters because weak force can increase resistance, encourage contamination problems, and produce unreliable electrical behavior. Stronger force can improve contact reliability, but it can also increase wear. Engineering is often the art of choosing which problem you would like to have later.
The fixed contacts
The fixed contacts are the circuit pads waiting to be bridged. Their material matters. Gold alloys are often used for low-current signal reliability because they resist oxidation. Silver-based contacts handle more current but can tarnish and arc under harsh conditions. Copper is conductive but needs protection in many switch environments. The contact material, shape, plating, and pressure determine whether a switch survives millions of polite presses or fails after a few months of angry thumb workouts.
The housing and seal
The housing keeps everything aligned and protects the switch from dust, skin oils, moisture, pocket lint, soda mist, and other environmental monsters. Sealed switches are used when dust and moisture are expected. Unsealed tiny switches are cheaper and common in consumer gadgets, but they rely heavily on good product design around them. If a device lets dirt, humidity, or mechanical stress reach the switch, the switch may file a quiet resignation letter.
Why Switches Fail Even When They Still Click
A switch can fail mechanically, electrically, chemically, thermally, or through a combination that deserves its own detective soundtrack. The click only proves that something moved. It does not prove that the circuit opened or closed correctly.
Contact wear
Every press creates impact. Over time, the contact surfaces may flatten, pit, deform, or transfer material. In small tactile switches, even microscopic changes matter because the electrical gaps are tiny. A little metal migration in the wrong place can create leakage or a permanent short. A little contamination in another place can create an open circuit. Switches are humble, but they are not magic. They are tiny metal parts repeatedly bumping into each other and hoping physics remains polite.
Oxidation and contamination
Air, moisture, skin oils, dust, and chemical vapors can form films on contacts. At higher currents, the switching action may burn through some contamination. At very low signal currents, however, the contact may not have enough energy to break through a film. That is why micro-load switching often needs better contact materials and more careful design. A switch that works perfectly for a lamp may be a terrible choice for a delicate logic input.
Arcing
When contacts open or close under load, electricity can jump across the tiny gap. That arc is hot, destructive, and rude. Arcing can erode contact material, create pits, transfer metal, increase contact resistance, and eventually weld contacts together. This is especially important with inductive loads such as motors, solenoids, relays, and transformers. When current through an inductor is interrupted, the circuit fights back with a voltage spike. The switch contacts become the battlefield.
Contact bounce
Switch contacts do not always make one clean transition. They bounce. When a button is pressed, the contacts may rapidly open and close for a few milliseconds before settling. Humans do not notice this, but microcontrollers absolutely do. Without hardware or software debouncing, one press may be read as several presses. That is why a cheap button connected to a digital input can behave like it had three espressos and a personal grudge.
Bad load matching
A switch rating is not decoration. It is a boundary condition. A switch rated for one voltage and current may not be safe or durable in another circuit. AC and DC switching are not the same. Resistive and inductive loads are not the same. A tiny tactile button meant for a logic input should not be asked to switch a motor, a heater, or a mystery load from the “seemed fine on the bench” department. Excessive current can heat contacts, weld them, or damage the housing.
The Autopsy Process: How to Diagnose a Failed Switch
1. Document the symptoms
Before grabbing tools, write down what the device does. Does the switch fail only sometimes? Does it double-trigger? Does it stick? Does it reboot the device? Does it work when pressed harder or at an angle? Does it buzz, smell hot, or feel warm? These clues help separate mechanical misalignment from electrical failure, contamination, firmware interpretation, or circuit design problems.
2. Rule out the obvious
Check the battery, connector, cable, firmware settings, and surrounding components. Many “bad switches” are innocent. A loose ribbon cable, cracked solder joint, corroded connector, or firmware debounce issue can imitate a failing button. Do not convict the switch until the evidence earns it.
3. Test electrically
A multimeter in continuity or resistance mode can reveal whether a switch opens and closes as expected. For a normally open tactile switch, resistance should be very high when released and very low when pressed. If it reads low resistance all the time, it may be shorted. If it reads high resistance all the time, the contacts may be open, contaminated, broken, or disconnected from the board.
4. Inspect solder joints
Many switch failures live at the solder joint, not inside the switch. Surface-mount switches experience mechanical stress every time they are pressed. If the board flexes or the external button applies side force, solder joints may crack. Under magnification, cracked joints can appear as dark rings or subtle fractures. Reflowing or replacing the switch may solve the problem, but only if the underlying mechanical stress is also addressed.
5. Remove and open the switch
For tiny SMD switches, removal often requires hot air, flux, solder wick, tweezers, patience, and the emotional stability of a sleeping cat. Once removed, the switch can be opened with fine tools under magnification. This is where the real autopsy begins. Look for pitted contacts, shifted domes, contamination, broken springs, solder transfer, bent housings, oxidation, or debris.
What the Autopsy Teaches Designers
The most important lesson is that switch selection should happen early in product design, not after the enclosure is already finished and someone says, “Just stick a button here.” A switch must match the electrical load, mechanical actuation force, expected lifetime, environment, assembly process, and user behavior. Users do not press buttons like lab instruments. They jab them in pockets, mash them during panic, drop devices on them, and occasionally treat them like emotional support hardware.
Designers should avoid off-axis force. If the external button cap pushes the internal switch from an angle, wear accelerates. Add proper travel stops so the switch does not absorb all impact energy. Use sealed switches in dirty or humid environments. Use gold contacts for low-level signals where oxidation matters. Add debouncing in firmware. Add pull-up or pull-down resistors so inputs do not float. Protect contacts from inductive spikes with snubbers, flyback diodes, or appropriate driver circuits when switching coils or motors.
Also, do not confuse “cheap” with “optimized.” A tiny switch costing a few cents may be excellent when used correctly. The same switch in the wrong mechanical stack-up can become a warranty avalanche. Saving two cents on a switch can cost thousands in support, returns, reputation damage, and engineers muttering dark poetry near the rework station.
What the Autopsy Teaches Repairers
For repairers, the lesson is equally practical: a switch can feel fine and still be guilty. If a phone enters a reboot loop, a remote control double-presses, a keyboard key chatters, or a device turns on by itself, test the switch electrically. Do not rely only on the click. The click is a witness, not a verdict.
Replacing a tiny tactile switch is often inexpensive in parts but expensive in skill. The component may cost less than a postage stamp, but the labor requires board-level repair tools and experience. Pads can lift. Plastic can melt. Nearby components can move. A repair that looks simple in a close-up photo can become a tabletop opera starring tweezers, profanity, and one missing 0402 capacitor.
For mains-powered equipment, the safety rules change completely. Do not autopsy a wall switch, power strip, appliance switch, or industrial control while energized. Disconnect power, verify absence of voltage, and follow appropriate lockout procedures. If the circuit involves household AC, hire a qualified electrician. Curiosity is wonderful. Curiosity plus live mains voltage is a bad documentary.
Common Switch Types and Their Autopsy Clues
Tactile switches
Common in phones, remotes, toys, control panels, and small electronics. Failure signs include no response, double response, permanent press, weak click, or intermittent triggering. Autopsy clues include dome collapse, contamination, worn pads, cracked solder joints, and conductive debris.
Mechanical keyboard switches
Common in enthusiast keyboards and high-use office keyboards. Failure signs include chatter, missed keystrokes, scratchy feel, or inconsistent actuation. Autopsy clues include dirty contacts, worn leaves, damaged stems, spring issues, or lubricant migration. Optical and Hall-effect keyboard switches avoid some metal-contact issues but introduce their own sensor and alignment considerations.
Rocker and toggle switches
Used in appliances, power supplies, vehicles, and tools. Failure signs include heat, looseness, flickering output, crackling, or partial operation. Autopsy clues include pitted contacts, heat discoloration, weak springs, melted housings, and terminal damage.
Microswitches and limit switches
Found in appliances, printers, machinery, 3D printers, and safety interlocks. Failure signs include intermittent limit detection, poor repeatability, or mechanical sticking. Autopsy clues include worn actuators, contact oxidation, overtravel damage, or contamination from dust and grease.
Relays
A relay is an electrically controlled switch. It may click loudly while its contacts fail quietly. Failure signs include loads not switching, contacts sticking, buzzing, or heat. Autopsy clues include arc erosion, welded contacts, carbon deposits, weakened springs, and coil damage.
How to Prevent the Next Switch Funeral
Use the right switch for the load. Respect voltage, current, inrush current, and whether the load is AC, DC, resistive, capacitive, or inductive. Add contact protection for coils and motors. Provide firmware debouncing for digital inputs. Use a proper pull-up or pull-down resistor. Keep liquids, dust, and aggressive vapors away from unsealed contacts. Design enclosures so external buttons press straight down with controlled travel. Do not let the switch become the mechanical stop for an angry user’s thumb.
For consumers, prevention is simpler. If a button starts acting weird, address it early. Intermittent failures rarely heal themselves. A phone power button that occasionally double-triggers may eventually become a boot-loop button. A light switch that buzzes or feels warm deserves professional attention. A power strip that sparks, melts, or smells burnt should be retired immediately, not moved to the garage for “less important electricity.” Electricity does not respect garage logic.
Why This Tiny Autopsy Is So Interesting
The switch autopsy is interesting because it reveals how much modern technology depends on small mechanical compromises. We talk constantly about processors, cameras, software, artificial intelligence, and battery chemistry. Yet a device costing hundreds or thousands of dollars can be defeated by a speck of metal in a button smaller than a lentil. That is not embarrassing; it is engineering reality.
Every physical interface is a negotiation between cost, feel, durability, assembly speed, repairability, and space. A phone manufacturer wants a crisp power button, thin housing, fast assembly, low cost, and millions of cycles. A component supplier wants a switch that meets specifications at scale. A user wants the button to work forever while being pressed through a case, dropped onto tile, and occasionally attacked by snack dust. Somewhere in the middle, a tiny dome flexes and hopes for the best.
Experience Notes: Lessons from Real-World Switch Autopsies
After you have opened a few failed switches, you begin to respect them in a new way. The first surprise is how often the mechanical feel lies. A failed tactile switch may still click sharply, while a perfectly good switch may feel mushy because the outer button cap is misaligned. That means diagnosis should combine touch, electrical testing, and visual inspection. The finger is useful, but it is not a calibrated instrument, no matter how confident it feels.
One common experience is the “works when pressed sideways” symptom. In small gadgets, this often points to cracked solder joints or a worn internal contact. Pressing at an angle flexes the board or shifts the dome just enough to make contact. It is tempting to call that fixed and move on. Do not. That is not a repair; that is a tiny electrical hostage negotiation. The proper fix is usually reflowing the joints, reinforcing the mechanical support, or replacing the switch.
Another memorable lesson comes from remote controls and game controllers. Many button failures are not dramatic at all. The contacts are simply dirty, the rubber membrane has worn conductive coating, or skin oil has formed a film that increases resistance. Cleaning can help, but aggressive scraping can destroy delicate coatings. Gentle cleaning, careful drying, and correct replacement parts are better than going in like a raccoon with a screwdriver.
Mechanical keyboard switches teach a different lesson: not every failure is electrical. A switch may chatter because of contact bounce, but it may also misbehave because of firmware debounce settings, debris in the stem, a bent contact leaf, or a cracked solder joint on a hot-swappable socket. The best repair experience comes from testing one variable at a time. Swap the switch. Test the socket. Check the PCB. Update firmware only after the hardware stops looking suspicious.
Power switches in appliances and tools are the most sobering. Once heat discoloration appears, the story usually includes too much current, poor contact pressure, loose terminals, or arcing. A melted housing is not a cosmetic issue. It is evidence. Replacing only the visible switch without checking the load, wiring, connectors, and ratings can recreate the failure. In these cases, the autopsy should lead to a system diagnosis, not just a parts swap.
The best practical habit is to keep failed switches for comparison. A small labeled box of dead parts becomes a classroom. One switch shows pitted contacts. Another shows a broken actuator. Another shows flux contamination. Another shows the classic “it clicks but it shorts” failure. Over time, you build pattern recognition. You stop seeing switches as generic little rectangles and start seeing them as engineered mechanisms with personalities. Some are sturdy. Some are delicate. Some are divas. Some clearly had a difficult childhood in procurement.
The final experience-based lesson is humility. Tiny parts fail in tiny ways, and tiny ways can create huge symptoms. An interesting switch autopsy reminds us that repair is not just replacing components. It is understanding cause, effect, and context. The switch did not fail in a vacuum. It lived inside a product, under mechanical force, electrical demand, environmental exposure, manufacturing tolerance, and user behavior. Open it carefully, learn from it, and give the next switch a better life.
Conclusion: The Click Is Only the Beginning
An interesting switch autopsy turns a small failed part into a big engineering lesson. A switch is not merely an on-off symbol on a schematic. It is a moving mechanical contact system that must survive force, contamination, electrical stress, heat, vibration, and millions of user interactions. The famous phone power-button failure proves the point beautifully: the button still clicked, but the electrical truth inside told a different story.
For designers, the takeaway is to choose switches based on real operating conditions, not wishful thinking. For repairers, the takeaway is to test electrically, inspect mechanically, and respect the fragility of surface-mount parts. For everyday users, the takeaway is simple: when a switch starts buzzing, heating, rebooting, double-clicking, or acting haunted, do not ignore it. The ghost in the machine may be a tired little contact asking for retirement.
Note: This article is written from synthesized research across reputable electronics teardown, component manufacturer, repair, electrical safety, and engineering education resources. Source links are intentionally omitted for clean web publishing.














