
Note: This article is written from synthesized DIY, woodworking, rustic finishing, budget crafting, and holiday-light safety guidance from reputable U.S. home improvement, craft, and consumer safety sources.
Introduction: Big Rustic Charm, Tiny Budget
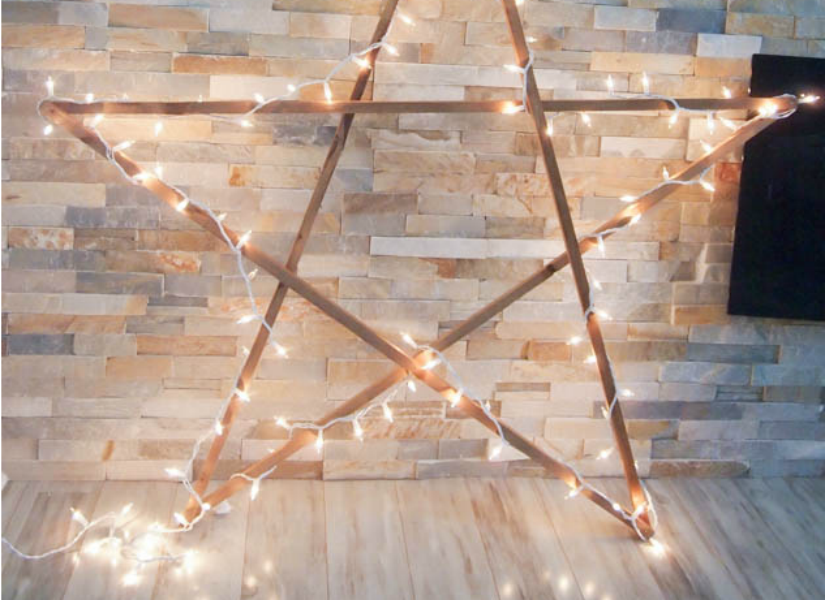
A large rustic wood star with lights sounds like something you would find in a boutique holiday shop with a price tag that makes your wallet quietly leave the room. But here is the good news: you can make your own DIY large rustic wood star with lights for under $5 if you use scrap wood, budget-store lights, leftover stain, and a little creative stubbornness.
This project is perfect for Christmas decor, farmhouse porch decorating, cozy winter mantels, patriotic summer displays, weddings, backyard parties, or that one empty wall that keeps judging your interior design decisions. A wooden star is simple, timeless, and surprisingly flexible. Add warm white lights, and suddenly it looks intentional, expensive, and maybe even Pinterest-approved.
The best part? You do not need to be a master woodworker. You do not need a garage full of tools. You do not need to know the emotional history of every board in the lumber aisle. This rustic wood star can be made with thin wood strips, paint stir sticks, craft sticks, pallet scraps, furring strips, or leftover trim. The rustic finish is forgiving, which is DIY code for: “If you mess up, call it character.”
In this guide, you will learn how to build a large wooden star, give it a weathered farmhouse finish, attach lights safely, and display it indoors or outdoors. We will also cover budget tips, mistakes to avoid, styling ideas, and real-life experience notes to help your project look charming instead of like a triangle convention gone wrong.
Why Make a DIY Rustic Wood Star?
A rustic wooden star is one of those decorations that works almost anywhere. It looks great leaning against a fireplace, hanging on a front porch, placed above a console table, or tucked into a holiday vignette with greenery and candles. Unlike some seasonal decorations, it does not scream “December only.” Change the ribbon, swap the lights, or add a small wreath in the center, and it can move from Christmas to Fourth of July to everyday farmhouse decor.
The lighted version adds instant warmth. Warm white LED lights create a soft glow that makes even a very simple star feel special. For under $5, the trick is to use materials you already have and buy only what you truly need. The most budget-friendly approach is usually scrap wood plus inexpensive battery-operated fairy lights or mini string lights.
Materials You Need
To keep this DIY wood star under $5, start by checking your home, garage, shed, or recycling pile before buying anything. Many makers can complete this project using leftovers from previous projects.
Basic Supply List
- 5 thin wood strips, paint stir sticks, pallet slats, yardsticks, or scrap trim pieces
- Small nails, brad nails, screws, staples, or hot glue for indoor-only versions
- Wood glue or strong craft glue
- Sandpaper, ideally medium and fine grit
- Brown stain, watered-down paint, coffee stain, or leftover wood finish
- Battery-operated fairy lights or a small strand of LED lights
- Twine, wire, ribbon, or sawtooth hanger for hanging
- Optional: clear sealer for outdoor or covered porch use
Budget Breakdown Example
Here is one realistic under-$5 version:
- Scrap wood: $0
- Leftover stain or diluted brown craft paint: $0
- Small nails or glue already on hand: $0
- Battery fairy lights from a dollar or discount store: about $1.25 to $3
- Twine or ribbon scrap: $0
If you need to buy every single item new, this project may go over $5. The “under $5” magic happens when you use salvaged wood, leftover finish, and a small budget light strand. Think of it less as cheating and more as financially responsible festive wizardry.
Tools You May Need
You can make this project with very basic tools. A miter saw makes angled cuts faster, but it is not required if your wood pieces are thin enough to cut by hand.
- Hand saw, miter box, or miter saw
- Measuring tape or ruler
- Pencil
- Clamps or heavy books
- Hammer or staple gun
- Drill with a small bit, if you want holes for lights
- Safety glasses
If you are cutting, sanding, or drilling wood, wear eye protection. If the wood is dusty, old, painted, or reclaimed, use a mask and work in a ventilated area. Rustic should describe the style, not your respiratory system.
Step-by-Step: How to Make a Large Rustic Wood Star with Lights
Step 1: Choose Your Wood
The easiest wood for a large rustic star is thin, lightweight wood. Paint stir sticks, pallet strips, furring strips, or leftover trim are great options. For a bigger star, use pieces around 18 to 24 inches long. For a huge porch star, go closer to 30 inches, but remember that bigger stars need stronger joints.
Try to choose wood pieces with similar width and thickness so the star sits flat. Crooked wood can still work, especially for a rustic look, but wildly warped boards may make the finished star twist like it has holiday drama.
Step 2: Sand the Wood
Lightly sand each piece to remove splinters and rough edges. You do not need a glass-smooth finish because rustic decor looks better with a little texture. Start with medium-grit sandpaper for rough pieces, then finish with a finer grit if needed.
Pay special attention to the ends and corners. A large wood star often gets moved, leaned, stored, and handled, so smooth edges make it safer and more pleasant to use.
Step 3: Lay Out the Star Shape
Place your five wood pieces on the floor or a large table. Arrange them into a classic five-point star by overlapping the ends. Do not attach anything yet. This is the part where the star may look like a confused pile of sticks. Stay calm. Every star has an awkward phase.
Start with one upside-down “V” for the top point. Then cross two pieces diagonally from the lower sides toward the opposite top sides. Finally, add the last piece across the bottom to complete the shape. Adjust the overlaps until all five points look fairly even.
A helpful trick is to step back and look at the star from a distance. If one point looks much longer than the others, shift the boards slightly before fastening. You can also trace a star template on paper or mark a guide on cardboard if you want more precision.
Step 4: Mark the Overlap Points
Once your star looks balanced, use a pencil to mark where the boards overlap. These marks show where you will glue, nail, screw, or staple the pieces together.
If your wood is thin, wood glue plus small brad nails works well. For very lightweight indoor decor, hot glue can work, but it is not ideal for outdoor use or long-term durability. For porch or yard display, use wood glue with small screws or nails.
Step 5: Attach the Star
Attach one joint at a time. Apply wood glue where the boards overlap, press them together, and secure them with a nail, brad, staple, or small screw. If using screws, drill pilot holes first to prevent the wood from splitting.
Keep checking the shape as you work. It is easy for one board to shift while you attach another. Clamps help, but if you do not have clamps, heavy books can do the job. Choose books you are not emotionally attached to in case they meet a little glue.
Let the glue dry according to the product directions. Even if the star feels sturdy right away, giving the glue time to cure makes the project stronger.
How to Add a Rustic Finish
The rustic finish is what takes this project from “I attached sticks together” to “I bought this from a charming market where everything smells like cinnamon.” There are several easy ways to create a weathered wood look.
Option 1: Use Wood Stain
Apply a small amount of brown, walnut, gray, or weathered oak stain with a rag or brush. Wipe off the excess quickly for a softer look. Darker stain makes the star feel more farmhouse and dramatic, while gray stain gives it a coastal or reclaimed-wood style.
Option 2: Use Diluted Paint
If you do not have stain, mix brown, black, gray, or white craft paint with water. Brush it on, then wipe it back with a rag. This creates a washed finish that lets the wood grain show through. For a barnwood effect, layer gray wash over brown wash and lightly sand the edges.
Option 3: Dry Brush White Paint
Dip a dry brush into a tiny amount of white paint, wipe most of it off, then drag the brush lightly across the wood. The paint will catch raised areas and edges, creating a worn, chippy look. This method is wonderfully forgiving and makes your mistakes look like antique-shop destiny.
Option 4: Distress the Edges
After staining or painting, sand the corners, overlaps, and high points. Focus on areas that would naturally wear over time. You can also tap the wood gently with a hammer, rub it with a wire brush, or add small dents for character. Do not overdo it unless your design goal is “survived a barn fight.”
How to Add Lights to the Wood Star
Lights turn the rustic wood star into the star of the room. For budget and ease, battery-operated fairy lights are usually the best option. They do not require an outlet, they are lightweight, and the battery pack can be hidden behind one of the wood strips.
Method 1: Wrap the Lights Around the Star
The simplest method is wrapping a thin strand of fairy lights around the wood. Start at the battery pack, secure it to the back with twine, tape, or a small hook-and-loop strip, then wrap the lights around each side of the star. Keep the spacing loose and natural.
This method creates a cozy glow and works especially well for mantels, shelves, and covered porch displays. Use warm white lights for a classic farmhouse feel or cool white lights for a crisp winter look.
Method 2: Drill Small Light Holes
For a cleaner marquee-style look, drill small holes through the wood and push individual fairy light bulbs through from the back. This works best with wider wood strips. Mark the light positions first, spacing them evenly around the star.
Make sure the holes are just large enough for the bulbs, not so large that they fall out. If needed, secure the wires on the back with tape, clips, or tiny staples placed carefully around the wire, never through it.
Method 3: Backlight the Star
For a softer glow, attach lights to the back of the star rather than the front. When the star is hung slightly away from the wall or leaned against a surface, the lights create a halo effect. This is a beautiful option for entryways, bedrooms, and holiday photo corners.
Important Lighting Safety Tips
Use LED lights whenever possible because they stay cooler and use less energy than older incandescent strands. Inspect every light strand before using it. Do not use lights with frayed wires, cracked sockets, loose connections, or damaged battery packs.
If you plan to display the star outdoors, use only lights labeled for outdoor use and connect them to outdoor-rated extension cords if needed. Outdoor electrical decorations should be plugged into GFCI-protected outlets. Keep plugs and connections dry, off the ground, and protected from puddles, snow, and direct rain.
Never attach lights with metal staples, nails, or anything sharp that could pierce the wire. Use plastic clips, twist ties, twine, or careful wrapping instead. Turn lights off before going to bed or leaving the house. A timer is a small luxury that makes you feel like a responsible adult with twinkle lights.
How to Hang or Display Your Large Wood Star
There are several easy ways to display your DIY rustic wood star. For indoor use, add a sawtooth hanger, loop of twine, or picture wire to the back. If the star is lightweight, a removable wall hook may work. For heavier stars, use a proper wall anchor or hang it from a secure nail or screw.
For porch styling, lean the star against a wall, place it in a large planter, or attach it to a wreath hanger. If it will be exposed to wind, secure it with floral wire, zip ties, or a discreet screw. A large star can act like a tiny wooden sail on a breezy day, and nobody wants to explain to the neighbors why their Christmas decor has migrated across the yard.
Decorating Ideas for Every Season
Christmas Farmhouse Star
Use warm white lights, pine greenery, buffalo-check ribbon, and a few pinecones. Lean the star beside the fireplace or place it on a covered porch with lanterns and a small evergreen tree.
Patriotic Rustic Star
Paint or dry brush the wood in muted red, white, and blue. Add warm lights for evening glow. This version is perfect for Memorial Day, Fourth of July, Labor Day, or year-round Americana decor.
Wedding or Party Backdrop
Use pale wood, whitewash, or champagne-toned lights. Hang several stars behind a dessert table, photo booth, or outdoor seating area. Rustic stars pair beautifully with burlap, greenery, mason jars, and soft fabric.
Everyday Farmhouse Decor
Skip the holiday ribbon and keep the finish simple. A plain stained wood star with subtle fairy lights looks great above a headboard, in a hallway, or on a gallery wall.
Common Mistakes to Avoid
The first common mistake is rushing the layout. A star needs balance. Take a few extra minutes to adjust the points before gluing or nailing. The second mistake is using too much paint or stain. Rustic wood looks best when layers are thin and the grain still shows.
Another mistake is choosing a light strand that is too bulky. Large bulbs can overwhelm thin wood, while delicate fairy lights keep the project elegant and inexpensive. Also, do not forget to hide the battery pack. Nothing ruins rustic charm quite like a plastic box dangling in plain sight like a tiny electrical backpack.
Finally, avoid using indoor-only lights outdoors. If your star will live on a porch or patio, check labels carefully and protect the finish with a clear sealer. Moisture is not a design feature.
How to Keep the Project Under $5
The best way to stay under budget is to reuse. Ask for scrap wood from a friend, save paint stir sticks, cut down pallet slats, or use leftover trim. Many hardware stores give away or sell paint stir sticks cheaply, and old fence boards can be perfect if they are clean and safe to handle.
Use leftover stain, watered-down craft paint, coffee, or even a mix of brown and black paint for a weathered look. Choose the smallest light strand that fits your star. Battery fairy lights often cost less than plug-in strands and are easier to hide.
If your total creeps over $5, do not panic. A large rustic lighted star for even $8 or $10 is still far cheaper than buying a finished version. The goal is budget-friendly beauty, not emotional accounting warfare.
Storage Tips
When the season ends, remove batteries from battery-operated lights to prevent corrosion. Wrap the star in kraft paper, an old towel, or bubble wrap. Store it flat or hang it on a garage wall. Avoid piling heavy decorations on top of it, especially if you used thin wood or glue-only joints.
If the lights are wrapped around the star, keep them attached to avoid tangles next year. If you used a plug-in strand, coil the extra cord loosely and secure it with a twist tie. Future you will be grateful. Future you has enough to deal with.
Final Thoughts: Rustic Decor Does Not Have to Be Expensive
A DIY large rustic wood star with lights is proof that beautiful decor does not need a luxury budget. With a few pieces of scrap wood, a basic star layout, a weathered finish, and a small strand of LED lights, you can create a glowing farmhouse-style decoration that looks custom, cozy, and far more expensive than it really is.
This project is beginner-friendly, easy to customize, and wonderfully forgiving. The rustic finish welcomes imperfect edges, uneven color, and natural wood texture. In fact, those little flaws are what make the finished star feel handmade and charming.
Whether you display it for Christmas, use it as porch decor, hang it in a bedroom, or make several as gifts, this budget wood star delivers maximum charm with minimal spending. And honestly, any project that makes your house glow for under $5 deserves a standing ovation and maybe a cookie.
Extra Experience Notes: What It Is Really Like to Make a DIY Large Rustic Wood Star with Lights
The first thing you learn when making a DIY large rustic wood star with lights is that stars look simple until you try to arrange five pieces of wood into one. On paper, it is easy. In real life, one point always wants to be taller, one side leans like it has had a long day, and the bottom line somehow refuses to cooperate. The trick is to lay everything out loosely and not attach anything too soon. Give yourself permission to adjust the shape several times. Once the star clicks visually, you will know.
Using scrap wood makes the project more fun because every piece has a little personality. Some pieces may have knots, nail holes, saw marks, paint stains, or rough patches. Instead of trying to hide those marks, let them become part of the design. A rustic wood star should not look like it came from a sterile factory. It should look like it has a story, preferably one involving cocoa, snow, and someone saying, “I can totally make that.”
One helpful experience tip is to build the star on the floor if it is large. A table may be more comfortable, but the floor gives you more room to step back and judge the shape. Take a quick photo with your phone before attaching the boards. Photos often reveal crooked angles that your eyes miss up close. It sounds silly, but it works. The camera has no emotional attachment to your project and will tell the truth.
When applying stain or diluted paint, start lighter than you think you need. You can always darken the wood, but removing a heavy coat is much harder. A thin brown wash followed by a dry brush of white or gray creates a believable aged finish without making the star look muddy. Wipe quickly, layer slowly, and remember that rustic style loves texture. If the finish looks too perfect, lightly sand the corners and overlaps until it feels more relaxed.
Adding lights is the most satisfying part. The project goes from “nice wooden shape” to “cozy glowing statement piece” in about five minutes. Battery-operated fairy lights are especially convenient because you can hide the battery pack behind a wood overlap. Use a small piece of hook-and-loop tape, twine, or a removable adhesive strip so you can still access the batteries later. Do not glue the battery box permanently unless you enjoy future regret as a hobby.
For indoor display, leaning the star against a mantel or shelf is often easier than hanging it. It also looks casual and collected, which is perfect for farmhouse decor. If you hang it, make sure the hanger is attached to a strong joint rather than a thin unsupported section. Large stars are lightweight until gravity gets involved.
For outdoor use, covered areas are best. A porch, patio wall, or protected entryway helps the wood and lights last longer. If the star will be outside for several weeks, use a clear exterior sealer and outdoor-rated lights. Wind is the sneaky enemy of large lightweight decor, so secure the star even if it seems stable. A discreet zip tie or wire loop can prevent your handmade masterpiece from taking an unscheduled trip down the driveway.
The biggest lesson from making this project is that budget DIY does not have to look cheap. Thoughtful proportions, warm lighting, and a good rustic finish make a huge difference. People will notice the glow, the size, and the handmade charm long before they notice that the materials cost less than a fancy coffee. And if someone asks where you bought it, you get the great pleasure of saying, “I made it,” while trying not to look too smug. Try your best. It will be difficult.













