
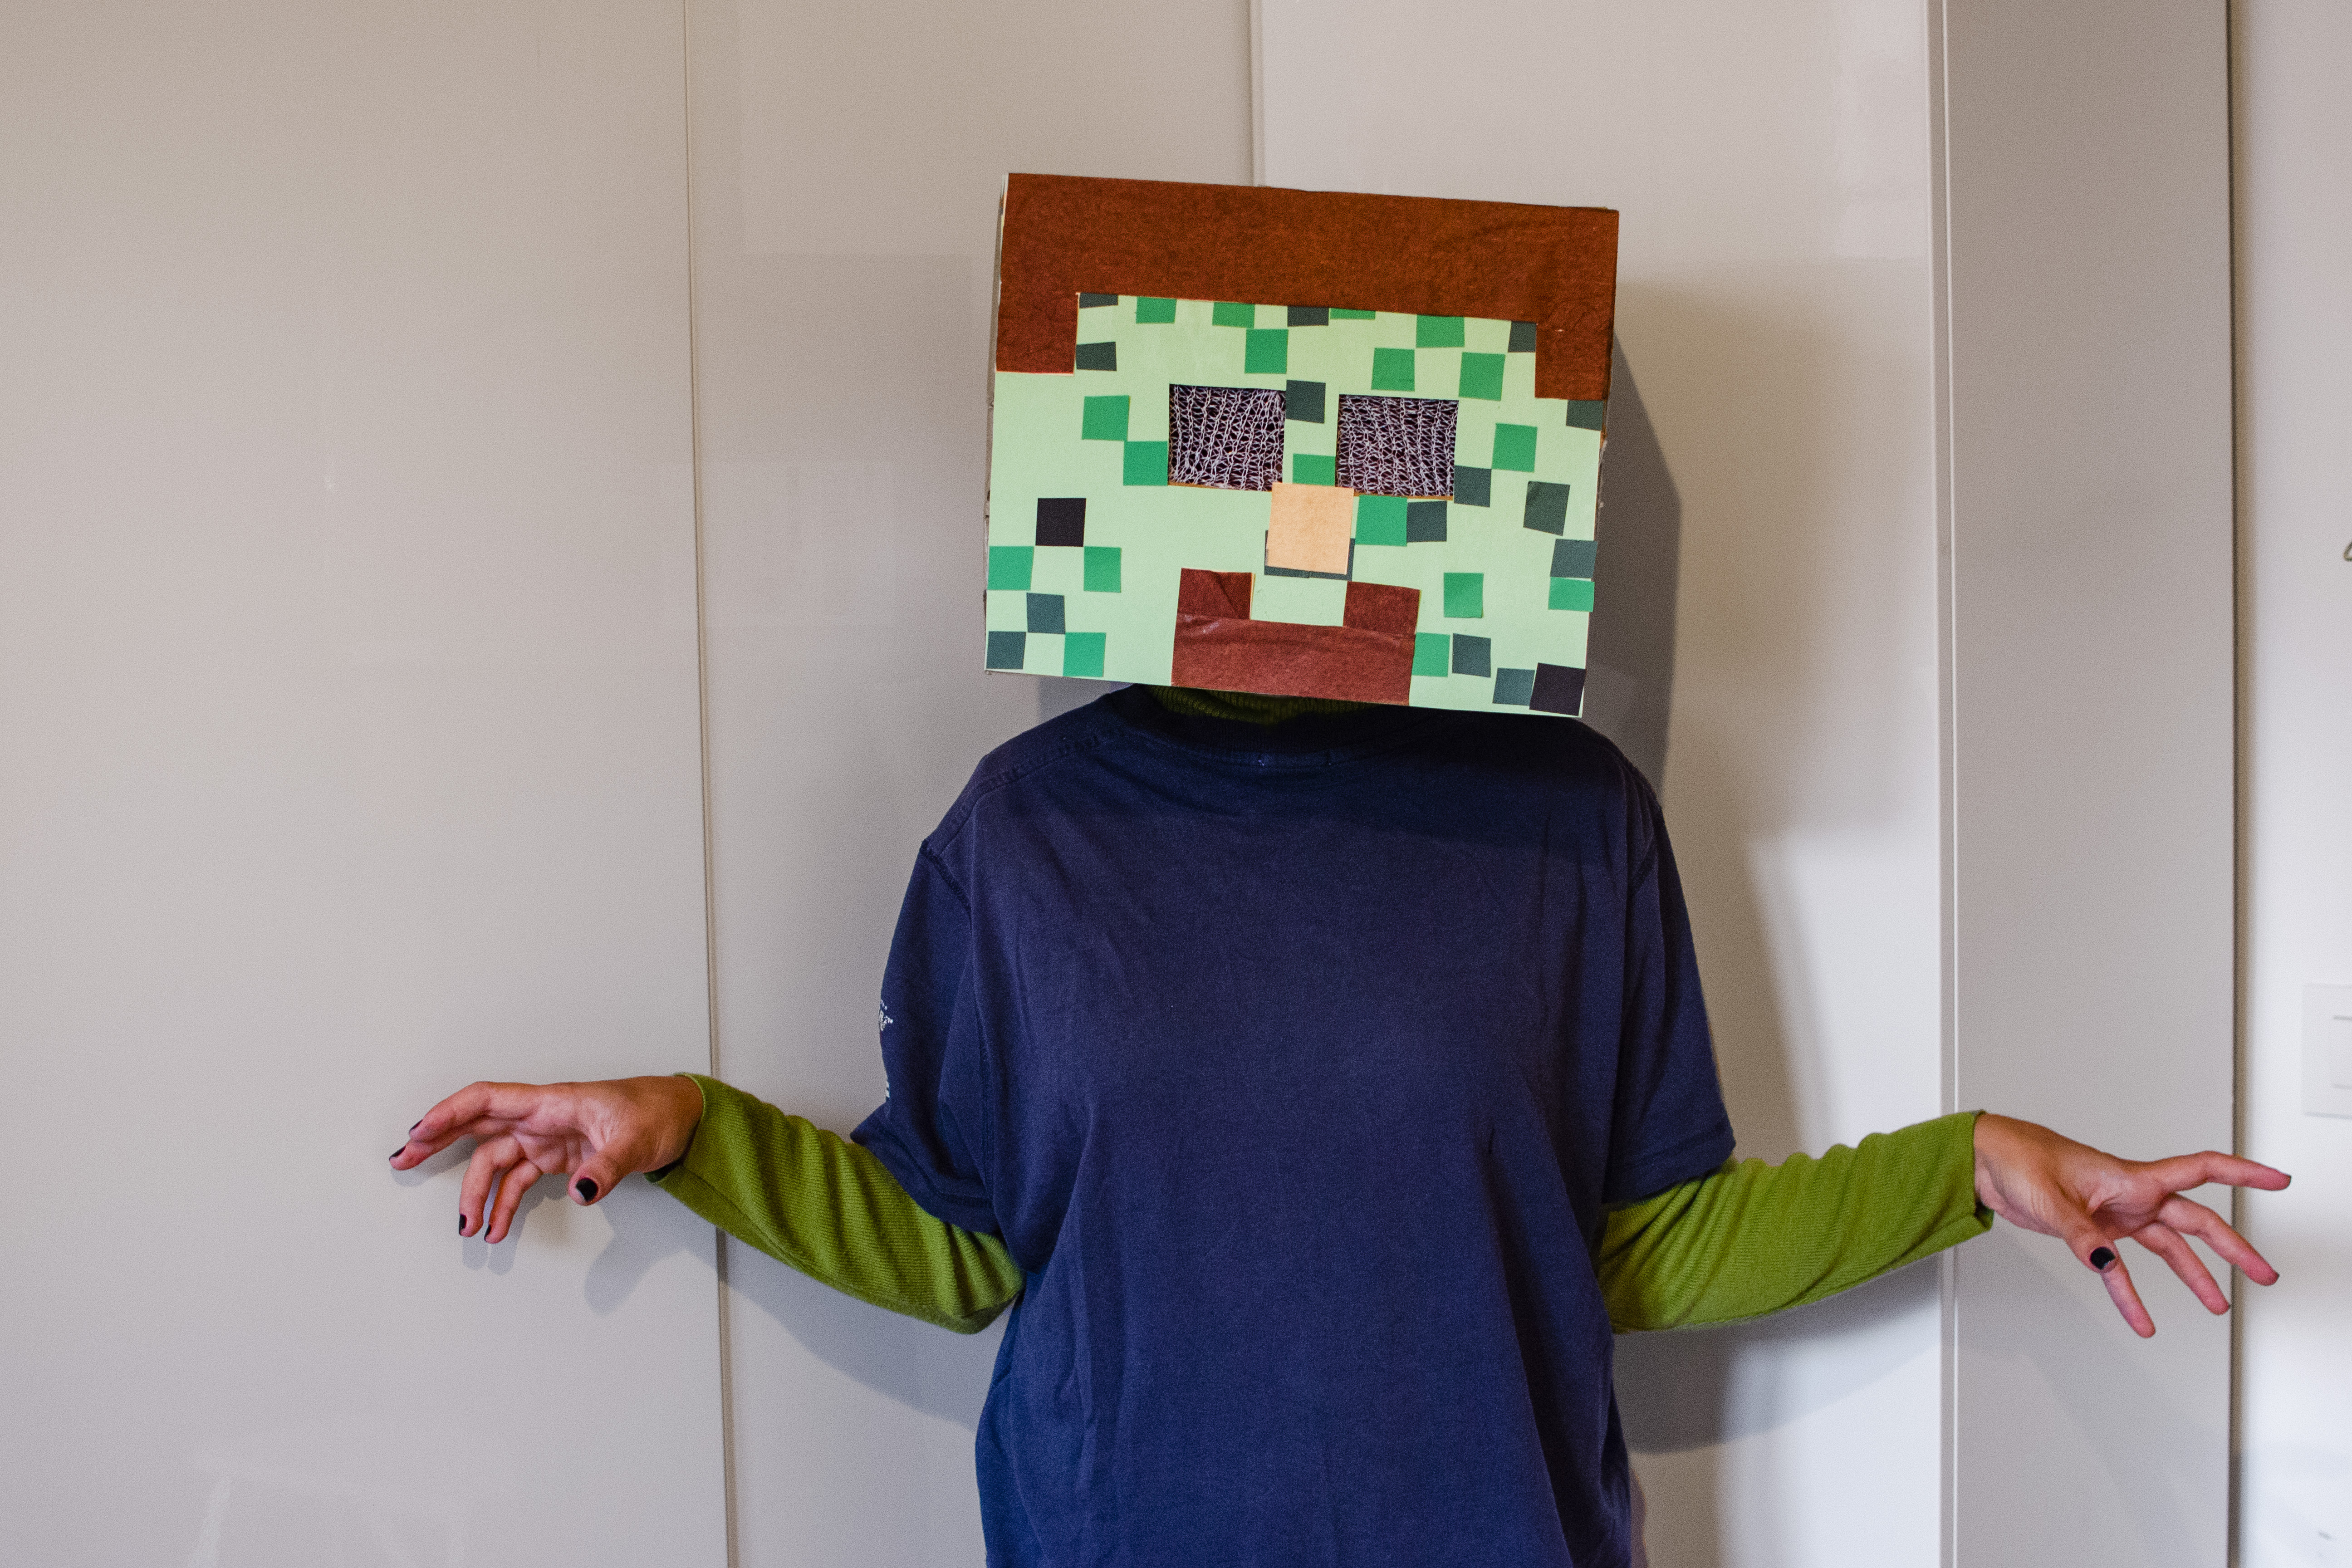
Minecraft costumes are the rare Halloween project where being square is not only acceptable, it is the entire assignment. No need to sculpt cheekbones, sew a velvet cape, or convince a wig to behave like a civilized object. Minecraft’s world is built from blocks, pixels, straight lines, and colors that look like they were invited to a party by a geometry teacher. That makes it one of the most DIY-friendly costume themes for kids, teens, adults, school events, cosplay nights, gaming parties, and last-minute “Wait, Halloween is tomorrow?” situations.
The good news: you can make a Minecraft costume with cardboard boxes, paper, paint, foam board, felt, old clothes, and a little patience. The better news: mistakes often look intentional because the game itself is delightfully blocky. A slightly crooked square? Congratulations, that is texture. A paint patch that looks uneven? Clearly, it is a pixel shadow. A boxy head that makes you walk like a refrigerator with dreams? Perfectly on brand.
This guide covers three practical ways to make a Minecraft costume: a classic Steve or Alex cardboard box costume, a Creeper or Enderman mob costume, and a more flexible pixel armor outfit using foam, felt, or printed textures. Each method includes materials, step-by-step instructions, comfort tips, safety notes, and creative upgrades so the finished costume looks recognizable without requiring a crafting table, redstone engineering degree, or emergency run to the Nether.
Why Minecraft Costumes Are Perfect for DIY
Many popular costumes require curves, complicated sewing patterns, or expensive accessories. Minecraft costumes are different because the game’s visual language is simple: cubes, rectangles, pixel grids, and bold color blocks. That means a handmade version can look charming even when it is built from recycled shipping boxes and school-project supplies.
The key is not making the costume “realistic.” The key is making it pixel accurate enough. When people see a square head, a turquoise shirt, blue pants, and a pickaxe, their brain immediately says, “Ah yes, Steve has left the server and arrived at the party.” The same is true for a green pixelated box face with a sad little Creeper expression. Minecraft designs are iconic, which gives DIY makers a big advantage.
Basic Supplies You Can Use for Any Minecraft Costume
Before choosing a method, gather the core supplies. You do not need every item on this list, but it helps to know your options:
- Cardboard boxes in sizes that fit the head, torso, or arms
- Foam board or poster board for flatter, cleaner panels
- Acrylic paint, craft paint, or spray paint used with adult supervision
- Colored paper, construction paper, or printable pixel textures
- Painter’s tape, duct tape, packing tape, or hot glue
- Scissors and a craft knife handled by an adult when needed
- Ruler, pencil, measuring tape, and a square template
- Elastic straps, ribbon, or Velcro strips for wearable pieces
- Plain clothing in character colors, such as teal, blue, black, green, or gray
- Reflective tape or glow sticks for trick-or-treat visibility
One important note: comfort matters. A Minecraft costume should look blocky, but it should not feel like being trapped inside a cardboard vending machine. Always test the costume while walking, turning, sitting, and looking around. Eye holes should be wide enough to see clearly, arm openings should allow movement, and the bottom of the costume should not drag near the feet.
Way 1: Make a Classic Steve or Alex Cardboard Costume
If you want the most recognizable Minecraft costume, start with Steve or Alex. These default player characters are simple, colorful, and instantly familiar. Steve usually has a square brown-haired head, turquoise shirt, blue pants, and blocky arms. Alex has orange hair, a green shirt, brown pants, and a similarly squared-off look. Both are excellent beginner costumes because the body can be made from regular clothes while the head and accessories do the heavy visual lifting.
What You Need
- One cube-shaped cardboard box for the head
- Teal or green shirt, depending on the character
- Blue jeans or brown pants
- Brown, peach, tan, white, and black paper or paint for the face
- Ruler and pencil for creating a pixel grid
- Tape, glue, or adhesive spray
- Optional: cardboard pickaxe, sword, or block prop
Step 1: Choose the Right Head Box
The head is the centerpiece. Choose a cardboard box that is large enough to sit over the wearer’s head without pressing against the face. A cube-shaped box gives the best Minecraft effect. The bottom should be open so the box can slide over the head. If the box is too deep, trim the lower edge so it rests comfortably around the shoulders without wobbling like a confused mailbox.
Mark the wearer’s eye level while the box is on their head. Then remove the box and cut eye holes. Instead of tiny square holes, make the viewing area a bit wider and hide it within the dark pixels of the character’s eyes. This keeps the costume safer while preserving the blocky design.
Step 2: Create a Pixel Grid
Use a ruler to lightly draw a grid on each side of the box. A simple 8-by-8 or 10-by-10 grid works well for most homemade Minecraft heads. The grid helps you place colors in square blocks instead of random blobs. You can paint each square or cut colored paper squares and glue them on.
For Steve, use brown and dark brown pixels for hair, tan and peach for skin, blue or purple for eyes, and darker tones for shadow. For Alex, use orange and reddish-orange pixels for hair, peach for skin, and green for the shirt area if the design continues down the neck. Keep the front face simple and bold. From across a driveway, tiny details disappear faster than diamonds in lava.
Step 3: Add the Shirt, Pants, and Arms
The easiest Steve costume uses a turquoise T-shirt and blue jeans. For Alex, choose a green shirt and brown pants. To make the body more block-like, cut two long rectangular cardboard panels for arms and attach them loosely with elastic or tape loops. Another comfortable option is to decorate shirt sleeves with pixel-colored felt or paper squares.
Do not overbuild the torso unless the wearer is comfortable in box costumes. A full cardboard chest looks great in photos, but it can make stairs, car seats, and snack tables surprisingly dramatic. A square head plus color-matched clothing usually gives enough Minecraft energy without turning basic movement into a boss battle.
Step 4: Make a Pickaxe or Sword Prop
A Minecraft pickaxe is one of the easiest props to make. Draw the pickaxe shape on cardboard, cut two identical pieces, glue them together for strength, and cover the surface with pixel squares. Use gray tones for a stone pickaxe, brown for the handle, or blue shades for a diamond pickaxe. Keep edges rounded and lightweight, especially for kids. The goal is “adorable miner,” not “cardboard jousting tournament.”
Way 2: Make a Creeper or Enderman Mob Costume
For anyone who wants a Minecraft costume with extra personality, mobs are the way to go. Creepers and Endermen are two of the most popular choices because their silhouettes are simple and their faces are unmistakable. Creepers are green, pixelated, and famous for appearing at exactly the wrong moment. Endermen are tall, black, mysterious, and have glowing purple eyes. Both can be made with cardboard, fabric, or plain clothing.
Creeper Costume Materials
- Green hoodie, sweatshirt, or long-sleeve shirt
- Green pants or leggings
- Cardboard box for the head
- Green, dark green, lime, gray-green, and black paper or paint
- Black felt or paper for the Creeper face
- Optional: rectangular cardboard body panel
How to Make a Creeper Head
Start with a square cardboard box. Cover the box in green pixel squares using paint or paper. The trick is to use several greens, not just one. Minecraft textures work because they have variation. Mix lime green, forest green, olive, and gray-green squares. The result should look like digital camouflage, except friendlier and less likely to explode.
For the face, cut black squares and rectangles for the Creeper’s eyes and mouth. The classic Creeper face has two square eyes and a long, blocky frown shape. Place the eye holes where the wearer can actually see, then blend them into the black eye design. If the costume is for nighttime trick-or-treating, add reflective tape to the back or sides of the outfit. Creepers are supposed to surprise players, but not drivers.
How to Build a Creeper Body
A simple Creeper body can be made with green clothing and a box head. For a more dramatic version, use a rectangular cardboard box as the torso. Cut armholes and a head opening, then paint it with the same green pixel pattern. Make sure the torso box is short enough for walking. If the wearer cannot bend or sit, the costume may look amazing for three minutes and become a cardboard prison by minute four.
Enderman Costume Materials
- Black hoodie or black long-sleeve shirt
- Black pants
- Black cardboard box or foam board for the head
- Purple paper, glow sticks, or battery-powered mini lights for the eyes
- Optional: long black cardboard arm extensions
How to Make an Enderman Costume
The Enderman costume is wonderfully simple because most of the outfit is black. Use black pants and a black hoodie as the base. Make a square black head from a cardboard box, then create two purple rectangular eyes. For a glowing effect, tape purple tissue paper or translucent plastic over the eye shapes and place small battery-powered lights inside the box. Keep the lights away from hair and skin, and make sure the box has ventilation.
Endermen are tall and thin, so arm extensions can help. Cut two long black cardboard rectangles and attach them loosely to the sleeves, or sew/clip black fabric tubes to the arms. Keep the extensions flexible and short enough that they do not trip the wearer or knock over every candy bowl in a five-foot radius. For extra personality, carry a lightweight grass block prop made from a small box painted brown and green.
Way 3: Make Pixel Armor and Accessories
The third method is perfect if you want a Minecraft costume that is easier to wear for a long time. Instead of building a full cardboard body, create pixel armor pieces and accessories that attach to normal clothing. This can represent diamond armor, iron armor, Netherite armor, a villager-inspired outfit, or a custom player skin. It is also a great option for school events where bulky costumes may not fit at desks or in hallways.
What You Need
- Foam board, craft foam, felt, or cardboard
- Plain shirt and pants in a base color
- Paint or colored felt for pixel squares
- Elastic straps, Velcro, or ribbon
- Cardboard for tools, blocks, or armor plates
- Optional: printable Minecraft-style texture patterns
Step 1: Pick an Armor Type
Diamond armor is popular because the bright blue color stands out. Iron armor uses gray and white tones. Gold armor uses yellow and orange. Netherite armor uses dark gray, black, and purple-gray shades. Choose one color family and create square patches in different shades. This gives the costume depth while keeping the pixel look.
You do not need to cover the entire body. A chest plate, shoulder pads, wrist cuffs, and a helmet-style headband can be enough. Think of it as the “comfortable convention floor” version of a Minecraft costume. You still look like you belong in the Overworld, but you can eat pizza without removing half a cardboard fortress.
Step 2: Make a Chest Plate
Cut a front chest panel from foam board or cardboard. Round the corners slightly for comfort while keeping the overall square shape. Paint or glue pixel squares across the surface. Punch holes near the top and sides, then thread elastic or ribbon through them so the panel can be worn like a sandwich board. Add a back panel if desired, but keep it lightweight.
If the wearer is active, use felt instead of cardboard. Felt armor can be attached to a hoodie or shirt with fabric glue, safety pins, or Velcro. It moves better and is less likely to crumple when sitting. The trade-off is that it looks softer, but that can be a smart choice for younger kids or long events.
Step 3: Add Helmet, Boots, and Gloves
A full cube head is not always necessary. You can make a pixel helmet using a headband, cap, or hood decorated with square patches. For boots, add colored felt or paper panels to old shoe covers, rain boots, or the lower legs of pants. For gloves, use plain gloves and attach small pixel squares to the back of the hand.
Keep hands functional. Trick-or-treaters need to hold bags, open doors, and defend their candy from suspicious siblings. Avoid bulky cardboard hands unless the costume is mainly for photos.
Step 4: Customize a Player Skin
One of the best things about Minecraft is customization. If the wearer has a favorite in-game skin, copy its main colors and patterns. You do not need every pixel. Focus on the hair color, shirt design, face details, and one signature accessory. A red hoodie, blue hair pixels, and a cardboard sword can be enough to suggest a custom character.
Design Tips for a Better Minecraft Costume
Use Squares Consistently
The fastest way to make a Minecraft costume look polished is to keep the pixel squares consistent. Choose one square size, such as one inch or two inches, and repeat it across the costume. Even when colors vary, the repeated grid makes the design feel intentional.
Layer Similar Colors
Minecraft textures rarely use one flat color. Grass has multiple greens. Wood has browns and tans. Stone has grays. Skin tones, hair, armor, and clothing all benefit from slight color changes. Use three to five shades in the same family for a more authentic look.
Keep It Lightweight
A costume that looks good but weighs too much will not last. Cardboard is usually light, but too many layers of tape, glue, and paint can add weight. Foam board is cleaner but can crack. Felt is flexible but less boxy. Choose materials based on where the costume will be worn and how long it needs to survive.
Plan for Weather
If the costume is for Halloween, think about temperature and rain. Cardboard dislikes rain with the passion of an Enderman near water. Seal painted pieces with clear tape or a light protective spray, or keep a poncho nearby. For cold weather, design the costume to fit over a hoodie or jacket.
Safety Tips Before Wearing the Costume
A homemade Minecraft costume should be fun, comfortable, and safe. Test visibility before going outside. If a box head blocks side vision, enlarge the eye openings or use face paint instead. Add reflective tape to darker costumes, especially Enderman outfits. Use comfortable shoes, keep hems above the ankles, and avoid long props that could poke people or catch on decorations.
For younger makers, adults should handle craft knives, hot glue guns, and spray paint. Use non-toxic paints whenever possible, and let painted pieces dry fully before wearing. If lights are added inside a box head, use battery-powered lights only, secure the battery pack, and leave space for airflow.
Budget-Friendly Minecraft Costume Ideas
A Minecraft costume does not need to be expensive. Many supplies may already be hiding in closets, recycling bins, or that mysterious drawer full of tape, markers, and batteries from 2017. A basic Steve costume can be made with jeans, a turquoise shirt, and a decorated box head. A Creeper costume can start with green pajamas or sweats. An Enderman costume may only require black clothing and purple eyes.
To save money, reuse cardboard shipping boxes, cereal boxes for smaller panels, and leftover craft paint. Instead of printing full textures, print only the face details and paint the rest. If you are making costumes for a group, assign each person a different character or mob and share materials. A family can go as Steve, Alex, Creeper, Skeleton, and a grass block, which is both adorable and slightly chaotic in the best possible way.
Common Mistakes to Avoid
Making the Head Too Small
A tight box head can become uncomfortable quickly. Leave space around the face and make sure the box can be removed easily. The wearer should be able to breathe, see, and speak without sounding like they are trapped inside a shipping department.
Using Only One Color
Flat green does not scream “Creeper.” It whispers “broccoli.” Add several shades of green in square patches to create the pixel effect. The same rule applies to hair, armor, stone, wood, and tools.
Ignoring Mobility
Big boxes look great in photos, but costumes need to move. Test stairs, doorways, sitting, and arm movement. If the wearer cannot pick up a treat bag, wave, or turn their head, simplify the costume.
Waiting Until the Last Minute
Yes, Minecraft costumes are beginner-friendly. No, that does not mean paint dries faster because you are emotionally motivated. Start at least a day early if painting is involved. Your future self will thank you, probably while not holding a wet cardboard head in front of a fan at midnight.
Experience Notes: What Actually Helps When Making a Minecraft Costume
After making or helping with Minecraft-style costumes, one lesson becomes clear very quickly: the best costume is not always the most complicated one. The costume that wins the night is the one the wearer can keep on without complaining every seven seconds. A perfectly painted cube head is impressive, but if it slides forward, blocks vision, or turns the wearer into a sweaty little furnace, it will spend most of the evening under someone’s arm like a defeated cardboard trophy.
The first practical experience tip is to build the head around comfort before decoration. Put the box on the wearer, mark the eye level carefully, and check how the box rests on the shoulders. Some makers add a baseball cap or foam padding inside the box to stabilize it. This can work well, but do not overpack the inside. A little padding keeps the head from wobbling; too much padding makes it feel like wearing a couch cushion inside a moving cube.
The second tip is to use paper squares when you want clean pixels and paint when you want speed. Paper squares create crisp edges and are great for faces, tools, and armor details. Paint is faster for covering large areas, especially Creeper bodies and cardboard torsos. A hybrid approach works beautifully: paint the base color first, then glue paper squares on top for highlights, shadows, and facial features. This makes the costume look detailed without requiring you to paint 300 tiny squares while questioning your life choices.
The third tip is to photograph the costume during the process. A quick phone photo shows whether the design reads correctly from a distance. Up close, every pixel feels important. From ten feet away, only the big shapes matter. If the Creeper face looks too small in a photo, enlarge it. If Steve’s hairline is hard to see, darken the top pixels. If the diamond sword looks more like a frozen spatula, add a stronger outline.
The fourth tip is to plan the costume around the event. For trick-or-treating, comfort, visibility, and weather protection matter most. For a school party, avoid bulky arms and props that make sitting difficult. For a gaming convention or photo shoot, you can go bigger with armor, blocks, and accessories. One costume does not have to do everything. A lightweight version often gets more compliments because the wearer is relaxed, smiling, and not slowly being consumed by cardboard architecture.
The fifth tip is to let imperfections stay. Minecraft is made of pixels, not porcelain. A homemade costume should feel handmade in the best way: creative, recognizable, and full of personality. Slightly uneven squares can look like texture. A patched corner can become “battle damage.” A repainted section can become shadow. The goal is not museum-level precision. The goal is to make something fun that causes people to say, “That is definitely Minecraft,” followed by, “Did you make that?” which is the DIY costume version of finding diamonds.
Finally, involve the wearer in the choices. Let them pick Steve, Alex, Creeper, Enderman, diamond armor, or a custom skin. Let them choose whether the sword is wood, stone, iron, or diamond. Let them place a few pixels, even if one square ends up wildly dramatic. Costumes are more memorable when the person wearing them feels ownership. A Minecraft costume is not just a Halloween outfit; it is a tiny build project in real life. And unlike in the game, nobody has to punch a tree to start.
Conclusion
Making a Minecraft costume is one of the most approachable DIY costume projects because the design is already built for simple shapes. With cardboard, paint, colored paper, foam, felt, and a little planning, you can create a classic Steve or Alex costume, a spooky Creeper or Enderman outfit, or comfortable pixel armor that works for Halloween, cosplay, school events, and themed parties.
The secret is to focus on the details that matter most: square shapes, pixel-style color blocks, recognizable faces, lightweight materials, and safe movement. Start with a strong base outfit, add one or two standout pieces, and keep comfort at the center of the build. Whether your final costume looks polished, silly, or proudly homemade, it belongs perfectly in the Minecraft universe. After all, this is a world where dirt blocks are valuable, pigs are transportation-adjacent, and a cardboard box can become a legendary helmet.
Note: This article is written for web publication and is based on practical DIY costume methods, official Minecraft character concepts, common cardboard costume techniques, and widely recommended Halloween safety practices. Minecraft is a trademark of its respective owners; this guide is an independent DIY article.













