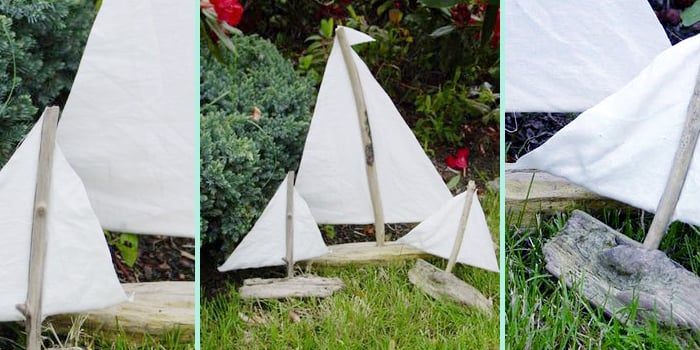
A weathered piece of wood may not look like much while it is resting between shells and seaweed. Give it a mast, a handmade sail, and a little creative rigging, however, and it becomes a miniature vessel that appears ready to chase the horizon. The Smooth Sailing, Driftwood Sail Boat Project turns naturally shaped wood into relaxed coastal decor using simple tools, inexpensive materials, and just enough nautical detail to make the finished piece convincing.
This project works for beach-house decorating, summer craft sessions, handmade gifts, wedding centerpieces, mantel displays, and anyone who has ever looked at a crooked stick and thought, “Clearly, that is a boat.” The irregularities are not flaws to hide. Knots, cracks, pale grain, old bark, and wave-smoothed edges are what give a DIY driftwood sailboat its character.
Why a Driftwood Sailboat Makes Such Appealing Coastal Decor
Driftwood has already received a finish that no hardware-store product can duplicate: years of water, sand, sunlight, and weather. Its muted gray, tan, cream, and silver tones fit naturally with nautical interiors, modern organic rooms, rustic cabins, and minimalist spaces. One boat can sit quietly on a bookshelf, while a group of different sizes can create an entire tabletop fleet.
The project is also highly adaptable. A clean white sail produces a breezy New England look. Faded stripes suggest an old marina. Linen and jute create a rustic farmhouse mood, while painted geometric sails can make the boat feel contemporary. You can make the design as polished or as cheerfully homemade as you like. Driftwood is not known for obeying rulers, so perfection has already been excused from the meeting.
A Useful Project for Leftover Materials
Most of the components can come from supplies already hiding in a craft drawer: cotton scraps, bamboo skewers, twine, beads, thin dowels, cardstock, and small pieces of wire. Because every hull is different, there is no single required template. The wood itself determines the scale and personality of the boat.
Materials and Tools
For a medium-size decorative sailboat with a hull approximately 12 to 18 inches long, gather the following materials:
- One dry, solid piece of legally collected or purchased driftwood
- A straight wooden dowel, bamboo skewer, or slender branch for the mast
- An optional shorter dowel for the boom
- Cotton, linen, canvas, burlap, decorative paper, or lightweight cardstock for the sail
- Strong wood glue or two-part epoxy suitable for the materials being joined
- Cotton cord, waxed thread, fishing line, or thin jute twine
- Fine- and medium-grit sandpaper
- A hand drill or power drill with a bit matching the mast diameter
- Scissors, ruler, pencil, clamps, and a small handsaw
- Optional acrylic paint, clear matte finish, eye screws, beads, or a display base
Wear eye protection when drilling or cutting, and control dust while sanding. Work in a ventilated area when applying adhesives, paint, epoxy, or clear finishes. Gloves may be useful while handling chemicals, but they should not be worn around rotating equipment where loose material could catch.
Choosing the Best Driftwood Hull
The ideal hull is stable, reasonably solid, and interesting from several angles. Long, low pieces usually create the most recognizable sailboat silhouette. A naturally curved end can become the bow, while a flatter end can suggest the stern. Set each candidate on a table before making a decision. A beautiful piece that rolls over every three seconds may be better suited to wall art unless you plan to add a base.
Avoid pieces that feel soft, crumbly, damp, oily, or unusually heavy with trapped moisture. Inspect small holes, loose bark, powdery residue, mold, and signs of active insects. Wood with a serious infestation should not be brought indoors. Purchasing cleaned driftwood from a craft supplier is a convenient alternative when local collection is prohibited or when you want material that is already dry.
Collect Responsibly
Rules for removing driftwood vary among beaches, parks, wildlife areas, and public lands. Some locations allow limited personal collection, while others protect all natural objects. Even where collecting is permitted, take only a modest amount and leave large logs, dune-forming material, and pieces being used as shelter by animals. The best souvenir is not worth rearranging an ecosystem.
Preparing Driftwood Before Building
1. Brush Away Loose Material
Use a stiff dry brush to remove sand, dirt, loose fibers, and fragile bark. A small nylon brush can reach into cracks without aggressively changing the surface. Preserve attractive weathering rather than sanding the entire piece into something that looks freshly purchased from the lumber aisle.
2. Wash Only When Necessary
If the wood is salty or dirty, scrub it gently with fresh water and a small amount of mild dish soap. Rinse thoroughly. Avoid saturating wood that is already clean, because every extra drink of water increases drying time.
3. Let the Wood Dry Completely
Place the piece in a warm, shaded, well-ventilated area with air moving around all sides. Drying time may range from several days to several weeks depending on the wood’s thickness, density, and original moisture level. Do not rush into gluing while the center remains damp. Wood changes dimension as it loses moisture, and a mast glued into wet wood may loosen, tilt, or crack later.
4. Sand Selectively
Smooth splinters, sharp corners, the bottom contact points, and the area where the mast will be installed. Begin with medium-grit sandpaper and finish with a finer grit. Leave wave-worn ridges and natural texture elsewhere. The goal is comfortable handling and reliable bonding, not turning the hull into a wooden potato.
Planning the Sailboat Design
Before drilling anything, place the hull on a table and experiment with the mast position. A mast located slightly forward of center often creates a balanced traditional profile. Mark the location lightly in pencil, then hold the dowel in place while viewing the boat from the front and side.
For a 14-inch hull, a mast between 12 and 16 inches tall generally looks proportional. The exact dimensions depend on the hull’s depth and shape. A tall narrow sail feels elegant, while a wider triangular sail gives the piece a playful, classic look.
Create a Paper Sail Template
Cut the first sail from scrap paper rather than expensive fabric. Tape it temporarily to the mast and step back. Check whether the triangle overwhelms the hull, leaves enough open space around the wood, and hangs at a pleasing angle. Trimming paper is considerably less dramatic than discovering that your finished linen sail belongs on a boat twice the size.
How to Make a Driftwood Sailboat Step by Step
Step 1: Stabilize the Hull
Decide whether the boat can stand independently. Small flat spots can be created carefully with sandpaper or a handsaw. If the shape remains unstable, attach it to a narrow reclaimed-wood base using glue, hidden screws, or short dowels. Another option is to cradle the hull between two small blocks that resemble a boatyard stand.
Step 2: Drill the Mast Hole
Secure the driftwood so it cannot rotate. Select a drill bit that creates a snug hole for the mast and place a piece of tape on the bit to mark the desired depth. Drill slowly and as vertically as possible. A depth of approximately 1 to 2 inches is often sufficient for a medium decorative boat, provided the surrounding wood is sound.
Test the dowel without adhesive. Correct the angle now, because glue has a mischievous habit of making every problem permanent.
Step 3: Cut and Fit the Mast
Trim the mast to length and sand both ends. For better adhesion, lightly roughen the section that will sit inside the hull. Clean dust from the hole and dowel. Bonding surfaces should be clean, dry, and slightly abraded where appropriate.
Apply the selected adhesive according to its instructions, insert the mast, and confirm the alignment from two directions. Use painter’s tape, blocks, or a temporary string support to keep the mast upright while the joint cures. Allow the full recommended curing time rather than testing it every six minutes with an optimistic wiggle.
Step 4: Add an Optional Boom
A horizontal boom gives the sail more structure and makes the model resemble a real sailboat. Cut a shorter dowel and attach it near the lower portion of the mast with glue, twine, or a tiny drilled connection. Keep the joint delicate; a bulky knot can make the miniature boat appear to be transporting a ball of rope.
Step 5: Cut and Finish the Sail
Transfer the paper template to fabric or decorative paper. Fabric sails look best when the edges are hemmed, folded, sealed with fabric medium, or intentionally frayed in a controlled way. Heavy canvas may hold its shape without support, while thin cotton can be stiffened with diluted fabric medium.
Plain sailcloth suits natural driftwood, but subtle embellishments can add personality. Consider faded stripes, a small number, a compass symbol, a monogram, or one hand-painted star. Keep decorations simple enough that the grain and shape of the hull remain important.
Step 6: Attach the Sail
Punch or stitch small attachment points along the mast edge of the sail. Tie it to the mast with short lengths of thread, use tiny metal rings, or glue the folded edge directly around the dowel. If a boom is present, secure the sail’s lower corner to it without pulling the fabric so tightly that the mast bends.
Step 7: Add Simple Rigging
Run thin cord from the mast top to the bow and stern to imitate standing rigging. Small eye screws provide neat anchor points, but cord can also be tied around natural grooves in the driftwood. Keep lines taut enough to look purposeful without placing excessive pressure on the mast joint.
Step 8: Let Everything Cure
Set the boat aside on a level surface until all adhesives, paint, and finishes have fully cured. Temporary supports should remain in place until the bond is ready to hold the mast independently. Patience is cheaper than rebuilding the rig after it leans into the nearest lamp.
Finishing and Display Ideas
Leaving the driftwood unfinished usually preserves the most authentic coastal appearance. If the wood sheds fibers or needs protection, apply a light coat of clear matte water-based finish after testing it on an inconspicuous area. Glossy coatings can make natural driftwood look oddly plastic, so satin or matte finishes are generally more forgiving.
Display the completed wooden sailboat decoration on a mantel, entry table, floating shelf, or stack of travel books. Place it near sea glass, a framed coastal map, rope accents, or a simple ceramic lamp. Avoid surrounding it with every nautical object ever invented; the boat does not require a lighthouse, three anchors, a captain’s bell, and a ceramic pelican to prove it has been near water.
Creative Variations
- Wedding centerpiece: Add a table number to the sail and place the boat on a shallow tray of sand.
- Family keepsake: Use fabric from an old shirt, curtain, or vacation tote as the sail.
- Holiday boat: Make a deep green sail and add a tiny strand of battery-operated lights.
- Modern version: Paint the mast black and use a sail with a bold geometric pattern.
- Miniature fleet: Build three boats in graduated sizes for a coordinated shelf display.
Common Problems and Practical Fixes
The Hull Keeps Tipping
Flatten a hidden contact point, attach a discreet wooden base, or add small supports beneath the hull. Do not solve the problem by making the mast shorter until the boat resembles a piece of driftwood carrying a cocktail umbrella.
The Mast Leans After Gluing
The hole may be too wide or shallow. Remove the mast before the adhesive sets, clean the joint, and use a small wood shim or appropriately thickened adhesive to improve the fit. Brace the mast from two directions during curing.
The Sail Sags
Use heavier fabric, add a boom, apply fabric stiffener, or stitch a thin wire into the outer edge. Slight movement looks natural, but a severely drooping sail suggests the crew has abandoned the voyage for lunch.
The Wood Continues to Crack
The interior may still be adjusting to indoor humidity. Stop construction and let the hull acclimate longer. Small existing checks can contribute to the rustic appearance, but expanding structural cracks may require a different piece of wood.
A Maker’s Experience: Lessons From a Typical First Build
A first driftwood sailboat project usually begins with confidence. The hull already looks like a boat, the dowel looks like a mast, and a triangle is among the less threatening shapes a person can cut. Then the hull rolls onto its side, the mast hole wanders slightly left, and the maker learns that “simple” does not mean “without personality.”
One of the most useful lessons is to let the wood lead the design. A typical beginner may start with a carefully measured plan, only to discover that the driftwood has a knot exactly where the mast was supposed to go. Moving the mast an inch forward often creates a better arrangement than forcing the original plan. Natural materials reward flexibility. They are less interested in blueprints than conventional lumber and considerably more dramatic about it.
Dry fitting also becomes an important habit. Holding the mast, boom, sail, and rigging in place before using glue reveals problems that are difficult to see on paper. A sail that seems modest on the workbench can look enormous once attached. A mast that appears upright from the side may be leaning toward the viewer. Taking a few photographs during the mock-up stage helps because the camera often exposes awkward proportions that the excited eye politely ignores.
The sail is frequently the most satisfying part of the process. Fabric changes the project from an interesting stick arrangement into a recognizable vessel. Linen creates a soft, refined effect, while slightly worn cotton makes the boat feel like a keepsake from an imaginary harbor. Small imperfections in the stitching or painted details generally improve the handmade quality, provided the edges are controlled and the sail is securely attached.
Rigging teaches restraint. It is tempting to add more lines because real sailboats contain plenty of them, but miniature cord quickly becomes visual clutter. Two or three carefully placed lines usually communicate the idea. Every extra knot should earn its passage.
The slowest part of the experience is waiting for adhesive to cure. Makers naturally want to remove supports, attach the sail, and place the boat on a shelf immediately. That impatience is responsible for many leaning masts. A better routine is to assemble the hull and mast at the end of one session, leave them untouched overnight, and complete the sail and rigging later.
The final lesson is that the finished boat does not need to look factory-made. Its charm comes from the contrast between a naturally weathered hull and carefully added details. One side may be smoother than the other. The bow may curve unexpectedly. The mast may follow the wood’s shape rather than standing at a mathematically perfect angle. These features turn an ordinary coastal craft into a one-of-a-kind object with a sense of history.
By the end of a typical build, the maker often begins seeing future boats everywhere: in crooked branches, discarded timber, fabric scraps, and narrow pieces of reclaimed wood. That may be the project’s only serious danger. One decorative sailboat can quietly become a fleet.
Conclusion
The Smooth Sailing, Driftwood Sail Boat Project proves that memorable home decor does not require expensive supplies or advanced woodworking skills. Careful wood selection, complete drying, a securely fitted mast, a well-proportioned sail, and restrained nautical details are enough to transform found or purchased driftwood into a striking handmade display.
Work with the natural curves instead of fighting them, allow adhesives and finishes adequate curing time, and keep the design personal. Whether the finished boat recalls a favorite beach, becomes a thoughtful gift, or simply brings a touch of the coast to an inland room, it carries the relaxed spirit of something shaped by water and given a second journey by hand.