
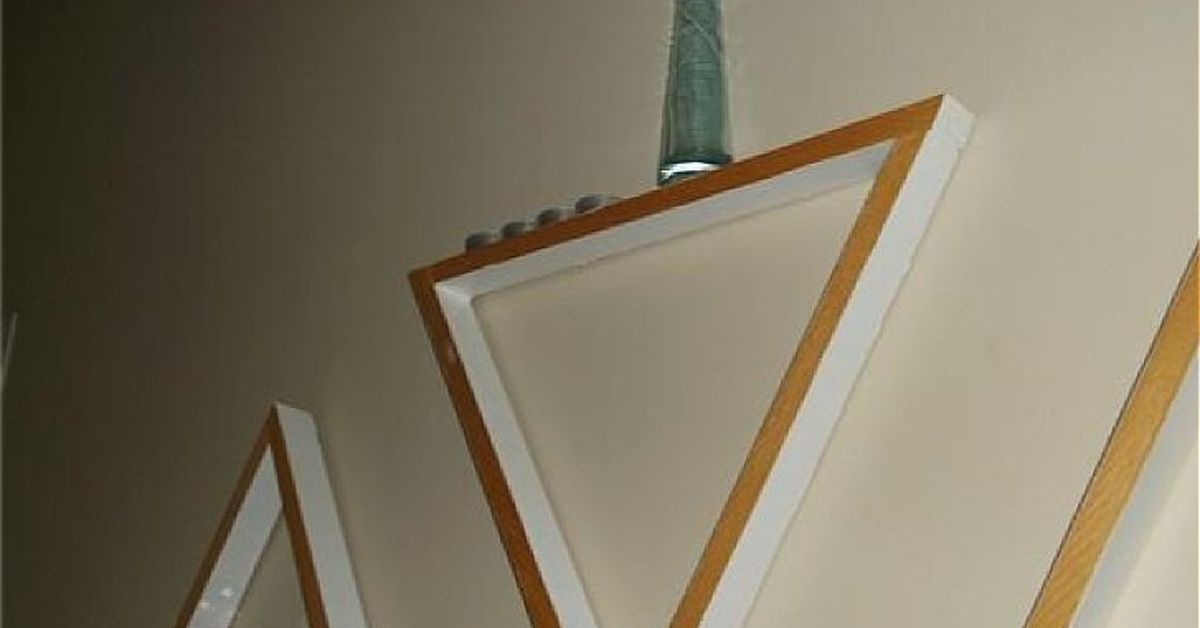
If your wall is looking a little too blank and a little too “I forgot this room existed,” DIY decorative wooden triangle shelves might be exactly the upgrade it needs. These shelves are stylish without trying too hard, geometric without being smug about it, and surprisingly practical for something that looks like modern art learned how to hold a candle. Whether you want a cozy boho vibe, clean Scandinavian lines, or a rustic accent that says “Yes, I own a drill and I’m emotionally attached to it,” triangle shelves are one of the easiest ways to add personality to a wall.
The beauty of decorative wooden triangle shelves is that they combine storage, display, and design in one neat little package. They can hold small plants, framed photos, candles, reed diffusers, tiny books, or those cute objects you bought because they were “so you” and then had nowhere to put. Better still, this is a beginner-friendly woodworking project if you plan carefully, measure twice, and avoid the ancient DIY curse of pretending the level is “close enough.”
In this guide, you’ll learn how to plan, build, finish, and style DIY triangle shelves so they actually look intentional instead of like leftover wood assembled during a caffeine emergency. We’ll cover wood choices, shelf sizing, step-by-step assembly, wall mounting, decorating ideas, and the small mistakes that can turn a simple project into a dramatic monologue in the garage.
Why DIY Decorative Wooden Triangle Shelves Are Worth Making
Triangle shelves work because they do something ordinary square shelves often do not: they create shape and movement on the wall. The angled frame instantly adds visual interest, so even one shelf can act like wall art. A small grouping of two or three can make a bigger design statement than a large rectangular shelf unit, especially in entryways, bedrooms, bathrooms, nurseries, and home offices.
They’re also wonderfully flexible. You can build a single open triangle, an inverted triangle, a triangle with one interior shelf, or a set of three in graduating sizes. You can stain the wood for a natural, warm look, paint it to match a room palette, or use a clear topcoat to show off the grain. Decorative triangle shelves are especially great for small spaces because they bring storage upward instead of outward, and they make corners, narrow walls, and awkward blank spots feel deliberate.
And let’s be honest: geometric shelves just look expensive. People will assume you bought them from a trendy boutique home store where throw pillows cost as much as groceries. You do not need to correct them.
Best Places to Use Triangle Shelves
Living Room
Use one medium shelf to display a trailing plant, a candle, and a framed photo. Use a trio if you want a mini gallery wall with more dimension.
Bedroom
Triangle wall shelves work beautifully above a dresser, beside a bed, or over a reading nook. They add softness when styled with small ceramics, books, and warm-toned decor.
Bathroom
In a bathroom, these shelves are ideal for rolled hand towels, small jars, a diffuser, or a low-maintenance plant. Just make sure you use a moisture-resistant finish.
Nursery or Kids’ Room
They’re perfect for displaying little books, soft decor, name signs, or stuffed animals. Keep heavy items off higher shelves and mount securely.
Entryway or Hallway
If you have a narrow wall near the front door, triangle shelves can turn an otherwise forgotten area into a stylish welcome spot.
Choosing the Right Wood for Triangle Shelves
The best wood for DIY decorative wooden triangle shelves depends on your budget, desired finish, and how much weight the shelves need to hold. For most decorative shelves, you do not need bulky lumber. Lighter materials are easier to cut, assemble, and mount.
Good Wood Options
- Pine: Affordable, easy to cut, easy to stain or paint, and perfect for beginners.
- Oak: Stronger and more durable, with a more pronounced grain if you want a richer, upscale look.
- Maple: Smooth and clean-looking, ideal for modern or minimal shelves.
- Birch plywood: Budget-friendly, stable, and attractive when properly edge-finished.
For decorative wall shelves, 1×2, 1×3, or 1×4 boards are usually enough, depending on the size and visual style you want. If you plan to add an interior shelf, match the material thickness so the whole piece looks intentional. Thick wood can look bold and high-end, but for small decorative shelves, overly chunky boards can make the design feel clumsy. Think elegant triangle, not medieval roof truss.
Tools and Materials You’ll Need
Materials
- Wood boards of your choice
- Wood glue
- Brad nails or wood screws
- Wood filler
- Sandpaper in several grits
- Paint, stain, or clear coat
- Wall anchors or screws for studs
- Hanging hardware, brackets, or a cleat system
Tools
- Tape measure
- Pencil
- Miter saw or miter box
- Drill/driver
- Clamps
- Level
- Stud finder
- Brad nailer or hammer
- Orbital sander or sanding block
If you do not own a miter saw, a basic miter box can still get the job done on a small project like this. It just takes a little more patience and a little less dramatic soundtrack.
How to Plan the Size of Your Triangle Shelf
Before cutting wood, decide what the shelf needs to do. Is it mostly decorative? Will it hold a plant pot? Is it part of a grouped wall arrangement? A small shelf can be around 12 to 16 inches wide. A medium one may be 18 to 24 inches wide. Larger triangle shelves can go beyond that, but once they get much bigger, the mounting and weight support matter more.
A common design uses three equal sides to create an equilateral triangle. That gives a crisp, balanced look. Another popular option is an isosceles triangle with a broader base and a taller point, which can feel more dramatic on the wall. If you want an inner shelf, place it about one-third of the way up from the bottom so it feels visually balanced and useful.
Mock up your shelf shape on paper or with painter’s tape on the wall. This is one of those boring planning steps that feels unnecessary until it saves you from building a shelf that looks much smaller on the wall than it did in your imagination.
Step-by-Step: How to Build DIY Decorative Wooden Triangle Shelves
Step 1: Measure and Mark Your Boards
Measure carefully and mark each cut line clearly. For a clean triangle, your angled cuts matter. Most triangle shelf designs use 30-degree or 60-degree cuts, depending on the orientation and construction method. Use a miter saw set to the correct angle and keep the board flush against the fence while cutting.
Label each piece before assembly so you do not end up playing a very annoying round of “Which side was supposed to go where?”
Step 2: Dry Fit the Pieces
Before adding glue, place the cut pieces together on a flat surface. Check the corners, the overall shape, and whether the shelf sits square and neat. If there are gaps, make tiny adjustments now. This step is the difference between “custom handmade” and “why does this triangle look tired?”
Step 3: Glue and Fasten the Frame
Apply a thin layer of wood glue at each joint. Clamp the pieces together, then secure them with brad nails, finish nails, or carefully driven screws. If you use screws, pre-drill to reduce splitting, especially with hardwood or narrow boards.
Wipe away glue squeeze-out before it dries. Dried glue is the clingy ex of woodworking finishes; it always shows up where it is least welcome.
Step 4: Add an Interior Shelf if Desired
If you want a second ledge inside the triangle, measure the inside width where the shelf will sit and cut that piece carefully. You can keep it straight for contrast or angle the ends so it fits neatly into the shape. Attach it with glue and brad nails or screws from the outside of the frame.
Step 5: Fill Holes and Sand Smooth
Fill nail holes, screw holes, or small gaps with wood filler. Once dry, sand the entire shelf. Start with a coarser grit only if needed, then work through finer grits for a smoother finish. For stained shelves, smooth prep matters a lot because stain loves to highlight every tiny scratch like it’s collecting evidence.
Step 6: Finish the Shelf
You can paint, stain, or clear-coat the wood depending on your style. For a natural look, use a clear water-based finish. For a cozy rustic vibe, choose a medium walnut or weathered oak stain. For a modern room, black, white, sage green, or muted clay paint can look fantastic.
If you stain the shelf, let the wood absorb the color evenly, wipe off excess, then add a protective finish once it is fully dry. If you paint, consider primer first for a cleaner final coat. Between coats of finish, a light sanding can help everything feel silky instead of sticky.
How to Mount Wooden Triangle Shelves Securely
Decorative triangle shelves may look delicate, but their installation should be anything but casual. The safest method is to mount into wall studs whenever possible. Use a stud finder, mark your wall carefully, and use a level so your shelf does not end up displaying everything at a dramatic downhill angle.
Option 1: Hidden Brackets
For a floating look, use small hidden brackets or a backplate-style floating shelf support. This keeps the triangle shelf looking clean and modern.
Option 2: Keyhole Hangers
These are good for lightweight decorative triangle shelves. They sit flush and are easy to conceal.
Option 3: French Cleat
For larger or heavier shelves, a French cleat system is a smart option. It uses two matching beveled strips that lock together and provide excellent support while staying mostly hidden.
Option 4: Decorative Brackets
If you want a farmhouse or industrial style, visible brackets can become part of the design.
If no stud lines up with your planned placement, use high-quality wall anchors rated for the shelf plus everything you intend to put on it. Not just the shelf itself. That cute ceramic planter filled with damp soil counts. So does your tendency to keep adding “just one more little thing.”
Decorating and Styling Your Triangle Shelves
Once the shelf is up, the fun part begins. Decorative wooden triangle shelves look best when they are styled with restraint. This is not the place to put fourteen unrelated mini objects and hope they become a vibe.
Easy Styling Formula
- One vertical item, such as a frame or bud vase
- One organic element, such as a small plant or branch
- One grounding object, such as a candle, bowl, or ceramic piece
- Optional stacked mini books or a small decorative box
Stick with a loose color palette so the shelf looks curated. Natural wood pairs beautifully with white ceramics, black accents, greenery, woven textures, and warm metals. If you hang multiple triangle shelves together, vary the styling a little so they feel connected but not identical.
Small potted plants, framed quotes, handmade pottery, travel keepsakes, and neatly stacked books all work especially well. Grouping similar materials or tones helps open shelves look polished rather than chaotic.
Common Mistakes to Avoid
Ignoring Wall Support
A triangle shelf is only as reliable as the hardware holding it. Decorative does not mean weightless.
Skipping the Dry Fit
Angles are unforgiving. Test everything before glue.
Rushing the Sanding
Even a beautiful design can look cheap if the surface feels rough or the finish is blotchy.
Using Too Many Decorations
Open shelving needs breathing room. Let the triangle shape be part of the visual impact.
Choosing the Wrong Scale
A tiny shelf on a huge blank wall can look lost. A giant one in a narrow hallway can look like it is trying to escape.
Creative Design Variations
If you want to personalize your project, here are a few easy ideas:
- Double triangle shelf: Layer a smaller triangle inside a larger one for a sculptural look.
- Painted interior: Stain the outside frame and paint the inside shelf a contrasting color.
- Burned wood finish: Create a rustic charred effect, then seal it properly.
- Mixed materials: Combine wood with metal brackets or leather hanging straps.
- Set of three: Make small, medium, and large shelves for a staggered wall display.
Triangle shelves also work beautifully as seasonal decor pieces. In spring, style them with greenery and soft ceramics. In fall, add warm woods, dried stems, and amber glass. Around the holidays, they can hold mini trees, ornaments, or cozy candles without making your entire wall look like it has entered a craft fair.
Final Thoughts
DIY decorative wooden triangle shelves hit a sweet spot that every home project dreams of reaching: useful, affordable, stylish, and satisfying to build. They are simple enough for a confident beginner, customizable enough for experienced DIYers, and attractive enough to make a blank wall look finished without a full room makeover.
The key is to treat them like both furniture and decor. Build them carefully, finish them patiently, mount them securely, and style them lightly. Do that, and you’ll end up with shelves that look intentional, modern, and personal. Also, every time someone asks where you bought them, you get to casually say, “Oh, I made those,” which is one of the most underrated luxuries in home design.
Experiences and Lessons From Making DIY Decorative Wooden Triangle Shelves
One of the most interesting things about building triangle shelves is how quickly the project teaches patience. On paper, it looks almost suspiciously simple. Three boards, a few angled cuts, some glue, a finish, done. In reality, the shelf tends to reveal your habits. If you measure carefully, it rewards you. If you rush, it remembers. A triangle is not especially forgiving; it has a way of turning a tiny error into a visible gap that seems to whisper, “You thought no one would notice?”
Many DIYers discover that the first shelf is really the practice shelf. The second one is where confidence shows up. By then, you know how important it is to keep each cut consistent, how useful a dry fit can be, and how much better the whole project looks when you sand just a little longer than you wanted to. That extra ten minutes of sanding can be the difference between a shelf that looks homemade in the best sense and one that looks homemade in the “bless your heart” sense.
There is also something unexpectedly satisfying about choosing the wood finish. A natural clear coat makes the shelf feel airy and modern. A darker stain gives it warmth and weight. Paint can make the shape feel playful or architectural. It is one of those rare projects where the same build can look Scandinavian, farmhouse, boho, rustic, or contemporary depending on the finish and the objects you place on it. That flexibility is part of the reason triangle shelves stay popular: they are not just storage, they are mood management for your wall.
Another common experience is realizing that styling the shelf is almost as important as building it. People often finish the project, hang it up, and then overload it with tiny decor pieces until the triangle shape disappears. The best-looking shelves usually hold fewer items than expected. A small plant, a framed photo, and a candle often look better than a crowded collection of mini objects competing for attention. The shelf should support the decor, not vanish behind it.
Perhaps the best part of making decorative wooden triangle shelves is the way they change a room without demanding a huge budget or a whole weekend of chaos. You can build one in an afternoon, hang it the next day, and instantly make a plain wall feel considered. It is a small project, but it creates that deeply satisfying moment every DIYer loves: stepping back, looking at the finished piece, and thinking, “Well, that wall used to be boring, and now it has personality.” That is a pretty good return for a few boards, a little patience, and the willingness to trust your measuring tape more than your optimism.













