
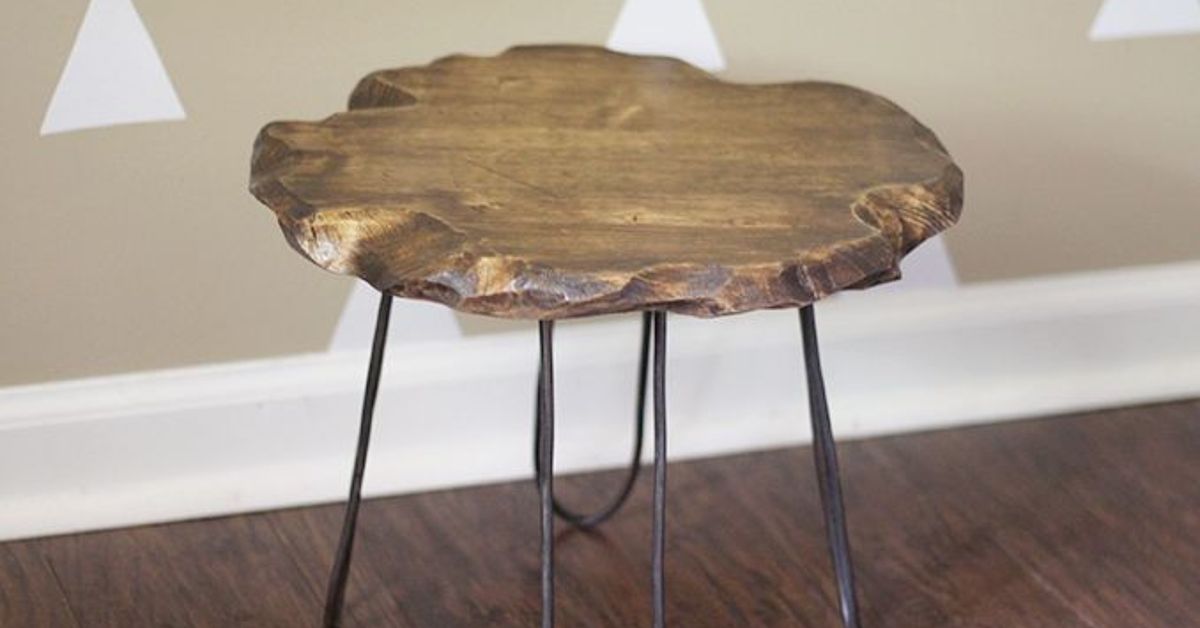
A small rustic stool is one of those magical DIY projects that looks far more expensive than it is. It can hold a plant, lift a stack of books, support a small basket in an entryway, or act as the charming little sidekick your reading chair never knew it needed. Add hairpin-style legs, and suddenly a simple wood round becomes a rustic-meets-modern accent piece with the confidence of designer furniture and the budget of a very determined weekend crafter.
The best part? You do not need to weld anything. No sparks. No helmet. No dramatic garage scene where your neighbors wonder whether you are building furniture or launching a rocket. This project uses easy-to-find materials, basic tools, and a smart no-weld method for creating the look of hairpin legs without needing metal fabrication skills.
In this guide, you will learn how to make a small rustic stool with DIY hairpin style legs, how to choose the right wood top, how to create a weathered finish, how to attach the legs securely, and how to avoid the little mistakes that turn a cute stool into a wobbly woodland creature. This is a beginner-friendly DIY furniture project, but it still has enough detail to satisfy makers who love clean measurements, good finishing, and a finished piece that does not scream, “I was assembled during a snack break.”
Why Make a Small Rustic Stool With Hairpin Style Legs?
A rustic stool with hairpin style legs works because it blends two design personalities that should not get along, but somehow do. The wood top brings warmth, texture, knots, grain, and natural character. The slender legs add a modern, airy shape inspired by classic mid-century furniture. Together, they create a piece that feels casual, stylish, and useful without taking over the room.
Small stools are also wonderfully practical. Use one as a plant stand near a sunny window, a mini side table beside a sofa, a bathroom stool for rolled towels, or a decorative riser on a covered porch. Because the stool is compact, it is a perfect project for scrap wood, leftover stain, and hardware-store creativity.
The no-welding approach makes the project much more approachable. Traditional metal hairpin legs are made from steel rods bent into a U or V shape and attached to a mounting plate. For this DIY version, you can either buy ready-made hairpin legs with predrilled plates or create a hairpin-style look using bendable copper tubing, steel rod, or similar material secured with mounting straps. The second option gives you a handmade, rustic appearance and keeps the project inexpensive.
What This Stool Is Best Used For
Before the sawdust starts flying, let’s be clear about function. A small rustic stool made with light DIY hairpin-style legs is best used as a decorative stool, plant stand, low display table, or small accent piece. If you plan to sit on it regularly, use professionally manufactured hairpin legs that are rated for seating, choose strong fasteners, and test the build carefully.
If you are making the legs from soft copper tubing or other bendable material, treat the finished piece as a decorative stand rather than a weight-bearing chair. It may look like a stool, but it should not be asked to perform like a gym bench. Furniture has feelings too, probably.
Materials You Will Need
One reason this DIY stool is so appealing is that the materials list is short. You can customize the size, height, finish, and color, but the basic build stays simple.
Recommended Materials
- One round wood board, wood slice, or edge-glued wood panel, about 12 to 16 inches wide
- Bendable copper refrigeration coil, steel rod, or purchased hairpin legs
- Pipe cutter or metal-cutting tool if using tubing
- Measuring tape and pencil
- Pliers for bending leg ends
- Galvanized hanger tape, metal straps, or mounting plates
- Wood screws short enough not to pierce through the seat
- Drill and drill bits
- Sandpaper in medium and fine grits
- Wood stain, paint, or oil finish
- Polyurethane, polycrylic, wax, or another clear protective topcoat
- Optional spray paint for the legs
- Optional felt pads or rubber feet
Tool Notes for Beginners
A drill is the most important tool here. You will use it to make pilot holes and drive screws. Pilot holes matter because they help prevent the wood from splitting, especially near the edge of a round top. A sander is helpful, but hand sanding works if you are patient. A pipe cutter makes cleaner cuts than wrestling tubing with random tools from the junk drawer, which is a path many brave DIYers have traveled and regretted.
Choosing the Right Wood Top
The wood top is the star of this project, so choose something with character. A round wood board is easy to find at craft stores, home improvement stores, and online. Edge-glued rounds are smooth and beginner-friendly. A natural wood slice gives a more organic rustic look, especially if it has bark, uneven edges, or visible rings.
For a decorative plant stand, a top between 12 and 16 inches wide works well. For height, many small accent stools land around 10 to 14 inches tall. Keep the proportions balanced. A very tall stool with lightweight DIY legs can become unstable, while a short stool with a wider top tends to feel more grounded.
Thickness also matters. A top around 3/4 inch to 1 inch thick is common for small projects, but thicker wood gives screws more material to grip. If your top is thin, avoid long screws and consider adding a small underside mounting block to strengthen the attachment points.
How to Create a Rustic Edge
Rustic style is not about making something look careless. It is about making it look natural, worn-in, and charming. There is a difference between “beautifully weathered” and “fell out of a shed during a raccoon argument.” The goal is controlled imperfection.
If you are using a plain round board, soften the edges with sandpaper or a sander. You can create a faux live edge by gently shaping the perimeter so it is not perfectly smooth. Vary the pressure and create subtle dips, but do not remove so much material that the stool looks chewed. Sand the top and bottom until they feel smooth to the touch, working from medium grit to fine grit.
For a more aged look, lightly distress the surface with a wire brush, small dents, or uneven sanding. Keep it subtle. A few marks add character; too many marks make the stool look like it lost a fight with a toolbox.
Staining and Sealing the Wood
A warm stain brings out grain and gives the stool its rustic personality. Popular choices include mission oak, walnut, early American, weathered gray, or natural oil finishes. Test the stain on the underside first because wood can be dramatic. One board may turn honey brown, while another may decide it wants to be orange. Wood is an artist, apparently.
Apply stain with a clean rag or brush, let it sit according to the product directions, and wipe away the excess. After it dries, apply a protective finish. A clear coat helps protect the wood from moisture, dirt, plant saucers, and everyday use. For indoor projects, water-based polycrylic stays clearer, while oil-based polyurethane adds warmth and durability. Wax or oil can create a softer, hand-rubbed look, though it may need more maintenance.
If this stool will hold plants, do not skip the topcoat. Water rings are sneaky. Use a saucer under pots and let the finish cure fully before putting anything damp on top.
Making DIY Hairpin Style Legs Without Welding
There are two main no-weld paths for this project. The easiest method is to buy ready-made hairpin legs and screw them to the underside of the wood top. The more handmade method is to create hairpin-style legs from bendable tubing or rod and secure them with hanger tape or mounting plates. Both methods can look great, but they serve slightly different purposes.
Option 1: Use Premade Hairpin Legs
Premade hairpin legs are the strongest and cleanest option. They usually come with mounting plates and screw holes already prepared. To install them, position each leg evenly around the underside of the stool top, mark the holes, drill pilot holes, and attach the legs with screws. This option is best if you want the stool to be more functional and stable.
For a small round top, three legs can work, but four legs often feel more familiar and balanced. Three legs are less likely to wobble on uneven floors, while four legs can look more like a classic stool. Choose based on the design you prefer and the hardware you have.
Option 2: Bend Your Own Hairpin Style Legs
For a handmade rustic version, use soft copper refrigeration coil or another bendable metal material. Cut four equal lengths, then bend each piece into a long U shape. Work slowly so the curve stays smooth. If you bend too sharply, the tubing can kink. A simple bending jig made from scrap wood and rounded forms can help keep all legs consistent.
Once each leg has a hairpin shape, bend the top ends inward or outward to create small tabs for mounting. These tabs can be secured to the underside of the wood with galvanized hanger tape or metal straps. This method gives the look of hairpin legs without welding, but it is best for decorative use rather than heavy seating.
Step-by-Step: How to Build the Stool
Step 1: Plan the Size
Decide how wide and tall you want the stool to be. A 14-inch round top with legs around 10 to 12 inches tall creates a useful small plant stand or accent stool. Mark your target height before cutting or bending any material. This is the stage where measuring twice saves you from inventing new swear words later.
Step 2: Prepare the Wood
Sand the wood top smooth. Shape the edge if you want a rustic or live-edge-inspired look. Remove dust with a tack cloth or slightly damp rag. If the wood has cracks or knots, decide whether to embrace them or fill them. Rustic furniture can celebrate imperfections, but loose bark, splinters, and unstable cracks should be cleaned up.
Step 3: Apply Stain and Finish
Stain the wood before attaching the legs. It is much easier to finish a flat piece of wood than to dance around legs with a brush. Apply your stain, let it dry, and seal it with your chosen topcoat. Lightly sand between coats if the finish instructions recommend it.
Step 4: Create or Prepare the Legs
If using premade legs, unpack them and check that all screws and foot caps are included. If making DIY legs, cut all tubing or rod pieces to equal lengths. Bend them slowly into matching hairpin shapes. Use the first leg as a pattern for the others. Perfect symmetry is not required for rustic charm, but “close enough” should still be close enough.
Step 5: Mark the Attachment Points
Turn the wood top upside down. Place the legs evenly around the underside. Use a measuring tape to keep each leg the same distance from the edge. Mark screw locations with a pencil. On a round top, a simple way to keep placement balanced is to mark a center point first, then position the legs evenly around it.
Step 6: Drill Pilot Holes
Drill pilot holes before adding screws. Use a bit slightly smaller than the screw shaft. Wrap tape around the drill bit as a depth guide so you do not accidentally drill through the top. That tiny piece of tape is the difference between “professional detail” and “surprise hole in the seat.”
Step 7: Attach the Legs
Secure each leg with screws. If using hanger tape, use two small strap pieces per leg to hold the bent metal tabs in place. Tighten screws firmly, but do not overdrive them. Over-tightening can strip the hole or crush softer wood.
Step 8: Test for Stability
Flip the stool upright and place it on a level surface. Press gently on the top and check for wobble. If one leg sits higher, adjust the bend slightly or add felt pads to even it out. For plant stands, make sure the pot sits centered over the legs rather than hanging off one side like it is trying to escape.
Design Ideas and Custom Finishes
This small rustic stool can go in many style directions. For farmhouse decor, use a warm brown stain and black legs. For a modern rustic look, choose a lighter natural wood top and matte black or raw steel legs. For boho style, keep copper legs exposed and pair the stool with a trailing plant. For cabin style, use a darker stain, distressed edges, and a satin finish.
You can also paint the legs. If using metal, clean the surface first, then apply a primer made for metal before adding thin coats of spray paint. Matte black is classic, oil-rubbed bronze feels vintage, and aged copper creates a handmade look. A clear sealer can help protect painted or raw metal from scratches and moisture.
Common Mistakes to Avoid
Using Screws That Are Too Long
Always check screw length against the thickness of the wood top. Screws should hold securely without poking through the surface. A screw tip emerging through your beautifully stained top is not a design feature. It is a tiny metal betrayal.
Skipping Pilot Holes
Pilot holes make assembly cleaner and reduce splitting. They are especially important near edges, in hardwood, and with smaller stool tops where there is less room for error.
Making the Stool Too Tall
Thin hairpin-style legs look best when proportions are balanced. If the top is small and the legs are tall, the stool can feel unstable. Keep DIY decorative versions low and compact.
Expecting Decorative Legs to Hold Heavy Weight
If you bend your own legs from soft tubing, use the piece as a decorative stand. For actual seating, choose load-rated hairpin legs and strong hardware. Safety is always more stylish than collapsing furniture.
Where to Use Your Finished Rustic Stool
A small rustic stool can be used almost anywhere. Place it beside a reading chair for a mug and a paperback. Use it in the bathroom to hold a candle, towel, or small basket. Put it near the front door as a landing spot for keys. Set a fern on it in the living room. Use it in a bedroom as a tiny nightstand if you only need space for a book and a glass of water.
It also works well as a styling riser. Interior designers often use small lifts and stands to create height variation on shelves, mantels, and tabletops. Your DIY stool can do the same job while adding texture and personality.
Real-World Experience: What This Project Teaches You
Making a small rustic stool with DIY hairpin style legs is one of those projects that teaches more than it promises. On paper, it sounds simple: sand a top, bend some legs, attach everything, admire your work. In reality, it gives you a crash course in proportion, patience, finishing, and the ancient DIY truth that nothing is truly square unless you personally checked it twice.
The first thing you notice is how much the wood matters. A plain round board can look ordinary at the store, but once you sand the edge, add stain, and seal it, the grain starts showing off. Knots become decorative. Slight unevenness becomes character. Even small dents feel intentional when the finish is right. That is the beauty of rustic DIY furniture: it rewards personality over perfection.
The second lesson is that leg placement makes or breaks the project. Hairpin-style legs are visually light, which is great for design, but they need thoughtful spacing. If they are too close to the center, the stool feels tippy. If they are too close to the edge, screws may split the wood or show from the side. The sweet spot is usually a balanced inset that gives the legs room to support the top while still looking elegant.
Bending your own legs is surprisingly satisfying. The process feels a little like convincing metal to become furniture. Go slowly, use steady pressure, and do not expect all four legs to be identical on the first try. The handmade look is part of the charm. Still, consistency matters. Lay the legs next to each other as you work, compare the curves, and make small adjustments before attaching anything.
Finishing the stool is where the project starts to feel real. A coat of stain can transform the top in minutes, but the clear coat is what makes it feel complete. Rushing the drying time is tempting, especially when the stool is sitting there looking adorable and useful. Resist. A finish that has not cured can stay tacky, pick up dust, or mark easily under a plant pot. Give it time. Your future self, the one not sanding out a weird circular pot ring, will be grateful.
One practical experience worth mentioning: felt pads are tiny heroes. If the stool has the slightest wobble, felt pads can help level it. They also protect floors from metal feet. This is especially useful if you plan to move the stool around for styling, cleaning, or chasing the best sunlight for your houseplants.
The final lesson is confidence. This project proves that DIY furniture does not have to begin with a fully equipped workshop. You can make something attractive and useful with basic tools, thoughtful materials, and a willingness to adjust as you go. The finished stool may be small, but the creative payoff is big. It is the kind of project that makes you look around the house and think, “What else can I put legs on?” Be careful. That is how coffee tables, plant stands, and suspiciously upgraded scrap wood collections are born.
Conclusion
A small rustic stool with DIY hairpin style legs is a fun, affordable, and stylish project for anyone who loves handmade furniture. It combines natural wood, slim modern lines, and no-weld construction into one compact piece that can serve as a plant stand, accent table, display riser, or decorative stool. With careful sanding, smart leg placement, pilot holes, and a protective finish, you can create a piece that looks boutique-worthy without paying boutique prices.
The key is to match the build to the purpose. Use bendable tubing or handmade hairpin-style legs for lightweight decorative use. Choose rated premade hairpin legs if you want a stronger stool for everyday function. Either way, the result is a charming rustic accent that adds warmth, height, and personality to your space.
Note: This project is intended for a small decorative stool, plant stand, or accent piece. For load-bearing seating or step-stool use, choose properly rated legs, stronger mounting hardware, and test the finished piece carefully on a level surface.












