
Note: This article is written as original web-ready content in standard American English. The techniques below are based on real DIY ribbon-bow methods commonly used for Christmas gifts, wreaths, garlands, trees, stair rails, mantels, and front-door decorations.
A Christmas bow is the tiny holiday miracle that makes everything look intentional. A plain wreath suddenly becomes “designer.” A gift wrapped five minutes before guests arrive suddenly looks boutique. A slightly tired garland suddenly says, “Yes, I planned this festive moment in October,” even if you were panic-buying ribbon in the craft aisle with glitter on your sweater.
The good news is that learning how to make a Christmas bow is much easier than it looks. You do not need a professional decorator, a bow-making machine, or the calm personality of a lifestyle influencer. You need ribbon, scissors, floral wire or pipe cleaners, and a willingness to fluff loops until they behave. In this guide, you will learn five different Christmas bow styles: the classic gift bow, the double-loop bow, the fluffy wreath bow, the layered designer bow, and the cascading tree-topper bow.
Each style has its own personality. Some are neat and traditional. Some are big, dramatic, and ready to be seen from the sidewalk. Others are perfect for packages, chairs, garlands, and Christmas trees. Once you understand the basic rhythmloop, pinch, secure, fluffyou can adjust the size, ribbon type, and color palette to match almost any holiday decorating style.
Before You Start: Choose the Right Ribbon
The easiest way to make a Christmas bow look polished is to start with the right ribbon. Wired ribbon is the best choice for most holiday bows because the thin wire along the edges helps the loops hold their shape. It also lets you reshape the bow after storage, shipping, or an unfortunate encounter with a curious cat.
Best Ribbon Types for Christmas Bows
Wired velvet ribbon gives a rich, classic Christmas look. It is perfect for wreaths, mantels, staircases, and front doors. Satin ribbon looks smooth and elegant on gifts, but it can be slippery, so wired satin is easier for beginners. Grosgrain ribbon has a ribbed texture and works well for smaller bows. Burlap or linen ribbon creates a rustic farmhouse style. Metallic mesh ribbon adds sparkle and works beautifully for large tree bows or garland accents.
For gift bows, ribbon that is 1 to 1.5 inches wide is usually enough. For wreaths and garlands, 2.5-inch ribbon is a reliable choice. For oversized tree toppers or dramatic outdoor bows, use ribbon that is 2.5 to 4 inches wide. Wider ribbon creates more visual impact, but it also needs stronger wire, floral wire, or zip ties to stay secure.
Basic Supplies
- Wired ribbon or decorative ribbon
- Sharp scissors
- Floral wire, chenille stems, or pipe cleaners
- Wire cutters, if using floral wire
- Hot glue, optional for attaching bows to décor
- Measuring tape, optional but helpful
Now let’s make some Christmas bows. Put on holiday music if necessary. Cookies are optional, but emotionally recommended.
Style 1: The Classic Christmas Gift Bow
The classic Christmas gift bow is the bow most people imagine when they think of wrapped presents under the tree. It is simple, balanced, and beginner-friendly. This style works best with satin, grosgrain, velvet, or wired ribbon that is not too wide.
Best For
Wrapped gifts, gift bags, small wreaths, candle jars, napkin rings, and holiday baskets.
How to Make It
- Cut a ribbon length of about 24 to 36 inches, depending on the size of the gift.
- Wrap the ribbon around the package and cross the ends at the center.
- Tie a single knot to anchor the ribbon in place.
- Create one loop with the left side of the ribbon.
- Wrap the right side around that loop, then pull it through to form the second loop.
- Adjust both loops until they are even.
- Trim the tails at an angle or cut a small V shape for a fishtail finish.
The secret to a clean classic bow is not pulling it too tight too soon. Tighten the knot first, then gently adjust the loops. If one loop looks like it has given up on Christmas, hold the center knot and tug the opposite tail until the loop becomes smaller and neater.
Pro Tip
For a fuller gift bow, tie a second small bow separately and attach it to the first with wire or double-sided tape. It gives the package more dimension without requiring complicated technique.
Style 2: The Double-Loop Christmas Bow
The double-loop bow is the classic bow’s more glamorous cousin. It has extra loops on each side, which makes it look fuller and more decorative. This is one of the best styles for people who want a fancy Christmas bow without needing advanced craft skills.
Best For
Medium gifts, chair backs, small wreaths, garland corners, lanterns, stockings, and kitchen cabinet decorations.
How to Make It
- Start with about 4 feet of wired ribbon.
- Make one loop on the left side, then pinch the ribbon in the center.
- Make one loop on the right side, keeping it the same size.
- Twist the ribbon at the center so the decorative side faces outward.
- Create a second loop on the left, then a second loop on the right.
- Pinch all layers tightly at the center.
- Wrap floral wire or a pipe cleaner around the center and twist it securely at the back.
- Pull the loops apart and fluff them into a rounded shape.
- Cut the tails to your preferred length.
This bow looks best when the loops are not perfectly stacked. Gently angle the loops upward and outward so the bow has shape. Think of it like styling hair: volume is the goal, but nobody wants a helmet.
Design Ideas
Use red velvet ribbon for a traditional Christmas look, plaid ribbon for farmhouse charm, gold ribbon for elegant holiday décor, or candy-cane striped ribbon for a playful style. A double-loop bow also looks beautiful when attached to the top of a wrapped wine bottle, a homemade cookie tin, or a holiday hostess gift.
Style 3: The Fluffy Christmas Wreath Bow
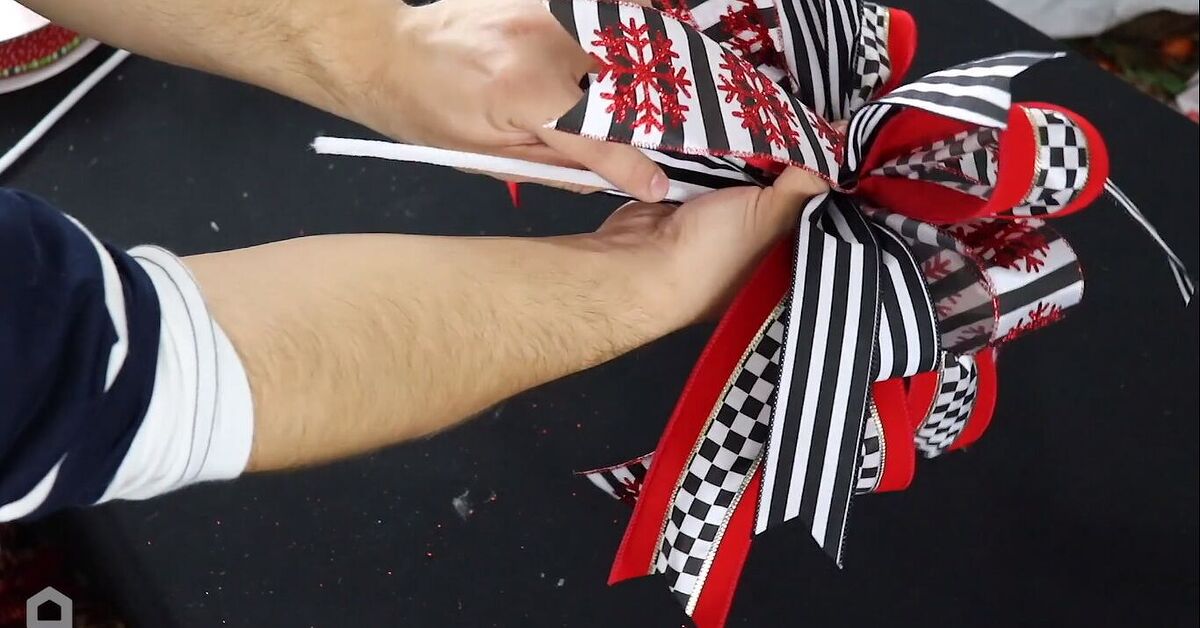
If you want a bow that makes a wreath look expensive, this is the one. The fluffy wreath bow uses multiple loops, wired ribbon, and a strong center tie. It is bold, festive, and very forgiving. If one loop looks odd, fluff it. If the whole bow looks flat, fluff it more. If it still looks questionable, add greenery and pretend it was rustic on purpose.
Best For
Front-door wreaths, fireplace mantels, banisters, mailbox decorations, porch lights, outdoor garlands, and oversized holiday displays.
How to Make It
- Use wired ribbon that is 2.5 inches wide for the easiest shaping.
- Leave a tail of about 10 to 14 inches before making your first loop.
- Create a loop about 5 to 6 inches long and pinch it at the center.
- Twist the ribbon at the pinch point so the front side of the ribbon stays visible.
- Create a matching loop on the opposite side.
- Continue making loops, alternating left and right, until you have 6 to 10 loops total.
- Leave a second tail, then cut the ribbon from the spool.
- Secure the center tightly with floral wire or a chenille stem.
- Spread the loops apart, pulling some forward and some backward for depth.
- Trim the tails with diagonal cuts or swallow-tail cuts.
To attach this Christmas bow to a wreath, use the same wire that holds the center. Thread the wire through the wreath base, twist it at the back, and tuck the ends safely away. If the bow will hang outdoors, avoid relying only on hot glue. Cold weather, moisture, and wind can make glue less dependable. Wire is your holiday insurance policy.
How Big Should a Wreath Bow Be?
For a standard 24-inch wreath, a bow that is 10 to 12 inches wide usually looks balanced. For a smaller 18-inch wreath, aim for 7 to 9 inches wide. For a giant porch wreath, go big14 inches or more. Christmas is not the season for timid bows.
Style 4: The Layered Designer Christmas Bow
The layered designer bow looks like something from a boutique holiday display, but it is basically a clever stack of ribbon loops. The trick is using two or three ribbons with different colors, widths, or textures. For example, combine wide red velvet ribbon with narrow gold ribbon, or layer plaid ribbon with solid green satin.
Best For
Luxury-looking gifts, wreaths, garlands, staircase posts, tree accents, holiday centerpieces, and special event décor.
How to Make It
- Choose one wide base ribbon and one narrower accent ribbon.
- Cut a piece of wide ribbon about twice the finished bow width you want.
- Cut a piece of narrow ribbon the same length.
- Place the narrow ribbon on top of the wide ribbon.
- Form the layered ribbon into a loop, overlapping the ends at the back.
- Flatten the loop so the overlapped ends sit in the center back.
- Pinch the middle to create a bow shape.
- Wrap a short strip of ribbon, wire, or twine around the center.
- Add separate ribbon tails behind the bow if you want a longer, more dramatic finish.
This style is excellent when you want your Christmas decorations to look coordinated. Use the same layered bow on your wreath, tree, and a few special gifts. Suddenly your home has a theme. No one needs to know the theme was “whatever ribbon was on sale.”
Color Combinations That Work
Try red and gold for a traditional holiday look, navy and silver for a winter-night palette, ivory and champagne for soft elegance, plaid and burlap for farmhouse style, or emerald and velvet burgundy for a rich vintage mood. The layered designer bow is also a smart way to use leftover ribbon scraps, as long as the colors look intentional together.
Style 5: The Cascading Christmas Tree Topper Bow
The cascading tree-topper bow is the showstopper. It sits near the top of the Christmas tree and sends long ribbon tails flowing down through the branches. This bow can replace a traditional star or angel, or it can sit beneath one for extra drama. It is especially useful for trees decorated with ribbon garlands, oversized ornaments, or a coordinated color palette.
Best For
Christmas trees, staircase newel posts, large garlands, dramatic wreaths, entryway arrangements, and holiday photo backdrops.
How to Make It
- Use wired ribbon that is at least 2.5 inches wide.
- Create a fluffy wreath-style bow with 8 to 12 loops.
- Secure the center tightly with floral wire, leaving long wire ends for attachment.
- Cut 3 to 5 long ribbon tails, each between 2 and 4 feet long, depending on tree size.
- Fold each tail in half and wire it to the back of the bow at the center.
- Attach the bow near the top of the tree using floral wire.
- Let the tails cascade down the tree, tucking them loosely into branches every 12 to 18 inches.
- Shape the tails into soft waves instead of pulling them straight down.
For a professional look, do not let all the tails fall in one flat sheet. Separate them slightly so they move around the tree. Tuck one tail to the left, one to the right, and one toward the front. Add smaller matching bows throughout the tree if you want a cohesive designer effect.
Tree Topper Bow Sizing
For a 6-foot tree, a bow around 10 inches wide with 2-foot tails is usually enough. For a 7.5-foot tree, aim for a 12- to 14-inch bow with 3-foot tails. For a 9-foot tree, go bigger with 4-foot tails or multiple ribbon streamers. Large trees can handle large bows; small trees may look like they are being attacked by ribbon.
How to Cut Bow Tails Like a Pro
The finish of your ribbon tails can make a big difference. A diagonal cut gives a clean, simple look. A swallow-tail or fishtail cut looks more decorative and is especially popular for wreath bows and gift bows. To make a fishtail cut, fold the ribbon tail in half lengthwise, then cut diagonally upward from the folded edge toward the outside edge. Open the ribbon, and you will have a neat V shape.
Always use sharp scissors. Dull scissors can chew up ribbon edges, especially on satin, velvet, or mesh ribbon. If your ribbon frays easily, you can apply a tiny amount of clear fabric glue to the ends or choose wired ribbon with a finished edge.
Common Christmas Bow Mistakes and How to Fix Them
The Bow Looks Flat
Use wired ribbon and fluff each loop individually. Pull loops in different directions instead of stacking them directly on top of one another. If the center is loose, tighten the wire and reshape the loops.
The Loops Are Uneven
Before securing the center, compare each loop against the first loop you made. If the bow is already tied, gently tug the ribbon through the center until the loops match. Handmade bows do not need to be mathematically perfect, but they should look balanced.
The Ribbon Keeps Twisting
When making looped bows, twist the ribbon at the center after every loop so the decorative side faces outward. This is especially important with one-sided ribbon, printed ribbon, or velvet ribbon.
The Bow Will Not Stay Attached
For wreaths, garlands, and outdoor decorations, use floral wire, pipe cleaners, or zip ties. Hot glue is helpful for light indoor projects, but wire is stronger and easier to reposition.
Where to Use Christmas Bows Around the Home
Christmas bows are not just for gifts. Tie small bows to dining chairs for a festive dinner setting. Add velvet bows to kitchen cabinet handles for a cozy holiday kitchen. Attach oversized bows to lanterns, porch lights, mailbox posts, stair rails, and garlands. Use tiny bows on ornaments, stockings, and napkin rings. A bow can also rescue a plain wreath, hide a gap in garland, or cover the spot where two pieces of ribbon meet.
For a polished home-decor look, repeat the same ribbon in several places. Use one ribbon style for the front-door wreath, another for the tree, and a smaller version for wrapped gifts. Repetition helps holiday décor feel coordinated without making every corner look identical.
Experience Notes: What I Learned From Making Christmas Bows in Real Life
The first lesson of Christmas bow-making is that ribbon has a personality. Some ribbon behaves beautifully. Some ribbon acts like it has been personally offended by your crafting ambitions. Wired velvet ribbon is usually the easiest to shape, but it can be bulky at the center. Satin ribbon looks elegant, but it loves to slip at exactly the wrong moment. Mesh ribbon is dramatic and sparkly, but it sheds glitter like it is trying to mark territory. This is normal. Keep going.
When making bows for gifts, I have found that smaller bows often look better than giant ones. A huge bow on a small box can feel charming, but it can also look like the present is wearing a hat. For gift wrapping, balance matters. If the wrapping paper is busy, choose a simple solid ribbon. If the paper is plain kraft, white, red, or green, use plaid, velvet, metallic, or patterned ribbon to create contrast.
For wreath bows, the biggest improvement comes from making more loops than you think you need. Four loops can look nice, but six to ten loops make the bow look full and intentional. The second improvement is using longer tails. Short tails can make a wreath bow look stiff. Longer tails add movement, especially when you curl or wave them slightly with your hands. Wired ribbon lets you shape those tails so they fall naturally instead of hanging like sad lasagna noodles.
Another useful experience: do not cut ribbon from the spool too early when making a large looped bow. Beginners often cut a piece, start making loops, and then discover they needed another foot of ribbon. Keeping the ribbon attached to the spool until the loops are finished gives you more control and less waste. Once the bow looks full enough, then cut the final tail.
For outdoor bows, durability matters more than perfection. Use wired ribbon that can handle moisture better, secure the center with floral wire, and attach the bow firmly to the wreath or railing. If your front door gets direct rain or snow, avoid delicate paper ribbon or untreated fabric ribbon. Also, darker red ribbon may fade in strong sun over the season, so choose quality ribbon if the bow will be displayed outside for several weeks.
Storage is another detail people forget. Do not crush handmade bows into a crowded ornament bin and expect them to emerge looking cheerful next year. Store large bows in a separate box, loosely packed with tissue paper. If they are made with wired ribbon, you can usually reshape them the next season. If they are made with non-wired satin, you may need to steam them lightly or retire them gracefully.
The best part of making Christmas bows is that small imperfections rarely matter once the bow is in place. On a wreath, surrounded by greenery, berries, pinecones, bells, and lights, no one will notice that one loop is half an inch larger. On a gift, people see the whole presentation, not the exact geometry of the knot. Handmade bows have warmth. They look personal. They say, “I cared enough to add something extra,” even if the process involved scissors, coffee, and muttering.
After practicing these five styles, you can mix them freely. Use a classic bow for small gifts, a double-loop bow for cabinet doors, a fluffy bow for the wreath, a layered bow for special packages, and a cascading bow for the tree. Once you learn the basic technique, every ribbon spool becomes a possibility. That is both festive and slightly dangerous for your craft budget.
Conclusion
Learning how to make a Christmas bow in different styles gives you an easy way to personalize your holiday décor without spending a fortune. A classic gift bow adds charm to presents. A double-loop bow brings fullness to small decorations. A fluffy wreath bow creates front-door drama. A layered designer bow looks polished and custom. A cascading tree-topper bow turns your Christmas tree into the main character of the room.
The key is choosing the right ribbon, securing the center tightly, shaping each loop, and trimming the tails neatly. Wired ribbon is your best friend, floral wire is your secret weapon, and fluffing is not optional. With a little practice, you can make bows for gifts, wreaths, garlands, trees, chairs, mantels, and mailboxes that look festive, handmade, and wonderfully merry.














