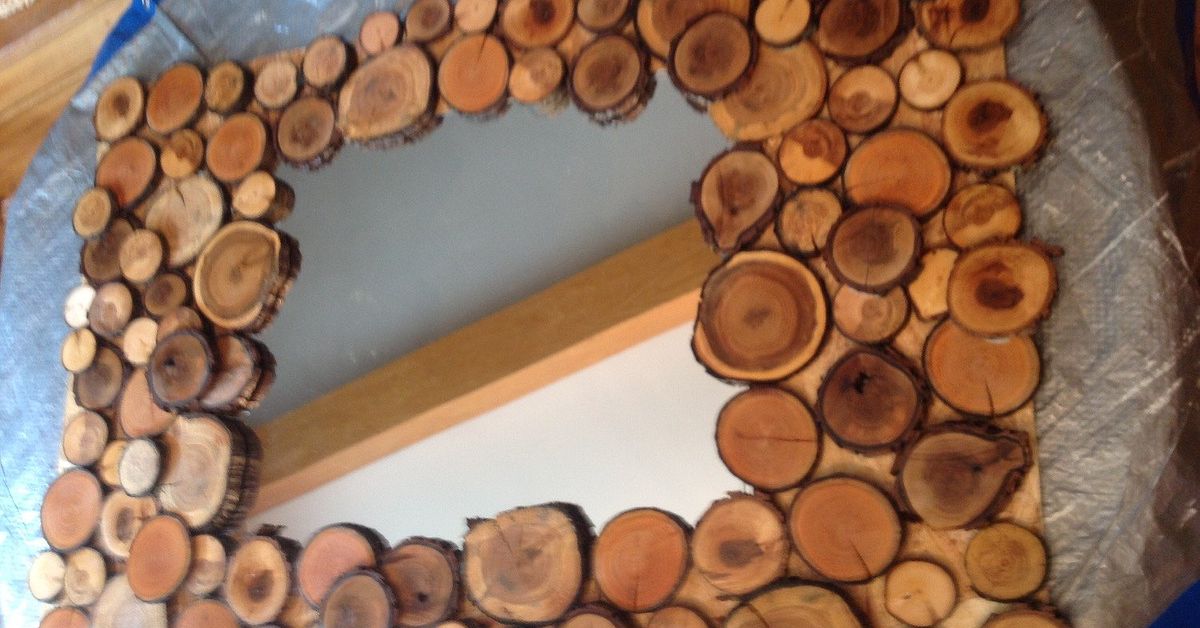
A plain mirror does its job. It reflects your face, tells you when your hair has chosen chaos, and politely hangs on the wall without much personality. Useful? Absolutely. Exciting? Not exactly. That is where a wood slice mirror makeover comes in. By surrounding a boring mirror with wood slices, you can turn a basic reflective surface into warm, textured wall art that looks custom, cozy, and surprisingly expensive for something you made while wearing old sweatpants.
This DIY project works because it combines two things people love in home decor: natural texture and practical function. Mirrors bounce light and make rooms feel bigger. Wood slices add warmth, movement, and a handmade look that feels rustic, organic, farmhouse-inspired, cabin-friendly, and even a little modern when styled the right way. In other words, this is not just a craft. It is a glow-up.
Whether you want to dress up an entryway mirror, create a statement piece for a powder room, or rescue a thrifted mirror from its painfully beige past, this guide will walk you through the process. We will cover what materials work best, how to arrange the slices, what mistakes to avoid, how to finish the wood, and how to make the final result look intentional instead of like your mirror got tackled by a stack of coasters.
Why a Wood Slice Mirror Works So Well
There is a reason natural wood keeps showing up in home decor trends year after year: it softens a space. A mirror already has shine, smoothness, and visual weight. Wood slices bring the opposite. They are imperfect, tactile, and full of grain patterns, rings, knots, and color variations. Put those two materials together and you get balance.
A wood slice mirror also gives you design flexibility. Want a rustic farmhouse look? Use raw slices with bark edges. Prefer something cleaner and more polished? Sand them smooth, stain them evenly, and create a symmetrical border. Want a playful, artsy vibe? Mix slice sizes and let the shape grow like a sunburst. This project can lean earthy, elegant, boho, Scandinavian, or cottagecore depending on the finish and arrangement.
And yes, it is also budget-friendly. Instead of buying an oversized designer mirror with a handcrafted wood frame, you can start with a cheap frameless mirror or a thrift-store find and upgrade it into something that looks far more custom.
What You Need Before You Start
Basic materials
- A plain mirror, framed or frameless
- Wood slices in assorted or matching sizes
- A sturdy backing board if needed
- Mirror-safe adhesive or a strong craft adhesive for decorative outer layers
- Hot glue gun for temporary layout support or lightweight accents
- Sandpaper in medium and fine grits
- Wood stain or clear sealer, optional
- Clamps, painter’s tape, or weights
- Hanging hardware rated for the finished weight
- Measuring tape, pencil, and a clean cloth
The exact adhesive matters more than many DIYers expect. If you are attaching wood around a mirror or to a backing board that supports the mirror, use products designed for the materials involved. A mirror-safe adhesive is important where the glue touches the mirror itself, especially in humid rooms like bathrooms. For decorative pieces applied around the outer edge, many DIYers use strong clear craft or construction adhesives, but the weight of the final project should determine your choice.
Wood slices can be purchased pre-cut from craft stores, home centers, or online sellers. You can also cut your own from branches if they are properly dried, but that route requires patience. Fresh wood can crack, warp, or shed bark later. Pre-cut slices are the safer choice if you want a predictable result and fewer surprises from Mother Nature.
Choosing the Right Mirror and Wood Slices
Best mirror types for this project
Round mirrors are the easiest and often the most beautiful option for a wood slice surround. The curves of the mirror echo the circular slices, so the whole piece feels harmonious. A square or rectangular mirror also works, but it creates a more structured look and may require extra planning at the corners.
If your mirror is already hanging on the wall and you do not want to remove it, you can still create a decorative border around it. Just measure carefully, keep adhesives away from anything not rated for mirror use, and make sure the added material will not interfere with mounting, outlets, or nearby trim.
How to pick wood slices
Uniform slices create a neater, more refined frame. Mixed diameters create a more organic, layered effect. Both are lovely. The real priority is thickness. Try to keep the slices relatively similar in thickness so the finished frame does not look lumpy or feel unstable. If one piece sticks out dramatically farther than the others, your mirror may start to resemble a science fair volcano.
Look for slices that are dry, fairly flat, and free of loose bark if your goal is durability. Bark edges are beautiful, but they can flake over time. If you love that rugged woodland look, seal the slices well after sanding and cleaning them.
How to Surround a Boring Mirror with Wood Slices
Step 1: Plan the design before opening the glue
Lay the mirror flat and arrange your wood slices around it without adhesive first. This dry fit is where the magic happens. Try one clean ring of evenly sized slices for a classic look, or overlap different sizes for a more dramatic frame. Take a photo when you find a layout you like. Future you will be grateful, because once you start gluing, your memory will suddenly become as reliable as a weather app in spring.
Step 2: Prep the wood
Lightly sand the faces and edges of the slices to remove rough spots, splinters, and loose debris. If you plan to stain them, sand in the direction of the grain and wipe away all dust before applying anything. Testing stain on a scrap or the back side of a slice is smart because wood absorbs color unpredictably. Some slices turn rich and warm; others go blotchy and moody like they have artistic grievances.
You can leave the wood natural for a lighter, more casual look. For a deeper tone, use a stain that complements your room. Add a clear protective topcoat if the mirror will live in a bathroom, entryway, or high-touch area.
Step 3: Prep the mirror surface and backing
Make sure the mirror, frame edge, or backing surface is clean and dry. Dust, grease, and moisture can weaken adhesive performance. If you are building the design on a backing board behind the mirror, dry-fit that entire assembly first and verify the hanging hardware can support the total weight.
Step 4: Start gluing from a reference point
Begin at the top, bottom, or centerline of the design and work outward in a balanced pattern. This helps prevent awkward gaps and keeps the frame from drifting off-center. Apply adhesive according to the product instructions, press each slice firmly in place, and use painter’s tape or gentle weights if needed while it sets.
For a fuller look, create two layers: a base ring close to the mirror and a second ring offset behind it. This adds depth and gives the frame a richer, more intentional look. Just remember that extra layers equal extra weight, and extra weight means your hanging plan needs to be smarter than “I think this nail feels strong.”
Step 5: Fill visual gaps, not every tiny space
You do not need to plug every opening between slices. Small gaps can make the design feel natural. If the frame looks too sparse, tuck in smaller slices or half-slices in strategic places. Stand back every few minutes and check the shape from a distance. DIY projects have a sneaky habit of looking symmetrical up close and mildly chaotic from six feet away.
Step 6: Let it cure fully
This is the least glamorous part of the project and one of the most important. Let the adhesive cure fully before moving or hanging the mirror. “It seems dry” and “it is cured” are not the same sentence, even though impatient people keep trying to make them one.
Step 7: Add secure hanging hardware
Once the mirror is finished, weigh it if possible and use hardware rated above that number. D-rings, cleats, or heavy-duty picture hangers are often better choices than basic sawtooth hangers for heavier pieces. If the mirror is substantial, anchor it into studs or use wall anchors designed for the load. A dramatic mirror moment is wonderful. A dramatic crash at 2 a.m. is less charming.
Best Design Ideas for a Wood Slice Mirror
1. Rustic cabin style
Use natural slices with visible bark, warm brown stain, and an intentionally uneven outline. This style works beautifully in entryways, bedrooms, and spaces with woven baskets, linen textiles, and vintage accents.
2. Clean modern organic
Choose slices with minimal bark, sand them smooth, and arrange them in a more controlled ring. Pair the mirror with white walls, black hardware, and simple furniture for a polished but not cold look.
3. Sunburst-inspired statement piece
Use different slice sizes and extend them outward in a radiating pattern. This works especially well with round mirrors and can create a sculptural piece that doubles as wall art.
4. Farmhouse bathroom update
Use medium-toned slices and a slightly tighter layout around a vanity mirror. Keep the palette warm and neutral so the frame feels cozy without overwhelming a small bathroom.
Mistakes to Avoid
- Using wet or green wood: It can crack, shrink, or loosen after installation.
- Skipping the dry layout: This is how you end up with one awkward gap that haunts you forever.
- Ignoring weight: Decorative materials add up quickly, especially with layered wood slices.
- Choosing the wrong adhesive: Not every glue is safe for mirrors or strong enough for wood-to-glass applications.
- Forgetting finish protection: Unsealed wood can stain, collect dust, and react poorly to humidity.
- Overcrowding the design: Sometimes the prettiest frame is the one that knows when to stop.
Where to Use a Wood Slice Mirror
This kind of mirror works especially well in entryways because it adds texture and immediately makes the space feel warmer. It also suits powder rooms, bedrooms, mudrooms, and cozy living rooms. In small spaces, a mirror with a natural wood surround can make the room feel brighter without looking cold or too formal.
If you are styling around the finished piece, keep the supporting decor simple. A plant, a small bench, a ceramic vase, or a woven basket is often enough. Let the mirror be the star. It has earned it.
How to Keep the Finished Mirror Looking Good
Dust the wood frame with a soft dry cloth or microfiber duster. Clean the mirror glass carefully so cleaner does not drip into unfinished wood edges. If the slices are sealed, maintenance gets much easier. For bark-edged pieces, handle gently and avoid excessive moisture. Every few months, inspect the hanging hardware and check that no slices have loosened.
A well-made wood slice mirror should age nicely. Minor changes in tone or texture can even make it look better over time, giving it that collected, lived-with character that mass-produced decor tries very hard to fake.
Real-Life Experiences with a Wood Slice Mirror Makeover
The best part about a project like this is that it changes more than the mirror. It changes how you see the room. A boring mirror tends to disappear into the background, but once you surround it with wood slices, people notice it right away. Guests ask where you bought it. You get to say, very casually, “Oh, I made it,” while trying not to look too pleased with yourself. Internally, of course, you are throwing confetti.
Many people also discover that the project is more relaxing than expected. Arranging wood slices is a little like solving a visual puzzle. You move one piece, then another, then suddenly the pattern clicks. It is creative without being wildly complicated. You do not need advanced carpentry skills, a giant workshop, or the confidence of someone who casually owns seven kinds of saws. You mostly need patience, a flat surface, and the willingness to adjust things until they feel right.
There is also something satisfying about working with natural wood. Every slice is slightly different. One has dramatic rings, another has a knot, another looks smooth and pale, and another seems determined to be the diva of the group. That variation is exactly what gives the mirror its charm. The final piece feels less manufactured and more personal, which is often what people are really craving when they start a DIY home decor project.
Of course, the experience is not always flawless. Some people realize halfway through that they should have bought more slices. Others discover that the perfect layout they created on the floor somehow shifts into a new and mysterious pattern once the gluing starts. And nearly everyone learns that adhesives operate on their own emotional timeline. Still, these small frustrations are part of the story. They make the finished result feel earned.
Another common experience is that the project sparks other updates. Once the mirror looks fantastic, the old lamp nearby suddenly seems suspicious. The plain console table begins to look underdressed. Before you know it, you are fluffing pillows, moving baskets, and wondering whether the hallway deserves a tiny olive tree. A mirror makeover has a sneaky way of starting a whole decor refresh.
There is also a nice emotional layer to projects like this. Taking an ordinary object and making it beautiful can feel surprisingly grounding. You start with something bland and functional, and with a few thoughtful choices, it becomes special. That transformation is rewarding in a practical sense, but it is also a reminder that homes do not become interesting because everything is expensive. They become interesting because someone cared enough to add texture, warmth, humor, and a little imagination.
And yes, the finished wood slice mirror photographs well. Very well. The grain catches light beautifully, the frame creates shadow and depth, and the natural texture gives the whole piece that “designer-but-approachable” look. So if your future includes posting a proud before-and-after online, this project is happy to cooperate. It is not vain. It is just doing what mirrors do.
In the end, surrounding a boring mirror with wood slices is one of those rare DIY projects that feels both creative and useful. You are not just making decor for the sake of decor. You are improving an everyday object, adding character to a room, and creating something that looks custom without requiring a custom-level budget. That is a solid win in any house.
Conclusion
If you have a plain mirror that has been quietly underachieving, this is your sign to upgrade it. A wood slice mirror frame is warm, eye-catching, customizable, and much easier to pull off than it first appears. With a smart layout, the right adhesive, properly prepared wood, and secure hanging hardware, you can turn a forgettable mirror into a statement piece that feels handcrafted and full of personality.
The secret is balancing beauty with practicality. Plan the layout, prep the wood, choose materials carefully, and respect the weight of the final project. Do that, and your once-boring mirror can become one of the most memorable things on the wall. Not bad for a reflective rectangle that used to bring absolutely no drama to the room.