
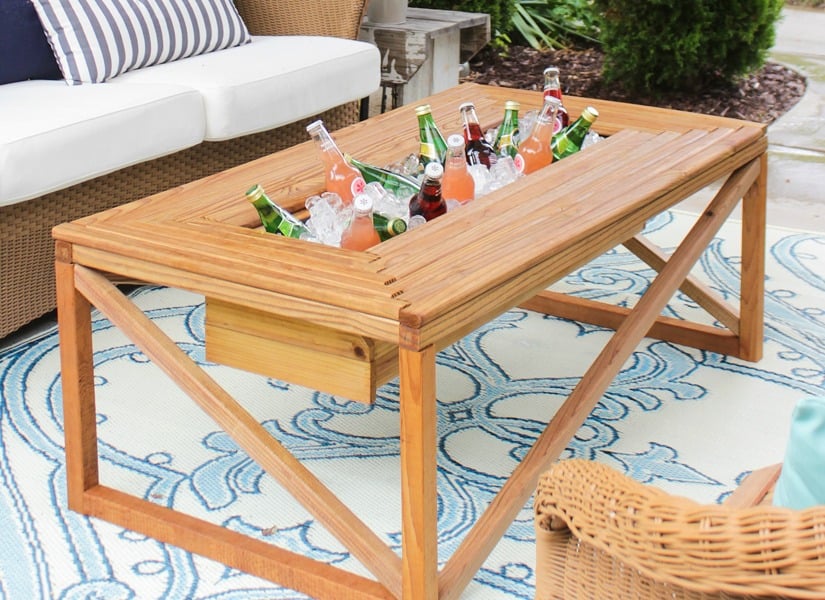
A patio table is already useful. A patio table with a built-in cooler, sink, or ice box is useful with a cape on. It holds drinks, keeps condiments chilled, gives guests a place to gather, and prevents the classic backyard workout: walking inside every six minutes because someone needs another sparkling water, lemonade, or bowl of fruit.
DIY cooler tables have become popular because they solve a real outdoor entertaining problem without requiring a full outdoor kitchen. You do not need a luxury backyard, a contractor, or a mysterious uncle named Gary who owns every tool ever made. With smart planning, weather-resistant materials, and a clear design, you can build a patio cooler table that looks custom, works hard, and earns compliments before the burgers even hit the grill.
This guide breaks down the best DIY cooler table ideas, practical construction tips, material choices, drainage solutions, sink options, and design mistakes to avoid. Whether you want a rustic cedar ice chest table, a modern coffee table with a removable ice bucket, a picnic table with a built-in drink trough, or a rolling serving cart with a sink, the goal is the same: keep the cold stuff cold and the party moving.
Why Build a DIY Cooler Table for the Patio?
The biggest reason is convenience. A built-in cooler table keeps drinks, fruit trays, chilled dips, and condiments within arm’s reach. Instead of crowding a plastic cooler in the corner like it has been banished from polite society, the cooler becomes part of the furniture.
A DIY patio cooler table also gives you design control. Store-bought outdoor cooler tables can be expensive, limited in size, or made from materials that do not match your patio style. Building your own lets you choose the height, wood species, finish, cooler size, tabletop shape, storage shelves, casters, handles, and whether the center insert doubles as a planter when not filled with ice.
Another advantage is flexibility. A removable plastic tub can become an ice box during summer, a herb planter in spring, or a storage bin for napkins and utensils when the weather cools down. A drop-in cooler can be lifted out for cleaning. A built-in sink can connect to a garden hose for quick rinsing. A drain hose or spigot can send melted ice away from the deck instead of creating a tiny backyard swamp.
Best DIY Cooler Table Ideas for Outdoor Entertaining
1. The Classic Patio Table with a Center Ice Trough
This is one of the most practical designs for outdoor dining. The tabletop has a long rectangular opening down the center, fitted with a metal or plastic trough. Fill it with ice and line up drinks, small bowls of fruit, salad toppings, or sealed condiment bottles.
The best version includes a removable lid made from matching boards. When the cooler trough is not in use, the lid drops into place and the table becomes a normal dining surface. This is perfect for homeowners who want function without permanently sacrificing table space.
2. The Coffee Table with a Hidden Ice Bucket
For lounge areas, a lower coffee-table design works beautifully. The cooler can be a 5-gallon bucket, galvanized tub, plastic beverage bin, or small insulated cooler hidden beneath a hinged plank. Guests can lift the lid, grab a cold drink, and return to relaxing without performing the awkward cooler crouch.
This style is ideal for small patios, apartment balconies, and conversation zones around outdoor sofas. It also requires less lumber than a full dining table, making it a friendly weekend project for DIYers who are still building confidence.
3. The Rolling Cooler Cart Table
A rolling cooler cart is half table, half beverage station, and half “why didn’t I build this sooner?” Yes, that is three halves, but outdoor hosting math is generous.
This design usually holds a removable cooler inside a wood frame, with a hinged or sliding top, side handles, a lower shelf, and locking casters. It can be rolled beside the grill, moved near the seating area, or tucked away when not in use. Add a towel bar, bottle opener, utensil hooks, or a paper towel holder, and it becomes a compact outdoor serving center.
4. The Picnic Table with Built-in Coolers
A picnic table with built-in coolers is perfect for families, cookouts, and casual backyard meals. The cooler compartments can sit in the middle of the tabletop or beneath removable planks. Some builders use two separate ice boxes so one side holds drinks and the other holds chilled food items.
This design works best when the frame is strong enough to support the weight of ice, water, and people leaning on the table. Remember: ice is heavier than it looks, and guests will absolutely lean on anything that looks sturdy.
5. The Cooler Table with a Built-in Sink
A built-in sink takes the project from “nice patio table” to “outdoor prep station.” It can be used for rinsing vegetables, washing sticky hands, cleaning small tools, or draining melted ice. A simple outdoor sink can connect to a garden hose with a faucet adapter, while drainage can run through a flexible hose into a bucket, gravel bed, or approved outdoor drain area.
For safety and sanitation, use the outdoor sink for rinsing and light cleanup, not as a replacement for a code-compliant kitchen sink. If the table will be used for food prep, choose a basin that is easy to clean, avoid porous surfaces near food zones, and keep raw meats separate from ready-to-eat foods.
Planning Your DIY Cooler Table Before You Cut Wood
The most successful cooler tables are planned around the insert first. Before buying lumber, choose the cooler, tub, trough, sink, or ice box that will drop into the table. Measure the rim, the body, the depth, and the lid clearance. Then design the table opening slightly smaller than the rim so the insert rests securely instead of falling through like a very expensive magic trick.
Think about how the table will drain. Melted ice has to go somewhere. A removable tub can simply be lifted out and emptied. A fixed cooler needs a drain plug, spigot, or hose. A sink needs a drain line that does not dump water where people stand. If your patio surface is wood, composite, or stone, route water away from furniture legs and high-traffic areas.
Also plan the table height. Dining tables are usually around 28 to 30 inches high, coffee tables are much lower, and bar-height tables may be around 40 to 42 inches. Cooler carts often work best at counter height because guests can serve themselves without bending over.
Best Materials for a Patio Cooler Table
Outdoor furniture needs materials that can handle sun, moisture, temperature swings, and the occasional guest who treats the tabletop like a drum set. Cedar is a favorite for DIY cooler tables because it is attractive, lightweight, easy to work with, and naturally resistant to rot and insects. Teak is highly weather-resistant and beautiful, though usually more expensive. Pressure-treated pine is budget-friendly and durable, but it should be dried properly before finishing and handled with appropriate sanding and dust protection.
For fasteners, choose exterior-rated screws, stainless-steel screws, or coated deck screws. Ordinary indoor screws can rust, stain the wood, and weaken over time. Use exterior wood glue where appropriate, but do not rely on glue alone for structural joints. Ice, water, and outdoor movement demand mechanical strength.
For the insert, stainless steel, copper, heavy-duty plastic, galvanized tubs, and insulated coolers are common choices. Stainless steel is easy to clean and modern-looking. Copper looks beautiful and ages with character. Plastic bins are affordable and removable. A real insulated cooler will keep contents colder longer than a plain metal trough, but it may require a larger table frame.
Step-by-Step Overview: How to Build a DIY Cooler Table
Step 1: Choose the Cooler or Sink Insert
Start with the heart of the project. Decide whether you want a removable tub, a long ice trough, a drop-in cooler, or a small sink. Measure carefully. Include the lip or rim in your measurements because that is what will support the insert at the tabletop.
Step 2: Build a Strong Frame
Use sturdy legs and rails to create a frame that can support the tabletop and the loaded cooler. A cooler filled with ice and drinks can weigh far more than expected. Add cross supports beneath the cooler opening, but keep them clear of the tub or sink body.
Step 3: Cut the Tabletop Opening
Trace the insert upside down on the tabletop. Then mark a second line inside the tracing so the opening is smaller than the insert rim. Cut with a jigsaw, circular saw, or track saw depending on the shape. Sand the cut edges thoroughly because nobody wants a splinter with their lemonade.
Step 4: Add Drainage
If using a fixed cooler or sink, install a drain fitting at the lowest point. For a cooler, a small spigot or threaded drain plug makes cleanup easy. For a sink, attach a drain basket and flexible hose. Keep the hose accessible so it can be removed and cleaned.
Step 5: Create a Lid or Cover
A removable or hinged cover makes the table more useful when the cooler is empty. Use matching boards and leave a tiny gap for seasonal wood movement. If you prefer a sleek look, make the cover flush with the tabletop. If you prefer convenience, add a small finger hole, recessed pull, or handle.
Step 6: Sand, Seal, and Finish
Sand all surfaces smooth, especially around edges, corners, and hand-contact areas. Apply an exterior stain, sealer, or outdoor-rated finish according to the product instructions. The finish is not just decoration; it helps protect the table from moisture, UV exposure, and daily patio life.
Smart Features Worth Adding
A DIY cooler table becomes much more useful when you add small convenience features. Locking casters make a cart mobile but stable. A lower shelf can hold serving trays, extra towels, or outdoor-safe dishes. Side hooks can hold grilling tools. A towel bar keeps cleanup cloths nearby. A bottle opener can be attached to the side, although families may also use that spot for a small magnetic cap catcher or utensil hook.
For a sink table, consider a removable cutting board that fits over the basin. It creates more prep space when the sink is not in use. For a dining table, consider two narrow cooler inserts instead of one wide trough. That keeps the table structurally stronger and leaves more room for plates.
Common DIY Cooler Table Mistakes to Avoid
The first mistake is skipping drainage. A cooler table without a drainage plan is basically a stylish bathtub. Meltwater will collect, become annoying to remove, and possibly damage the wood over time.
The second mistake is using the wrong finish. Interior stain or paint may look good at first, but outdoor moisture and sunlight can make it fail quickly. Use products made for exterior wood, and reapply as needed based on weather exposure.
The third mistake is making the insert permanent when it should be removable. Removable tubs are easier to clean, refill, and replace. If you do build in a fixed basin, make sure you can access the drain hardware from below.
The fourth mistake is ignoring weight. Ice, water, drinks, dishes, and elbows add up. Reinforce the frame beneath the cooler and avoid thin tabletop boards around large cutouts.
Food Safety and Cooler Use Tips
If your DIY cooler table will hold perishable foods, keep them properly chilled. Cold food should stay at 40°F or below, and perishable items should not sit out too long in hot weather. Use plenty of ice or frozen gel packs, start with pre-chilled drinks and foods, and consider using separate cooler sections for drinks and perishable foods so the food compartment is not opened constantly.
For parties, sealed drinks, whole fruit, and condiment bottles are the easiest items to manage in a built-in ice box. For items like salads, dairy-based dips, cut fruit, or seafood, use shallow containers nestled into ice and refresh the ice as it melts. When in doubt, keep food safety boring. Boring food safety is much better than exciting stomach drama.
Maintenance: Keeping Your Cooler Table Looking Good
After each use, drain melted ice, remove leftover items, and wipe the basin dry. Clean removable tubs with mild soap and water. Leave lids open until the interior is completely dry so trapped moisture does not create odors.
For the wood, sweep away leaves and debris, especially around joints and under the legs. Inspect screws, hinges, casters, and handles at least once a season. If water stops beading on the wood surface, it may be time to clean and reseal. Store the table under cover during harsh weather or use a breathable outdoor furniture cover.
of Real-World Experience: What It Is Actually Like to Use a DIY Cooler Table
The best thing about a DIY cooler table is not the first compliment, although that is nice. The best thing is how naturally people use it. Guests gather around it without needing instructions. Someone lifts the lid, finds a cold drink, and suddenly the table becomes the center of the patio. It is furniture that quietly does a job, which is the highest form of DIY glory.
In real use, a removable insert is often the most practical choice. A built-in insulated cooler looks impressive, but a removable tub is easier to clean after a long afternoon outside. You can dump the water, rinse the bin, dry it in the sun, and slide it back into place. If the insert ever cracks or stains, replacing it is simple. That matters more than people think when the table becomes part of weekly family meals or weekend hangouts.
Drainage is the feature people appreciate after the first party. During planning, it feels like a small detail. After a cooler full of ice melts, it becomes the detail that separates “brilliant project” from “why is my patio wearing a puddle?” A small drain hose routed into a bucket or safe drainage area saves lifting, spilling, and awkward end-of-night cleanup.
The lid also matters. A cooler table without a cover is useful only when it is filled with ice. A cooler table with a cover becomes an everyday table. You can use it for morning coffee, board games, homework outside, serving snacks, or displaying a planter. The cover should be easy to lift but sturdy enough that it does not rattle every time someone sets down a plate.
Another real-world lesson: build slightly bigger than you think, but not gigantic. A tiny ice bucket looks cute but runs out of space quickly. A huge trough becomes heavy, expensive to fill with ice, and harder to drain. For many patios, a medium removable bin or compact cooler insert gives the best balance between capacity and convenience.
Finishing the wood is where patience pays off. Sanded edges feel better, sealed surfaces clean faster, and a smooth tabletop makes the whole project look less homemade in the “oops” sense and more handmade in the “wow” sense. Taking one extra afternoon to sand and seal properly can make the difference between a table that lasts one summer and one that becomes part of the patio for years.
Finally, the best DIY cooler tables are not overcomplicated. The goal is not to build a spaceship with cup holders. The goal is to create an outdoor table that fits your space, keeps things cold, drains easily, cleans quickly, and makes hosting feel relaxed. Add features only if they solve a real problem. A sink is great if you garden, grill, or prep food outside. Casters are great if the table moves often. Shelves are great if you need storage. But even a simple cedar coffee table with a hidden ice bucket can feel like a backyard upgrade worthy of applause.
Conclusion
A brilliant DIY cooler table is more than a fun patio project. It is a smart outdoor entertaining solution that combines furniture, storage, cooling, and style in one hardworking piece. With the right insert, strong framing, weather-resistant materials, proper drainage, and a durable finish, you can build a patio table that keeps drinks cold, reduces trips indoors, and makes your outdoor space feel custom without the custom price tag.
Whether you choose a center ice trough, rolling cooler cart, hidden coffee table cooler, picnic table with ice boxes, or outdoor sink station, keep the design practical. Make it easy to clean, easy to drain, and easy to use. Your future self will thank you every time guests reach for a cold drink without asking where the cooler is.
Note: This article was written as original web-ready content and synthesized from real DIY woodworking, outdoor furniture, patio entertaining, cooler safety, and home improvement best practices.














