
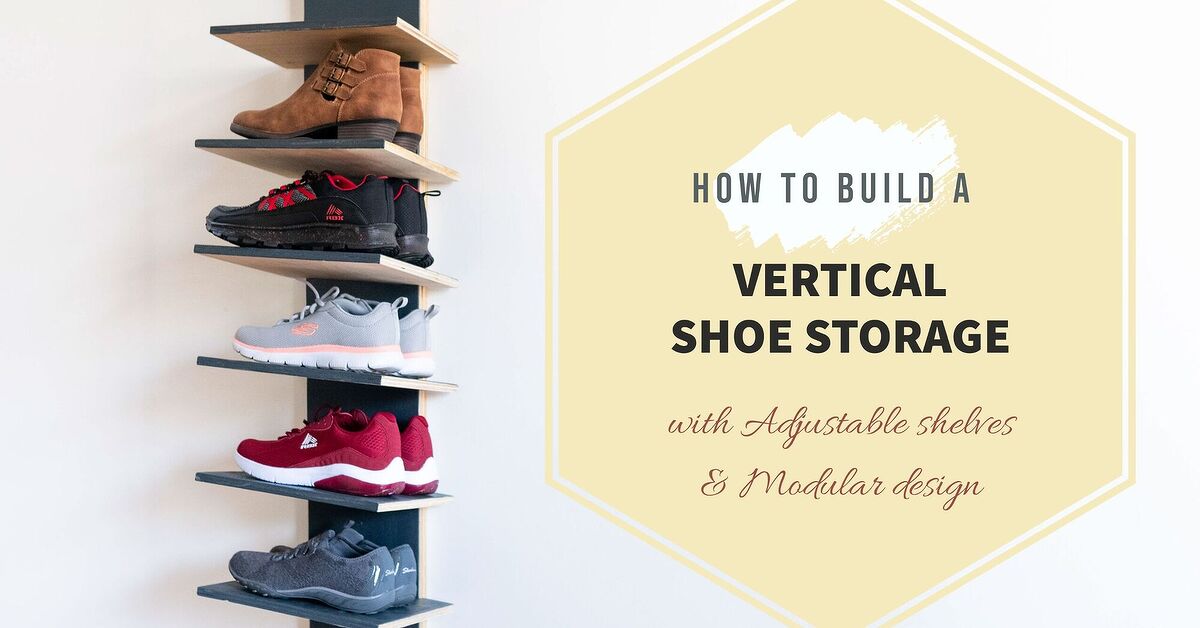
Somewhere in every home, there is a mysterious pile of shoes behaving like a tiny leather-and-rubber landslide. Sneakers lean on sandals. Boots bully flip-flops. One lonely dress shoe hides under the bench like it has unpaid taxes. If your entryway, closet, mudroom, or bedroom floor has become a footwear obstacle course, the cure is not buying fewer shoeslet’s not get dramatic. The smarter answer is building an adjustable DIY vertical shoe rack that uses height instead of floor space.
A vertical shoe rack is one of the most practical small-space organization projects because it turns an underused wall or narrow corner into a tidy storage tower. Better yet, when the shelves are adjustable, the rack can handle real life: ankle boots in winter, running shoes after a New Year’s resolution, kids’ shoes that mysteriously multiply, and the occasional pair of “special occasion” heels that mostly attend weddings and closet meetings.
This guide walks you through how to build a sturdy, attractive, space-saving shoe rack with adjustable shelves. The design is simple enough for a confident beginner, customizable for different rooms, and flexible enough to grow with your shoe collection. In other words, it is furniture with emotional intelligence.
Why Build a Vertical Shoe Rack Instead of Buying One?
Store-bought shoe racks can be useful, but they often come with one annoying personality trait: fixed spacing. That works fine until you try to store tall boots, high-top sneakers, chunky athletic shoes, or children’s rain boots shaped like dinosaurs. A DIY shoe rack gives you control over the height, width, depth, finish, and shelf spacing.
A vertical design is especially useful in small homes, apartments, dorm rooms, narrow entryways, and closets where floor space is already doing too many jobs. Instead of spreading shoes across the ground, you stack storage upward. This approach follows one of the golden rules of home organization: when the floor is full, look at the wall.
Main Benefits of an Adjustable DIY Vertical Shoe Rack
- Saves floor space: A tall, narrow rack can fit in a closet corner, beside a door, or along a small entryway wall.
- Adapts to different shoes: Adjustable shelves let you move shelf heights up or down for flats, sneakers, boots, heels, and sandals.
- Improves visibility: Open shelves make shoes easy to see, so you stop rebuying black sneakers you already own.
- Costs less than custom cabinetry: Basic plywood, boards, shelf pins, and screws can create a custom-looking storage solution.
- Can match your decor: Paint it, stain it, add trim, or keep it simple and modern.
Design Overview: The Best Size for a Space-Saving Shoe Rack
The project below uses a tall rectangular frame with adjustable shelves supported by shelf pins. Think of it as a slim bookcase, except the “books” are your sneakers, loafers, slippers, and that one pair of shoes you bought because they were “surprisingly comfortable,” which is adult code for “not ugly enough to reject.”
A practical starter size is about 18 to 24 inches wide, 12 to 14 inches deep, and 48 to 72 inches tall. The width depends on your available space and shoe size. Most adult shoes fit comfortably on shelves about 11 to 13 inches deep. For larger men’s shoes, boots, or athletic footwear, use 14 inches of depth. If the rack will sit in a narrow hallway, keep the depth slimmer so nobody performs an accidental toe ballet at 7 a.m.
Recommended Dimensions
- Compact closet version: 18 inches wide x 12 inches deep x 60 inches tall
- Entryway family version: 24 inches wide x 14 inches deep x 72 inches tall
- Boot-friendly version: 24 inches wide x 14 inches deep x 72 inches tall with one tall lower shelf
For the most flexible design, drill shelf-pin holes in both side panels. This allows each shelf to be moved in small increments, usually every 1 to 1.25 inches depending on your jig or spacing system. That tiny spacing makes a big difference when you are trying to squeeze in one more pair without turning the rack into a shoe lasagna.
Tools and Materials You’ll Need
This DIY vertical shoe rack can be built with basic woodworking tools. A table saw or circular saw with a straightedge guide helps, but many home centers can cut plywood panels down to rough size for easier transport and assembly.
Materials
- One sheet of 3/4-inch plywood, or prefinished plywood for a cleaner look
- 1×2 boards or edge banding for front shelf lips and trim
- Adjustable shelf pins, usually 1/4-inch or 5mm
- Wood screws or pocket-hole screws
- Wood glue
- Sandpaper in 120- and 220-grit
- Paint, stain, polyurethane, or water-based clear finish
- Anti-tip furniture anchor kit
- Optional: felt pads, labels, decorative molding, or wall cleats
Tools
- Tape measure and pencil
- Speed square or carpenter’s square
- Circular saw, table saw, or miter saw
- Drill/driver
- Shelf-pin jig or homemade drilling template
- Clamps
- Pocket-hole jig, optional but helpful
- Stud finder
- Level
- Sanding block or random-orbit sander
Step 1: Measure the Space Before You Cut Anything
Before buying lumber, measure the exact spot where the shoe rack will live. Measure width, depth, height, baseboards, door swing, closet doors, nearby outlets, and anything else that may interfere. This is the “measure twice, avoid emotional damage once” stage.
If the rack will go inside a closet, leave enough clearance to pull shoes out easily. If it will stand in an entryway, make sure it does not block traffic. A shoe rack that saves space but trips guests is not organization; it is a lawsuit wearing sneakers.
Count the shoes you want to store, then add space for at least two more pairs. Shoe collections have a way of expanding quietly, like houseplants or charging cables. For average adult shoes, plan for one pair every 7 to 8 inches of shelf width. A 24-inch-wide shelf can usually hold two to three pairs, depending on shoe size and whether you alternate shoes heel-to-toe.
Step 2: Choose a Smart Shelf Layout
The beauty of an adjustable shoe rack is that you do not need to predict your shoe life forever. Still, it helps to start with a logical layout. Place everyday shoes around waist or eye level for easy access. Put heavier boots lower for stability. Use the upper shelves for seasonal shoes, dress shoes, or less-used pairs.
A good setup for a 72-inch-tall rack might include a 10- to 12-inch-tall bottom zone for boots, several 6- to 8-inch spaces for sneakers and flats, and a taller top opening for storage baskets or accessories. Add a slight front lip to each shelf if you plan to angle shelves forward. Flat shelves are simpler, while lightly slanted shelves improve visibility.
Flat Shelves vs. Slanted Shelves
Flat shelves are easiest to build and work well for most shoes. They are stable, simple, and ideal if you want the rack to double as general storage for baskets, bags, or folded items.
Slanted shelves display shoes more clearly and can make the rack feel more like a boutique organizer. If you angle shelves, add a narrow front rail or lip so shoes do not slide forward. The angle should be modest. This is a shoe rack, not a ski jump.
Step 3: Cut the Frame Pieces
For a simple 24-inch-wide by 72-inch-tall rack, cut two side panels from 3/4-inch plywood at 72 inches tall by 14 inches deep. Cut the top and bottom panels at 22.5 inches wide by 14 inches deep if you want the finished outside width to be 24 inches. The shelves should be cut slightly narrower than the inside width, usually about 1/8 to 1/4 inch less, so they slide in easily without scraping the sides.
Example cut list for a 24-inch-wide rack:
- Two side panels: 72 inches x 14 inches
- Top panel: 22.5 inches x 14 inches
- Bottom panel: 22.5 inches x 14 inches
- Five to seven adjustable shelves: about 22.25 inches x 13.5 inches
- Optional shelf lips: 1×2 boards cut to shelf width
- Optional back rail or stretcher: 22.5 inches wide
You can add a thin plywood back for extra rigidity, but leaving the back open improves airflow and keeps the rack lighter. If you skip the full back panel, add a top and lower rear stretcher to keep the frame square.
Step 4: Drill Shelf-Pin Holes for Adjustable Shelves
This is the step that transforms a basic shoe shelf into an adjustable closet shoe organizer. A shelf-pin jig is the easiest way to drill consistent holes on both side panels. Consistency matters because uneven holes create wobbly shelves, and wobbly shelves create chaos. Shoes are dramatic enough without stage effects.
Mark the front edge and top of each side panel so you do not accidentally drill mirrored holes in the wrong direction. Clamp the panels together or use the same reference edge for both pieces. Drill matching rows of holes near the front and back of each side panel. A common setback is around 1.5 to 2 inches from the front and back edges, depending on the shelf depth and hardware.
Drill only as deep as the shelf pins require. Use a stop collar, tape flag, or jig-specific drill bit to avoid drilling through the side panel. If you want the most polished finish, add metal shelf-pin sleeves. They make the holes look cleaner and can reduce wear over time.
Step 5: Assemble the Outer Box
Lay one side panel flat, then attach the top and bottom panels with wood glue and screws. Pocket holes are a neat option because they hide fasteners inside the cabinet. Standard wood screws also work; just predrill to prevent splitting.
Add the second side panel and check for square before tightening everything fully. Measure diagonally from corner to corner in both directions. If the measurements match, the frame is square. If not, gently shift the box until it behaves. Woodworking is partly precision and partly polite negotiation with rectangles.
If using rear stretchers, install one near the top and one near the bottom. These strips help keep the frame stable and provide a place to attach the anti-tip hardware. If using a full back panel, nail or screw it into place while the frame is square.
Step 6: Prepare the Adjustable Shelves
Sand the shelf edges smooth and apply edge banding or 1×2 trim to the front for a finished look. A front lip is especially useful if you choose slanted shelves. It also makes thin plywood look thicker and more intentional, which is decorator language for “nobody needs to know this came from the plywood aisle.”
If you want angled shelves, attach a small rail to the front edge of each shelf. Then place the back shelf pins slightly higher than the front shelf pins. Keep the angle gentle so shoes stay visible without sliding. For flat shelves, simply rest each shelf on four matching pins.
Step 7: Sand, Finish, and Make It Pretty
Sand all exposed surfaces with 120-grit sandpaper, then finish with 220-grit for a smoother feel. Round over sharp corners slightly, especially if the rack will sit in a hallway, kid’s room, or mudroom. Ankles appreciate thoughtful design.
For an entryway shoe rack, choose a durable finish that can handle scuffs, moisture, and dirt. Semi-gloss or satin paint is easy to wipe clean. Stain with polyurethane gives a warmer wood look. Water-based finishes dry quickly and have lower odor than many oil-based finishes. If you use prefinished plywood, you can save time and focus on sealing cut edges.
Dark colors hide scuffs well, white makes closets feel brighter, and natural wood fits almost any style. For a modern look, paint the frame and leave shelf fronts natural. For farmhouse style, use painted sides with stained shelves. For a minimalist apartment, keep the lines plain and skip decorative trim.
Step 8: Anchor the Shoe Rack to the Wall
Because this is a vertical piece of furniture, anchoring is not optional. A tall narrow rack can tip if overloaded, climbed on, pulled forward, or bumped. Use an anti-tip furniture anchor kit and secure the rack to a wall stud whenever possible. If a stud is not in the right spot, use wall anchors rated for the wall type and load.
Place heavier shoes on the lower shelves and lighter shoes higher up. Do not store heavy boxes on the top shelf unless the rack is securely anchored. If children live in or visit the home, treat the anchor as a required safety feature, not a bonus accessory. The rack may be cute, but gravity has no sense of interior design.
Step 9: Organize Shoes Like a Professional
Once the finish is dry and the rack is anchored, it is time for the satisfying part: loading the shelves. Start by grouping shoes by use. Everyday shoes should be easiest to reach. Seasonal shoes can go higher. Wet shoes should sit on a lower shelf or tray until dry.
For maximum capacity, alternate shoes heel-to-toe. This small trick can create extra room on each shelf. Use bins for sandals, shoe care products, laces, insoles, or kids’ accessories. If the rack is in a shared entryway, assign each family member one or two shelves. Labeling may sound intense, but so does arguing over whose muddy cleats are touching the wall.
Smart Storage Zones
- Bottom shelf: Boots, heavy shoes, wet shoes, or outdoor footwear
- Middle shelves: Daily sneakers, flats, loafers, school shoes, and work shoes
- Upper shelves: Dress shoes, seasonal pairs, shoe boxes, or storage baskets
- Side hooks: Shoe horn, umbrella, dog leash, or reusable shopping bags
Customization Ideas for Different Homes
The best DIY projects solve the problem you actually have, not the problem shown in a perfect catalog photo where nobody owns muddy shoes. Here are a few ways to customize your space-saving shoe rack for real homes.
For Small Apartments
Keep the rack narrow and tall, around 18 inches wide. Add felt pads to protect floors and choose a finish that matches nearby furniture. If you rent, use removable wall-safe anchoring options where allowed, or place the rack inside a closet and anchor it according to your lease rules.
For Families
Use a wider rack and include durable lower shelves for school shoes, sports cleats, and boots. Add name labels to shelves to stop the daily “Where are my shoes?” concert. Consider a washable boot tray on the bottom.
For Closets
Build the rack to fit below hanging clothes or beside an existing closet system. Add vertical rows of shelf-pin holes from top to bottom so you can change the spacing when seasons change.
For Mudrooms
Use moisture-resistant paint or a clear protective finish. Leave more space between lower shelves for boots. Add a slatted bottom shelf or removable tray so dirt and water are easier to clean.
Common Mistakes to Avoid
The biggest mistake is building the rack too deep. Deep shelves sound generous, but shoes can disappear into the back like they are entering a witness protection program. Keep the depth close to the actual shoe length plus a little breathing room.
Another mistake is skipping the shelf-pin jig or template. Adjustable shelves only work well when the holes line up. Take your time during drilling and use consistent reference edges.
Do not forget airflow. Shoes need ventilation, especially after rain, workouts, or summer errands. Open shelving helps reduce trapped odors. A fully enclosed cabinet may look cleaner, but it can also become a tiny sneaker sauna.
Finally, do not overload the top. Tall furniture should be balanced with weight low and secured to the wall. Organization should make your home safer, not turn your entryway into a physics experiment.
Maintenance: Keeping the Rack Clean and Useful
A shoe rack only stays helpful if it does not become a vertical junk drawer. Once a month, remove shoes that do not belong, wipe down shelves, and check the wall anchor. Tighten loose screws if needed. Touch up paint when scuffs appear. If a shelf starts to sag, replace it with thicker plywood, add a front support strip, or reduce the load.
Seasonal resets also work beautifully. In spring, move boots higher and bring sneakers down. In fall, reverse the system. The adjustable shelves make this easy, which means you might actually do it instead of simply staring at the closet and whispering, “Soon.”
Real-Life Experience: What Building an Adjustable Vertical Shoe Rack Teaches You
The first thing you learn from building a vertical shoe rack is that shoes are not standard creatures. One pair is slim and polite. The next pair is a bulky running shoe that acts like it needs its own apartment. Boots demand height. Sandals flop around like relaxed noodles. This is exactly why adjustable shelves are worth the extra drilling. Fixed shelves look efficient on paper, but real life wears different footwear every season.
In a small entryway, the biggest improvement is not just the saved space. It is the calmer routine. When shoes have a visible place to land, mornings become easier. Nobody has to dig under a chair for the left sneaker. Nobody steps on a cleat while holding coffee. The floor looks larger because it is no longer hosting a shoe convention. A narrow rack can change the mood of the whole doorway, especially in homes where the entry is also the mail drop, backpack station, dog leash zone, and emotional launchpad for Monday morning.
Another lesson is that measuring matters more than ambition. It is tempting to build the tallest, widest rack possible, but the best version is the one that fits the traffic flow. A rack that sticks too far into a hallway will annoy everyone, even if it stores twenty pairs. The sweet spot is a slim footprint, strong construction, and shelves spaced for the shoes you actually wear. Not the fantasy shoes. Not the “maybe I’ll start hiking weekly” shoes. The real shoes.
During assembly, the shelf-pin holes are usually the moment of truth. If the holes line up, the project feels professional. If they do not, the shelves wobble and your confidence briefly leaves the room. A jig or careful template solves this. Even a homemade guide made from scrap hardboard can work if you clamp it firmly and reference the same edge every time. The goal is repeatability, not magic.
Finishing the rack also teaches patience. Paint needs curing time before shoes start rubbing against it. Clear finish needs smooth sanding between coats if you want a polished feel. If you rush the finish, the rack may look fine from across the room but feel sticky, rough, or easy to scuff. Give the finish time to harden, and the rack will handle daily use better.
The most satisfying part is customizing the storage after it is built. You may discover that boots belong at the bottom, gym shoes need the easiest shelf, and dress shoes can live higher because they are not invited to daily errands. Add a small basket for shoe spray, laces, or insoles. Add a hook on the side for a shoehorn. Add a tray beneath the bottom shelf during rainy months. These tiny upgrades make the rack feel less like a project and more like a system.
And yes, there is a strange pride in seeing shoes lined up vertically. It feels like your home got a haircut. The same shoes are still there, but now they are behaving. That is the quiet magic of a well-built adjustable DIY vertical shoe rack: it does not ask you to own less, move to a bigger house, or become a minimalist monk. It simply gives every pair a better place to stand.
Conclusion
A space-saving adjustable DIY vertical shoe rack is one of those projects that delivers immediate everyday benefits. It reduces clutter, uses vertical space wisely, adapts to different shoe sizes, and adds a custom touch to closets, mudrooms, bedrooms, and entryways. With plywood, shelf pins, basic tools, and a little patience, you can build a rack that fits your home better than most store-bought options.
The key is to plan around real shoe habits. Measure the space, choose a practical depth, drill accurate shelf-pin holes, keep heavy shoes low, and anchor the rack securely. Once finished, the rack becomes more than a storage project. It becomes a small daily luxury: shoes you can find, floors you can see, and an entryway that no longer looks like a sneaker tornado recently passed through.
Note: This article was written for web publication in standard American English and synthesizes current DIY, woodworking, home-organization, adjustable shelving, and furniture-safety guidance from reputable U.S. home improvement and consumer safety sources.














