
Digital instruments are wonderfully confident. A multimeter will stare you straight in the face and announce that a resistor measures 9.9987 kilohms, complete with enough decimal places to make the result look legally binding. Unfortunately, confidence and correctness are not the same thing. Sometimes those extra digits are valuable information. Sometimes they are tiny electronic decorations.
That is why calibration remains important, even in a workshop filled with modern digital multimeters, precision components, automatic ranging, and self-calibration features. The basic idea is refreshingly old-fashioned: compare an instrument with a known reference, understand the difference, and decide whether the instrument is accurate enough for the work at hand.
A clever plug-in reference built from a precision resistor and a thermistor shows how useful this habit can be. It will not turn a hobby bench into a national metrology laboratory, but it can reveal drift, temperature effects, poor connections, and suspicious readings before they ruin a project. That alone makes good old calibration worth revisiting.
The Small Calibration Tool That Started the Conversation
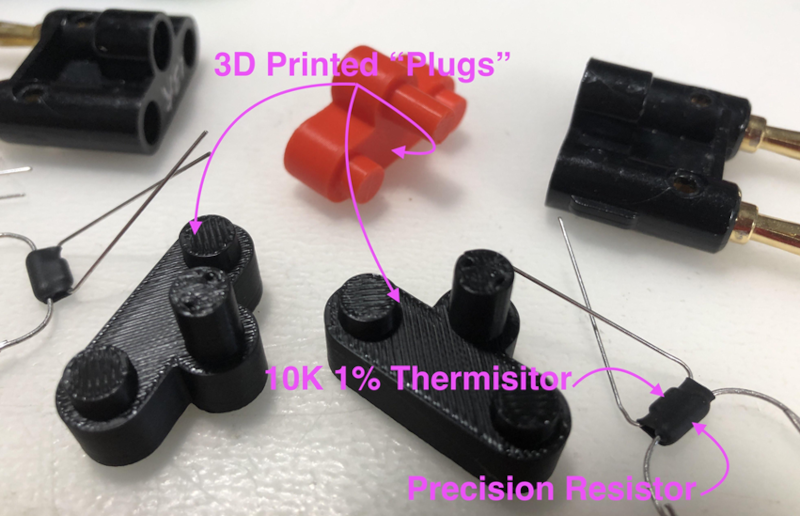
The idea behind “Calibration, Good Old Calibration” centers on a compact digital multimeter test accessory. The device combines an axial precision resistor with a thermistor, mounts both in a dual banana plug, and uses a small 3D-printed piece to protect and support the components. The resistor gives the meter a stable value to measure, while the thermistor helps the user observe the temperature near the resistor and the meter’s input terminals.
The original design also leaves accessible loops or test points for external clips. Those connections allow the resistor or thermistor to be measured with another instrument and make Kelvin-style measurements possible when the setup supports them. It is simple, inexpensive, and far more convenient than keeping a delicate precision resistor loose in a drawer beside mystery screws and the one hex key that fits absolutely nothing.
The most interesting observation was not merely that the resistor could check a meter. It was that bench multimeters may have input terminals several degrees Celsius warmer than the surrounding air. In the reported tests, one bench meter’s terminals were roughly 3 to 3.5 degrees Celsius above ambient, while another was approximately 2 to 3 degrees warmer. A handheld meter generally warmed the attached reference less and stabilized sooner.
That modest temperature difference can matter when measuring a low-temperature-coefficient precision resistor with a high-resolution meter. The last few digits may wander not because the resistor is defective, but because the resistor has just moved from room temperature into the meter’s tiny tropical resort.
What Calibration Actually Means
Calibration Is a Comparison
Calibration is often described as “making an instrument accurate,” but technically it begins with a comparison. A device under test is compared with a reference whose value and uncertainty are known. The comparison establishes how the instrument’s indication relates to the reference under specified conditions.
An adjustment may follow, but adjustment and calibration are not identical. A meter can be calibrated, found to be within tolerance, and left untouched. It can also be calibrated, found outside tolerance, and documented without being adjusted. Alternatively, a technician may adjust it and then perform another calibration to verify the final result.
This distinction matters because turning a hidden potentiometer until the display matches one resistor is not a complete calibration. That is closer to persuading one point on one range to behave. A real digital multimeter calibration evaluates multiple functions, ranges, polarities, frequencies, and test points using standards with appropriately small uncertainties.
Traceability Is About the Measurement Result
Metrological traceability connects a measurement result to a stated reference through a documented, unbroken chain of calibrations. Each link in that chain contributes uncertainty. NIST emphasizes that traceability belongs to a measurement result, not magically to an instrument, sticker, laboratory, or logo. A meter does not become eternally “NIST traceable” because someone once waved a certificate near it.
For formal work, the documentation should identify the measured value, the associated uncertainty, the reference standards, the environmental conditions, and the procedure used. ISO/IEC 17025 provides internationally recognized requirements for laboratories that perform testing and calibration, focusing on competence, impartiality, consistent operation, and valid results.
Accuracy, Precision, Resolution, and the Decimal-Point Parade
Four measurement terms are commonly mixed together:
- Accuracy describes how close a result is expected to be to the true or accepted value.
- Precision describes how consistently repeated measurements agree with one another.
- Resolution is the smallest displayed or detectable change.
- Uncertainty quantifies the remaining doubt associated with the reported result.
A meter can be highly repeatable but consistently wrong. It can also display six digits while only four carry meaningful accuracy. NI’s measurement guidance treats gain error, offset error, range, and noise as separate contributors to overall accuracy. The impressive display is therefore only the beginning of the story, not the triumphant final chapter.
Why Temperature Quietly Changes Resistance
A resistor’s value changes with temperature. This behavior is commonly expressed as its temperature coefficient of resistance, or TCR, usually in parts per million per degree Celsius.
A simplified estimate is:
Resistance change = nominal resistance × TCR × temperature change
Consider a 10-kilohm resistor with a TCR of 2 ppm/°C. If its temperature rises by 3°C, its expected change is approximately:
10,000 Ω × 2 × 10-6/°C × 3°C = 0.06 Ω
Six hundredths of an ohm is irrelevant for many repairs, but it can be visible on a high-resolution bench meter. A resistor with a larger TCR would move more. Self-heating from the meter’s test current may add another change, particularly when the component is small or poorly ventilated. Precision resistor manufacturers consequently specify TCR, long-term stability, load effects, and sometimes nonlinear resistance-versus-temperature behavior.
The thermistor in the plug-in reference does not automatically correct the resistor. Instead, it gives the user temperature information that can explain drift or support a calculated correction. NTC thermistors typically decrease in resistance as temperature rises, and their response is nonlinear. Their nominal resistance tolerance and beta-value tolerance must be considered when converting resistance into temperature.
Two-Wire Versus Four-Wire Resistance Measurement
The Convenient Two-Wire Method
In a standard two-wire measurement, the same leads carry the test current and sense the resulting voltage. The meter therefore sees the resistor plus lead resistance, connector resistance, and contact resistance.
Suppose a 100-ohm reference is connected through leads and contacts totaling 0.1 ohm. The display may show approximately 100.1 ohms, producing a 0.1% error before the meter itself has done anything wrong. Clean, short, firmly seated connections help, but they do not make the added resistance vanish.
The Four-Wire Kelvin Method
A four-wire measurement uses one pair of leads to apply current and a separate high-impedance pair to sense voltage directly across the component. Because almost no current flows through the sense leads, their voltage drop contributes very little error.
Keithley guidance notes that typical lead resistances can make accurate two-wire measurements difficult when the device under test is below roughly 10 to 100 ohms, depending on the leads and required accuracy. Keysight and Fluke likewise recommend four-wire connections for precision components, low resistances, long leads, and laboratory-grade resistance work.
This explains the practical recommendation to use the compact two-terminal reference mainly above approximately 100 ohms. Below that region, lead and contact resistance can become a meaningful percentage of the result. The accessory may still be useful, but a proper Kelvin connection becomes increasingly important.
How to Build a Useful DMM Check Reference
1. Choose an Appropriate Resistor
Select a precision resistor with a documented tolerance, low TCR, suitable power rating, and stable construction. Values such as 1 kilohm, 10 kilohms, or 100 kilohms are generally easier to use in a simple two-wire plug than very low resistance values.
Do not assume that a 0.01% tolerance means the resistor remains within 0.01% forever, at every temperature, under every load. Tolerance describes its initial relationship to the nominal value under specified conditions. TCR, aging, humidity, mechanical stress, and self-heating still matter.
2. Add a Thermally Coupled Temperature Sensor
Place a small thermistor close to the precision resistor. Heat-shrink tubing can hold the two components together while providing electrical insulation. The thermistor should sense the resistor’s local temperature rather than hanging far away and reporting the weather in another zip code.
Use a very small measurement current when reading the thermistor. Excessive current can warm the thermistor and cause it to report the temperature it created rather than the temperature it was supposed to measure.
3. Protect the Components
A dual banana plug provides convenient spacing for many multimeter inputs. A custom cap or 3D-printed support can protect the components and route the thermistor leads to accessible test points.
Leave a little flexibility in the resistor leads. Bending them tightly or clamping the body under mechanical stress may change the resistance slightly. Precision parts can be surprisingly sensitive creatures; treat them less like framing nails and more like tiny laboratory divas.
4. Characterize the Finished Reference
The nominal color-code value is not enough. Measure the completed reference with a more accurate instrument or have it characterized by a competent calibration laboratory. Record the measured resistance, temperature, date, method, and uncertainty when available.
Repeat measurements over time. A reference becomes more useful when its history shows whether it is stable. Without that history, it is still a resistorjust one wearing an important-looking outfit.
How to Use the Reference Responsibly
- Allow the meter to warm up for the period recommended by its manufacturer.
- Keep the reference and meter in a stable environment away from sunlight, vents, soldering irons, and hot power supplies.
- Inspect and clean the banana contacts before connecting the reference.
- Insert the reference without handling the resistor body more than necessary.
- Monitor the thermistor and wait for the reading to stabilize.
- Record the resistance, temperature, meter range, date, and elapsed warm-up time.
- Repeat the measurement and compare it with previous results.
A single check should be treated as a verification or sanity test, not as proof that every meter function is calibrated. A resistance reference says little about DC voltage accuracy, AC bandwidth, current shunts, capacitance ranges, frequency measurement, input protection, or electrical safety.
What a DIY Reference Cannot Replace
A professional electrical calibration system can generate and measure highly accurate DC voltage, AC voltage, current, resistance, frequency, and other quantities across multiple ranges. It may automate test sequences, account for environmental conditions, calculate measurement uncertainty, and produce complete “as found” and “as left” data.
A homemade resistance standard cannot provide that scope. It may indicate that a meter has changed, but it cannot always identify whether the cause is the meter, the reference, the contacts, temperature, or technique. Nor can it provide accredited traceability unless the complete measurement chain, uncertainty evaluation, procedure, and quality controls support the claim.
Professional calibration is especially appropriate when measurements affect product acceptance, medical devices, aerospace hardware, regulated manufacturing, customer contracts, worker safety, or expensive troubleshooting decisions. Accredited laboratories use controlled standards, documented uncertainty budgets, and quality systems intended to make results defensible beyond one workbench.
How Often Should a Multimeter Be Calibrated?
There is no universal interval that fits every instrument. NIST does not prescribe one fixed recalibration schedule for all measuring devices. The appropriate interval depends on required accuracy, contractual or regulatory rules, instrument stability, usage, environmental exposure, transportation, and past performance.
A meter used daily in a mobile repair truck faces different risks from a bench meter that spends its life in a temperature-controlled laboratory. A one-year interval is common, but it should not be treated as a law of physics.
Regular checks with a stable reference can help establish evidence-based intervals. Plotting results over time may reveal gradual drift, sudden shifts, seasonal effects, or connection problems. NIST guidance on instrument control recommends checking suitable standards at representative points and using control-chart concepts to detect degradation.
Common Calibration Mistakes
- Confusing resolution with accuracy: More digits do not automatically mean a more trustworthy result.
- Ignoring temperature: The resistor, terminals, test leads, and meter may all be at different temperatures.
- Using an unsuitable resistance value: Very low values magnify lead and contact errors in two-wire measurements.
- Trusting nominal value alone: A “10 kΩ” label is not a calibration certificate.
- Adjusting from one test point: Correcting one reading may worsen another range or function.
- Skipping warm-up: Precision instruments may drift while their internal temperature stabilizes.
- Failing to keep records: An undocumented check cannot reveal long-term trends.
- Assuming the reference never changes: Reference components also age, drift, and suffer mechanical damage.
Conclusion: Calibration Is a Habit, Not a Sticker
Calibration does not have to begin with an intimidating rack of equipment. It can begin with a stable resistor, a temperature sensor, careful technique, and the healthy suspicion that a digital display may occasionally be telling a very precise fairy tale.
The plug-in resistor-and-thermistor concept is valuable because it makes routine checking easy. It highlights temperature effects, encourages recordkeeping, and helps users distinguish repeatable readings from reliable measurements. Used honestly, it is an excellent workshop reference. Used carelessly, it is merely a banana plug with excellent self-esteem.
The central lesson is simple: know what you are measuring, know the limitations of your reference, control the conditions, and match the rigor of calibration to the consequences of being wrong.
Practical Experience Notes: What Calibration Teaches at the Bench
A common first experience with a precision reference is mild disappointment. The user expects to plug it into two meters and see identical readings immediately. Instead, one meter shows 9.9998 kilohms, another shows 10.0003 kilohms, and both values slowly move. The temptation is to declare one meter defective. Waiting ten minutes often changes the diagnosis.
The reference warms after being connected to a bench meter. The front terminals may already be warmer than the room, and heat travels through the metal contacts. Meanwhile, fingers have warmed the plug during installation. As the resistor approaches thermal equilibrium, its value settles. The experience teaches a memorable rule: when chasing small errors, time is part of the measurement setup.
Another typical lesson appears when the same resistor is tested with ordinary leads. Moving a clip, rotating a banana plug, or squeezing a connector may change the last digits. At higher resistance values, the effect may be small. Near 100 ohms or below, contact resistance becomes impossible to ignore. Switching to a four-wire connection often produces a calmer, more repeatable result and demonstrates why Kelvin measurement is not merely an elaborate way to use twice as many cables.
Recordkeeping creates an equally important surprise. A reading that looks suspicious by itself may be perfectly consistent with six months of history. Conversely, a result that remains inside the resistor’s broad tolerance may still represent a meaningful shift from its established baseline. A notebook or spreadsheet turns isolated numbers into evidence.
For example, imagine a 10-kilohm check reference that repeatedly measures between 9,999.92 and 9,999.96 ohms at 23°C. Several months later, the same setup produces 10,000.18 ohms after stabilization. The new reading may still appear close to nominal, but the change deserves investigation. The cause could be meter drift, resistor aging, damaged contacts, a different measurement range, altered test current, or an unnoticed temperature difference.
A useful troubleshooting sequence is to clean the connectors, repeat the test, reverse or reseat the reference, verify the thermistor reading, and compare the result with a second instrument. If the reference and several meters disagree in different directions, the situation requires better standards rather than louder opinions.
Calibration checks also teach humility about specifications. A handheld meter may be entirely suitable for checking a car battery, household wiring, or a sensor circuit even though it disagrees with an 8.5-digit laboratory meter in the fifth decimal place. The correct question is not “Which display has more digits?” It is “What uncertainty can this task tolerate?”
That perspective prevents both under-testing and unnecessary perfectionism. Repairing a broken cable rarely requires parts-per-million resistance accuracy. Characterizing a precision voltage reference may require strict temperature control, low-thermal connections, careful warm-up, and traceable equipment. Good calibration practice scales its effort to the decision being made.
The most valuable experience is therefore not learning how to force every meter to display the same number. It is learning to recognize which differences matter, which differences have explainable causes, and when the available equipment cannot support the conclusion you want to draw. That is the quiet power of good old calibration: fewer guesses, better records, and far less time arguing with decimal points.
Research note: This article synthesizes metrology guidance and technical examples from NIST, ISO, Hackaday, EDN, Fluke Calibration, Keysight Technologies, Tektronix and Keithley, National Instruments, Analog Devices, and Vishay. The compact resistor-and-thermistor accessory discussed here is a practical verification aid, not a substitute for accredited calibration of safety-critical or regulated equipment.














