
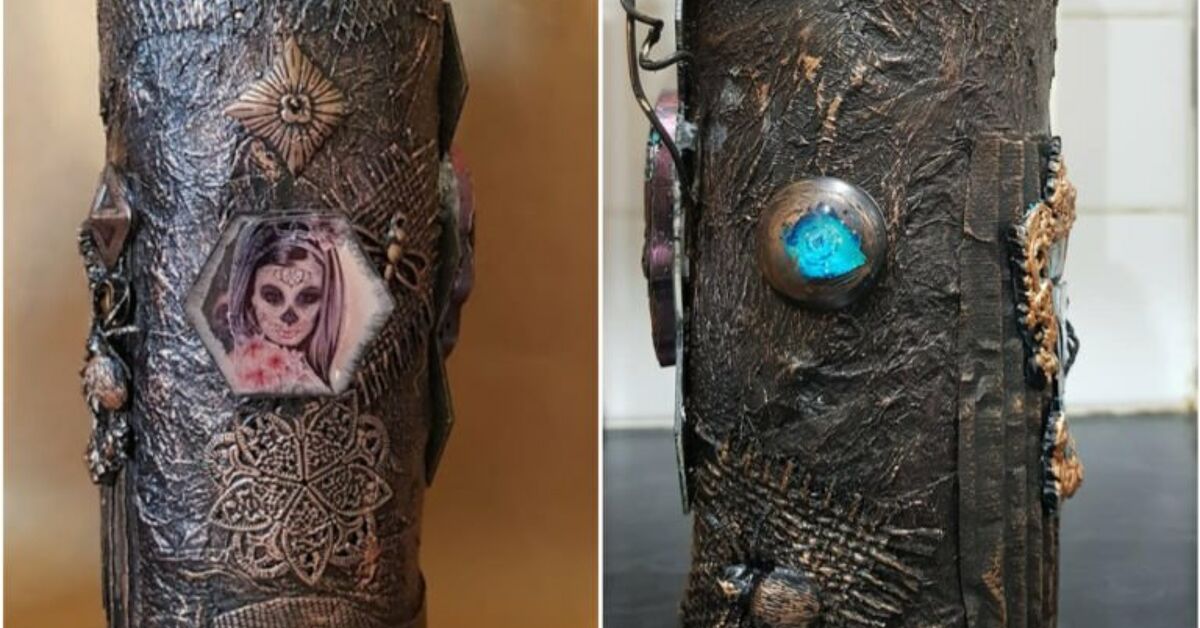
Empty bottles usually have two possible futures: the recycling bin or a dramatic second career as suspicious-looking containers from a witch’s private pantry. This Halloween mixed media bottles DIY project enthusiastically chooses the second option.
By combining paint, decoupage, textured paper, raised glue details, labels, fabric, charms, and metallic highlights, you can transform ordinary glass containers into eerie Halloween decorations that look collected rather than freshly purchased. The technique is forgiving, inexpensive, and ideal for anyone who enjoys crafting without measuring every speck of glitter with laboratory precision.
The finished bottles work beautifully on a mantel, party table, bookshelf, entryway console, or faux apothecary display. Best of all, no two bottles need to match. In fact, a mismatched collection often looks more convincingas though each mysterious potion was acquired during a different questionable adventure.
What Are Halloween Mixed Media Bottles?
Mixed media art combines several materials or artistic techniques in one project. Instead of simply painting a bottle black and calling it “Professor Fang’s Cough Syrup,” you build layers of color, texture, imagery, and dimensional decoration.
A single bottle might include acrylic paint, torn tissue paper, printed labels, cheesecloth, twine, molded shapes, plastic insects, beads, charms, sand, metallic wax, and decoupage medium. Each layer adds age and visual history. The goal is not a perfectly smooth factory finish. Cracks, wrinkles, uneven color, and worn edges make the bottle look older and far more interesting.
Why this Halloween bottle craft works so well
Glass bottles already resemble vintage medicine, perfume, poison, and laboratory containers. Once covered with dark color and strange labels, they require very little persuasion to become spooky. Reusing bottles also keeps the project budget-friendly and gives containers with unusual necks, handles, or embossed details a second life.
Materials and Tools
You do not need every item listed below. Mixed media is less about following a rigid supply list and more about building an interesting combination from what you already have.
Basic bottle supplies
- Clean glass bottles, jars, or small containers
- Dish soap and warm water
- Rubbing alcohol and a lint-free cloth
- Acrylic paint, chalk-style paint, or spray paint intended for glass
- Black, brown, gray, cream, green, purple, or deep red paint
- Paintbrushes, including one small detail brush
- Decoupage medium or another clear-drying craft sealer
- Scissors and a craft knife
- Protective paper, cardboard, or a drop cloth
Texture and decoration options
- Tissue paper, book pages, napkins, scrapbook paper, or paper towel
- Cheesecloth, gauze, lace, burlap, ribbon, or torn fabric
- Twine, embroidery thread, thin chain, or raffia
- Halloween labels printed on ordinary paper
- Plastic spiders, snakes, bats, skulls, or insects
- Buttons, beads, keys, charms, gears, or broken costume jewelry
- Air-dry clay shapes or lightweight molded embellishments
- Fine sand, dried coffee grounds, texture paste, or baking soda
- Low-temperature hot glue or a glass-compatible craft adhesive
- Metallic paint or wax in gold, bronze, copper, or silver
- Clear matte, satin, or gloss sealer
- Corks, decorative stoppers, wooden knobs, or old cabinet pulls
Safety note: Keep these bottles decorative. Do not fill them with beverages, food, medicine, household chemicals, or anything someone might accidentally consume. Use spray products only in a properly ventilated location and follow the manufacturer’s instructions. Adults should handle craft knives, aerosol products, and hot adhesive. For family crafting, a low-temperature glue gun is the safer option.
How to Make Halloween Mixed Media Bottles DIY
Step 1: Choose bottles with personality
Look for bottles with interesting silhouettes rather than focusing only on size. Syrup bottles, vinegar bottles, small juice containers, perfume-style bottles, spice jars, and thrift-store decanters can all work. A group looks most convincing when it includes different heights and shapes.
Inspect each container for chips and cracks. Discard damaged glass instead of trying to disguise it beneath a heroic amount of gauze.
Step 2: Remove labels and residue
Soak bottles in warm, soapy water until the original labels loosen. Scrape away remaining paper gently, then remove sticky residue with an appropriate adhesive remover. Wash the bottle again and let it dry completely.
Before painting, wipe the exterior with rubbing alcohol to remove fingerprints, oil, and invisible residue. Avoid touching the cleaned surface afterward. Glass may appear innocent, but it remembers every greasy fingerprint when paint begins peeling.
Step 3: Plan the design before gluing
Choose a loose theme for each bottle. Possibilities include Victorian apothecary, swamp witch, Gothic laboratory, haunted carnival, steampunk alchemist, or elegant black-and-gold poison cabinet.
Lay the label and embellishments against the bottle without attaching them. Decide where the front will be and check whether large decorations prevent the bottle from standing securely. Photograph the arrangement with your phone so you can remember the plan after everything is scattered across the table.
Step 4: Build the first texture layer
Brush a thin coat of decoupage medium onto part of the bottle. Press on torn tissue paper, thin book pages, or separated napkin layers. Small pieces conform to rounded glass more easily than one large sheet.
Allow some wrinkles to remain. They create a weathered, leathery surface once painted. For stronger texture, twist narrow tissue strips into cords and place them around the neck or shoulders of the bottle.
You can also mix a small amount of fine sand or baking soda into acrylic paint to create a rough, corroded finish. Test the mixture on scrap material first. Too much texture can turn an ancient poison bottle into something resembling a breaded appetizer.
Step 5: Add raised details
Use low-temperature hot glue to draw drips, vines, stitches, cracks, letters, or decorative borders. Work slowly and rotate the bottle instead of stretching your hand around it.
Raised glue can imitate wax seals, molten potion overflow, roots, scars, or metal framework. Let it cool completely before painting. Attach lightweight embellishments such as plastic spiders, charms, tiny skulls, gears, or faux gemstones with an adhesive suitable for glass and the chosen material.
Step 6: Apply the base color
Paint the entire bottle with a dark base coat. Matte black is the easiest foundation, but deep brown, charcoal, eggplant, forest green, and dried-blood red also create strong Halloween effects.
Apply several thin coats instead of one thick coat. Thick paint can run, obscure raised details, and remain soft beneath the surface. Let each coat dry according to the product directions.
When using spray paint, protect the work area, provide active ventilation, and keep the bottle on cardboard so it can be rotated without touching wet paint. Move the spray in steady passes and slightly overlap each stroke.
Step 7: Create depth with layered color
After the base coat dries, stipple on a second color with a nearly dry brush or sponge. Brown over black creates rust and age. Green suggests mold or alchemical residue. Purple adds theatrical magic, while dark red makes everything look mildly cursed.
Next, dry-brush a lighter shade over the raised texture. Load a brush with a small amount of paint, wipe most of it onto scrap paper, and sweep it lightly across the surface. The color will catch only the highest details.
Finish with tiny touches of metallic paint or wax. Bronze and copper create an antique industrial appearance; silver looks cold and spectral; muted gold adds the elegance of a wealthy vampire who owns several properties and definitely avoids garlic bread.
Step 8: Make and age the Halloween labels
Create names such as “Moonwort Elixir,” “Spider Venom No. 13,” “Essence of Restless Spirit,” “Midnight Tonic,” or “Premium Bat Breath.” Use fonts that match your theme, but keep the words readable.
To age ordinary printer paper, tear the edges rather than cutting perfect rectangles. Lightly brush the paper with diluted brown paint, strong coffee, or tea, then let it dry flat. Darken the outer edges with brown or black ink.
Apply a thin layer of decoupage medium to the bottle, position the label, and smooth it gently from the center outward. Add another light coat over the paper after it has settled. Excess medium can cause wrinkles, cloudiness, or lifted edges, so resist the instinct to pour on half the jar “for protection.”
Step 9: Add fabric, string, and finishing objects
Wrap the bottle neck with twine, gauze, lace, or torn fabric. Secure it discreetly at the back. Hang a charm, key, small tag, or tiny plastic bone from the wrap.
Decorate the stopper separately. Paint a cork, glue a bead or wooden knob to the top, or cover it with wax-colored hot glue. A circular paper seal stamped with an initial can make an inexpensive closure look surprisingly official.
Step 10: Distress and seal the bottle
Inspect the bottle from several angles. Add scratches with a dry brush, dark paint around the label edges, or a little faux grime where dust would naturally collect. Stop before every square inch receives equal treatment. Good distressing should look accidental, not democratically distributed.
When all layers are completely dry, apply a compatible clear sealer. Choose matte for dusty apothecary bottles, satin for a gently aged finish, or gloss for wet-looking poison and magical elixirs. Several thin coats are generally more reliable than one heavy coat.
Three Halloween Bottle Design Ideas
1. Witch’s Swamp Tonic
Cover a bottle with wrinkled tissue paper and paint it dark green. Add black shading around the base and neck, then dry-brush the texture with mossy green. Attach a crooked label, wrap the neck with twine, and add a tiny frog or snake charm.
2. Victorian Spider Venom
Paint a narrow bottle matte black and add raised hot-glue web lines. Dry-brush the web with silver, attach a plastic spider, and use a cream label with ornate black lettering. Finish with a black lace collar and a faux gemstone.
3. Alchemist’s Moon Dust
Use charcoal paint with purple and blue highlights. Add gears, chains, stars, and a crescent moon charm. A little antique-gold dry brushing will unify the mixed materials. Seal the bottle with a cork wrapped in thin metallic cord.
Common Problems and Easy Fixes
| Problem | Likely Cause | Solution |
|---|---|---|
| Paint peels from the glass | The surface was oily, damp, or incompatible with the paint | Clean with rubbing alcohol, let dry, and use paint formulated for glass or multi-surface projects |
| The paper label wrinkles badly | Too much medium or a piece that is too large | Use a thinner coat, smaller paper sections, and gentle pressure from the center outward |
| Embellishments fall off | The adhesive does not bond to glass or the item is too heavy | Use a glass-compatible adhesive and support heavy pieces while they cure |
| The finish looks flat | The colors have similar values and no highlighted texture | Add dark shading, light dry brushing, and restrained metallic accents |
| The bottle looks cluttered | Every available embellishment joined the party | Remove several pieces and preserve a clear focal point around the label |
| The sealer remains sticky | Coats were too heavy or products were incompatible | Follow curing directions, use thin coats, and test combinations before sealing the finished bottle |
How to Display DIY Halloween Potion Bottles
Arrange bottles in odd-numbered groups and vary their heights. Place a few on old books, small boxes, or cake stands so the labels remain visible. Add battery-operated candles, faux cobwebs, dried branches, miniature pumpkins, ravens, or framed botanical illustrations.
A mirrored tray creates a glamorous laboratory display, while an unfinished wooden crate produces a rustic witch-shop effect. For a party, place the bottles behind a drink station as decorative props, but keep them clearly separated from anything guests will consume.
Avoid open flames near paper, fabric, glue, dried moss, aerosol finishes, or other flammable craft materials. Battery-powered lights provide the atmosphere without asking your handmade spider venom to participate in an actual emergency.
Experience Notes: What Usually Happens During a Test Batch
A typical first batch of Halloween mixed media bottles begins with great confidence. The bottles are lined up, the paint is ready, and the crafter imagines a museum-quality cabinet of supernatural artifacts. About fifteen minutes later, the table contains twelve brushes, three unidentified scraps of lace, and a plastic spider permanently attached to the wrong object.
The most useful lesson is to work on several bottles at once. While the first bottle’s texture layer dries, the second can be painted and the third can receive its label. This rotation prevents impatient handling, which is responsible for fingerprints, smeared paint, shifted paper, and a surprising amount of muttering.
In a three-bottle test collection, the simplest bottle often becomes the favorite. One container may receive tissue texture, metal gears, string, fabric, charms, glitter, beads, and an ambitious clay gargoyle. Another may use only matte-black paint, a distressed label, and a silver spider. The restrained bottle usually reads more clearly from across the room. Mixed media rewards layering, but it also rewards knowing when the bottle has enough emotional baggage.
Label placement creates another common learning moment. A label centered while the bottle is lying down may appear crooked when it stands upright. Setting the bottle on a level surface and marking the position with removable tape helps. Curved bottles also make large labels difficult to smooth, so smaller designs generally behave better.
Texture experiments can produce excellent accidents. A torn tissue edge may look like peeling skin after painting. A bead buried under gauze may resemble an ancient growth. A drip of glue that seemed disastrous can become convincing candle wax or potion overflow. Mixed media is particularly friendly to mistakes because most errors can be renamed “distressing” and highlighted with bronze paint.
Drying time is the least exciting part of the process and one of the most important. A surface can feel dry while remaining soft underneath. Adding a heavy charm too early may pull off paint and paper together. Allowing each major layer to dry thoroughly produces a bottle that can survive storage instead of emerging next October with its decorative face stuck to another prop.
Color restraint also improves with experience. Beginning crafters often use pure black, bright green, vivid purple, and shiny gold at full strength. The result can be cheerful rather than ancient. Mixing a little brown, gray, or black into brighter colors makes them feel older. Metallic paint works best as a highlight across raised edges rather than a complete coat.
Finally, successful bottle collections share a visual connection. The containers do not need identical colors or labels, but repeating one elementsuch as copper highlights, cream paper, black lace, or a recurring spider emblemmakes the group look intentional. Without that connection, the display can resemble several unrelated craft projects waiting for separate rides home.
The practical takeaway is encouraging: the project improves naturally as it develops. The first bottle teaches surface preparation, the second teaches restraint, and the third proves that crooked labels become much less noticeable once a tiny skull is attached nearby.
Conclusion
Learning how to make Halloween mixed media bottles is less about mastering one complicated technique and more about combining simple techniques thoughtfully. Clean the glass, build texture in light layers, use compatible paint and adhesive, add an aged label, highlight raised details, and allow everything to dry before sealing.
The project is flexible enough for beginners but detailed enough to keep experienced crafters entertained. Recycled bottles can become mysterious poisons, enchanted tonics, ghostly specimens, or elegant Gothic decorations. Give each one a story, display them together, and enjoy the fact that yesterday’s vinegar bottle now appears capable of summoning fog.














