
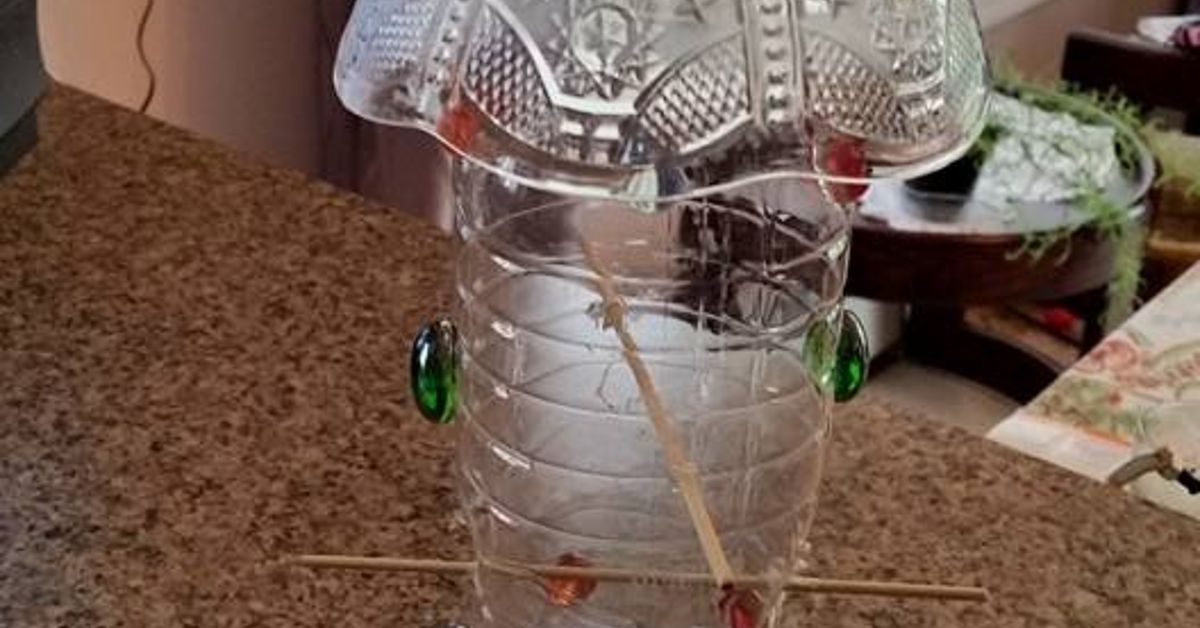
A used water bottle may look like yesterday’s trash, but with two perches, a few careful openings, and fresh seed, it can become tomorrow morning’s neighborhood café. Making a birdfeeder out of a recycled wate, balconies, or small yards. No woodworking shop is required, and the birds will not ask to see your contractor’s license.
The best recycled bottle bird feeder is more than a cute craft. It needs smooth edges, stable perches, drainage, dry food, safe placement, and regular cleaning. Build those features into the project from the start, and the result can be a practical feeder rather than a hanging container of soggy seed.
Why Make a Recycled Water Bottle Birdfeeder?
Reusing a bottle before recycling it extends the life of an everyday item and turns waste reduction into a visible, useful project. The U.S. Environmental Protection Agency specifically recommends repurposing items such as water bottles to help reduce plastic waste. ottle also has practical advantages: you can monitor the seed level, spot condensation, and see when food begins to clump. Choose a 20- to 32-ounce bottle for a compact feeder or a sturdy one- to two-liter bottle for a larger design. Remember that feeders should supplement natural habitat, not replace it. Native plants provide birds with seeds, berries, insects, shelter, and nesting resources throughout the year. s
- One clean plastic water or soda bottle with its cap
- Two wooden spoons, chopsticks, pencils, or smooth dowels
- Strong twine, weather-resistant cord, or coated wire
- Marker and ruler
- Scissors, an awl, a small drill, or a craft knife
- Fine sandpaper or an emery board
- Funnel or rolled sheet of paper
- Fresh birdseed
- Optional weather-resistant tape for reinforcement
Safety first: An adult should make all cuts and punctures. Work on a stable surface, cut away from the body, and smooth every opening. Thin plastic can split suddenly, which is the bottle’s way of reminding you that it never attended safety training.
How to Make a Birdfeeder Out of a Recycled Water Bottle
1. Choose and Clean the Bottle
Select a sturdy bottle that held water or another food-safe drink. Do not reuse containers that held cleaners, oils, pesticides, or chemicals. Remove the label if you want to see the seed clearly, then wash the bottle and cap with warm, soapy water. Rinse thoroughly and let both pieces dry completely. Dampness encourages seed to clump and spoil.
2. Mark the First Perch
Stand the bottle upright. Mark two points directly opposite each other about two to three inches above the bottom. These holes will hold a wooden spoon, chopstick, pencil, or dowel. Inserted through both sides, the object becomes a stable perch.
Mark a small feeding port about one-half inch above each perch hole. If you use a wooden spoon, position the spoon’s bowl below the port so it catches a little seed. Begin with small markings; plastic openings can always be enlarged, but they are famously unwilling to shrink.
3. Add a Second Feeding Station
Rotate the bottle 90 degrees and mark a second pair of perch holes several inches higher. Staggering the perches prevents them from colliding inside the bottle and gives more than one bird access to the feeder.
4. Make the Holes
Carefully puncture the perch holes and enlarge them gradually until each perch fits snugly. Then cut the feeding ports above them. A short slit or small oval is usually enough. The opening should release only a few seeds at a time while allowing a bird to reach them.
Smooth every cut edge with fine sandpaper or an emery board. Check both the inside and outside for pointed plastic flaps. If a perch hole is slightly loose, reinforce the exterior with weather-resistant tape, leaving no exposed sticky surface where feathers or feet could touch it.
5. Add Drainage
Make four to six tiny holes in the lowest part of the bottle. These allow accidental moisture to escape without losing much seed. Drainage is essential because moldy or decomposing seed can harm birds, especially during wet or humid weather. h the Hanger
Make two opposite holes near the neck and thread cord through them, or drill one small hole through the cap, pass the cord through, and tie a large knot beneath it. Create a strong loop and test it indoors with a small amount of seed. If the cap bends, the knot slips, or the bottle tilts, repair the hanger before moving outdoors.
7. Fill with the Right Seed
Use a funnel or a rolled sheet of paper and add only enough food for a few days. Black-oil sunflower seed is an excellent general choice because its thin shell is accessible to many feeder birds. White proso millet may appeal to sparrows, juncos, and similar species, while sunflower chips reduce shell litter but spoil more quickly when damp. Avoid bread, salty snacks, seasoned nuts, and table scraps. It in a Safe Location
Choose a sheltered place that stays as dry as possible. Nearby shrubs or trees give birds a place to pause and escape, but dense cover immediately beside the feeder can conceal cats. Cornell guidance suggests that about ten feet from protective cover can be a useful compromise, although every yard requires adjustment. feeder away from grills, busy doors, and pet areas. If it is near a window, use exterior markings or another proven collision-reduction method so birds recognize the glass as a barrier.
Cleaning and Maintenance
Inspect the feeder whenever you refill it. Remove wet seed immediately and replace the bottle if it becomes cloudy, cracked, brittle, or chewed. A reused feeder should be durable enough to maintain; once it can no longer be cleaned properly, recycle it where local rules permit and build another.
Many bird organizations and wildlife agencies recommend cleaning seed feeders about every one to two weeks, with more frequent cleaning during wet weather, heavy use, visible contamination, or a local disease event. Empty the feeder, scrub away debris with hot soapy water, rinse, disinfect according to current wildlife-health guidance, and let every part dry completely before refilling. Clean outdoors when possible, wear gloves, and wash your hands afterward. sh a bird feeder in a kitchen sink or food-preparation area. Sweep beneath it to remove hulls, droppings, and spoiled food, which can attract rodents and expose birds to contaminated material. If birds appear weak, unusually puffed up, lethargic, or unable to fly normally, remove the feeder and consult your state wildlife agency. roblems and Quick Fixes
Seed Falls Out Too Fast
The ports are too large or too low. Empty and clean the bottle, reinforce part of each opening with weather-resistant tape, and cut a smaller port through the reinforced area.
Seed Will Not Flow
The ports may be too small or the seed may be damp. Enlarge the holes slightly. Discard clumped or wet seed rather than breaking it apart and serving it anyway.
The Bottle Spins
Shorten the hanging loop, use two cords, or move the feeder to a sheltered hook. A loose stabilizing line can reduce movement without forcing the bottle to tilt.
Squirrels Take Over
Move the feeder away from roofs, fences, and launch-friendly branches. A pole with a correctly installed baffle is more reliable than hoping squirrels will honor a polite request.
No Birds Visit
Leave the feeder in one safe place and give birds time to inspect it. Keep the seed fresh, limit nearby disturbance, and provide natural cover. Once one confident visitor approves the new café, others may follow.
Simple Design Improvements
Add a small roof made from another washable reused item, improve the bottom drainage, or use natural wooden perches that are easy for small feet to grip. Keep decorations on the outside and avoid glitter, loose fibers, dangling plastic, exposed adhesive, or tiny pieces that could be swallowed.
Turn the feeder into an observation project by recording the date, weather, seed type, and birds seen. Cornell’s Project FeederWatch demonstrates how consistent backyard observations can contribute to larger studies of feeder birds. ce Notes: What the First Few Weeks Teach You
The first lesson is patience. You hang the completed feeder, step back proudly, and expect a cardinal to arrive as though it received a grand-opening invitation. Instead, the yard becomes suspiciously quiet. A chickadee may watch from a branch and leave. A squirrel may conduct a full inspection without purchasing anything.
That hesitation is normal. A new object changes a familiar space, and small birds survive by being cautious. Avoid moving the feeder every few hours. Keep it in a safe location, maintain fresh seed, and allow birds to investigate. Once one confident bird lands, the feeder can go from ignored to busy surprisingly quickly.
The second lesson is to start with tiny feeding ports. First-time builders often make generous openings because they want the seed to be easy to reach. Then they fill the bottle, lift it, and create a sunflower-seed hourglass. A narrow slit provides control. Enlarge it a fraction at a time after testing how the chosen seed flows.
Weather delivers the third lesson. A feeder that works perfectly on a dry afternoon may collect condensation after a storm. Seed near the bottom begins to clump, revealing why drainage holes, a sheltered location, and small refills matter. Filling only one-third of the bottle may look stingy, but it keeps food fresher and reduces waste if moisture gets inside.
The fourth lesson is that birds ignore human ideas of symmetry. One perch may become the popular table while the other remains empty. A chickadee might grab one seed and fly away. A finch may settle in as though it has signed a lease. Ground-feeding birds may skip the bottle entirely and search below it for spilled millet. Those differences turn a simple craft into an introduction to feeding behavior.
Maintenance becomes easier when it is scheduled before the feeder looks dirty. Refill lightly, inspect daily, and wash on a routine. Keeping a second clean, dry bottle ready allows you to rotate feeders without rushing the drying process. This is especially helpful after rain or during periods of heavy activity.
The project also changes how ordinary materials are viewed. A bottle becomes a weather-resistant container. A chopstick becomes a perch. A scrap of cord becomes a suspension system. More importantly, you begin noticing which birds arrive first, how they approach, which seeds disappear, and where they retreat when startled.
That is the lasting value of a recycled water bottle birdfeeder. The object is simple, but the experience combines reuse, design, observation, maintenance, and responsible wildlife care. It costs little, teaches quickly, and provides a front-row seat to daily dramas involving feathers, weather, seed, and at least one squirrel convinced it has solved your engineering.
Conclusion
A birdfeeder out of a recycled water bottle can be a safe, useful backyard project when it includes smooth openings, secure perches, drainage, fresh seed, thoughtful placement, and routine cleaning. Start small, test the seed flow, watch how local birds respond, and adjust the design rather than treating the first version as sacred architecture.
The feeder is only one part of a bird-friendly space. Pair it with native plants, clean water, shelter, and safer windows. Done responsibly, this low-cost project gives a bottle a second life and gives you a better view of the wildlife already sharing your neighborhood.
Note: Wildlife conditions, disease advisories, bear activity, predators, and local feeding rules vary. Check current guidance from your state wildlife agency and remove feeders temporarily whenever officials recommend doing so.













