
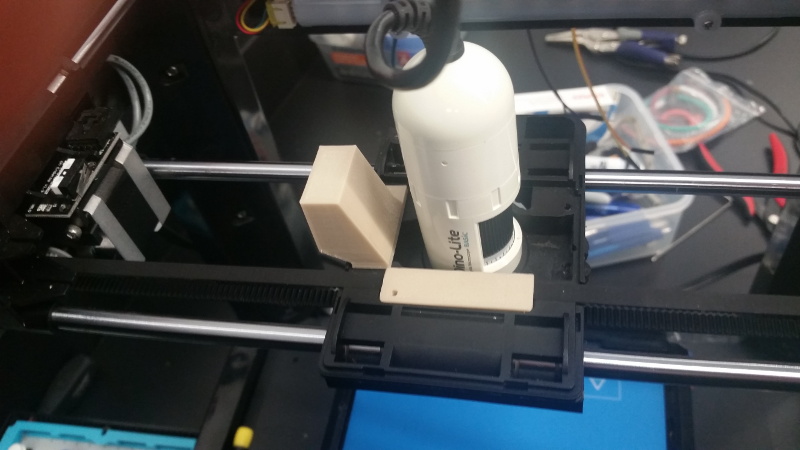
Most broken gadgets end their lives in one of two places: a closet of shame or a cardboard box labeled “important cables” that contains exactly zero important cables. But every so often, a dead machine gets a second act so clever it makes brand-new hardware look a little lazy. That is exactly what happened when a broken 3D printer was reborn as a scanning microscope.
At first glance, this sounds like one of those late-night maker ideas that begins with confidence and ends with a small puff of regret. A 3D printer is for making plastic dragons, calibration cubes, and replacement knobs you swear are “temporary.” A microscope is for inspecting things too tiny for the naked eye. Different jobs, different personalities, different dinner parties. And yet the marriage works beautifully.
The reason is simple: a desktop 3D printer is already a precision motion platform. It knows how to move in X, Y, and Z. It already has rails, belts, stepper motors, and a frame designed to position a tool with repeatable accuracy. Replace the print head with a camera or microscope module, add control software, and suddenly the machine is not laying down filament anymore. It is laying down image tiles, one tiny view at a time, across a specimen.
That is the magic behind the “broken 3D printer turned scanning microscope” idea. It is not just a funny salvage story. It is a smart example of how maker culture, open hardware, and real imaging science increasingly overlap. What looks like a junk-bin hack is actually part of a much larger movement toward low-cost, modular, highly capable microscopy.
When a Dead Printer Refuses to Stay Dead
The headline-grabbing version of this story starts with a Flashforge Finder whose mainboard was accidentally cooked during a fan replacement. For most machines, that would have been the end. Instead, the printer’s mechanical guts lived on. Its motion system was paired with a Raspberry Pi, a USB microscope, driver electronics, and custom adapter parts, turning the old printer into a platform that could scan objects in a grid and collect image data at high detail.
That is the sort of engineering twist that deserves a slow clap. The printer stopped making objects and started studying them. Honestly, that is a strong career pivot.
The converted machine worked as a scanning microscope by moving the camera across the target in the X and Y directions, taking many overlapping images along the way. Then, because real-world surfaces are rarely perfectly flat, the system could shift in Z and repeat the process. That opens the door to stitched panoramas, focus-stacked images, and depth-aware scans of tiny objects whose details would normally disappear outside the narrow field of view of a cheap microscope.
In other words, the dead printer did not just come back. It came back with a doctorate.
Why a 3D Printer Is Weirdly Good at Microscopy
Motion control is the real hero
People often think microscopes are mostly about magnification. Magnification matters, of course, but motion control is where the serious work begins. Once magnification increases, your field of view shrinks. That means you see a smaller area, your depth of field gets thinner, and every little vibration or alignment problem becomes dramatic. At that scale, even a tiny wobble behaves like a diva.
A consumer 3D printer already solves part of that problem. Its frame and motion components are built to move a toolhead or bed with predictable steps. That is not the same thing as laboratory-grade microscopy hardware, but it is far better than trying to hold a USB microscope in your hand and pretending your coffee intake does not matter.
This is also why open-source microscope projects have repeatedly borrowed from printer-style mechanics. Some systems use stepper motors, some use flexure stages, and others combine printed structures with off-the-shelf optics and Raspberry Pi cameras. The core idea stays the same: if you can control motion precisely, you can automate image capture, map larger sample areas, and turn a narrow optical view into a much more useful data set.
Scanning beats staring
A cheap digital microscope can show a tiny patch of a surface. That is nice for a quick peek. But a scanning microscope does something more ambitious. It captures many images in a controlled pattern, then stitches them into one larger composite. Suddenly, instead of seeing a small patch of an insect wing, a printed circuit board trace, a fabric weave, or a mineral surface, you see the big picture with fine detail preserved.
This is not a gimmick. Commercial microscope vendors use exactly this logic in panorama imaging, tile scanning, and whole-slide imaging. When the camera sensor cannot capture enough of the sample in one shot, the stage moves, the software collects overlapping tiles, and the system assembles them into a larger virtual image. The recycled 3D printer version is basically the garage-band cover of a song usually performed by very expensive instruments. Same melody, fewer matching uniforms.
Z-stacks make flat images less flat
The Z-axis is where the project gets even more interesting. When objects are not perfectly flat, one focal plane is not enough. A bug leg, grain of sand, flower pollen sample, or electronic solder joint can have height differences that throw parts of the image out of focus. By capturing multiple slices at different heights, the system can later produce an extended-depth-of-field image or even generate depth maps for pseudo-3D visualization.
That makes a converted 3D printer more than a moving webcam. It becomes a data-collection platform for computational imaging.
From Maker Hack to Real Imaging Strategy
This is the part where the story stops being a one-off curiosity and starts looking like a trend.
Years before the broken-printer microscope caught attention, makers had already experimented with turning 3D printers into imaging platforms. One early example used a MakerBot as a microscope stage by replacing the print head with a webcam. The concept was delightfully direct: if a printer can position a nozzle, it can position a camera. That simple swap hinted at a larger truth that later projects would develop much more seriously.
Then came systems like LadyBug, a motorized microscope and 3D scanner built from salvaged Blu-ray drive parts, 3D-printed components, a Raspberry Pi, and a low-cost USB microscope. It pushed the same philosophy further: use accessible parts, automate motion, and rely on software to turn many images into something richer than a single shot. In that project, sub-10-micron detail became part of the conversation, which is wildly ambitious for something built from consumer-grade pieces and determination.
Other open projects extended the idea in different directions. OpenFlexure focused on precision mechanics, using a printed flexure stage designed for stable motion at high magnification. MicroscoPI repurposed an old microscope and added Raspberry Pi imaging, stage control, and ImageJ-based analysis. POLIR adapted 3D-printer design principles into an imaging robot for microbiology work. None of these systems are identical, but together they prove a point: motion control, low-cost cameras, open-source software, and printable parts can go much farther than people expect.
Even academic research has leaned into this shift. Open-source modular microscope toolkits have shown that 3D-printed systems can support brightfield imaging, fluorescence, and other configurations at costs dramatically below traditional lab platforms. Portable holographic microscope designs have demonstrated micrometer-scale imaging with 3D-printed housings and single-board computers. More recent work has shown fully 3D-printed microscope systems achieving single-cell-level imaging, proving that the line between “maker project” and “serious instrument” is getting blurrier every year.
That does not mean your broken desktop printer is secretly a full commercial microscope waiting for its Oscar moment. It does mean the underlying concept is real, technically meaningful, and increasingly validated by both hobbyists and researchers.
How the System Actually Works
The hardware swap
In a typical printer conversion, the hotend is removed and replaced with a camera or microscope attachment. On some machines, the existing carriage geometry makes that surprisingly convenient. A USB microscope can fit where the extruder assembly once lived, while the original rails and belts continue doing what they do best: moving precisely and repeatedly.
A Raspberry Pi or similar controller handles coordination. It tells the motors where to go, triggers image capture, and manages scan routines. In some builds, stepper drivers are added directly. In others, printer-style control stacks or scripts handle the movement. Python shows up often because it is friendly, flexible, and has enough image-processing friends to keep the project from feeling lonely.
The imaging pass
Once the sample is in place, the microscope captures a grid of overlapping frames. Overlap matters because stitching software needs common visual features between neighboring images. If every frame is an isolated island, the software starts guessing, and software that guesses too much becomes modern art.
With good overlap, the software can align the frames and build a larger mosaic. This is the same principle used in whole-slide imaging and panorama microscopy. It is especially useful when the subject is larger than the microscope’s field of view but still needs close detail.
The focus pass
For textured or uneven specimens, one XY scan may not be enough. The system can repeat the same tile pattern at multiple Z heights. Those stacks can later be combined into an image where more of the object appears sharp at once. That approach is especially useful for insects, fibers, crystals, printed electronics, plant structures, and other samples that refuse to behave like obedient flat slides.
The software finish
Raw images are only half the story. Post-processing is where the microscope earns its “scanning” title. Stitching, alignment, focus stacking, contrast adjustment, and sometimes depth-map generation transform a folder full of tiny images into something coherent and useful. Open-source tools such as ImageJ, Fiji, and project-specific scripts often fill this role, though some makers still use commercial tools for the heavy lifting.
That software layer is not a side dish. It is the plate.
What a Broken-Printer Microscope Is Actually Good For
Let us be practical. Who needs this?
First, makers and tinkerers. A scanning microscope built from a dead printer is perfect for examining 3D print layers, nozzle wear, PCB traces, solder joints, resin artifacts, tiny mechanical parts, and materials you want to inspect without spending lab-equipment money.
Second, educators. A classroom or community lab can use this kind of project to teach motion systems, optics, image analysis, programming, and open hardware all at once. It is one of those rare projects that genuinely deserves the phrase “interdisciplinary” instead of just wearing it like a LinkedIn hat.
Third, citizen scientists, hobby microscopists, and small research teams. Low-cost scanning systems can help document insects, fibers, microfossils, biological samples, surface textures, and small manufactured objects. They also encourage experimentation. If the optics are not perfect, you can change them. If the lighting is bad, you can redesign it. If the field of view is too small, you can scan more tiles and let the computer do the knitting.
Finally, it is useful for anyone interested in digital archiving of fine detail. Scanning microscopes can create very large composite images from small fields, which makes them attractive for documentation work where both scale and detail matter.
Where the Hack Still Has Limits
Of course, this clever conversion does not break the laws of optics. It only annoys them politely.
Low-cost USB microscopes have limitations in sensor quality, lens quality, illumination, distortion, and working distance. Mechanical accuracy from a consumer printer can be good, but not always stable enough for every high-magnification task. Vibration, backlash, uneven lighting, sample tilt, and thermal drift can all show up and make your beautiful scan look like it had a disagreement with reality.
There is also the issue of throughput. A large XY scan with multiple Z slices can mean hundreds or thousands of images. That is not hard in theory, but in practice it requires time, storage, patience, and software that does not throw a tantrum halfway through.
And then there is calibration. If you want measurements that mean something, you need scale references, consistent optics, repeatable focus behavior, and disciplined imaging conditions. Turning a dead printer into a microscope is very achievable. Turning it into a reliable measuring instrument takes more care.
Still, these limits do not weaken the project’s importance. They define the playground.
Why This Matters More Than the Joke in the Headline
The title “Broken 3D Printer Turned Scanning Microscope” sounds charming because it captures a familiar maker fantasy: junk becomes genius. But the deeper story is about accessibility. Open-source microscopy is growing because traditional instruments are expensive, closed, and often difficult to modify. Meanwhile, printers, single-board computers, printable parts, commodity cameras, and open software are everywhere.
That changes the economics of experimentation.
When motion hardware becomes cheap, imaging becomes programmable. When imaging becomes programmable, microscopy stops being only about what the lens sees in one instant. It becomes about what software can reconstruct over time and space. The scan becomes the instrument. The dataset becomes the view.
That is why this hack resonates. It is funny, yes. It is resourceful, definitely. But it is also a glimpse of a broader shift toward customizable scientific tools built from accessible technology. Yesterday’s printer chassis becomes today’s microscope stage. Today’s microscope stage might become tomorrow’s automated imaging platform. The only constant is that somebody, somewhere, is probably attaching a Raspberry Pi to it right now.
Workbench Notes: What This Kind of Project Feels Like in Real Life
Anyone who has actually worked on a project like this knows the emotional journey is not a straight line. It is more like a badly tuned belt path: technically functional, but noisy.
You start with optimism. You look at the dead printer and think, “This already has motors, rails, and a frame. I am basically one adapter bracket away from scientific greatness.” Then you spend two hours discovering that one screw is inaccessible unless you remove three other parts, one of which appears to have been installed by a raccoon with a torque wrench.
Then comes the thrill of first motion. The camera carriage slides across the sample under software control, and suddenly the project feels real. It does not matter that the wiring looks like spaghetti going through a difficult period. It moved. On purpose. Because you told it to. That moment is intoxicating.
The next phase is humbling. Illumination is uneven. Focus drifts. The sample is not flat. Stitching fails because the overlap was too small, or because the subject did not have enough texture, or because the software decided today was a good day to become abstract. You learn very quickly that microscopy is not just magnification. It is lighting, alignment, mechanics, timing, stability, and patience pretending to be separate topics.
And yet the rewards are weirdly addictive. The first successful stitched image feels like finding treasure in a drawer of spare parts. A printed circuit board becomes a cityscape. A grain of sand starts looking like architecture. A dead insect wing becomes a field of repeating structures more elegant than most modern wallpaper. You begin by trying to salvage hardware, and you end up changing the scale at which you notice the world.
That is probably the best experience tied to a project like this: it retrains attention. Once you build a scanning microscope from broken hardware, ordinary objects stop behaving like ordinary objects. The texture on paper, the fibers in fabric, the finish on a coin, the scratches on plastic, the geometry of pollen, the layered edges of a 3D print, all of it starts telling stories. The machine becomes a translator between the everyday and the invisible.
There is also something deeply satisfying about the ethics of the build. Instead of throwing away a broken tool, you harvest its strengths. The printer failed at one task, but its mechanics still had value. That mindset feels increasingly important in a world full of sealed gadgets and disposable upgrades. A project like this quietly argues that machines are not always finished when manufacturers think they are.
And maybe that is why the idea sticks. Not because it is quirky, though it absolutely is. Not because it saves money, though it can. It sticks because it feels like a small rebellion against waste, against closed systems, and against the belief that advanced tools must always arrive fully assembled from somewhere expensive. Sometimes innovation looks like a polished instrument in a catalog. Sometimes it looks like a broken printer, a microscope camera, a Raspberry Pi, and a person stubborn enough to say, “Nope, I can still do something with this.”
Note: Source links are intentionally omitted for publication-ready formatting, and the HTML below is limited to the <body> section only.











