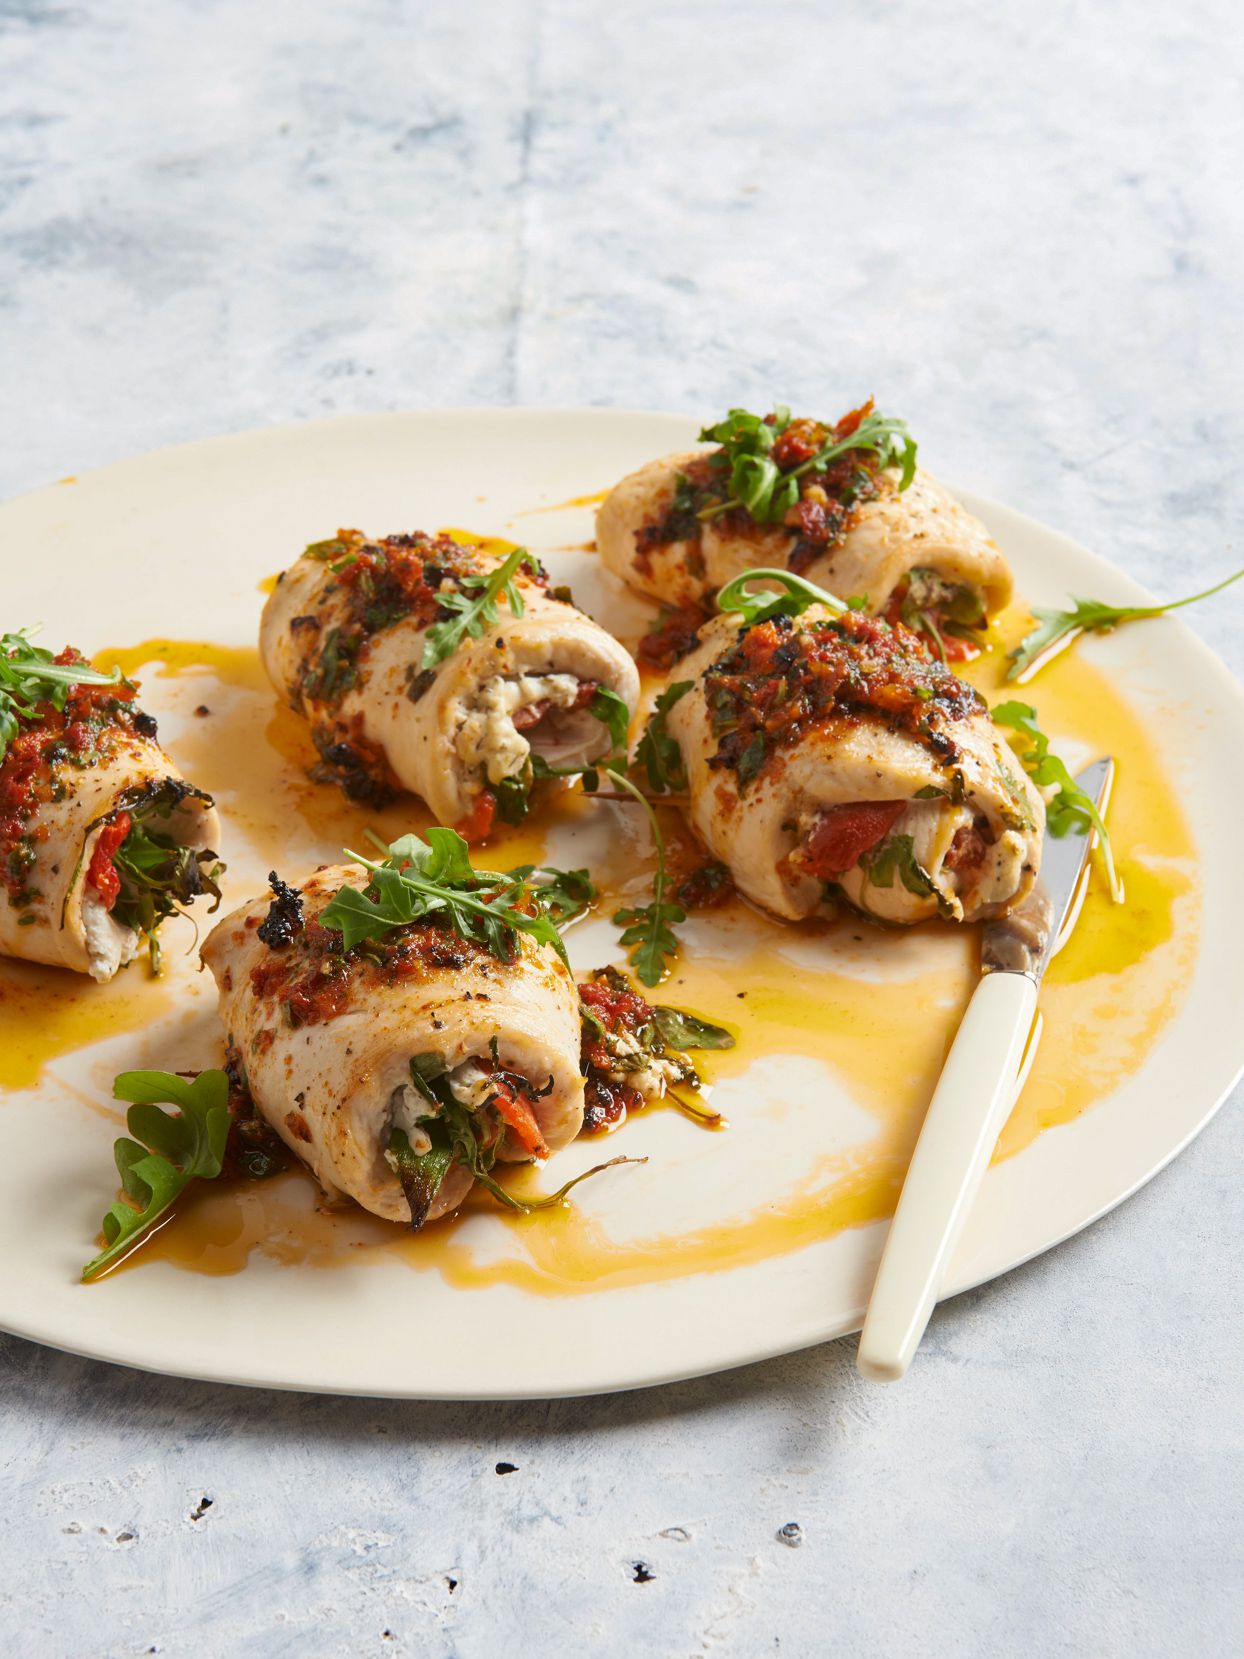
If weeknight dinner had a charm school, chicken and roasted pepper roll-ups would graduate with honors, a tidy apron, and a suspiciously delicious aroma following them out the door. This recipe takes lean chicken breasts, fills them with sweet roasted red peppers, creamy cheese, herbs, and greens, then rolls everything into neat little bundles that look fancy enough for guests but are forgiving enough for a Tuesday night when your patience is running on low battery mode.
The beauty of a Chicken and Roasted Pepper Roll-Ups Recipe is balance. The chicken brings protein and a mild canvas. Roasted red peppers add smoky sweetness. Cheese gives the filling a creamy, savory backbone. A little pesto, garlic, or fresh basil wakes everything up. The result is juicy, colorful, and satisfying without feeling heavy. In other words, this dish knows how to behave at dinner.
Why You’ll Love These Chicken and Roasted Pepper Roll-Ups
These chicken roll-ups are the kind of recipe that makes people ask, “Did you take a cooking class?” You can smile mysteriously and say, “No, I just own toothpicks.” The method is simple: pound the chicken thin, layer on the filling, roll it tightly, secure it, and bake until tender. Thin chicken cooks quickly and evenly, while the filling keeps the inside moist and flavorful.
This dish also works beautifully for meal prep. You can assemble the roll-ups earlier in the day, refrigerate them, and bake them when dinner time arrives. They pair well with roasted vegetables, rice, pasta, couscous, mashed potatoes, or a crisp green salad. For a lighter plate, serve them with lemony arugula. For comfort food energy, spoon warm marinara or roasted red pepper sauce over the top.
Ingredients for Chicken and Roasted Pepper Roll-Ups
This recipe serves 4 people generously, or 6 if you slice the roll-ups and serve them with hearty sides.
Main Ingredients
- 4 boneless, skinless chicken breasts
- 1 cup roasted red peppers, drained and sliced into strips
- 1 cup baby spinach or arugula
- 4 ounces garlic-herb goat cheese, cream cheese, or fresh mozzarella
- 1/4 cup basil pesto or sun-dried tomato pesto
- 2 tablespoons olive oil
- 2 cloves garlic, minced
- 1 teaspoon Italian seasoning
- 1/2 teaspoon kosher salt
- 1/4 teaspoon black pepper
- 1/4 teaspoon smoked paprika, optional
- Toothpicks or kitchen twine
Optional Add-Ins
- Fresh basil leaves for a brighter flavor
- Grated Parmesan for extra savory depth
- Thin slices of prosciutto for a special-occasion version
- A spoonful of ricotta for a softer filling
- Crushed red pepper flakes for gentle heat
How to Make Chicken and Roasted Pepper Roll-Ups
Step 1: Prepare the Chicken
Place each chicken breast between two sheets of plastic wrap or parchment paper. Using the flat side of a meat mallet, pound the chicken to about 1/4-inch thickness. Try to keep the thickness even from edge to edge. This helps the chicken roll easily and cook at the same pace. If one side is thick and the other is thin, dinner may develop trust issues.
Season both sides of the chicken with salt, black pepper, Italian seasoning, garlic, and smoked paprika if using. Let the chicken sit for 10 minutes while you prepare the filling.
Step 2: Build the Filling
Drain the roasted red peppers well and pat them dry with paper towels. This step matters. Wet peppers can make the filling slide around like it is auditioning for a cooking show disaster reel. Spread a thin layer of goat cheese, cream cheese, or mozzarella over one side of each chicken breast. Add spinach or arugula, then layer the roasted red pepper strips over the greens.
If you enjoy a stronger herbal flavor, add a few fresh basil leaves. If you prefer a creamier bite, use garlic-herb cheese. For a classic Italian-inspired version, mozzarella, basil, and roasted red peppers are a reliable trio.
Step 3: Roll and Secure
Starting from the short end, roll each chicken breast tightly around the filling. Secure each roll-up with toothpicks or kitchen twine. Do not panic if a little filling peeks out. That is not failure; that is dinner waving hello.
Step 4: Sear for Flavor
Heat olive oil in a large oven-safe skillet over medium-high heat. Add the chicken roll-ups seam-side down and sear for 2 to 3 minutes per side, until lightly golden. Searing adds color and deeper flavor, but if you are short on time, you can skip straight to baking. The dish will still be delicious.
Step 5: Bake Until Juicy and Safe
Preheat the oven to 400°F. Brush the tops of the roll-ups with pesto, then transfer the skillet to the oven. If you do not have an oven-safe skillet, place the seared roll-ups in a lightly greased baking dish. Bake for 18 to 25 minutes, depending on thickness, until the chicken reaches an internal temperature of 165°F when checked with a food thermometer.
Let the roll-ups rest for 5 minutes before slicing. Resting allows the juices to settle, which means the chicken stays tender instead of turning into the culinary equivalent of a dry handshake.
Homemade Roasted Red Peppers vs. Jarred Peppers
You can use either homemade roasted red peppers or jarred roasted red peppers for this recipe. Jarred peppers are convenient, flavorful, and perfect when dinner needs to happen before everyone starts eating cereal from the box. Just drain them well and pat them dry.
For homemade roasted peppers, place halved red bell peppers on a baking sheet, drizzle lightly with olive oil, and roast at 425°F until tender and blistered, usually around 30 to 35 minutes. Transfer them to a covered bowl for a few minutes, then peel away the loosened skins. The flavor is sweet, smoky, and slightly caramelized.
Best Cheese Options for Chicken Roll-Ups
Cheese is the glue that makes this recipe feel luxurious. Different cheeses create different personalities:
- Goat cheese: Tangy, creamy, and elegant. It pairs beautifully with arugula and pesto.
- Mozzarella: Mild, melty, and family-friendly. It gives the roll-ups a classic Italian feel.
- Cream cheese: Rich and smooth. Mix it with garlic, herbs, or Parmesan for more flavor.
- Ricotta: Soft and light. Best when combined with Parmesan and chopped spinach.
- Feta: Salty and bold. Use it sparingly with spinach and roasted peppers.
Flavor Variations
Italian Chicken Roll-Ups
Use mozzarella, basil, roasted red peppers, and a spoonful of marinara. Top with Parmesan before baking for a cozy, restaurant-style finish.
Mediterranean Chicken Roll-Ups
Use goat cheese, spinach, roasted peppers, chopped olives, and a little lemon zest. Serve with couscous or a cucumber-tomato salad.
Low-Carb Chicken Roll-Ups
Keep the filling simple with roasted peppers, spinach, mozzarella, and herbs. Serve with roasted broccoli, zucchini noodles, or cauliflower mash.
Creamy Pesto Chicken Roll-Ups
Spread pesto over the chicken before rolling and brush more on top before baking. Add a splash of cream to the baking dish for a silky sauce.
What to Serve with Chicken and Roasted Pepper Roll-Ups
These roll-ups are flexible enough to match many side dishes. For a fresh dinner, serve them with a crisp salad, lemon vinaigrette, and warm bread. For something hearty, try garlic mashed potatoes, buttered noodles, or rice pilaf. If you want a colorful plate, roasted asparagus, green beans, carrots, or zucchini are excellent choices.
A simple sauce can also make the dish feel complete. Try warm marinara, basil pesto, roasted red pepper sauce, or a light pan sauce made with chicken broth, garlic, and a squeeze of lemon. The key is not to drown the roll-ups. They are dinner, not a submarine.
Storage and Reheating Tips
Store leftover chicken roll-ups in an airtight container in the refrigerator for up to 3 to 4 days. For best results, reheat them gently in a covered baking dish at 325°F until warmed through. You can also microwave slices in short intervals, but add a spoonful of broth or sauce to help keep the chicken moist.
To freeze, wrap cooled roll-ups tightly and store them in a freezer-safe container for up to 2 months. Thaw overnight in the refrigerator before reheating. For meal prep, slice the roll-ups after chilling; they hold their shape better and look great in lunch containers.
Common Mistakes to Avoid
Using Thick Chicken Breasts
Thick chicken is harder to roll and takes longer to cook. Pound the chicken evenly so it wraps around the filling without tearing.
Skipping the Pepper-Drying Step
Roasted red peppers are often packed in liquid or oil. Patting them dry prevents soggy filling and helps the roll-ups stay neat.
Overfilling the Chicken
It is tempting to pack in “just one more” strip of pepper or “a harmless little mountain” of cheese. Resist. Too much filling leaks out during baking.
Forgetting the Thermometer
Chicken should be cooked to 165°F for safety. A food thermometer is the easiest way to avoid both undercooked chicken and overcooked sadness.
Chicken and Roasted Pepper Roll-Ups Recipe Card
Prep Time
20 minutes
Cook Time
25 minutes
Total Time
45 minutes
Servings
4 servings
Ingredients
- 4 boneless, skinless chicken breasts, pounded thin
- 1 cup roasted red peppers, drained, patted dry, and sliced
- 1 cup baby spinach or arugula
- 4 ounces garlic-herb goat cheese, cream cheese, or mozzarella
- 1/4 cup basil pesto or sun-dried tomato pesto
- 2 tablespoons olive oil
- 2 cloves garlic, minced
- 1 teaspoon Italian seasoning
- 1/2 teaspoon kosher salt
- 1/4 teaspoon black pepper
- Toothpicks or kitchen twine
Instructions
- Preheat oven to 400°F.
- Pound chicken breasts to about 1/4-inch thickness.
- Season chicken with salt, pepper, garlic, and Italian seasoning.
- Spread cheese over one side of each chicken breast.
- Layer spinach or arugula and roasted red pepper strips on top.
- Roll each chicken breast tightly and secure with toothpicks.
- Sear roll-ups in olive oil for 2 to 3 minutes per side.
- Brush tops with pesto and transfer to the oven.
- Bake for 18 to 25 minutes, until the internal temperature reaches 165°F.
- Rest for 5 minutes, remove toothpicks, slice, and serve warm.
Extra Experience: What I’ve Learned Making Chicken and Roasted Pepper Roll-Ups
The first time you make chicken and roasted pepper roll-ups, you may think the hardest part is rolling the chicken. It is not. The hardest part is convincing yourself that the filling does not need to include half the refrigerator. A little cheese, a few strips of roasted pepper, and a small handful of greens are enough. The chicken needs room to close, and the filling needs room to melt without escaping dramatically across the baking dish.
One of the best lessons from making this recipe is that texture matters as much as flavor. Thin chicken rolls cleanly. Dry roasted peppers stay in place. Soft cheese spreads evenly. Fresh greens add color and a little bite. When these pieces work together, the finished roll-up slices beautifully and looks far more complicated than it actually is.
I have also learned that pesto is a small ingredient with a big personality. A spoonful brushed over the top adds herbs, oil, garlic, and richness in one move. Sun-dried tomato pesto gives the dish a deeper, slightly sweet flavor, while basil pesto keeps it bright and classic. If you are serving picky eaters, use mozzarella and basil pesto. If you are serving adults who appreciate a tangy bite, goat cheese and arugula are excellent.
Another useful trick is to chill the assembled roll-ups for 10 to 15 minutes before cooking. This helps them hold their shape, especially if the chicken is very thin. You can also place them seam-side down when searing so the roll naturally seals as it cooks. Toothpicks are helpful, but remember to count them before serving. Nobody wants dinner with a surprise wooden accessory.
For entertaining, these roll-ups are a quiet hero. You can prepare them in advance, bake them shortly before guests arrive, and slice them on a platter with extra pesto or warm marinara. They look colorful, they smell amazing, and they do not require last-minute panic. That alone gives them a permanent spot in the dinner rotation.
For everyday meals, I like serving them with roasted vegetables because the oven is already on. Zucchini, carrots, broccoli, and potatoes all work well. If I want something lighter, I slice the roll-ups over a salad with lemon vinaigrette. If I want comfort, I serve them with buttered pasta and call it a very good decision.
The most important experience-based tip is simple: do not overbake. Chicken breasts are lean, and they can go from juicy to dry quickly. Check the temperature near the center of the thickest roll-up. Once it reaches 165°F, take the dish out and let it rest. Resting is not optional; it is where the chicken gathers itself emotionally and keeps its juices where they belong.
Finally, this recipe is flexible. You can make it elegant, casual, low-carb, extra cheesy, or vegetable-packed. You can use jarred peppers on busy nights or roast your own when you want deeper flavor. Either way, chicken and roasted pepper roll-ups deliver a meal that feels special without asking you to wrestle with complicated techniques. That is the kind of recipe every home cook deserves: dependable, colorful, and just fancy enough to make Tuesday feel like it put on a clean shirt.
Conclusion
Chicken and Roasted Pepper Roll-Ups are proof that a simple chicken breast can absolutely have main-character energy. With tender chicken, smoky-sweet roasted red peppers, creamy cheese, fresh greens, and a glossy pesto finish, this recipe turns familiar ingredients into a dinner that looks polished and tastes comforting. It is easy enough for weeknights, attractive enough for guests, and flexible enough to match whatever side dish is currently living rent-free in your pantry.
Whether you use goat cheese and arugula for a bistro-style plate or mozzarella and basil for an Italian-inspired family dinner, the method stays simple and reliable. Pound, fill, roll, sear, bake, rest, slice, and enjoy. That is dinner with a plan, a purpose, and thankfully, very few dishes.