
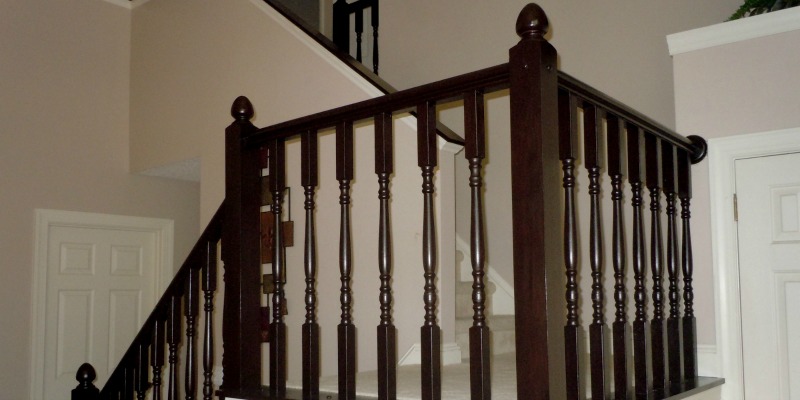
A tired honey-oak banister can make an otherwise updated entryway feel trapped in another decade. Fortunately, you may not need to strip the railing to bare wood or replace it with something expensive. A carefully planned DIY stair banister makeover using gel stain can deepen the color, soften orange undertones, and give the staircase a richer, more modern appearance.
Gel stain is especially useful on railings because its thick consistency clings to vertical and curved surfaces better than many traditional liquid stains. It also offers greater color control over an existing finish. The catchand there is always a catch wearing work glovesis that gel stain is forgiving, not magical. Cleaning, testing, thin coats, and patient drying are still essential.
Why Gel Stain Works Well on a Stair Banister
Traditional penetrating stain is designed primarily for bare wood. It soaks into the fibers, which means an existing polyurethane or varnish coating can prevent it from working properly. Gel stain behaves differently. Although formulations vary, it generally sits closer to the surface and acts partly like a translucent coating.
This makes gel stain a practical option for darkening a sound, previously finished handrail without performing a complete chemical stripping job. Its thicker body also reduces drips on newel posts, curved rails, and other vertical surfaces.
What gel stain can and cannot do
Gel stain can add a darker, more consistent tone while allowing some existing grain and variation to remain visible. It can help blend minor color differences and disguise light wear. Dark walnut, Java, espresso, and antique walnut are popular choices for transforming orange or golden oak.
However, gel stain will not repair peeling finish, deep gouges, loose joints, or water damage. It also cannot turn painted MDF into naturally stained walnut. A faux-grain effect can be created over paint with specialized techniques, but that is a different project from staining real wood.
If the old coating is flaking, waxy, badly damaged, or incompatible with the selected product, stripping to a stable surface may be necessary. Gel stain appreciates a solid foundation. It does not enjoy being asked to negotiate with peeling varnish.
Supplies for a Gel-Stained Banister Makeover
- Interior gel stain in the selected color
- A compatible clear protective topcoat
- Degreasing cleaner recommended for finished wood
- Fine sanding sponges or 180- to 220-grit sandpaper
- Vacuum with a brush attachment
- Clean, lint-free cotton cloths
- Foam brushes and a quality synthetic-bristle brush
- Small artist brushes for tight corners
- Painter’s tape and masking film
- Drop cloths or rosin paper
- Nitrile gloves and eye protection
- Respiratory protection appropriate for the product and task
- A listed metal container for safely holding solvent-soaked rags
Buy the stain and topcoat as a compatible finishing system whenever possible. Combining unrelated oil- and water-based products can work, but only after the lower layer is completely dry and the manufacturers confirm compatibility. The instructions on the actual containers override generic online drying schedules.
Inspect the Banister Before Starting
Identify the surface
Determine whether the handrail is solid wood, veneer, painted wood, MDF, or another material. Look underneath the rail or behind a removable decorative piece for an inconspicuous testing area. If a clear wood pattern continues around edges and into small scratches, the railing is probably stained wood. A completely uniform surface may be painted or factory coated.
Check the existing finish
Inspect the rail for wax, furniture polish, grease, silicone residue, peeling finish, and bare patches. Handrails collect skin oils with impressive dedication, so cleaning is not optional. Stain applied over contamination may bead, remain sticky, or rub off later.
Repair loose railings and unstable newel posts before doing cosmetic work. A gleaming dark-walnut finish is not compensation for a handrail that wobbles like a shopping cart wheel.
Consider lead safety in older homes
If the house was built before 1978 and painted surfaces may be disturbed, determine whether lead-based paint is present before sanding. Stairs, railings, and banisters are high-wear areas where old coatings may produce hazardous dust. Follow current EPA lead-safe practices or hire a lead-safe certified professional when appropriate.
How to Choose the Right Gel Stain Color
Never select a stain solely from the color printed on the can. The original wood species, existing finish, application thickness, and lighting all affect the final result. A color that appears medium brown on raw oak may look nearly black over an already amber-toned railing.
Test at least two colors in a hidden location or on a sample board prepared to resemble the banister. Apply the intended number of coats and add the planned topcoat. Clear finishes can deepen the color or alter its warmth, so the test is incomplete until the entire finishing system is represented.
For many entryways, a dark brown offers more flexibility than pure black. It creates contrast against white balusters while preserving a hint of wood character. If the floor contains both warm and cool tones, a neutral walnut or espresso shade can help connect them.
Step-by-Step DIY Stair Banister Makeover
Step 1: Protect the stairs and surrounding walls
Cover stair treads, flooring, baseboards, and nearby walls. Use painter’s tape along every edge where stain should stop. Press the tape firmly around curves and joints, but do not rely on tape to contain a flooded coat. Gel stain is thicker than liquid stain, yet gravity remains stubbornly employed.
Plan how household members will move between floors. Keep children and pets out of the work area, provide ventilation, and avoid creating an unsafe obstacle on the stairs.
Step 2: Clean away oil, wax, and grime
Wash the handrail and newel posts with a residue-free cleaner suitable for the existing coating. Concentrate on the top and underside of the handrail, where hands regularly make contact. Change cloths as they become dirty instead of redistributing old polish across the wood.
Rinse or neutralize the cleaner if its instructions require it, and allow the surface to dry completely. Avoid casually combining household chemicals. A cleaner should prepare the surface, not begin an unsupervised chemistry experiment in the foyer.
Step 3: Repair visible damage
Fill small holes and dents with a stainable repair product compatible with the finish. Test the filler because some products absorb stain differently from the surrounding wood. For deep scratches or missing finish, spot repairs may remain visible beneath a translucent gel stain, especially in bright natural light.
Step 4: Scuff-sand the existing finish
Lightly sand the sound finish to remove gloss and improve mechanical adhesion. Fine 180- to 220-grit paper is commonly appropriate, but follow the gel stain manufacturer’s preparation directions. The goal is usually to dull the surface evenly, not grind through every layer to bare wood.
Sand with the grain where possible. A flexible sanding sponge is useful on curves and molded edges. Be gentle around veneers and sharp profiles, where aggressive sanding can expose a different material or flatten details.
Step 5: Remove every trace of dust
Vacuum the banister and surrounding stairs, then wipe the surface with a clean cloth approved for the finishing system. Dust trapped in stain becomes texture, and texture on a handrail quickly becomes the only thing anyone can feel.
Step 6: Perform an adhesion and color test
Apply gel stain to a hidden section using the complete planned method. Allow it to dry for the full recommended period, then test whether it adheres and resists rubbing. If it remains tacky, wipes away easily, or separates into uneven patches, stop and identify the cause before coating the visible railing.
Step 7: Stir the gel stain thoroughly
Stir from the bottom until the color and consistency are uniform. Do not shake the container unless the label specifically permits it, because shaking can introduce bubbles. Pour a small working amount into a separate container to avoid contaminating the original product.
Step 8: Apply the first thin coat
Work in manageable sections, such as one side of a newel post or a two- to three-foot stretch of handrail. Apply gel stain with a foam brush, synthetic brush, staining pad, or lint-free cloth as directed by the manufacturer. Push the color into open grain and detailed areas, then wipe or feather the excess in the direction of the grain.
Thin coats dry more reliably and are easier to control. Heavy application may appear darker at first, but it can stay sticky for days and create an uneven, easily damaged film. More product is not automatically more luxurious; sometimes it is simply more product refusing to dry.
Step 9: Blend joints and overlapping sections
Maintain a wet edge and inspect the work from several angles. Staircases receive changing light throughout the day, so lap marks can hide until the afternoon sun arrives with the enthusiasm of a building inspector.
Use a small dry brush to feather excess stain out of corners, grooves, and transitions. Wipe the applicator frequently so accumulated material is not dragged into the next section.
Step 10: Let the stain dry completely
Drying time depends on the formula, coating thickness, temperature, humidity, airflow, and underlying finish. Manufacturer recommendations range from a few hours to 24 hours or longer between coats, particularly over sealed surfaces. Cool, humid conditions and heavy application extend the wait.
Do not judge dryness by the clock alone. The surface should not feel tacky, transfer significant color to a clean white cloth, or lift during the product’s recommended dryness test. When uncertain, allow additional time.
Step 11: Add another coat if needed
A second thin coat can increase depth and even out the color after the first coat has dried fully. Avoid repeatedly coating the railing simply to chase a nearly black appearance. Excess layers can obscure the grain and extend curing time. If the test area required three or four heavy coats, a different stain color may be the smarter choice.
Step 12: Seal the stained banister
Gel stain supplies color, but many products require a clear topcoat for lasting protection. A banister is a high-touch surface exposed to skin oils, rings, watches, bags, and daily cleaning, so a durable compatible finish is important.
Apply thin, even coats of polyurethane, polycrylic, or another manufacturer-approved topcoat. Respect the required wait between oil-based stain and a water-based finish. Lightly sand between clear coats only when the product instructions call for it, then remove all dust before recoating. Satin is popular because it looks refined without highlighting every fingerprint.
Step 13: Allow the finish to cure
Dry and cured are not the same thing. A coating may feel dry while remaining vulnerable to pressure, abrasion, and cleaning chemicals. Limit handling for the period specified on the label, restore normal use gradually, and avoid taping decorations to the new finish until it has cured.
Common Gel Stain Problems and Solutions
The stain is still sticky
The coat was probably too heavy, the surface was contaminated, or drying conditions were poor. Increase ventilation without blowing dust onto the finish and allow more time. Do not trap uncured stain under a topcoat. If it does not harden, consult the manufacturer before attempting removal or correction.
The color looks streaky
Streaks can result from inconsistent wiping, sections that were too large, or stain that began setting before it was blended. On the next coat, work in smaller areas and maintain the same application pressure. A dry brush can soften transitions while the stain is still workable.
The finish looks almost painted
Gel stain becomes increasingly opaque as coats accumulate. If the grain has disappeared, additional stain will not bring it back. Allow the surface to dry and decide whether the deeper solid color is acceptable. Otherwise, correction may require removing some or all of the applied finish.
The topcoat lifts the stain
The stain was likely not fully dry or the products were incompatible. Stop brushing immediately; repeated passes usually make the damage larger. Let the area harden, lightly repair it according to the product instructions, and extend the drying period before trying again.
Practical Experience: What This Makeover Is Really Like
The most noticeable lesson from real-world banister makeovers is that preparation consumes more time than staining. Cleaning a railing can reveal years of residue that was practically invisible before work began. The top may look respectable while the underside turns the first cleaning cloth an alarming shade of gray-brown. Skipping that cleaning would leave the new coating attached to grime instead of the old finish.
Masking also takes longer than expected. A staircase contains curves, wall brackets, baluster connections, tread edges, and awkward corners seemingly designed by someone with a personal dislike of painter’s tape. Spending an extra hour protecting those areas is still faster than removing dark stain from white trim later.
The first coat can be emotionally confusing. It may look lighter, patchier, or more transparent than the finished sample. That does not necessarily mean the project is failing. Gel stain develops through controlled layers, and the clear topcoat often gives the color additional depth. Evaluating the work while it is wet, under one light source, is a reliable way to create unnecessary panic.
Working in small sections makes the biggest difference. On a long handrail, coating six or eight feet at once gives the first area time to begin setting while the last area is still being applied. When the excess is finally wiped, one end may be pale and the other dark. Short sections provide enough time to distribute, wipe, inspect, and feather the stain consistently.
Curves require a different touch from flat surfaces. A foam brush quickly covers the broad top of a rail, while a folded cotton cloth reaches around the underside. Small artist brushes are surprisingly valuable near brackets and decorative grooves. The goal is not to use one heroic applicator for everything; it is to choose the tool that gives the best control in each area.
Drying days are where patience is tested. A surface can look perfect and still feel slightly tacky at a joint or inside a groove where stain accumulated. Applying topcoat because the project schedule says it is time can turn a small delay into a complete refinishing problem. Waiting another day is boring. Sanding off a gummy finish is also boring, but with consequences.
Lighting deserves attention throughout the project. A railing that looks uniform from the first floor may show lap marks when viewed from the landing. Checking from above, below, and beside a window catches problems while they can still be feathered. Portable work lighting is useful even in a bright foyer because shadows gather under handrails and around newel-post details.
Finally, the makeover often changes the entire staircase more than expected. A darker handrail paired with light balusters creates strong contrast and can visually connect dark flooring, black hardware, or nearby furniture. The result feels architectural rather than merely decorative. Better still, the project requires more patience than advanced carpentry, making it approachable for a careful DIYer who respects preparation, product instructions, and drying time.
Conclusion
A DIY stair banister makeover using gel stain can refresh an outdated entryway without the cost and disruption of replacing the railing. Success depends on accurately identifying the surface, removing contamination, scuff-sanding evenly, testing the complete finish system, and applying thin coats with controlled overlap.
The most important tool is patience. Let every layer dry according to its actual condition rather than an optimistic weekend schedule. Once the color is even and protected by a compatible topcoat, the banister can look dramatically richer while retaining the character of the original woodwork.











