
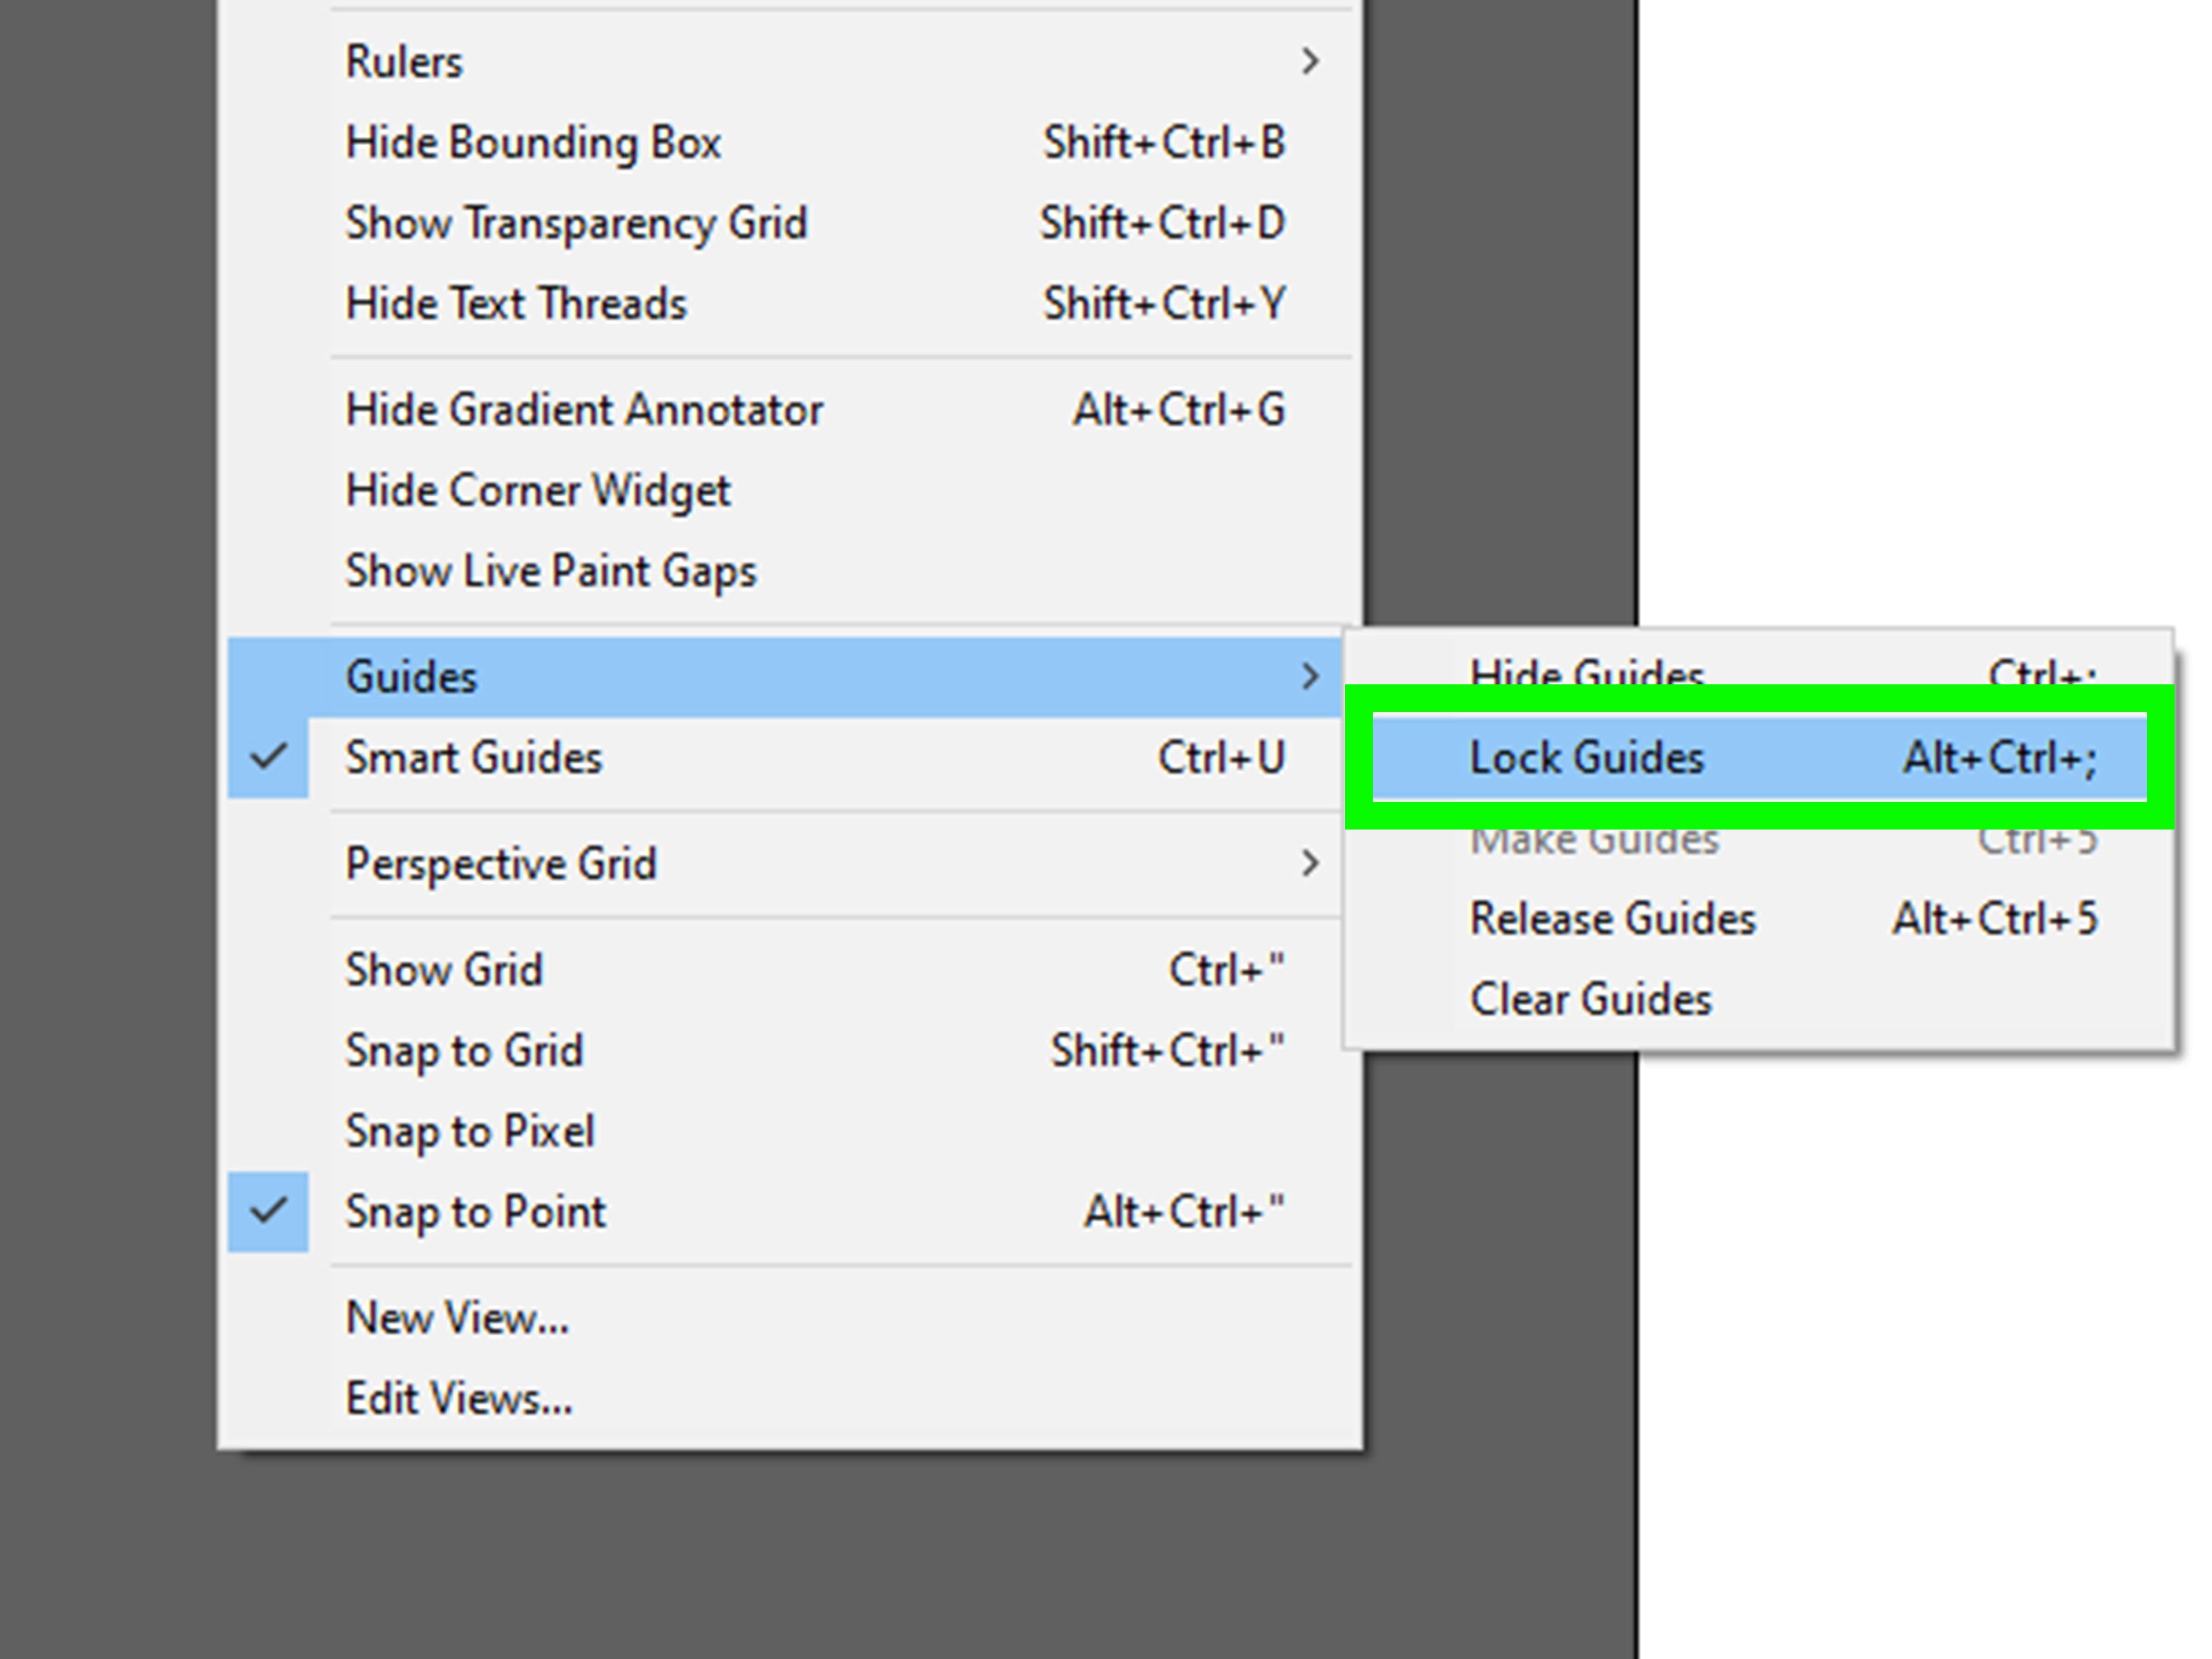
Quick answer: To unlock guides in Adobe Illustrator, go to View > Guides > Unlock Guides. Once unlocked, guides can be selected, moved, copied, deleted, released back into objects, or adjusted as part of your layout workflow.
Why Illustrator Guides Get Locked in the First Place
Adobe Illustrator guides are the invisible stage crew of clean design. They do not usually get applause, they do not wear dramatic capes, and yet they quietly keep logos, icons, packaging layouts, posters, UI mockups, and social graphics from looking like they were aligned during an earthquake.
Guides are nonprinting alignment aids that help you position artwork with precision. You can drag ruler guides from the top or left ruler, convert vector shapes into custom guide objects, use Smart Guides for temporary snap-to alignment, or build more advanced layout systems around artboards and grids. The problem begins when guides are locked and you suddenly cannot move them. You click. Nothing happens. You drag. Still nothing. Illustrator sits there calmly, as if your deadline is not making direct eye contact with you.
The good news is that unlocking guides in Illustrator is simple once you know where the command lives. The slightly sneaky part is that guides can feel locked for more than one reason. The global guide lock might be turned on. A layer might be locked. An object may have been converted into a guide. Smart Guides may be confused with regular ruler guides. Or you may be trying to select a guide while the wrong tool, layer, or view setting is active.
This guide walks through the cleanest seven-step method to unlock guides in Illustrator, plus practical troubleshooting advice for real design files. Whether you are adjusting a flyer margin, fixing a logo grid, cleaning up an icon set, or rescuing a mysterious template from a coworker who believes “Layer 47 copy final FINAL” is a naming system, these steps will help.
Easy Ways to Unlock Guides in Illustrator: 7 Steps
Step 1: Open the Illustrator File and Confirm Guides Are Visible
Start by opening the Illustrator document that contains the guides you want to edit. Before unlocking anything, make sure you can actually see the guides. Go to View > Guides and look for Show Guides or Hide Guides. If Illustrator offers “Show Guides,” your guides are currently hidden. Turn them on.
This matters because hidden guides can make you think they are locked, missing, or broken. They may be perfectly editable, just invisible. That is the design software equivalent of looking for your glasses while wearing them.
You can also turn on rulers by choosing View > Rulers > Show Rulers. Rulers make it easier to understand where your guides came from and where new ones can be created. Horizontal guides usually come from the top ruler, and vertical guides usually come from the left ruler.
Step 2: Go to View > Guides > Unlock Guides
The main command is direct: choose View > Guides > Unlock Guides. This unlocks the document-level guide lock, allowing guides to be selected and moved again.
After using the command, switch to the Selection Tool, also known as the black arrow. Click directly on a guide and try dragging it. If the guide moves, congratulations: you have restored order to the universe, or at least to your artboard.
If the menu says Lock Guides instead of Unlock Guides, that usually means the global guide lock is already off. In that case, your issue may be a locked layer, hidden guide, object lock, or selection setting. Keep going through the next steps.
Step 3: Use the Keyboard Shortcut for Speed
If you work in Illustrator often, the menu path is useful, but shortcuts are faster. On Windows, the common shortcut for locking or unlocking guides is Ctrl + Alt + ;. On macOS, use Command + Option + ;.
Think of this as the “please stop ignoring my guide” shortcut. It toggles guide locking on and off, so pay attention to what changes in the menu. If your guides still will not move after using the shortcut, do not keep smashing keys like you are trying to beat Illustrator in a rhythm game. Move to the layer checks below.
Step 4: Check Whether the Guide Is on a Locked Layer
Guides can be unlocked globally but still impossible to move if the layer containing them is locked. Open the Layers panel by choosing Window > Layers. Look for a lock icon beside the layer or sublayer that contains your guides.
If you see a lock icon, click it to unlock the layer. You may also need to expand layers and sublayers to find where the guide lives. This is especially common in downloaded templates, brand files, packaging dielines, and older client documents where guides were intentionally placed on their own layer.
A smart workflow is to keep guides on a dedicated layer named “Guides,” “Layout Guides,” or “Grid.” Lock that layer when you are designing, and unlock it only when you need to adjust the structure. This keeps your alignment system safe without forcing you to hunt through the entire document.
Step 5: Select, Move, Copy, or Delete the Guide
Once guides are unlocked, you can edit them like practical layout helpers. Use the Selection Tool to click a guide and drag it to a new position. To copy a guide while dragging, hold Alt on Windows or Option on macOS.
To delete a single guide, select it and press Backspace on Windows or Delete on macOS. To delete every guide in the document at once, choose View > Guides > Clear Guides. Use Clear Guides carefully. It is wonderfully efficient when you want a fresh layout, and wonderfully tragic when you delete a carefully built grid five minutes before exporting.
If you converted vector artwork into guides, you can also release those guides back into regular editable objects by selecting them and choosing View > Guides > Release Guides. This is helpful when a custom shape guide needs to become artwork again.
Step 6: Understand the Difference Between Guides and Smart Guides
Regular guides and Smart Guides are not the same thing. Regular ruler guides are the fixed lines you drag from rulers or create from vector objects. Smart Guides are temporary visual cues that appear while you move, draw, align, or transform artwork.
If you are trying to “unlock” a guide that only appears while dragging an object, you may actually be looking at a Smart Guide. Smart Guides do not unlock like regular guides because they are not permanent objects. You can turn them on or off from View > Smart Guides.
Smart Guides are extremely useful for snapping to edges, centers, anchor points, spacing relationships, artboards, and angles. But if your screen feels like it has turned into a neon geometry lecture, temporarily turning Smart Guides off can make manual guide editing easier.
Step 7: Save a Clean Version of Your File
After unlocking, moving, deleting, or releasing guides, save your work. For important client files, save a new version instead of overwriting the original. A file named something like brand-layout-guides-clean.ai is much more useful than new-new-final-v7-actually-final.ai, though we have all been emotionally involved with that second naming style.
Before exporting final artwork, you may want to lock guides again using View > Guides > Lock Guides. This prevents accidental changes while you adjust type, colors, symbols, masks, or production elements. Guides are meant to help your design stay organized, not wander around the canvas like unsupervised furniture.
Common Problems When Unlocking Guides in Illustrator
The Guides Are Unlocked, But I Still Cannot Move Them
First, check the Layers panel. A locked layer is the most common reason unlocked guides still refuse to move. Second, make sure you are using the Selection Tool. Third, confirm that the guide is visible and not hidden behind other view settings. Fourth, try toggling View > Guides > Lock Guides and then View > Guides > Unlock Guides again. Sometimes a simple toggle refreshes the document behavior.
The Guide Disappeared When I Tried to Move It
You may have dragged the guide back onto the ruler area, which removes it. You may also have deleted it accidentally. If that just happened, use Edit > Undo right away. Illustrator is forgiving, but only if you ask quickly.
I Cannot Select a Custom Shape Guide
Custom guides are made from vector objects using View > Guides > Make Guides. To edit them, unlock guides first. If you need the original shape back, select the guide and choose View > Guides > Release Guides. If the guide is on a locked layer, unlock the layer too.
My Guides Are in the Wrong Place on the Artboard
Guides can relate to the canvas or to specific artboards depending on how they are created and moved. If you are working with multiple artboards, zoom in and confirm which artboard is active. For layout-heavy projects, it helps to create guides while the correct artboard is selected.
Best Practices for Working With Illustrator Guides
Keep Guides on Their Own Layer
For professional files, place guides on a dedicated layer. Name it clearly, lock it while designing, and unlock it only when needed. This prevents accidental movement and makes collaboration easier. When another designer opens your file, they should not need a treasure map to understand the structure.
Use Rulers for Precise Layouts
Turn on rulers when building margins, columns, icon grids, packaging layouts, and web graphics. You can drag guides from the rulers or use ruler-based methods to create more precise guide placement. Right-clicking the ruler can also help you work in suitable units such as pixels, inches, points, or millimeters depending on the project.
Use Smart Guides, But Do Not Let Them Boss You Around
Smart Guides are fantastic for quick alignment, especially when spacing objects or snapping to centers and edges. However, if they become distracting, turn them off temporarily. A good Illustrator workflow often switches between fixed guides, Smart Guides, grids, and manual alignment depending on the task.
Lock Guides Before Final Artwork Edits
Once your layout is correct, lock the guides. This protects your structure while you edit shapes, text, strokes, gradients, patterns, and effects. Accidentally moving a guide by two pixels may not sound dramatic, but in logo design, two pixels can start an argument in a conference room.
Practical Example: Unlocking Guides in a Logo Grid
Imagine you are working on a logo built around a circular grid. The previous designer converted several circles and diagonal lines into guides, then locked everything. You need to adjust the spacing because the icon feels too tight beside the wordmark.
First, choose View > Guides > Unlock Guides. Next, open the Layers panel and unlock the guide layer if needed. Select the custom guide shapes and move them slightly to test the new spacing. If one custom guide needs to become a normal editable circle, select it and choose View > Guides > Release Guides. After adjusting the artwork, lock the guides again so the structure does not shift while you refine the logo.
This workflow is cleaner than deleting guides and rebuilding everything from scratch. It also preserves the design logic of the file, which is especially important when working with brand systems, icon families, and templates.
Extra Experience: What Unlocking Guides Teaches You About Better Illustrator Workflow
After using Illustrator for a while, you realize that unlocking guides is not just a tiny menu command. It is part of a bigger lesson: good design files need structure. A beautiful illustration can become frustrating if the file is chaotic. A simple poster can become a production nightmare if guides, layers, masks, and type are scattered everywhere with no naming system.
One useful habit is to treat guides like scaffolding. They help you build the design, but they should not get mixed randomly into the artwork. When guides sit on their own layer, you can lock or unlock them confidently. When they are scattered across several layers, you may waste time clicking around and wondering why one guide moves while another refuses. That is not creativity; that is hide-and-seek with blue lines.
Another experience-based tip is to lock guides during creative exploration and unlock them during structural editing. For example, when designing a business card, you might create margin guides, bleed guides, center lines, and text-safe areas. Once those are set, lock them. Then focus on typography, logo placement, and color. If the layout needs a major change, unlock the guides, adjust the system, and lock them again. This rhythm keeps you from accidentally nudging the foundation while decorating the house.
When working with client templates, always inspect the Layers panel before assuming Illustrator is broken. Many templates include locked layers for guides, dielines, folds, trim areas, safety margins, or notes. Packaging files are especially famous for this. A box design might contain separate layers for artwork, varnish, foil, cut lines, fold lines, white ink, and guides. Unlocking the wrong layer can create expensive production mistakes, so move slowly and read layer names carefully.
For icon design, custom guides are often more useful than ordinary straight lines. You can create circles, angles, curves, or geometric shapes, convert them into guides, and use them as a visual system. This is excellent for building consistent icons, app symbols, badges, and logos. When the system needs editing, unlock guides, make the change, and then lock them again. The result is a file that feels intentional rather than improvised.
Smart Guides also deserve a balanced approach. They are brilliant when aligning objects quickly, but they can create visual noise in complex artwork. If Illustrator seems to be snapping too aggressively or showing too many temporary lines, turn Smart Guides off for a moment. Edit your fixed guides, adjust the artwork, then turn Smart Guides back on when you need quick alignment help.
Finally, create versions before making big guide changes. Guides often represent decisions about spacing, proportion, margins, and production requirements. If you clear them all and later realize they were important, you may have to rebuild the logic from memory. Saving a duplicate file before major cleanup is boring, responsible, and absolutely worth it. In design, “boring and responsible” is often what saves Friday afternoon.
The more you work with Illustrator guides, the more they become part of your design thinking. Unlocking them is easy. Knowing when to unlock them, how to organize them, and when to lock them again is what makes your workflow faster, cleaner, and much less dramatic.
Conclusion
Unlocking guides in Illustrator is simple: go to View > Guides > Unlock Guides, or use the keyboard shortcut. But a smooth workflow also means checking layer locks, understanding the difference between regular guides and Smart Guides, knowing how to release custom guides, and keeping your layout structure organized.
Guides may look like humble lines, but they are powerful tools for precision. They help you align artwork, build repeatable systems, maintain consistent spacing, and avoid the classic design disaster known as “I eyeballed it and now everything is slightly haunted.” Use them well, lock them when needed, unlock them when editing, and your Illustrator files will be cleaner, calmer, and easier to share.












