
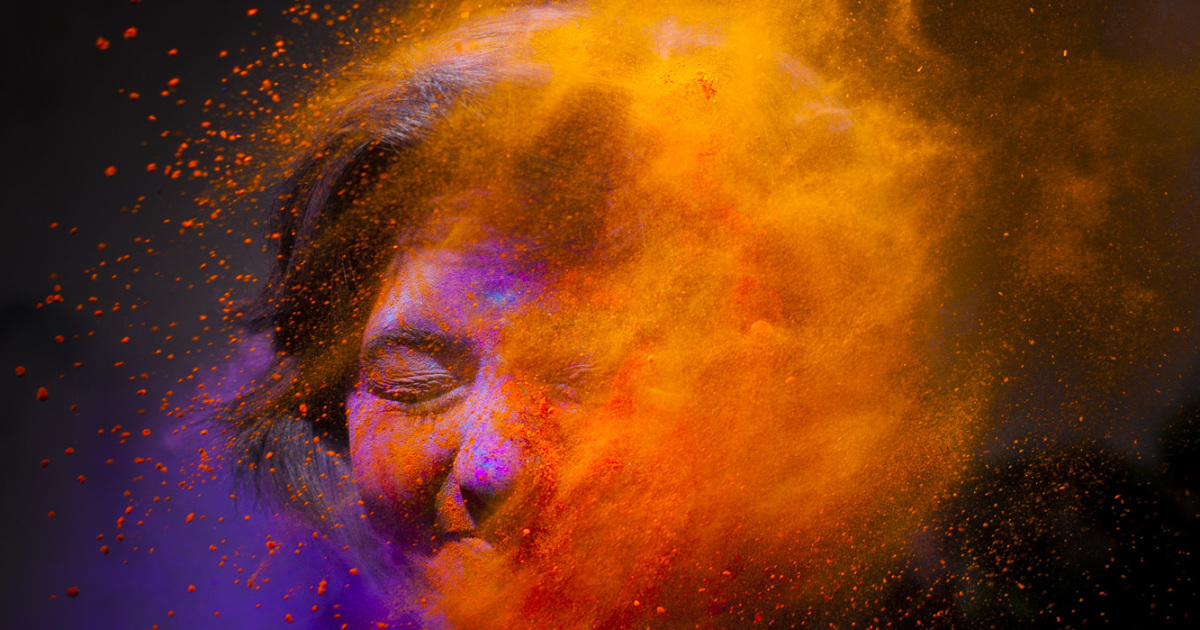
Every Holi portrait begins with an obvious advantage: color. Glorious, chaotic, impossible-to-ignore color. Pink dust on eyelashes. Blue powder on cheeks. Yellow clouds floating through the air like someone shook a giant box of crayons over the neighborhood. It is a photographer’s dreamand also, after the 400th nearly identical smiling face covered in gulal, a tiny creative trap.
That was the moment I got bored of regular Holi portraits and decided to take out my camera not just to document color, but to play with light. Instead of asking people to stand, smile, and look festive, I started treating Holi like a moving studio. The colored powder became atmosphere. The sun became a rim light. Shadows became part of the story. A cheap reflector suddenly felt like a magic wand. And yes, my camera looked like it had survived a rainbow-flavored dust storm by lunch.
Holi, often called the Festival of Colors, is a Hindu spring celebration associated with joy, renewal, love, togetherness, and the victory of good over evil. People throw colored powders and water, dance, share food, forgive old grudges, and generally remind the world that life looks better when it stops taking itself so seriously. For photographers, that means Holi is not only a cultural event; it is a living lesson in motion, expression, color theory, environmental portraiture, and creative lighting.
This article is for photographers, visual storytellers, content creators, and curious humans who want to move beyond ordinary Holi photography. The goal is simple: create Holi portraits that feel cinematic, emotional, playful, and different from the usual “person covered in color, standing in daylight” shot. Nothing against that classic frameit is classic for a reason. But sometimes the camera wants dessert.
Why Regular Holi Portraits Start Looking the Same
There is a strange irony in Holi photography: the event is wildly colorful, yet many photos end up feeling repetitive. The subject faces the camera. The background is busy. The colors are bright. Everyone smiles. The shutter clicks. Congratulations, you have made a nice photographand so has everyone else within a three-mile radius.
The problem is not the festival. The problem is the photographer’s comfort zone. Holi gives you so much visual drama that it becomes tempting to rely only on the powder. But color alone does not create depth. A face covered in magenta is interesting for a second; a face half-lit through a drifting cloud of magenta powder can stop someone mid-scroll.
Great Holi portraits need structure. They need direction, contrast, timing, and intention. Light creates that structure. It separates the subject from the background, reveals texture in the powder, gives shape to the face, and turns random chaos into a deliberate frame. In other words, color grabs attention, but light holds it hostagein a friendly, artistic way.
Understanding Holi as a Visual Story
Before talking about camera settings or lighting setups, it helps to understand what Holi represents visually. This is not a normal portrait session with a neat backdrop and a nervous subject asking, “What do I do with my hands?” Holi is movement, laughter, mess, music, surprise, and human connection.
The best Holi portraits respect that energy. They do not make the festival look like a fashion shoot that wandered into a temple courtyard by accident. They preserve the joy while shaping it through composition and light. A good Holi portrait might show someone closing their eyes as color bursts around them, a child laughing through a cloud of yellow, two friends colliding in a pink haze, or a single face emerging from darkness with powder glowing around the edges.
The trick is to photograph the feeling, not just the pigment. Holi is not “people plus powder.” It is release. It is noise. It is spring announcing itself like it kicked open the door.
Playing With Light: The Secret Ingredient
When I decided to experiment, I stopped asking, “Where are the colors?” and started asking, “Where is the light coming from?” That small shift changed everything.
Front light made colors clean and cheerful, but sometimes flat. Side light created shadows and texture, making powder on the skin look almost sculptural. Backlight turned airborne color into glowing mist. Hard sunlight made dramatic edges. Soft shade gave faces a gentle, painterly feel. Artificial light added control when the natural light became dull or unpredictable.
In portrait photography, light is not just brightness. It is mood. A soft light can make a Holi portrait feel tender and intimate. A hard beam through colored powder can make it feel like a movie poster. A colored gel on a flash can exaggerate the festival mood until reality looks slightly drunk on its own beauty.
Backlighting the Powder Cloud
If there is one lighting technique that instantly upgrades Holi photography, it is backlighting. Place the sun or a flash behind the subject and let the powder pass between the light and the camera. Suddenly, the powder is no longer just color on clothing; it becomes atmosphere.
Backlight catches the tiny particles in the air and gives them a glowing outline. Pink becomes smoke. Yellow becomes golden fog. Blue becomes a dreamy haze. The subject’s hair, shoulders, and profile can pick up a bright rim, separating them from the background. This is especially powerful when the background is darker or less cluttered.
For a simple setup, shoot late in the afternoon when the sun is lower. Position the subject with the sun behind them, slightly off to one side. Expose for the face, not the sky, and take several frames as the color is thrown. The best moment often happens a fraction of a second after the powder leaves the hand, when it expands into a cloud but has not yet swallowed the subject completely.
Using Side Light for Texture and Drama
Side light is perfect for portraits where you want the powder on the skin to feel tactile. It reveals the ridges, streaks, fingerprints, and uneven patches that make Holi portraits human. A face covered in color should not look airbrushed into a plastic festival advertisement. It should show evidence of laughter, sweat, dust, and the friendly attack of several enthusiastic relatives.
Place your subject near a doorway, wall, tree, or any area where the light comes from one direction. The shadow side of the face adds depth, while the bright side catches the color. This works beautifully for quieter portraits after the wildest moments of celebration, when people are tired, happy, and wearing five different colors like emotional evidence.
Adding Flash Without Killing the Mood
Flash can make Holi portraits sharper and more controlled, but it can also flatten the scene if used carelessly. The goal is not to blast the subject like a passport photo taken during a confetti emergency. The goal is to add shape, freeze action, or create a highlight that natural light cannot provide.
A small off-camera flash placed at a 45-degree angle can add dimension to the face. A flash behind the subject can create a rim light through powder. A flash with a colored gel can add blue, red, orange, or purple tones that blend with the Holi atmosphere. Keep the flash subtle enough that the scene still feels alive, not staged in a laboratory for extremely cheerful scientists.
If you use gels, remember that exposure matters. Overexposing can wash out the color, while slightly underexposing the ambient light can make gel colors richer. Start simple: one light, one gel, one subject, one powder throw. Once that works, add complexity.
Camera Settings for Creative Holi Portrait Photography
There is no single perfect setting for Holi portraits because the scene changes constantly. People move. Powder flies. Light shifts. Someone’s uncle walks into the frame with a plate of sweets. Still, a few starting points can help.
Shutter Speed
Use a fast shutter speed if you want to freeze powder in the air. A range around 1/500 to 1/1000 second can capture sharp particles and expressions. If you want motion blur for a dreamy or chaotic effect, slow down to around 1/60 or 1/125 second and move with the subject. Just know that motion blur is like hot sauce: wonderful in the right amount, regrettable when poured blindly.
Aperture
For individual portraits, an aperture around f/2.8 to f/4 can separate the subject from the background while keeping enough of the face sharp. For groups or action scenes, f/5.6 to f/8 gives more depth of field and a better chance of keeping multiple people in focus. Holi is not patient, so give yourself a little forgiveness.
ISO
Keep ISO as low as possible in bright daylight, but do not be afraid to raise it in shade or late afternoon. A slightly noisy photo with great expression is better than a perfectly clean file of someone blinking like they just saw their future.
Focus Mode
Continuous autofocus is useful for action. Eye detection can help for close portraits, although powder, sunglasses, and sudden movement may confuse the camera. Take bursts during key moments, but do not spray endlessly. Your memory card deserves dignity.
Composition: Turning Color Chaos Into Art
Holi can be visually overwhelming. That is part of its charm, but also part of the challenge. A strong composition helps the viewer know where to look.
Look for clean backgrounds whenever possible. A plain wall, open sky, shaded doorway, or darker tree line can make the subject stand out. Use leading lines from streets, temple steps, hands, or powder trails. Frame through arms, fabric, flags, or drifting color. Get low to make powder clouds look larger. Shoot from above to turn the ground into a painted canvas.
Negative space can be surprisingly powerful in Holi photography. Instead of filling every inch with faces and color, let one subject stand against a quiet background while a cloud of powder moves through the frame. The contrast between stillness and chaos can feel poetic.
Color Theory for Holi Portraits
Holi already provides a wild palette, but great photographers still think about color relationships. Complementary colors such as blue and orange or purple and yellow can create visual energy. Similar colors such as pink, red, and orange can feel warm and emotional. A single dominant color can create a stronger identity than a dozen colors fighting for attention.
When editing, resist the urge to push saturation until every face looks radioactive. Holi colors are already strong. Instead, focus on contrast, skin tone balance, and preserving texture. Let the colors breathe. If everything is equally intense, nothing feels special.
Protecting Your Camera During Holi
Now for the less glamorous part: Holi powder and water are not camera-friendly. Fine powder can settle into buttons, lens rings, viewfinders, microphone ports, and every tiny place your camera manufacturer forgot to emotionally prepare you for. Water adds another layer of risk.
Use a rain cover, plastic camera sleeve, or protective housing if you plan to shoot close to the action. Tape around vulnerable openings if needed, but avoid blocking heat vents or controls you need. Use a UV or clear protective filter on the lens. Keep lens changes to an absolute minimum. Carry microfiber cloths, a blower, and sealed plastic bags. After shooting, clean the exterior gently before opening compartments or removing lenses.
Also protect yourself. Wear sunglasses or eye protection, use a mask or scarf if powder is heavy, and avoid getting too close when people are throwing color directly. A photographer with burning eyes and a coughing fit is not a creative visionary; that is just a person who should have packed better.
Working With People Respectfully
Holi is joyful, but it is still a cultural and personal event. Ask before making close portraits, especially of children, elders, or people in private spaces. Be aware of religious settings. Do not shove a camera into someone’s face just because the light is beautiful. The best portraits often come from trust, not ambush.
Give simple direction. Ask someone to turn slightly toward the light, close their eyes before powder is thrown, laugh with a friend, or walk through a patch of sun. Keep the energy light. Holi is not the time to deliver a 14-minute lecture on chin position.
Editing Holi Portraits Without Overcooking Them
Post-processing is where Holi portraits can either become magical or look like a unicorn exploded inside a photo editor. Start with exposure and contrast. Recover highlights in bright powder clouds. Lift shadows only if needed. Adjust white balance carefully because colored powder can trick the camera into strange tones.
Use selective adjustments to guide attention. Brighten the face slightly. Add clarity to powder texture. Darken distracting areas. If the background is too colorful, reduce its saturation a little so the subject becomes stronger. A subtle vignette can help, but avoid making every frame look like it was shot through a dramatic tunnel.
The best edit should feel like the scene, only more intentional. Think of editing as seasoning, not deep-frying.
Creative Holi Portrait Ideas to Try
1. The Powder Halo
Ask a friend to throw powder behind the subject while you backlight the scene. The powder creates a glowing halo around the head and shoulders. This works especially well with yellow, orange, or pink powder near sunset.
2. The Half-Shadow Portrait
Place the subject so one side of the face is lit and the other falls into shadow. The contrast makes the colors feel more dramatic and adds emotional weight to the image.
3. The Gelled Night Portrait
Use one colored light from the side and another small light behind the subject. Add a little powder in the air. The result can look like Holi wandered into a neon music video and decided to stay.
4. The Quiet Aftermath
Not every Holi photo needs flying powder. Some of the best portraits happen after the action, when faces are tired, clothes are stained, and people sit quietly with color in their hair. Use soft light and focus on expression.
5. The Silhouette Burst
Shoot toward the sun and expose for the bright background, allowing the subject to become a dark shape. When powder is thrown, it glows around the silhouette. Simple, bold, and wonderfully dramatic.
My Experience: What Happened When I Stopped Chasing Color and Started Chasing Light
The first time I tried to photograph Holi differently, I failed in several educational ways. I arrived thinking the colors would do all the work. They did not. The first batch of photos was bright, cheerful, and completely forgettable. Everyone looked happy, which was nice, but the images had the same energy as a postcard rack near a tourist bus.
Then I noticed a narrow strip of sunlight cutting between two buildings. People kept walking through it for half a second before disappearing back into shade. When powder floated through that light, it glowed. Not just appearedglowed. I positioned myself low, waited for someone to pass through, and caught a portrait of a young man laughing as orange powder exploded behind his shoulder. His face was partly shadowed, the edge of his hair was lit, and the powder looked like fire. That frame taught me more than the previous hundred.
After that, I began treating the location like a studio with terrible housekeeping. I looked for dark backgrounds, reflective walls, shafts of sun, shaded corners, and places where color would hang in the air. I asked friends to throw powder from behind the subject instead of directly at the camera. I used a small flash behind one person and watched blue powder turn into electric fog. I placed another subject near a doorway, where the soft side light made green and pink powder look like brushstrokes.
I also learned practical lessons quickly. First, protect the camera before the fun begins, not after the first purple cloud hits your lens. Second, bring more cloths than you think you need. Third, do not change lenses in the middle of a powder storm unless you enjoy living dangerously and possibly expensively. Fourth, people relax when you show them a great shot on the back of the camera. Suddenly they understand the experiment and start helping you create better images.
The most surprising lesson was that Holi portraits become stronger when you slow down. The festival itself is fast, but observation matters. Instead of chasing every splash of color, I waited for good light and let the action come to me. That changed my timing. I stopped shooting everything and started anticipating moments: the inhale before someone throws powder, the laugh after impact, the tiny pause when a person wipes color from one eye, the stillness after the crowd moves on.
Playing with light made the portraits feel less like event coverage and more like visual storytelling. The images had mood. Some were joyful and bright. Some were mysterious. Some looked almost theatrical. The same festival gave me multiple styles because light kept changing the emotional language of the scene.
By the end of the day, my shoes were ruined, my hands were pink, and my camera bag looked like it had been dusted by a mischievous bakery. But the photos were different. They felt personal. They showed not only what Holi looked like, but how it felt to stand inside that storm of color, warmth, laughter, and light.
Conclusion
Getting bored of regular Holi portraits turned out to be a good problem. Boredom pushed the camera away from the obvious and toward the creative. Holi already gives photographers color, emotion, motion, and human connection. But light is what transforms those ingredients into memorable portraits.
Whether you use golden-hour backlight, dramatic side light, off-camera flash, colored gels, silhouettes, or soft shade, the idea is the same: do not just photograph the color. Photograph what the light does to the color. Let powder become atmosphere. Let shadows shape the face. Let the chaos become composition.
Regular Holi portraits will always have their place. They are bright, happy, and full of life. But when you start playing with light, Holi becomes more than a festival of colors. It becomes a festival of possibilitiesand your camera gets invited to the best part of the party.
Note: This article was written as original, publish-ready web content and synthesized from real cultural knowledge about Holi along with practical portrait photography, lighting, color, and camera-care principles.












