
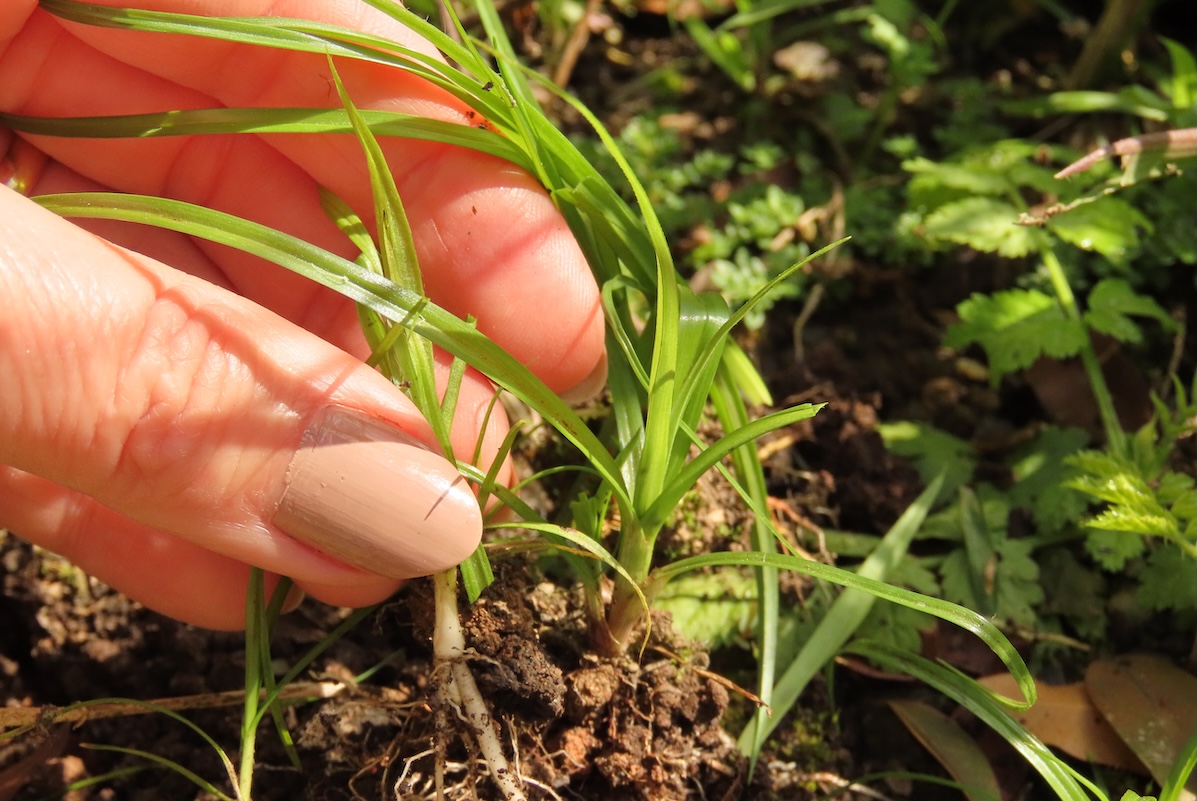
Nutsedge is the lawn weed that shows up like it owns the mortgage. You mow on Saturday, admire your yard on Sunday, and by Tuesday there it is againtaller, brighter, and smugly waving above the grass. Often called “nutgrass,” nutsedge is not actually a grass. It is a sedge, and that small botanical detail explains why ordinary lawn weed killers often shrug at it like, “Not my department.”
The good news: you can get rid of nutsedge. The honest news: you usually cannot do it with one dramatic afternoon of pulling, spraying, and muttering at the soil. Nutsedge spreads through underground tubers called nutlets, which store energy and help the plant return after the top growth is removed. Effective nutsedge control means combining identification, moisture management, smart mowing, careful digging, andwhen neededa selective herbicide labeled for sedges.
This guide explains how to identify nutsedge, why it keeps coming back, and how to remove it from lawns, garden beds, and landscape areas without turning your yard into a science experiment with grass clippings.
What Is Nutsedge?
Nutsedge is a perennial weed in the sedge family. The most common lawn invader in the United States is yellow nutsedge, though purple nutsedge can also appear, especially in warmer regions. Both types are aggressive, fast-growing, and frustratingly persistent.
Unlike annual weeds that mainly rely on seed, nutsedge spreads heavily through underground structures. It produces rhizomes and small tubers, often called nutlets, that can survive in the soil and send up new shoots. This is why simply cutting the visible plant rarely solves the problem. You are only giving it a haircut. Unfortunately, nutsedge does not appreciate your styling services.
How to Identify Nutsedge
Correct identification matters because nutsedge control is different from regular grassy weed control. Look for these signs:
- Triangular stems: Roll the stem between your fingers. Sedges often have a triangular feel, unlike grasses with round or flat stems.
- Bright, yellow-green color: Yellow nutsedge often looks lighter than surrounding turf.
- Fast vertical growth: It grows faster than lawn grass and pops above the mower height quickly.
- Three-ranked leaves: Leaves commonly appear in sets of three from the base.
- Seedheads in summer: Yellow nutsedge produces golden-brown seedheads, while purple nutsedge has darker, purplish seedheads.
If the “grass” in your lawn is taller than everything else two days after mowing, has a waxy shine, and seems oddly proud of itself, nutsedge is a strong suspect.
Why Nutsedge Is So Hard to Kill
Nutsedge is difficult because the visible leaves are only the part you can insult directly. The real problem sits below ground. Tubers store energy and can produce new plants even after the top growth is removed. A single established plant may contribute to a larger patch over time, especially in damp or poorly drained areas.
Another challenge is timing. When nutsedge is young and actively growing, it is easier to suppress. Once it has produced new tubers, control becomes slower because the plant has already stocked its underground pantry. That is why late spring through early summer is often the best time to begin treatment, depending on your region and lawn type.
Step 1: Confirm You Really Have Nutsedge
Before you treat anything, confirm the weed. Many homeowners mistake nutsedge for crabgrass, tall fescue clumps, green kyllinga, or other grassy-looking weeds. Using the wrong product wastes money and may damage your lawn.
Check the stem shape, leaf arrangement, growth habit, and color. If you are unsure, take clear photos of the plant, including the base and any seedhead, and contact your local Cooperative Extension office or a reputable garden center. A proper ID can save you from attacking crabgrass with sedge control or sedge with crabgrass control. That is the lawn-care version of sending a plumber to fix Wi-Fi.
Step 2: Fix the Moisture Problem
Nutsedge loves wet soil. It often appears in low spots, compacted areas, over-irrigated lawns, poorly drained beds, and places where sprinklers are more enthusiastic than necessary. If you only kill the existing plants but leave the soil soggy, the weed may return like a sequel nobody requested.
Improve Drainage
Walk your yard after rain or irrigation. Look for puddles, squishy patches, and areas where water lingers. Correcting drainage may involve filling low spots, redirecting downspouts, aerating compacted turf, improving soil structure, or adjusting landscape grading. In garden beds, avoid creating heavy, water-holding soil unless the plants actually need it.
Water Deeply, Not Constantly
Frequent shallow watering encourages shallow roots and favors weeds like nutsedge. Most established lawns do better with deeper, less frequent irrigation. Water early in the morning so grass blades dry during the day, and adjust sprinklers so they are not watering sidewalks, driveways, or the same sad corner for 45 minutes like it owes them money.
Step 3: Keep Your Lawn Thick and Competitive
A dense, healthy lawn is one of the best long-term defenses against nutsedge and other weeds. Thin turf gives weeds sunlight, space, and opportunity. Nutsedge is already ambitious; do not give it office space.
Mow at the Right Height
Set your mower height according to your turfgrass species. Taller mowing generally helps shade the soil surface and supports deeper grass roots. Avoid scalping the lawn, especially during hot weather. Scalping weakens desirable grass and gives fast-growing weeds a competitive advantage.
Fertilize Based on Need
Use a soil test when possible. Too little fertility can weaken turf, while too much fertilizer can create lush, disease-prone growth. Balanced lawn care helps grass compete without turning the yard into an all-you-can-eat buffet for problems.
Repair Bare Spots Quickly
Bare soil is an invitation. Reseed or sod thin areas at the best time for your grass type. In cool-season lawns, early fall is often ideal for seeding. Warm-season lawns are typically repaired during active growth in late spring or summer.
Step 4: Remove Small Patches by HandCarefully
Hand removal can work when nutsedge patches are small and young, especially before tubers have multiplied. The key word is “carefully.” Yanking the plant from the top often breaks it off and leaves the underground tuber behind. That is not removal; that is pruning with optimism.
Use a narrow digging tool or weeder to loosen the soil around the plant. Try to remove the entire root system, including nutlets. In loose, moist soil, this is easier. In compacted clay, it can feel like archaeology with mosquitoes.
Dispose of the removed plants and tubers. Do not toss them into a casual compost pile unless you are confident the pile heats properly and destroys viable plant parts. Otherwise, you may be creating artisanal, small-batch nutsedge starter mix.
Step 5: Avoid Tilling Infested Soil
In garden beds, the instinct may be to till the whole area and “clean it up.” Be careful. Tilling can chop and move tubers, spreading nutsedge through the bed. If nutsedge is already present, repeated deep disturbance may make the problem worse.
For landscape beds, targeted digging, mulching, improving drainage, and careful spot treatment are usually better than repeatedly stirring the soil. If you must renovate a bed, remove as many tubers as possible and monitor regrowth closely.
Step 6: Use Mulch in Landscape Beds
Mulch helps suppress many weeds by blocking light and reducing open soil. Nutsedge is tougher than many annual weeds and may still push through thin mulch, landscape fabric, or weak barriers. Still, mulch is useful as part of a broader strategy.
Apply mulch at an appropriate depth for your plants, keeping it away from stems and trunks. Organic mulches such as wood chips can improve soil over time, while also making new weed seedlings easier to spot and remove. Just remember: mulch helps, but nutsedge may treat a thin layer like a polite suggestion.
Step 7: Choose the Right Nutsedge Herbicide
When nutsedge is established across a lawn, hand digging every plant may not be realistic unless you enjoy spending weekends hunched over like a detective interrogating soil. A selective post-emergent herbicide labeled for nutsedge can be effective when used correctly.
Common active ingredients used for nutsedge control include halosulfuron, sulfentrazone, bentazon, and imazaquin, depending on the site, turfgrass species, and product label. Some products act faster, while others may work more slowly but move through the plant. Many nutsedge treatments require patience and may need follow-up applications according to the label.
Read the Label Before Applying
The product label is not decorative literature. It tells you where the product can be used, which turfgrasses tolerate it, what weeds it controls, when to apply it, whether watering is needed, how long to wait before mowing, and when repeat applications are allowed.
Never assume a product is safe for your lawn because it says “lawn weed killer” on the front. Some herbicides are safe for certain turf species and risky for others. Bermudagrass, zoysiagrass, tall fescue, Kentucky bluegrass, St. Augustinegrass, and centipedegrass can respond differently to the same product.
Spot Treat When Possible
For small infestations, spot treatment is usually better than blanket spraying the entire lawn. It reduces chemical use, saves money, and limits stress on desirable turf. Apply only to the target weed and follow all safety directions. Keep people and pets away from treated areas until the label says it is safe to return.
Treat Actively Growing Nutsedge
Herbicides generally work best when nutsedge is actively growing and not drought-stressed. Avoid treating during extreme heat, severe drought, or when the lawn is already struggling. A stressed plant may not absorb and move the herbicide effectively, and a stressed lawn may be more likely to show injury.
Step 8: Time Your Control Efforts
The best time to control nutsedge is usually when it is young, visible, and actively growing, before it has built a large supply of new tubers. In many regions, that means late spring to early summer. However, local climate matters. Southern lawns may see nutsedge activity earlier and longer than northern lawns.
Watch for the first flush of growth. Once you see nutsedge rising above the turf, begin your control plan. Waiting until late summer may still reduce top growth, but it may not prevent the plant from strengthening its underground reserves.
How to Get Rid of Nutsedge Naturally
Natural nutsedge control focuses on persistence, prevention, and soil correction. There is no magic kitchen-cabinet spray that reliably kills nutsedge tubers without risking nearby plants or soil health. Vinegar, boiling water, and salt-based methods can injure desirable grass, damage soil, or only burn the top growth while leaving tubers alive.
For a more natural approach, focus on these steps:
- Improve drainage and reduce overwatering.
- Dig young plants with the tubers intact.
- Maintain a thick, properly mowed lawn.
- Mulch landscape beds to reduce new growth.
- Avoid tilling infested soil unnecessarily.
- Monitor weekly during the growing season.
Natural control can work best when the infestation is small. For large, established patches, a hybrid approachcultural control plus careful spot treatmentoften produces better results.
Nutsedge in Garden Beds vs. Lawns
Control methods change depending on where the weed is growing.
In Lawns
Focus on turf health, proper irrigation, correct mowing height, and selective herbicides labeled for your grass type. Avoid nonselective herbicides unless you are treating isolated spots and accept that nearby grass may be damaged or killed.
In Flower Beds
Hand digging, mulch, and careful spot treatment are common options. Be extra cautious around ornamentals because many desirable plants are sensitive to herbicides. Shield nearby plants if spot treating, and never spray on windy days.
In Vegetable Gardens
Be especially careful. Many herbicides are not labeled for edible gardens, and using the wrong product can create safety issues. Hand removal, moisture management, mulching, and crop spacing are safer core strategies. Always follow labels exactly for any product used near food crops.
Common Mistakes That Make Nutsedge Worse
Nutsedge is annoying enough without accidentally helping it. Avoid these common errors:
- Pulling mature plants too casually: If tubers remain, the weed may return.
- Overwatering: Wet soil encourages nutsedge growth.
- Using the wrong herbicide: Many broadleaf or crabgrass products do not control sedges.
- Mowing too low: Scalped lawns are easier for weeds to invade.
- Tilling infested beds: Soil disturbance can spread tubers.
- Giving up after one treatment: Established nutsedge often requires repeated monitoring.
A Simple Nutsedge Control Plan
Here is a practical plan for most homeowners:
- Identify the weed. Confirm triangular stems, fast growth, and sedge-like leaves.
- Map the infestation. Note whether it is in wet areas, thin turf, garden beds, or drainage zones.
- Fix watering problems. Reduce shallow irrigation and improve drainage.
- Dig small patches. Remove young plants with tubers when possible.
- Strengthen the lawn. Mow correctly, fertilize wisely, and repair bare spots.
- Spot treat established patches. Use a sedge-labeled product appropriate for your turf and site.
- Recheck every two weeks. Remove or treat regrowth before it rebuilds underground reserves.
How Long Does It Take to Get Rid of Nutsedge?
Small, new patches may be controlled in one season with careful digging and follow-up. Established infestations can take multiple seasons to reduce significantly. The timeline depends on the number of tubers in the soil, moisture conditions, lawn density, and how consistently you monitor regrowth.
Think of nutsedge control as a campaign, not a duel. You are not trying to win one dramatic battle; you are trying to exhaust the plant’s underground energy supply while making your lawn or garden less inviting.
of Real-World Experience: What Actually Works in a Yard
In real life, getting rid of nutsedge usually starts with confusion. Most homeowners first notice it after mowing. The lawn looks neat, then a few days later bright green blades are standing above everything else like tiny flags of rebellion. The first instinct is to pull them. That feels satisfying for about twelve seconds. Then, a week later, new shoots appear in the same area, and the yard owner begins questioning both lawn care and destiny.
The biggest lesson from practical nutsedge control is that the wet spot matters. In many yards, nutsedge is not evenly scattered. It appears near a downspout, along a low fence line, beside an overwatered flower bed, or in a compacted strip where runoff collects. Once that pattern becomes obvious, the solution becomes less mysterious. Killing the visible weed helps, but correcting the water issue changes the game. Redirecting a downspout, reducing sprinkler run time, or aerating compacted soil can make the area less comfortable for nutsedge and much better for turfgrass.
Another experience-based tip: do not panic-spray the entire lawn. Many people see a few patches and immediately consider a full-yard herbicide application. Usually, that is unnecessary. Spot treatment is cleaner, cheaper, and easier to manage. It also helps you observe what is working. Mark the treated patches with small flags or take photos on your phone. After two or three weeks, compare the results. Nutsedge often yellows, weakens, or stops growing before it disappears completely, so photos help prevent the classic “nothing is happening” impatience spiral.
Hand digging works best when the patch is small and the soil is slightly moist, not muddy and not brick-hard. A narrow trowel or weeding knife is better than grabbing the leaves and pulling. The goal is to lift the plant with the attached underground parts. In a new bed, this can be surprisingly effective. In an old infestation, you may remove some tubers and miss others, but every removed tuber is one less tiny villain waiting underground.
Mulch helps in beds, but it is not a force field. Nutsedge can punch through weak mulch layers, especially if the soil below is damp and fertile. A better approach is to remove what you can, mulch properly, then inspect weekly. The earlier you catch new shoots, the less energy they return to the tubers.
The most successful homeowners treat nutsedge like a recurring maintenance issue for a season or two, not a one-day chore. They improve drainage, stop overwatering, keep the lawn taller and thicker, dig small patches, spot treat larger ones, and keep checking. It is not glamorous. No one makes a dramatic movie montage about responsible irrigation. But it works. Over time, the nutsedge patch gets weaker, the desirable grass fills in, and the lawn finally stops looking like it has a bad haircut three days after mowing.
Conclusion
Nutsedge is stubborn, but it is not unbeatable. The best way to get rid of nutsedge is to combine smart identification, moisture control, healthy lawn practices, careful hand removal, and selective treatment when necessary. Start early, avoid overwatering, do not rely on regular grass weed killers, and remember that underground tubers are the real target. With patience and a steady plan, you can turn a nutsedge invasion into a manageable lawn-care problem instead of a yearly backyard soap opera.
Note: This article is based on current, practical lawn and garden guidance commonly recommended by U.S. Cooperative Extension and university IPM resources. Always follow local regulations and the exact product label when using any herbicide.











