Want to hang a plant, lantern, mobile, basket, canopy, or decorative light from the ceiling without turning your living room into a gravity experiment? Good news: hanging a ceiling hook is a very doable DIY project when you choose the right hardware, find solid framing when needed, and respect the fact that drywall is not a superhero.
This guide explains how to hang a hook from the ceiling safely, including how to install a screw hook into a ceiling joist, how to use a toggle bolt in hollow drywall, what tools you need, what mistakes to avoid, and where pictures should go in your article layout.
Before You Start: Know What You Are Hanging
The first rule of ceiling hooks is simple: the ceiling does not care how cute your hanging plant is. It only cares about weight, hardware, and structure. A small macramé planter and a heavy basket full of wet soil are very different projects. So before drilling, weigh the item or estimate its fully loaded weight.
For plants, remember that water adds weight. A planter that feels light at the store may become surprisingly chunky after soil, drainage stones, water, and the plant itself are added. For décor, include the weight of chains, cords, baskets, glass shades, or hanging accessories.
Important safety note: This article is for hanging lightweight to moderate decorative items, such as plants, lights, mobiles, baskets, and small décor. Do not use these instructions for supporting people, exercise equipment, hammocks, swings, or anything that will be pulled, climbed on, or bounced. For heavy or structural loads, hire a qualified professional.

Tools and Materials You Will Need
- Ceiling hook, screw hook, swag hook, or plant hook rated for your item
- Toggle bolt hook set if installing into hollow drywall
- Stud finder with ceiling joist detection
- Pencil or painter’s tape for marking
- Drill and drill bits
- Measuring tape
- Safety glasses
- Step ladder
- Pliers or screwdriver for tightening, depending on hook style
- Voltage detector or multi-scanner if wiring may be nearby
A small pilot hole is usually needed when screwing into a wood joist. A larger hole is usually needed for a toggle bolt because the folded wings must fit through the ceiling before opening above the drywall.
Choose the Best Spot for the Ceiling Hook
Placement is part design, part physics, and part “will I hit my head on this every morning?” Choose a spot where the item looks balanced, has enough clearance, and will not block doors, windows, cabinets, ceiling fans, smoke alarms, sprinklers, or light fixtures.
If you are hanging a plant, think about sunlight. A trailing pothos may be happy near bright indirect light, while a sun-loving plant may need to sit closer to a window. If you are hanging a pendant cord or decorative lantern, make sure the cord can run neatly and safely without becoming a trip hazard or looking like a spaghetti noodle with ambition.

Ceiling Joist vs. Drywall: The Big Decision
The best way to hang a hook from the ceiling is to screw it directly into a ceiling joist or exposed beam. A joist is part of the ceiling’s framing, which makes it much stronger than drywall alone. If you can place your hook in a joist, do that. Your future self will sleep better.
If the perfect location falls between joists, you may use a ceiling-rated toggle bolt for light to moderate décor. A toggle bolt spreads the load across the back side of the drywall. This is much better than a regular screw in drywall, which is basically asking powdered gypsum to make adult decisions.
Use a Joist When:
- The item is heavier than a few pounds.
- The item may swing slightly, such as a plant basket near a window.
- The hook will stay in place long-term.
- You want the strongest normal DIY installation.
Use a Toggle Bolt When:
- You cannot position the hook over a joist.
- The item is lightweight to moderate.
- The hardware is rated for ceiling use.
- You follow the manufacturer’s weight limit and installation instructions.
Method 1: How To Hang a Hook from a Ceiling Joist
Step 1: Find the Joist
Use a stud finder to locate the ceiling joist. Move slowly and mark both edges of the joist, then mark the center. The center is the best target because it gives the screw threads more wood to grip.
If your stud finder is unreliable on textured ceilings, try scanning from multiple directions. You can also knock lightly and listen for a more solid sound, but use that only as a clue, not your final proof. When in doubt, drill a tiny test hole in an inconspicuous spot to confirm wood.

Step 2: Check for Wires and Obstacles
Before drilling, look for nearby lights, switches, ceiling fans, outlets on nearby walls, HVAC vents, and plumbing fixtures above the room. A hook near a light fixture may seem convenient, but hidden wires may be nearby. Use a scanner with live-wire detection if you have one, and avoid drilling where wiring is likely.
Step 3: Drill a Pilot Hole
Choose a drill bit slightly smaller than the solid center shank of the screw hook, not including the threads. Drill straight into the marked center of the joist. Keep the hole shallow enough for the screw portion of the hook and do not overdrill.
A pilot hole makes installation easier and helps prevent the wood from splitting. It also saves you from the awkward ceiling-drilling face: squinting upward while dust tries to become your new eyebrow.
Step 4: Screw in the Hook
Turn the hook clockwise into the pilot hole. Start by hand, then use pliers for extra leverage if needed. To protect the finish, wrap the hook with a cloth before gripping it. Screw until the base sits snugly against the ceiling, but do not over-tighten and strip the wood.
Step 5: Test the Hook
Before hanging your item, tug gently downward with your hand. The hook should not wobble, spin loosely, or pull away from the ceiling. If it moves, remove it and reassess the hole, joist location, and hook size.
Method 2: How To Hang a Hook from Drywall with a Toggle Bolt
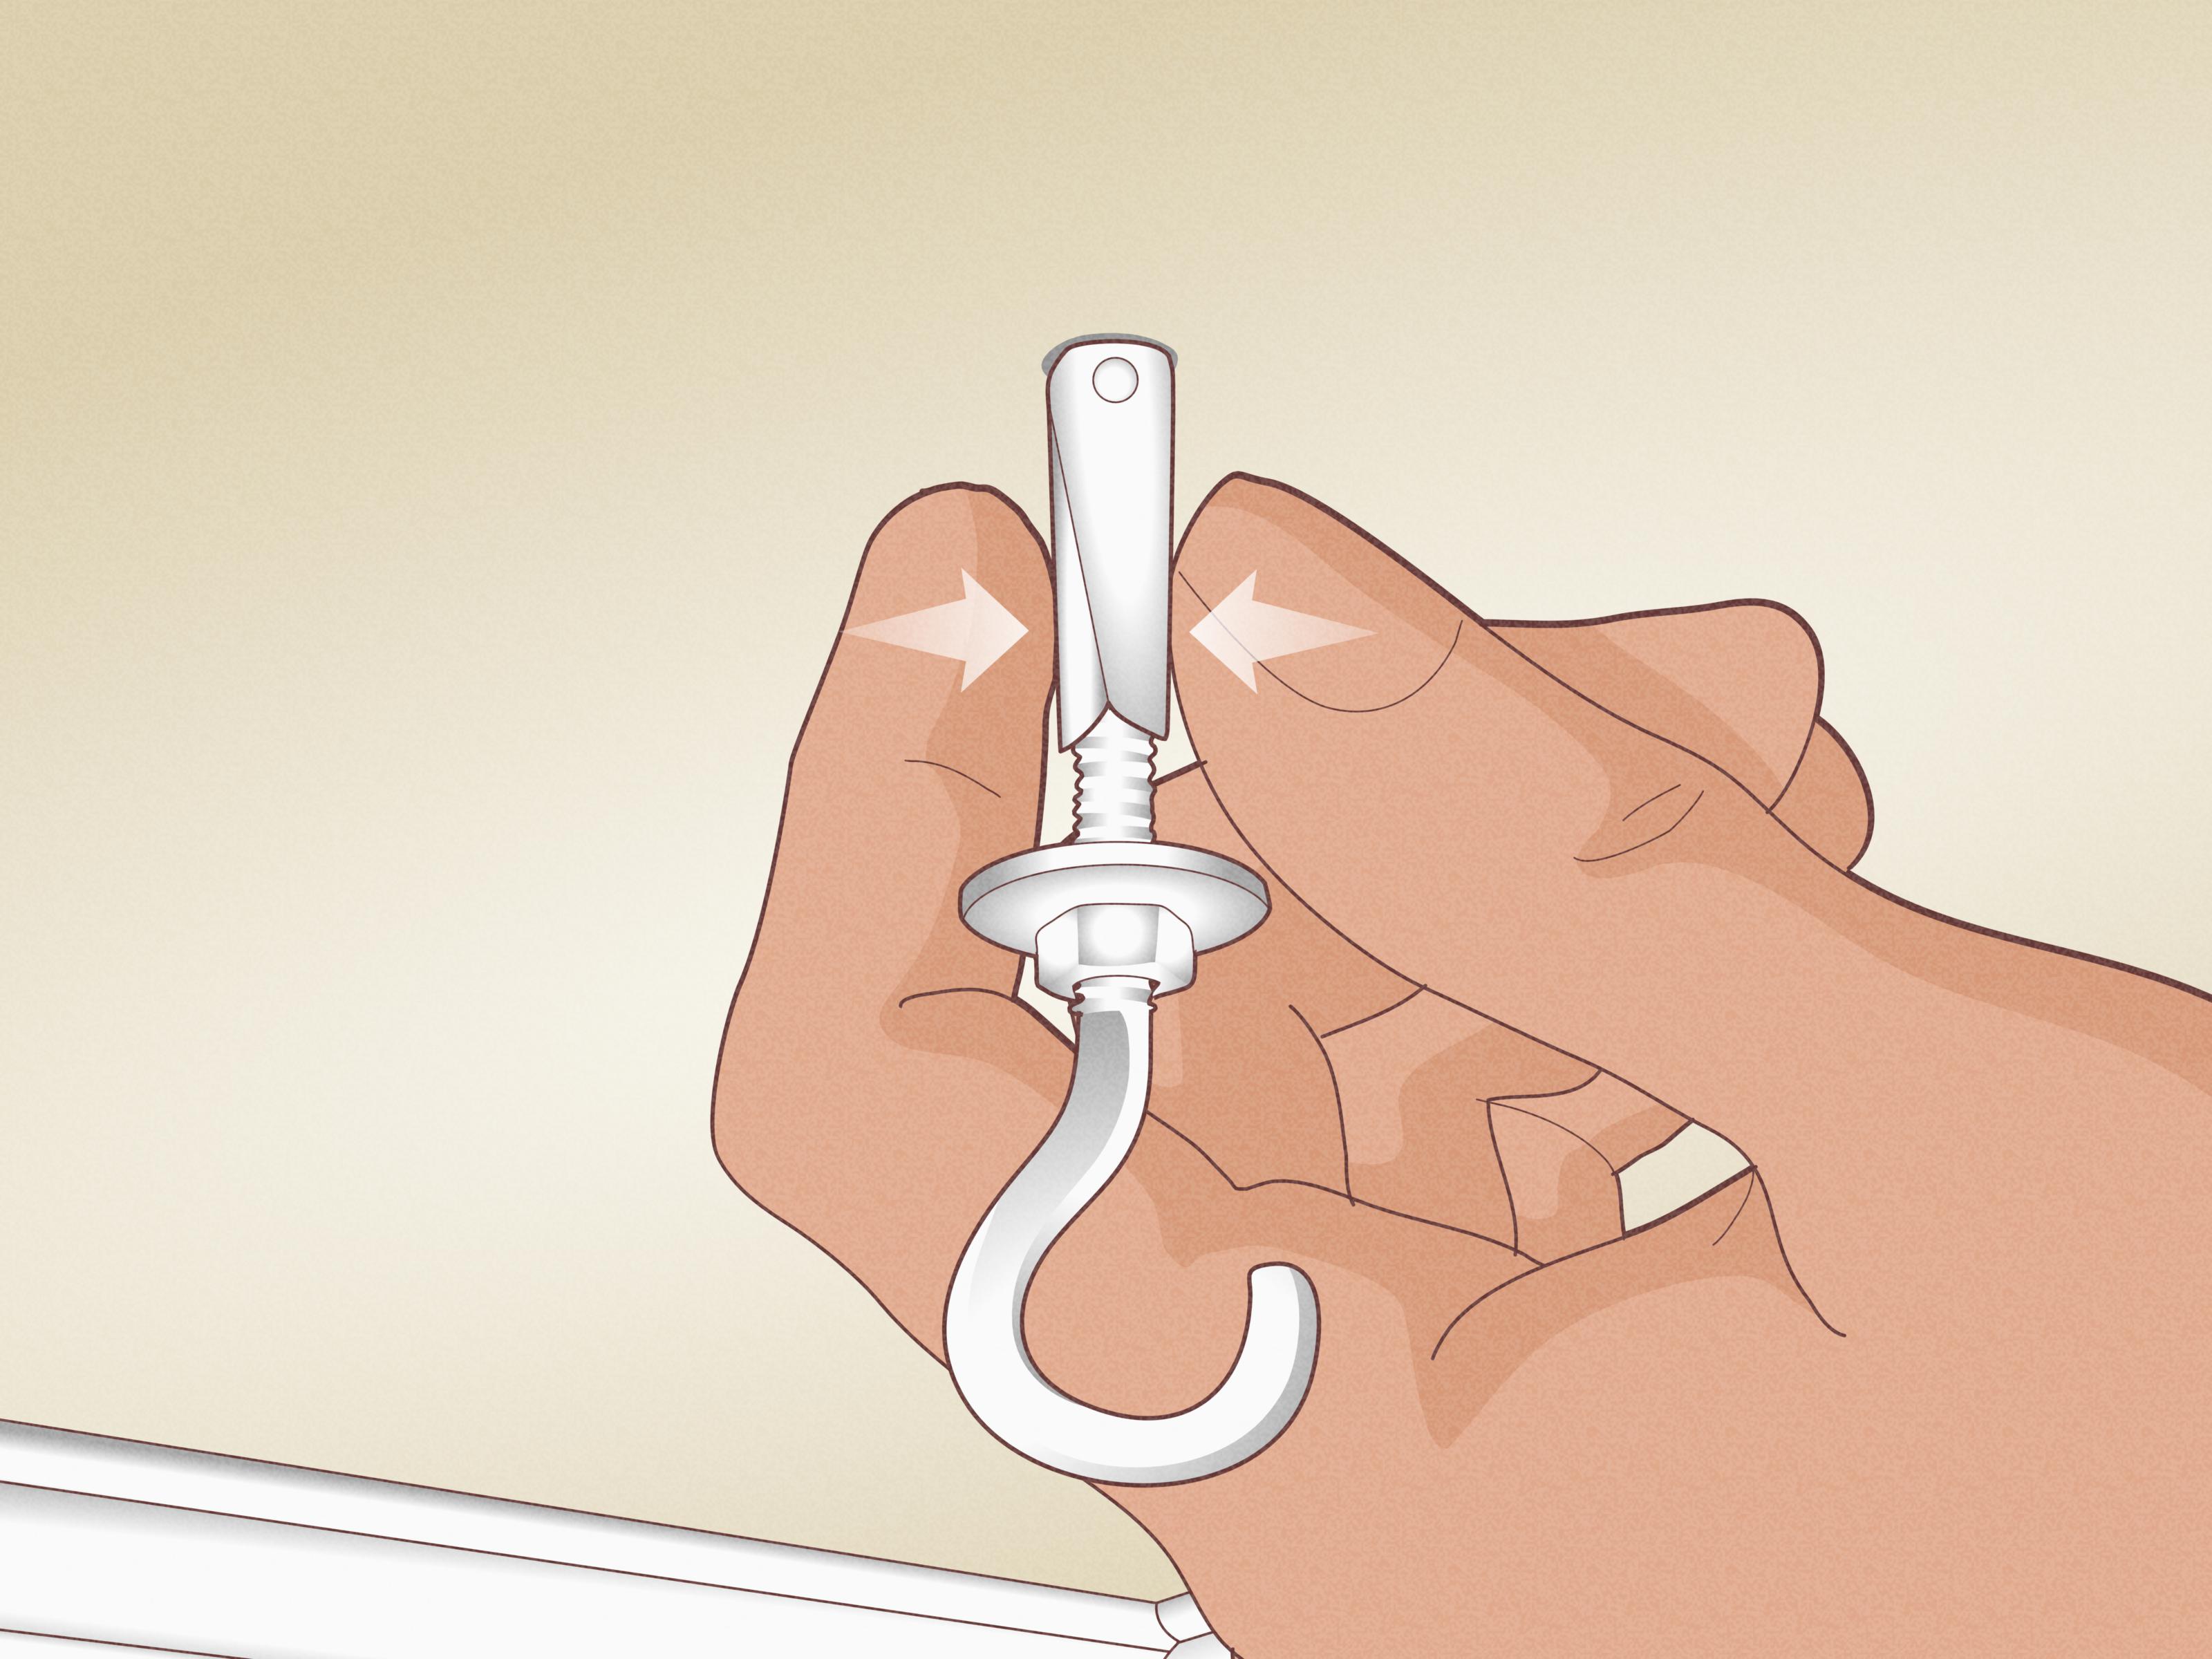
If there is no joist where you want the hook, a toggle bolt may be the right solution for lighter hanging décor. A toggle bolt has spring-loaded wings that fold together to pass through the hole, then open above the drywall to spread the load.
Step 1: Choose a Ceiling-Rated Toggle Hook
Use a toggle hook or swag hook kit designed for ceiling installation. Check the package for the weight rating and ceiling compatibility. Do not assume a wall anchor is safe for overhead use. Ceiling loads pull straight down, which is more demanding than many wall installations.
Step 2: Mark a Hollow Spot
Use your stud finder to confirm that the spot is between joists. Mark the location with pencil or painter’s tape. Make sure there is enough space above the drywall for the toggle wings to open fully.
Step 3: Drill the Correct Size Hole
Read the toggle bolt package and use the recommended drill bit size. The hole must be large enough for the folded wings to pass through, but not so large that the hook base cannot cover it. Drill slowly and keep the drill straight.

Step 4: Attach the Toggle to the Hook
Thread the toggle wings onto the hook’s bolt according to the package directions. The wings should fold toward the hook so they can pass through the ceiling hole. Make sure the toggle is engaged on the threads; otherwise, it may fall into the ceiling cavity and begin its new life as a tiny metal ghost.
Step 5: Insert the Toggle and Tighten
Fold the wings, push them through the hole, and let them spring open above the drywall. Pull gently downward on the hook so the wings press against the back of the ceiling panel. While keeping light tension, tighten the hook until the base sits flush against the ceiling.
Step 6: Test Before Hanging
Give the hook a gentle test pull. Do not yank or bounce it. If the hook shifts, loosens, or crushes the drywall surface, remove it and use a different location, larger rated hardware, or a joist-mounted installation.

What Kind of Ceiling Hook Should You Use?
Screw Hooks
Screw hooks are simple hooks with threaded ends. They are best for installation into wood joists or beams. They are not designed to be screwed directly into drywall without proper anchoring.
Swag Hooks
Swag hooks are decorative ceiling hooks often used for hanging lamps, plants, and draped cords. Many kits include hardware for both wood and hollow drywall installation. They are practical when the hook will be visible and you want it to look intentional instead of “garage hardware wandered into the dining room.”
Toggle Hook Sets
Toggle hook sets are made for hollow ceiling or wall cavities. They are useful when you cannot hit a joist, but they must be rated for the weight and used exactly as directed.
S-Hooks
S-hooks can hang over exposed structural beams, racks, or approved supports without drilling. Do not hang from sprinkler pipes, electrical conduit, plumbing, or anything that is not meant to carry decorative loads.
Common Mistakes To Avoid
- Ignoring the weight rating: Hardware ratings exist for a reason. They are not decorative numbers.
- Using plastic anchors in ceilings: Many plastic wall anchors are not suitable for overhead loads.
- Missing the joist: If the hook spins and never tightens, you may be in drywall, not wood.
- Hanging wet plants without recalculating weight: Soil and water can add more weight than expected.
- Drilling near wires: Always check the area before drilling, especially near light fixtures or ceiling fans.
- Standing on the top step of a ladder: Use the ladder correctly and keep your balance.
- Using ceiling hooks for dynamic loads: Swinging, bouncing, pulling, or climbing loads require professional structural support.
How Much Weight Can a Ceiling Hook Hold?
The honest answer is: it depends. The hook’s capacity depends on the hook type, screw size, anchor type, ceiling material, installation quality, and whether the hook is fastened into wood framing or only into drywall.
A screw hook installed into a solid ceiling joist is usually stronger than a toggle bolt installed into drywall. A toggle bolt can be useful for light to moderate décor, but drywall can weaken from moisture, age, vibration, or poor installation. Always follow the rating on the actual hardware package, and choose a hook rated above the fully loaded weight of the item.
For heavy planters, glass fixtures, large baskets, or anything valuable, aim for a joist. For very heavy objects, unusual ceilings, plaster ceilings, old homes, or rental properties where you are unsure what is above the surface, get professional help.
Ceiling Type Matters
Drywall Ceilings
Most modern homes have drywall ceilings. Use a joist whenever possible. If not, use a ceiling-rated toggle bolt for lighter items and avoid overloading the panel.
Plaster Ceilings
Older plaster ceilings can be harder, more brittle, and less predictable than drywall. Drill carefully and avoid forcing anchors. For heavy items, find framing or ask a professional.
Wood Beam Ceilings
Exposed wood beams are excellent for hooks when they are structural and in good condition. Pre-drill to prevent splitting, then install a properly rated screw hook or J-hook.
Drop Ceilings
Do not hang hooks from ceiling tiles. Drop ceiling panels are not structural. If you need to hang something, attach it to the building structure above the ceiling grid using approved hardware.
Quick Troubleshooting Guide
The Hook Keeps Spinning
You may have missed the joist or drilled the pilot hole too large. Move slightly and locate the joist center, or switch to a proper toggle bolt if the spot is hollow.
The Toggle Bolt Fell Into the Ceiling
This happens when the wings are not threaded properly or the bolt is backed out too far. You will likely need a new toggle. The old one can stay in the ceiling cavity unless it causes noise or obstruction.
The Ceiling Surface Is Crumbling
Stop. The ceiling may be damaged, old, damp, or unsuitable for that anchor. Move to a joist or call a professional.
The Hook Is Crooked
Back it out carefully and reinstall straight. For visible swag hooks, a crooked hook is not just annoying; it will stare at you every time you walk into the room.
Safety Tips for a Cleaner, Smarter Installation
Wear safety glasses because ceiling dust has impressive aim. Use a stable step ladder, keep your body centered, and do not overreach. Keep one hand available for balance when possible, and move the ladder instead of leaning dramatically like a home-improvement action hero.
Turn off nearby power if drilling close to ceiling fixtures, and never drill into suspicious areas without checking for wiring. If your ceiling contains asbestos-era materials, unusual plaster, radiant heat, or complex electrical work, pause and ask a qualified professional.
After installation, inspect the hook every few months. This is especially important for hanging plants, because watering, movement, and humidity can change the load over time.
Personal Experience: What Hanging Ceiling Hooks Teaches You
The first thing you learn when hanging a hook from the ceiling is that ceilings are more mysterious than walls. A wall politely lets you stand in front of it. A ceiling makes you climb a ladder, tilt your head back, hold a drill above your face, and question every life choice that led to this moment. Still, once you understand the basics, the job becomes much less intimidating.
One practical lesson is that the “perfect spot” for design is not always the perfect spot for structure. You may want a hanging plant centered exactly over a reading chair, only to discover the joist is three inches to the left. In that moment, you have three choices: shift the plant slightly, use a rated toggle bolt for a lightweight item, or install a decorative ceiling plate or wood cleat that lets you fasten securely into framing while positioning the hook where you want it. The best DIY decisions usually happen when style and structure agree to share custody.
Another experience-based tip: always test your setup before adding the final item. Hang an empty basket first, then gradually add weight. For plants, water them in the sink, let excess water drain, and then return them to the hook. This prevents surprise dripping and keeps the hook from dealing with sudden extra weight. Your floor will also appreciate not becoming a swamp.
It also helps to take pictures during the process. A photo of the marked joist location, the pilot hole, the hook before tightening, and the finished installation can make the project easier to explain in a blog post. Pictures reassure readers that they are on the right track. They also show important details, such as how flush the hook base should sit and how large a toggle bolt hole looks before the hook covers it.
Finally, ceiling hooks are one of those small projects that can change a room quickly. A plant in a sunny corner, a lantern over a cozy nook, or a basket in a laundry room can make unused vertical space feel intentional. The secret is not brute force. It is patience, correct hardware, and knowing when drywall deserves support from something stronger. In other words: let the joist do the heavy lifting, and let the hook take the compliments.
Conclusion
Learning how to hang a hook from the ceiling is simple when you follow the right process: choose the location, identify the ceiling material, find a joist when possible, use the correct anchor when not, drill carefully, tighten securely, and test before hanging anything valuable. A ceiling hook may be small, but the installation deserves attention. Done right, it adds function, charm, and vertical style to your room without creating a surprise crash landing.
For the strongest installation, mount the hook into a ceiling joist or structural beam. For lightweight décor in hollow drywall, use a ceiling-rated toggle hook and stay within the manufacturer’s weight limit. When the load is heavy, moving, or safety-critical, do not guess. Bring in a professional.
SEO Tags
Note: This article is intended for decorative household hanging projects only. For heavy, moving, or structural loads, consult a licensed contractor or qualified professional.