
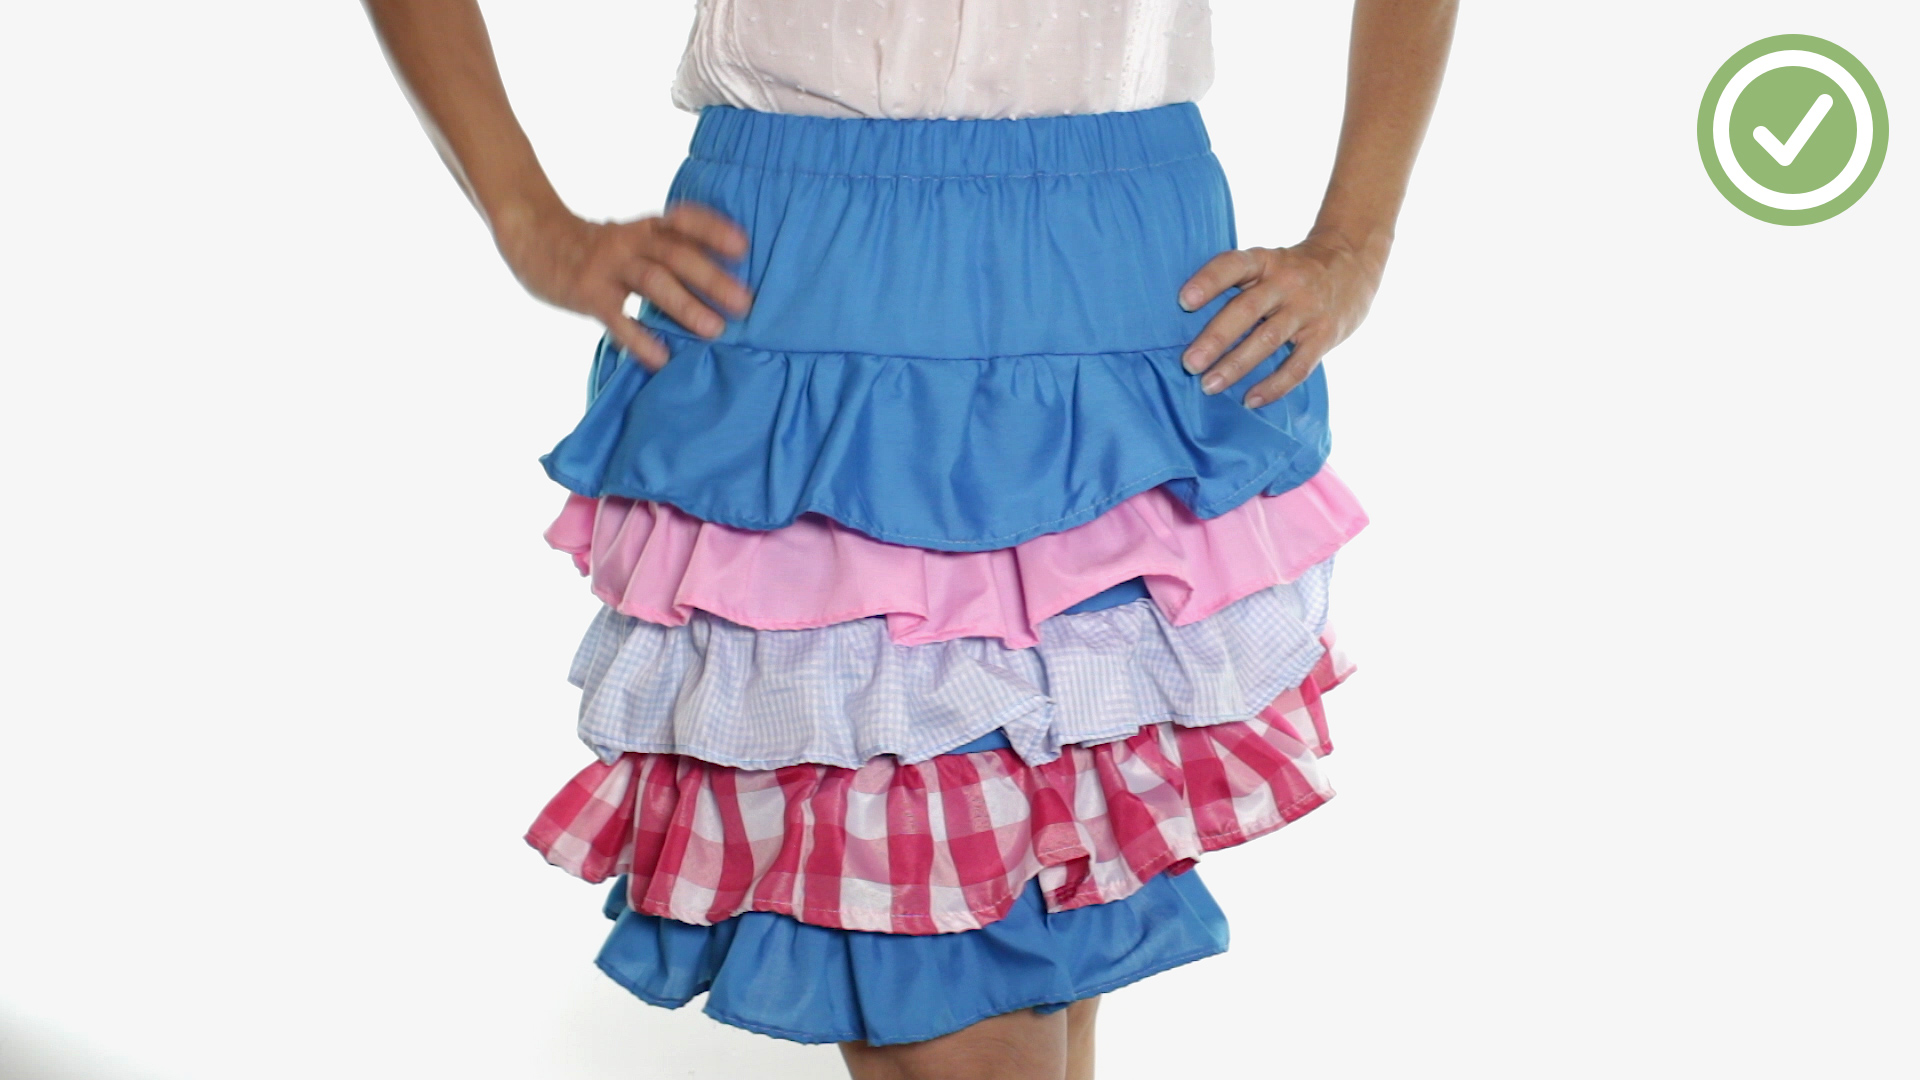
If your sewing machine has been staring at you like, “So… are we making something cute or just collecting lint again?” this is your sign. A ruffle skirt is one of those magical projects that looks charming, swishy, and vaguely boutique-priced, but is actually very doable at home. Better yet, it teaches several useful sewing skills in one go: measuring, hemming, gathering, attaching a ruffle, and making a simple waistband.
This guide walks you through how to make a ruffle skirt from scratch using a beginner-friendly elastic waistband design. It is easy enough for newer sewists, but still satisfying for anyone who enjoys making clothes that move when they walk. And yes, the movement matters. A good ruffle skirt should swish. If it does not swish, we ask questions.
Why a ruffle skirt is such a good sewing project
A DIY ruffle skirt checks a lot of boxes. It is practical, customizable, forgiving, and surprisingly stylish. You can make it short, midi, dramatic, minimal, cottagecore, beachy, or “I casually made this while drinking iced coffee and pretending I run a tiny fashion house.”
It is also a great introduction to gathered sewing. Once you learn how to make a ruffle skirt, you are already halfway to making tiered dresses, peasant tops, gathered sleeves, and ruffle hems. One project, many bragging rights.
What you will need
- 1.5 to 3 yards of fabric, depending on skirt length, size, and fullness
- Matching thread
- 1-inch elastic for the waistband
- Sewing machine
- Fabric scissors or rotary cutter
- Pins or clips
- Measuring tape
- Iron and ironing board
- Safety pin or bodkin for threading elastic
- Fabric marker or chalk
If you own a gathering foot or ruffler foot, great. If not, no problem. A regular sewing machine and patience will do the job just fine.
Choose the right fabric before you cut anything
The success of a ruffle skirt starts with fabric choice. If you want soft movement and easy gathers, go with lightweight or light-to-medium woven fabrics. Good choices include cotton poplin, cotton lawn, voile, rayon challis, gauze, seersucker, and lightweight linen blends. These fabrics gather well and do not turn your waistline into a puffy architecture experiment.
If you are a beginner, cotton poplin is a safe and friendly option. It presses well, behaves during cutting, and will not slide around your table like it is trying to escape responsibility. If you want a more romantic drape, rayon challis is beautiful, but it can be slipperier to handle. Stiff or heavy fabrics can make a gathered skirt look bulky, especially at the waistband and ruffle seam, so save denim-weight drama for later.
Before cutting, wash and dry your fabric the same way you plan to wash the finished skirt. Prewashing helps prevent shrinking surprises later. Nobody enjoys making a perfect skirt only to have it come out of the laundry looking like it belongs to a very stylish doll.
Take your measurements and plan the skirt
For this tutorial, we are making a simple elastic-waist gathered skirt with a ruffle attached to the bottom edge. You only need a few key measurements:
- Waist: Measure around your natural waist.
- Hip: Measure around the fullest part of your hips.
- Skirt length: Measure from waist to where you want the skirt to end.
- Visible ruffle depth: Decide how deep you want the ruffle to look once finished.
For an easy fit, base the main skirt panel width on your hip measurement rather than your waist. A common beginner-friendly formula is:
Main skirt width = hip measurement × 1.5 to 2
This gives enough fullness for a gathered look without becoming a fabric blizzard. For a softer result, use 1.5 times your hip measurement. For a fuller ruffle skirt, use 2 times.
Main skirt length = desired finished length − visible ruffle depth − waistband casing allowance − seam allowances
For the ruffle:
Ruffle length = skirt hem circumference × 1.5 to 2.5
Ruffle cut width = visible ruffle depth + seam allowance + hem allowance
If you want maximum drama, go closer to 2.5 times the hem circumference. If you want a neat, everyday ruffle hem, 1.5 to 2 times is usually perfect.
Example measurements
Let’s say your hip measurement is 40 inches and you want a knee-length skirt with a 5-inch visible ruffle.
- Main skirt width: 40 × 1.75 = 70 inches
- Main skirt length: 24-inch finished length − 5-inch ruffle − 1.5-inch waistband casing − 0.5-inch seam allowance = about 17 inches
- Ruffle length: 70 inches × 1.75 to 2 = 122.5 to 140 inches
- Ruffle cut width: 5 inches visible + 0.5-inch seam allowance + 0.5-inch narrow hem allowance = 6 inches
Math in sewing is rude but necessary. The good news is it leads to cute results.
Step 1: Cut your fabric
Cut one main skirt panel using your calculated width and length. If your width is wider than your fabric, cut two panels and seam them together at the sides.
Then cut your ruffle strips. If one strip is not long enough, cut multiple strips and sew them together along the short ends to create one long ruffle piece. Press those seams open or to one side to reduce bulk.
Label your pieces if needed. It sounds unnecessary until two long rectangles are on your table and suddenly they both seem to be named “fabric.”
Step 2: Sew the main skirt panel
With right sides together, sew the short ends of the main skirt panel together to form a tube. Use your chosen seam allowance, usually 1/2 inch or 5/8 inch. Finish the raw edge with a zigzag stitch, serger, or another seam-finishing method to prevent fraying.
Press the seam neatly. Pressing is one of those unglamorous steps that makes handmade clothes look polished instead of homemade in the “middle school costume project” sense.
Step 3: Hem the ruffle before attaching it
The bottom edge of the ruffle will be visible, so finish it first. A narrow double-fold hem works well for most fabrics. Fold the long edge up 1/4 inch, press, then fold again 1/4 inch and stitch close to the inner fold.
If your fabric is very lightweight, you can do an even narrower hem. If you own a rolled hem foot and enjoy feeling fancy, this is its moment.
Once hemmed, press the ruffle flat.
Step 4: Gather the ruffle
Run two or three rows of long basting stitches along the top raw edge of the ruffle, staying within the seam allowance. Do not backstitch. Leave long thread tails at both ends.
Now divide both the ruffle and the bottom edge of the skirt into equal sections, usually quarters. Mark each point with pins or clips. This helps distribute the gathers evenly, which is a very elegant way of saying it keeps one side from looking calm while the other side looks like it is hosting a fabric uprising.
Pull the bobbin threads gently to gather the ruffle until it matches the skirt opening. Adjust the fullness so the gathers are even between each marked section.
Beginner tip
If your thread breaks, do not panic and do not question all your life choices. Sew another row of basting stitches and keep going. This is an ordinary sewing problem, not a sign from the universe.
Step 5: Attach the ruffle to the skirt
With right sides together, pin the gathered edge of the ruffle to the bottom edge of the skirt, matching section marks and seams. Stitch slowly, keeping the gathers upright and evenly spread. Remove pins as you go, not after, unless you enjoy the adrenaline sport known as “sewing over metal.”
After stitching, finish the seam allowance with a zigzag stitch or serger. Press the seam allowance upward toward the main skirt. Then topstitch just above the seam on the skirt body if you want the seam to stay flatter and stronger. This is optional, but it gives the finished ruffle skirt a cleaner look.
Step 6: Make the waistband casing
At the top edge of the skirt, fold the raw edge to the wrong side by 1/4 inch and press. Then fold again by enough to create a casing for your elastic, usually 1 1/4 inches for 1-inch elastic. Stitch close to the lower folded edge, leaving a 2-inch opening to insert the elastic.
Measure your elastic by wrapping it comfortably around your waist. Subtract about 1 inch for a snug but wearable fit, depending on the stretch of the elastic and your comfort preference.
Step 7: Insert the elastic
Attach a safety pin or bodkin to one end of the elastic and thread it through the casing. Be careful not to twist it. Once both ends are out, overlap them by about 1/2 inch and stitch securely several times.
Pull the elastic back into the casing, distribute the gathers evenly around the waist, and stitch the casing opening closed. Give the waistband a final press, but avoid touching the iron directly to the elastic unless you want a science experiment.
Optional ways to customize your ruffle skirt
Add more tiers
Once you know how to attach one ruffle, you can create a tiered skirt by sewing additional gathered panels together from top to bottom. Each lower tier is usually wider than the one above it so the skirt gains volume as it goes down.
Use contrast fabric
A ruffle hem in a contrasting print or color makes the skirt look more designer and intentional. Think floral skirt with striped ruffle, or solid linen with a subtle gingham edge.
Try lace or trim
You can sew lace, ric-rac, or pom-pom trim along the ruffle hem for extra character. This is where your skirt can go from “cute handmade piece” to “main character walked through a farmer’s market and caused several compliments.”
Switch the waistband style
If you want a smoother waistline, use a flat waistband with a zipper instead of an elastic casing. That version takes a little more skill, but it creates a less gathered look at the waist and more structure overall.
Common mistakes when making a ruffle skirt
- Choosing fabric that is too heavy: It makes the ruffle bulky and stiff.
- Skipping pressing: Unpressed seams can make the skirt look messy fast.
- Making the ruffle too short: The hem will look more like a polite wave than a true ruffle.
- Uneven gathering: Sectioning and pinning solve most of this problem.
- Twisting the elastic: Check before sewing the casing shut.
The easiest way to improve your skirt is not a fancier machine or expensive fabric. It is slowing down on the gathering and pressing steps.
How to style a handmade ruffle skirt
A ruffle skirt is more versatile than people think. A cotton ruffle skirt with sneakers and a tucked-in tee feels casual and modern. A midi ruffle skirt in rayon or gauze paired with sandals looks breezy and relaxed. A dark floral ruffle skirt with boots and a fitted knit top works well in cooler weather. If you make it in black with a subtle hem ruffle, it can even lean polished rather than frilly.
In other words, you are not limited to a prairie aesthetic unless that is your dream, in which case, live your truth and add the hat.
Conclusion
Learning how to make a ruffle skirt is one of the most rewarding beginner sewing projects because it teaches real garment skills while still being fun. You get to practice measuring, hemming, gathering, sewing seams, and building a waistband, all while ending up with something wearable and pretty. That is a strong return on investment for a few rectangles and a spool of thread.
The best part is how adaptable the design is. You can make a simple everyday skirt, a floaty summer piece, a dramatic tiered style, or a sweet ruffle hem skirt with contrast fabric. Start with a lightweight woven fabric, give yourself enough fullness, and do not rush the gathering. A little patience goes a long way toward a skirt that feels handmade in the best possible way.
Real-World Sewing Experiences: What Making a Ruffle Skirt Actually Teaches You
The first time many people make a ruffle skirt, they expect the hardest part to be sewing the seams. It usually is not. The real learning curve is in the gathering. At first, the ruffle can look uneven, lumpy, or suspiciously concentrated in one heroic corner. Then something clicks. You start pinching the fabric along the basting threads, sliding the gathers into place, and suddenly the skirt begins to look intentional. That moment feels great because it is the moment sewing stops being abstract and becomes something you can control with your hands.
Another common experience is discovering that fabric personality is real. Two cotton fabrics can both look cute online, but at the sewing machine they behave like completely different species. One presses beautifully and gathers like a dream. The other wrinkles, shifts, and tries to become a philosophical lesson about patience. After making even one ruffle skirt, most sewists get better at spotting fabrics that will actually work for gathered designs, not just fabrics that look pretty folded on a shelf.
There is also a surprising confidence boost in making an elastic waistband skirt. It is forgiving. If your seam line is not runway-perfect, the gathers hide a lot. If your fit is slightly off, elastic is kind. The project teaches accuracy without punishing you for not being a professional dressmaker on day one. That is one reason so many people remember their first gathered skirt fondly. It is wearable, flattering, and realistic.
Many beginners also discover that pressing changes everything. Before sewing clothing, ironing can seem like a side quest. After sewing a ruffle skirt, it becomes obvious that pressing is part of the construction, not an optional finishing flourish. A pressed hem lies flatter. A pressed seam looks cleaner. A pressed ruffle has shape instead of chaos. It is not glamorous advice, but it is honest advice.
Then there is the fitting moment. You pull the finished skirt on, adjust the gathers around the waistband, and see the ruffle move when you walk. That tiny swish is wildly satisfying. It is also the point where many sewists immediately start planning the next version: maybe one in striped cotton, one in black linen, one with two tiers, one with contrast trim. A ruffle skirt has a way of becoming less of a one-time project and more of a pattern formula you keep returning to.
Most of all, making a ruffle skirt teaches that sewing is a skill built through repetition, not perfection. Threads may break. Measurements may need adjusting. Your first ruffle may be slightly more enthusiastic on the left side than the right. That is normal. The real experience is learning how to fix those things calmly and keep going. By the end, you do not just have a skirt. You have better instincts, better fabric judgment, and a much stronger chance of saying, “Actually, I can make that,” the next time you see a cute skirt in a store.














