
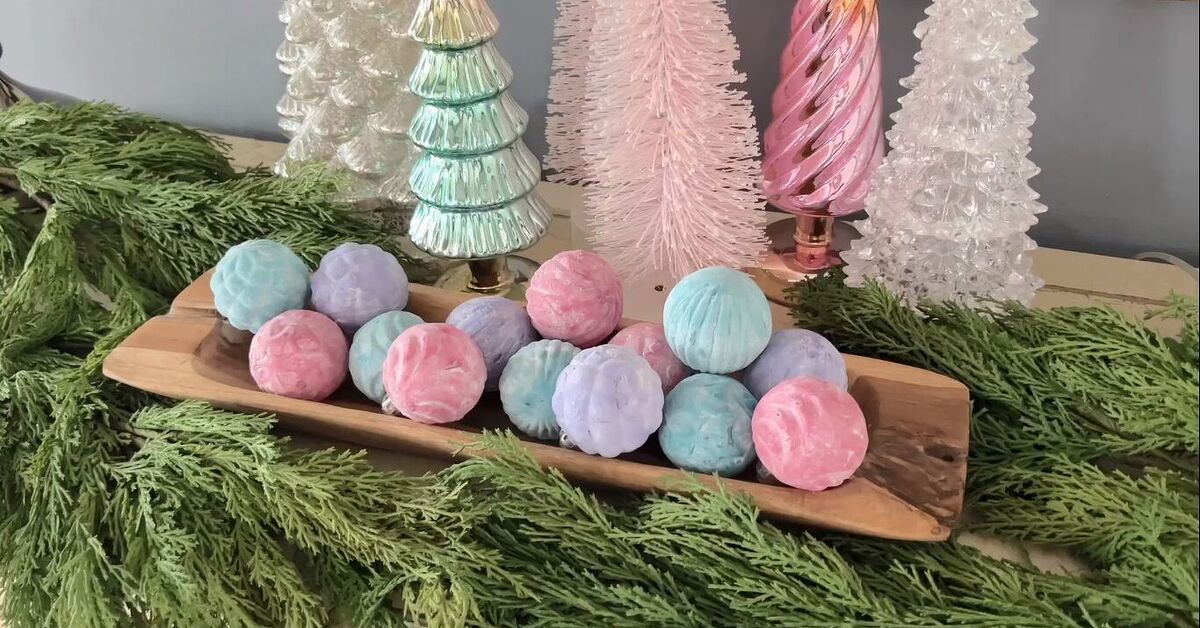
There is something magical about a Christmas ornament that looks like it wandered out of a snowy cabin, borrowed a velvet coat, and decided to live on your tree forever. Unfortunately, store-bought flocked ornaments can cost enough to make your holiday budget quietly hide behind the wrapping paper. The good news? You can make festive DIY flocked ornaments using baking soda, paint, and a few basic supplies you may already have at home.
This baking soda ornament technique creates a soft, matte, slightly powdery finish that looks like faux velvet, vintage ceramic, or freshly fallen snow depending on your color choice and application method. It is affordable, beginner-friendly, and perfect for refreshing old plastic or glass Christmas ornaments that no longer match your holiday style. In other words, those shiny red baubles from 2012 finally get their redemption arc.
In this guide, you will learn how to make DIY flocked ornaments with baking soda step by step, how to choose the right paint, how to get a smooth snowy finish, how to avoid common mistakes, and how to style your finished ornaments like they came from a boutique holiday catalog instead of your kitchen table.
What Are Baking Soda Flocked Ornaments?
Baking soda flocked ornaments are Christmas ornaments coated with paint and baking soda to create a soft, textured, matte surface. Traditional flocking usually refers to adding tiny fibers or powder to a surface to mimic velvet, suede, or snow. This DIY version uses baking soda as the texture booster. It does not create true velvet fibers, but it gives a similar cozy, dusty, snow-kissed look.
The technique works because baking soda thickens water-based paint and reduces shine. When sprinkled over wet paint, it clings to the surface and dries into a powdery, frosted layer. When mixed directly into paint, it creates a thicker, chalky coating that resembles ceramic, plaster, or aged pottery. Both methods are useful, and you can even combine them for extra dimension.
Why Use Baking Soda for DIY Christmas Ornaments?
Baking soda is inexpensive, easy to find, and surprisingly useful in craft projects. For ornament making, it gives paint more body and grip. That matters because glossy plastic and glass ornaments can be slippery little divas. Regular paint may streak, slide, or look patchy, but baking soda helps create a textured surface that hides small flaws.
It is also ideal for modern holiday decorating trends. Matte Christmas ornaments, neutral Christmas decor, faux ceramic finishes, velvet-style baubles, and handmade holiday decorations have become popular because they feel warm and personal. Baking soda ornaments fit right into that style without requiring fancy equipment.
Supplies You Will Need
Before you begin, gather everything in one place. This project moves quickly once the paint is wet, and you do not want to be sprinting across the room searching for a brush while holding a dripping ornament like a tiny festive grenade.
Basic Materials
- Old plastic or glass ball ornaments
- Acrylic craft paint, chalk paint, or latex paint
- Baking soda
- Small mixing bowl or disposable cup
- Paintbrush or foam brush
- Soft-bristle brush for dusting
- Wood skewers, chopsticks, or dowels
- Cardboard box, foam block, or jar for drying
- Ribbon, twine, or ornament hooks
- Drop cloth, parchment paper, or newspaper
Optional Materials
- Spray primer for shiny plastic ornaments
- Mod Podge or craft glue for extra hold
- Fine glitter or mica powder for sparkle
- Metallic paint for accents
- Velvet ribbon for a boutique finish
- Clear matte sealer for extra durability
Best Ornaments to Use
Plastic ornaments are the easiest choice because they are lightweight, shatterproof, and forgiving. They are especially smart if you have kids, pets, or a Christmas tree that gets treated like a climbing gym by your cat. Glass ornaments also work beautifully, but they require more careful handling.
Old glitter ornaments are surprisingly good candidates. The existing glitter creates extra texture under the paint, which can make the finished surface look richer and more handmade. Clear ornaments, metallic ornaments, and outdated colored ornaments can all be transformed as long as the surface is clean and dry.
Step-by-Step: How to Make Festive DIY Flocked Ornaments Using Baking Soda
Step 1: Clean the Ornaments
Remove the ornament caps and wipe each ornament with a dry or slightly damp cloth. If the surface is greasy or dusty, use a small amount of mild dish soap and water, then dry thoroughly. Paint sticks better to clean surfaces. Think of this as giving your ornaments a tiny spa treatment before their makeover.
Step 2: Create a Drying Station
Push wood skewers or chopsticks through the top opening of each ornament. Then place the other end into a cardboard box, foam block, or jar so the ornament can dry without touching the table. This setup allows you to paint all sides evenly and prevents flat spots.
If you are using a cardboard box, poke small holes in the top first. Space the holes a few inches apart so the ornaments do not bump into each other while drying.
Step 3: Prime the Surface If Needed
Primer is optional, but it helps when working with very glossy plastic or dark-colored ornaments. A light coat of spray primer gives paint something to grip. Let the primer dry according to the product directions before moving on.
If you are using acrylic craft paint on a matte or lightly textured ornament, you can often skip primer. For the smoothest finish, test one ornament first. The test ornament is your holiday science experiment, minus the lab coat.
Step 4: Choose Your Flocking Method
There are two main ways to make baking soda flocked ornaments. The first method is to paint the ornament, then sprinkle baking soda over the wet paint. This gives the softest snowy look. The second method is to mix baking soda directly into the paint. This creates a thicker faux ceramic or matte velvet texture.
For the most festive flocked effect, use both methods: mix a little baking soda into the paint, brush it onto the ornament, and then dust extra baking soda over the wet surface.
Step 5: Mix Baking Soda Paint
Start with about two tablespoons of acrylic or latex paint in a small cup. Add one to two teaspoons of baking soda and stir until the mixture looks slightly thicker than regular paint. It should still spread easily. If it becomes too stiff, add a little more paint. If it looks too thin, add a pinch more baking soda.
For a subtle matte finish, use less baking soda. For a chunky snow or pottery texture, use more. The goal is a creamy consistency, not cookie dough. If your brush stands upright in the mixture, you have gone too far and accidentally invented ornament frosting.
Step 6: Paint the First Coat
Brush a thin, even coat over the ornament. Work in gentle strokes and rotate the ornament as you go. Do not worry if the first coat looks streaky. The second coat is where the magic usually happens.
Let the first coat dry completely. Drying time depends on paint thickness, room temperature, and humidity, but most ornaments need at least 30 to 60 minutes before another coat. Rushing this step can pull up the first layer and create clumps.
Step 7: Add a Thicker Second Coat
Apply a second coat using the same baking soda paint mixture. This time, make the coat slightly thicker but still smooth. Try to cover any transparent spots and soften visible brush marks. If you want a faux velvet ornament, this second coat should remain wet for the next step.
Step 8: Sprinkle Baking Soda Over Wet Paint
While the second coat is still wet, hold the ornament over a tray or sheet of paper and sprinkle baking soda generously over the entire surface. Rotate the ornament slowly so the baking soda lands evenly. Do not rub it in. Let it fall naturally like snow, except this snow came from a cardboard box in your pantry.
Once covered, place the ornament upright in your drying station. Let it dry fully. This may take several hours, especially if the paint layer is thick.
Step 9: Brush Away Excess Baking Soda
After the ornament is completely dry, use a soft-bristle brush to gently remove loose baking soda. Do not scrub. A light touch preserves the flocked texture while revealing the paint color underneath.
If you want a heavier snowy look, leave more baking soda on the surface. If you want a smoother velvet look, brush more of it away. This is where each ornament gets its own personality. Some will look elegant. Some will look rustic. One may look like it survived a powdered donut incident. That is part of the charm.
Step 10: Add Details and Finishing Touches
Once the base finish is dry, you can add accents. Try a tiny amount of metallic paint around the top for an antique look. Add fine glitter for sparkle. Use a dry brush technique with white paint to create frosty highlights. Tie velvet ribbon, satin ribbon, jute twine, or gingham fabric through the cap for a polished finish.
If the original ornament caps are too shiny, paint them with gold, bronze, black, or champagne acrylic paint. This small detail makes the whole ornament look more expensive.
Step 11: Seal the Ornaments
Sealing is optional, but it helps if you plan to store and reuse the ornaments for several years. Use a clear matte sealer if you want to preserve the soft, non-shiny look. Avoid glossy sealer unless you intentionally want a polished finish.
Spray sealer should be used outdoors or in a well-ventilated area. Let the ornaments dry completely before hanging them on your tree or packing them away.
Color Ideas for Baking Soda Flocked Ornaments
The color palette determines the final style. White and ivory create classic snow-covered ornaments. Beige, taupe, mushroom, and warm gray create a cozy Scandinavian or farmhouse look. Deep green, burgundy, navy, and charcoal feel dramatic and elegant. Terracotta, clay, rust, and sand tones make the ornaments look like handmade pottery.
For a designer-style Christmas tree, choose three coordinating colors. For example, combine ivory, champagne, and sage green. Or try black, bronze, and deep wine red for a moody holiday look. If you prefer a playful tree, use pastel pink, mint, sky blue, and creamy white. Baking soda softens bright colors, so even bold shades feel more sophisticated.
Common Mistakes and How to Fix Them
The Paint Is Too Thick
If your paint mixture feels gritty and hard to brush, add more paint a few drops at a time. A thick texture is good, but it should still glide over the ornament.
The Baking Soda Falls Off
This usually happens when the paint is too dry before sprinkling. Add the baking soda immediately after painting the second coat. For better hold, mix a small amount of Mod Podge into the paint or seal the finished ornament with matte sealer.
The Ornament Looks Patchy
Patchiness is common after the first coat. Let it dry and add another coat. If the original ornament color still shows through, use primer next time or choose a more opaque paint.
The Finish Looks Too Powdery
Use a soft brush to remove more baking soda once dry. You can also apply a very light mist of matte sealer to lock down the surface.
The Brush Marks Are Too Visible
Use a softer brush, apply thinner coats, and rotate the ornament while painting. For a smoother finish, dab the final coat lightly with a foam brush instead of dragging bristles across the surface.
Safety Tips for Holiday Crafting
If children are helping, choose shatterproof plastic ornaments and non-toxic, water-based paints. Keep ornament caps, hooks, ribbons, and small decorations away from toddlers because small parts can be choking hazards. Cover your work surface, wash hands after painting, and keep baking soda out of eyes and mouths.
If using spray primer or spray sealer, work outside or in a well-ventilated space. Wear gloves if your skin is sensitive. Let everything dry fully before handling, decorating, or storing. Holiday crafting should smell like cookies and pine, not like a paint aisle having a dramatic moment.
How to Style Your Finished DIY Flocked Ornaments
These ornaments look beautiful on a Christmas tree, but they are also useful beyond the branches. Place them in a wooden bowl with pinecones and fairy lights. Tie them onto wrapped gifts as keepsake toppers. Hang them from garland on a mantel. Add them to a wreath for instant texture.
For a cohesive look, repeat the same ribbon across all ornaments. Velvet ribbon gives a luxe finish, while twine feels rustic. Satin ribbon looks traditional, and thin black ribbon creates a modern contrast. If your ornaments are neutral, mix them with warm white lights, dried orange slices, wooden beads, bells, and greenery.
Storage Tips for Reusing Them Next Year
Let the ornaments cure for at least 24 hours before storing. Wrap each one in tissue paper, coffee filters, or soft cloth. Store them in an ornament box or divided container so they do not rub against each other. Keep them in a dry place because moisture can affect the powdery finish.
If an ornament gets scuffed next year, touch it up with a little leftover baking soda paint. That is one of the best parts of this project: repairs are easy, and imperfections usually make the ornaments look more handmade rather than ruined.
Real-Life Experience Notes: What I Learned Making Baking Soda Flocked Ornaments
The first thing you learn when making DIY flocked ornaments with baking soda is that the project is much easier than it looks, but it rewards patience. The first coat almost always looks suspicious. You may stare at it and think, “Excellent, I have ruined Christmas.” Do not panic. The first coat is only the base. The second coat, the baking soda dusting, and the final brushing are what turn ordinary ornaments into soft, festive decorations.
One helpful experience is to work in small batches. Painting twelve ornaments at once sounds efficient until you realize the first one has started drying before you have time to sprinkle baking soda on it. A batch of three or four ornaments is more manageable. Paint one, sprinkle it, set it aside, then move to the next. This keeps the surface wet enough for the baking soda to cling properly.
Another useful lesson is that color changes after drying. Paint mixed with baking soda often dries lighter and more muted than it looks in the cup. A deep green may become softer and dustier. A warm beige may turn into an elegant oatmeal shade. This is usually beautiful, but if you want a bold color, choose paint slightly darker than your target shade.
Texture also depends on how much baking soda you use. A small amount mixed into paint creates a refined matte finish, almost like expensive ceramic. A heavier sprinkle over wet paint gives a snowy, flocked effect. If you want ornaments that look like faux velvet, brush away the excess powder gently after drying. If you want them to look like they were dipped in fresh snow, leave more baking soda on the surface and seal lightly.
The drying station matters more than expected. Skewers in a cardboard box work well because the ornaments can dry without touching anything. Jars also work, but they can tip if the ornament is heavy. A foam block is excellent if you have one. Whatever you use, test the balance before painting. A wet ornament rolling across the table is festive only in the way a kitchen disaster is festive.
Ribbons make a huge difference. Even a simple ornament looks high-end when finished with velvet ribbon or soft cotton twine. Matching the ribbon to the paint color creates a boutique look. Contrasting ribbon, such as black on ivory or burgundy on blush, makes the ornament feel more dramatic. Do not skip this final detail; it is the tiny bow tie of the ornament world.
Finally, this project is best when you allow each ornament to be slightly different. Handmade Christmas ornaments do not need to look factory-perfect. A little uneven texture, a soft brush mark, or a dustier patch can make the finished set feel warm and collected. The beauty of baking soda flocked ornaments is that they turn inexpensive supplies into decorations with character. They are budget-friendly, customizable, and satisfying enough that you may suddenly look at every old ornament in the house and whisper, “You’re next.”
Conclusion
Making festive DIY flocked ornaments using baking soda is one of the easiest ways to upgrade your Christmas decor without spending much money. With basic ornaments, water-based paint, baking soda, and a little patience, you can create a soft matte finish that looks snowy, vintage, ceramic, or velvet-inspired. The technique is flexible enough for farmhouse trees, elegant neutral themes, colorful family trees, handmade gift toppers, and cozy holiday displays.
The best part is that this project welcomes creativity. You can use old ornaments, leftover paint, thrifted finds, or mismatched decorations and turn them into a coordinated set. Whether you want white snowball ornaments, moody velvet-style baubles, or earthy faux pottery Christmas decor, baking soda makes the transformation simple and surprisingly satisfying. Your tree gets a custom look, your wallet stays cheerful, and those forgotten ornaments finally get invited back to the holiday party.













