
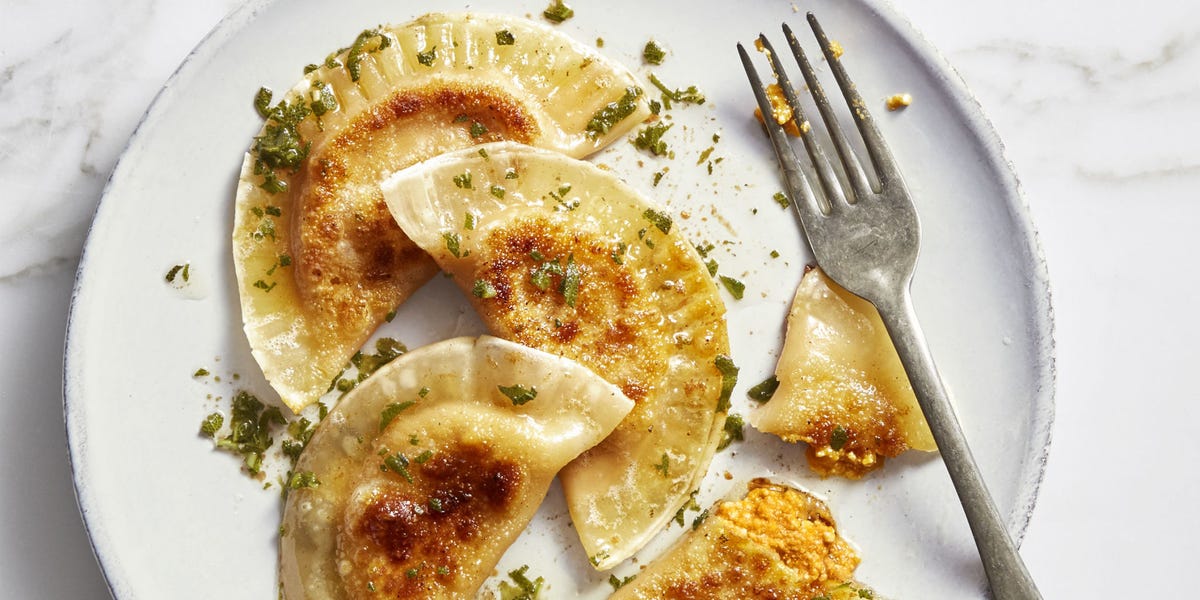
Sweet potato-ricotta pierogies are what happens when cozy Eastern European dumplings wander into an Italian kitchen, meet a roasted sweet potato, and decide to become everyone’s favorite dinner guest. They are tender, creamy, lightly sweet, savory in all the right places, and finished with brown butter and sage because, frankly, plain butter saw the assignment and decided to graduate with honors.
This recipe combines a soft homemade pierogi dough with a velvety filling made from roasted sweet potato, ricotta cheese, Parmesan, garlic, and warm seasoning. The pierogies are boiled until tender, then pan-fried until lightly golden. The final touch is a nutty sage brown butter sauce that clings to every dumpling like it has signed a long-term flavor contract.
If you have never made pierogies before, do not panic. The process is simpler than it looks: make dough, mix filling, roll, cut, stuff, seal, boil, and sizzle. Yes, it takes a little time. No, it does not require professional chef skills, a dumpling degree, or a grandmother watching from the corner with a wooden spoon. Though honestly, that would add atmosphere.
What Are Sweet Potato-Ricotta Pierogies?
Pierogies are filled dumplings traditionally made with unleavened dough and savory or sweet fillings. Classic versions often include potato and cheese, sauerkraut, mushrooms, meat, or fruit. This sweet potato-ricotta version keeps the comforting spirit of the original while adding a creamy, slightly sweet, modern twist.
Sweet potatoes bring natural sweetness and body. Ricotta adds a soft, milky richness. Parmesan gives a salty, savory edge. Garlic, pepper, and nutmeg keep the filling from tasting like dessert in disguise. The result is balanced: plush but not heavy, sweet but not sugary, elegant but still very much the kind of food you want to eat in sweatpants.
Why This Is the Best Sweet Potato-Ricotta Pierogies Recipe
The best pierogies have three things: a tender dough, a flavorful filling that does not leak, and a finish that makes you reach for one more “just to check.” This recipe focuses on all three.
1. Roasted Sweet Potato for Deeper Flavor
Boiled sweet potatoes can work, but roasting concentrates their flavor and reduces excess moisture. That matters because a wet filling makes pierogies harder to seal and easier to burst in boiling water. Roasting also brings out caramelized notes, giving the filling a richer, rounder taste.
2. Ricotta for Creaminess Without Heaviness
Ricotta is mild, creamy, and slightly sweet, which makes it a natural partner for sweet potato. For best results, use whole-milk ricotta and drain it briefly if it looks watery. A drier filling is easier to scoop, fold, and seal.
3. Brown Butter and Sage for the Finish
Brown butter tastes nutty, warm, and almost toasted. Sage adds an earthy aroma that pairs beautifully with sweet potato. Together, they transform these dumplings from “nice homemade dinner” into “please leave me alone while I emotionally bond with my plate.”
Ingredients
For the Pierogi Dough
- 2 1/2 cups all-purpose flour, plus more for rolling
- 1 teaspoon kosher salt
- 1 large egg
- 1/2 cup sour cream
- 4 tablespoons unsalted butter, softened
- 2 to 4 tablespoons warm water, as needed
For the Sweet Potato-Ricotta Filling
- 1 large sweet potato, about 12 to 14 ounces
- 3/4 cup whole-milk ricotta, drained if wet
- 1/3 cup finely grated Parmesan cheese
- 1 small garlic clove, grated or minced
- 1/2 teaspoon kosher salt, plus more to taste
- 1/4 teaspoon black pepper
- 1/8 teaspoon ground nutmeg
- 1 tablespoon chopped fresh chives or parsley
For the Sage Brown Butter
- 6 tablespoons unsalted butter
- 8 to 10 fresh sage leaves
- 1 tablespoon lemon juice
- Extra Parmesan, for serving
- Black pepper, for serving
Step-by-Step Instructions
Step 1: Roast the Sweet Potato
Preheat the oven to 400°F. Pierce the sweet potato a few times with a fork and place it on a baking sheet. Roast for 45 to 60 minutes, or until the flesh is completely tender and a knife slides through easily.
Let it cool until you can handle it, then peel away the skin. Mash the flesh until smooth. If the sweet potato looks watery, place the mash in a skillet over low heat for 2 to 3 minutes, stirring often, to steam off extra moisture. This tiny step is the difference between confident dumplings and dramatic little kitchen water balloons.
Step 2: Make the Pierogi Dough
In a large bowl, whisk together the flour and salt. Add the egg, sour cream, and softened butter. Mix with a fork or your hands until the dough begins to clump together. Add warm water, 1 tablespoon at a time, only if the dough feels too dry.
Turn the dough onto a lightly floured surface and knead gently for 3 to 5 minutes. The dough should become smooth, soft, and slightly tacky, but not sticky enough to glue itself permanently to your fingers. Wrap it in plastic wrap or cover it with a clean towel and let it rest for 30 minutes.
Step 3: Mix the Filling
In a medium bowl, combine the mashed roasted sweet potato, ricotta, Parmesan, garlic, salt, pepper, nutmeg, and herbs. Stir until smooth and creamy. Taste the filling before assembling. It should be savory, lightly sweet, and well-seasoned. Remember, dough softens flavor, so the filling should taste slightly more seasoned than you think it needs to.
Step 4: Roll and Cut the Dough
Divide the rested dough in half. Keep one half covered while working with the other. Roll the dough on a lightly floured surface until it is about 1/8 inch thick. Use a 3-inch round cutter, biscuit cutter, or the rim of a drinking glass to cut circles.
Gather scraps, cover them, and reroll only once if possible. Overworked dough can become tough, and nobody invited chewy shoe leather to dinner.
Step 5: Fill and Seal the Pierogies
Spoon about 1 teaspoon of filling into the center of each dough circle. Fold the dough over the filling to form a half-moon shape. Press the edges firmly to seal, pushing out any trapped air as you go. For extra security, crimp the edges with a fork or pinch them with your fingers.
If the dough edges feel dry, lightly dab them with water before sealing. Do not overfill the pierogies. Overfilling is tempting because the filling is delicious, but it usually ends with one pierogi splitting open in the pot like it has chosen chaos.
Step 6: Boil the Pierogies
Bring a large pot of salted water to a gentle boil. Add the pierogies in batches, making sure not to crowd the pot. Stir gently once so they do not stick to the bottom.
When the pierogies float to the surface, cook for 1 to 2 minutes more. Transfer them with a slotted spoon to a lightly oiled plate or baking sheet. At this point, they are fully cooked and tender, but the pan-fry step gives them that irresistible golden edge.
Step 7: Make the Sage Brown Butter
In a large skillet, melt the butter over medium heat. Add the sage leaves. Cook, swirling the pan often, until the butter foams, smells nutty, and turns golden brown. This usually takes 3 to 5 minutes. Watch carefully because brown butter goes from “gorgeous” to “oops” faster than a toddler near a birthday cake.
Add the boiled pierogies to the skillet in a single layer. Cook for 2 to 3 minutes per side, until lightly crisp and golden. Remove from the heat and stir in the lemon juice.
Step 8: Serve
Serve the sweet potato-ricotta pierogies warm with extra Parmesan, black pepper, crispy sage leaves, and a spoonful of brown butter from the pan. A dollop of sour cream or Greek yogurt on the side is also excellent.
Tips for Perfect Pierogies Every Time
Keep the Dough Soft, Not Dry
Pierogi dough should be tender and flexible. Add flour sparingly while rolling. Too much flour can make the dough tough and harder to seal.
Rest the Dough
Resting gives the flour time to hydrate and allows the gluten to relax. This makes rolling easier and helps prevent the dough from snapping back like a tiny edible rubber band.
Drain the Ricotta
If your ricotta has visible liquid, spoon it into a fine-mesh strainer for 15 to 30 minutes before mixing. A thick filling is much easier to work with.
Do Not Overfill
A teaspoon of filling may look modest, but it is enough. Pierogies need room to seal. Think of the filling as a polite guest, not someone bringing three suitcases for a weekend stay.
Boil Gently
A rolling, aggressive boil can knock the pierogies around and split the seams. Keep the water at a steady but gentle boil.
Make-Ahead, Freezing, and Storage
Sweet potato-ricotta pierogies are excellent for make-ahead meals. To freeze uncooked pierogies, arrange them in a single layer on a parchment-lined baking sheet and freeze until firm. Transfer to a freezer bag or airtight container. Boil them straight from frozen, adding a few extra minutes to the cooking time.
Cooked pierogies can be refrigerated in an airtight container for 3 to 4 days. Reheat them in a skillet with butter until warmed through and lightly crisp. For the best texture, avoid microwaving if possible; it works in an emergency, but the skillet gives you the golden edges that make pierogies worth writing poetry about.
Serving Ideas
These pierogies are satisfying enough to serve as a main dish, but they also play well with side dishes. Try them with a crisp green salad, roasted Brussels sprouts, sautéed cabbage, caramelized onions, or garlicky green beans. For a holiday meal, they make a beautiful vegetarian side dish that feels special without requiring a spreadsheet and a stress nap.
If you want a heartier plate, serve them with sautéed mushrooms and onions. For brightness, add a lemony arugula salad. For extra comfort, add a spoonful of sour cream and call it dinner. No one needs to know how many you ate standing over the stove.
Flavor Variations
Sweet Potato-Goat Cheese Pierogies
Swap half the ricotta for soft goat cheese. The tangy flavor cuts through the sweetness and gives the filling a more grown-up personality.
Sweet Potato-Ricotta Pierogies with Caramelized Onions
Fold 1/4 cup finely chopped caramelized onions into the filling for deeper savory flavor.
Spicy Sweet Potato Pierogies
Add a pinch of cayenne pepper or smoked paprika to the filling. This version is especially good with sour cream.
Herby Ricotta Pierogies
Add chopped thyme, parsley, or chives. Fresh herbs wake up the creamy filling and make the dumplings taste lighter.
Common Mistakes to Avoid
Using Wet Filling
Too much moisture is the top pierogi problem. Roast the sweet potato, drain the ricotta, and cook off extra liquid if needed.
Rolling the Dough Too Thick
Thick dough can make pierogies heavy. Aim for about 1/8 inch thick so the wrapper is tender but sturdy.
Skipping the Pan-Fry
Boiled pierogies are soft and lovely, but pan-fried pierogies are soft, crisp, buttery, and slightly dangerous to your self-control.
Forgetting to Taste the Filling
Season before sealing. Once the filling is inside the dough, it is too late unless you own a very tiny flavor rescue team.
Experience Notes: What Making Sweet Potato-Ricotta Pierogies Teaches You
Making sweet potato-ricotta pierogies is one of those cooking projects that feels slow in the best possible way. It asks you to pay attention, but not in a stressful restaurant-kitchen way. More like: roll dough, scoop filling, fold, pinch, repeat. After the first few, your hands figure it out. By pierogi number twelve, you may begin to feel like you have inherited ancient dumpling wisdom. By pierogi number twenty, you may start giving them personalities. This is normal. Probably.
The first big lesson is that moisture matters. Sweet potatoes are delicious, but they can be sneaky. Some are dense and creamy; others hold more water. Ricotta can vary too. One container may be thick and fluffy, while another looks like it has been quietly weeping in the dairy aisle. When you make the filling, trust your eyes. It should be scoopable and soft, not loose or runny. If it slides off the spoon like soup wearing a costume, it needs help. A few minutes in a skillet can dry the sweet potato, and a quick drain can fix the ricotta.
The second lesson is patience. Resting the dough is not optional kitchen theater. It truly makes the dough easier to roll and shape. If you rush it, the dough may fight back, shrink, or tear. If you let it rest, it behaves like a cooperative little blanket for your filling. Cooking often rewards the person who waits, which is annoying but true.
The third lesson is that sealing pierogies is more about confidence than perfection. Your first few may look slightly awkward. One might have a lopsided edge. Another might resemble a tiny pillow that had a difficult morning. That is fine. Homemade pierogies should look handmade. The goal is not factory precision; the goal is a sealed edge and a delicious bite. Press firmly, push out air, and keep going.
The best moment comes when the boiled pierogies hit the brown butter. Suddenly the kitchen smells nutty, herbal, sweet, and savory all at once. The sage crisps, the butter darkens, and the dumplings pick up golden spots. It is the kind of aroma that makes people wander into the kitchen pretending they came for water. They did not come for water.
Serving these pierogies also teaches you that comfort food does not have to be plain. Sweet potato and ricotta feel familiar, but the sage brown butter makes the dish special enough for guests. It works for fall dinners, winter holidays, cozy weekends, or any night when pasta sounds good but you want something with a little more personality. They are also practical: freeze a batch, and future you gets a homemade meal without starting from flour-covered square one.
Most of all, this recipe reminds you that great food is often built from simple ingredients treated with care. Flour, egg, sour cream, butter, sweet potato, ricotta, herbs, and salt become something memorable. That is the little magic trick of pierogies. They do not shout. They do not need fancy plating. They simply arrive warm, buttery, and tender, and somehow everyone at the table gets quieter for the first few bites.
Conclusion
Sweet potato-ricotta pierogies are creamy, cozy, and surprisingly achievable at home. The roasted sweet potato gives the filling natural sweetness and body, ricotta adds softness, Parmesan brings savory depth, and sage brown butter ties everything together with nutty elegance. With a tender dough, a well-drained filling, and a gentle boil before pan-frying, you can make pierogies that taste comforting, special, and completely homemade.
Whether you serve them as a vegetarian main dish, a holiday side, or a freezer-friendly comfort meal, these pierogies are worth the effort. They are soft, golden, buttery, and just fancy enough to make dinner feel like an event without requiring you to iron a tablecloth.












