
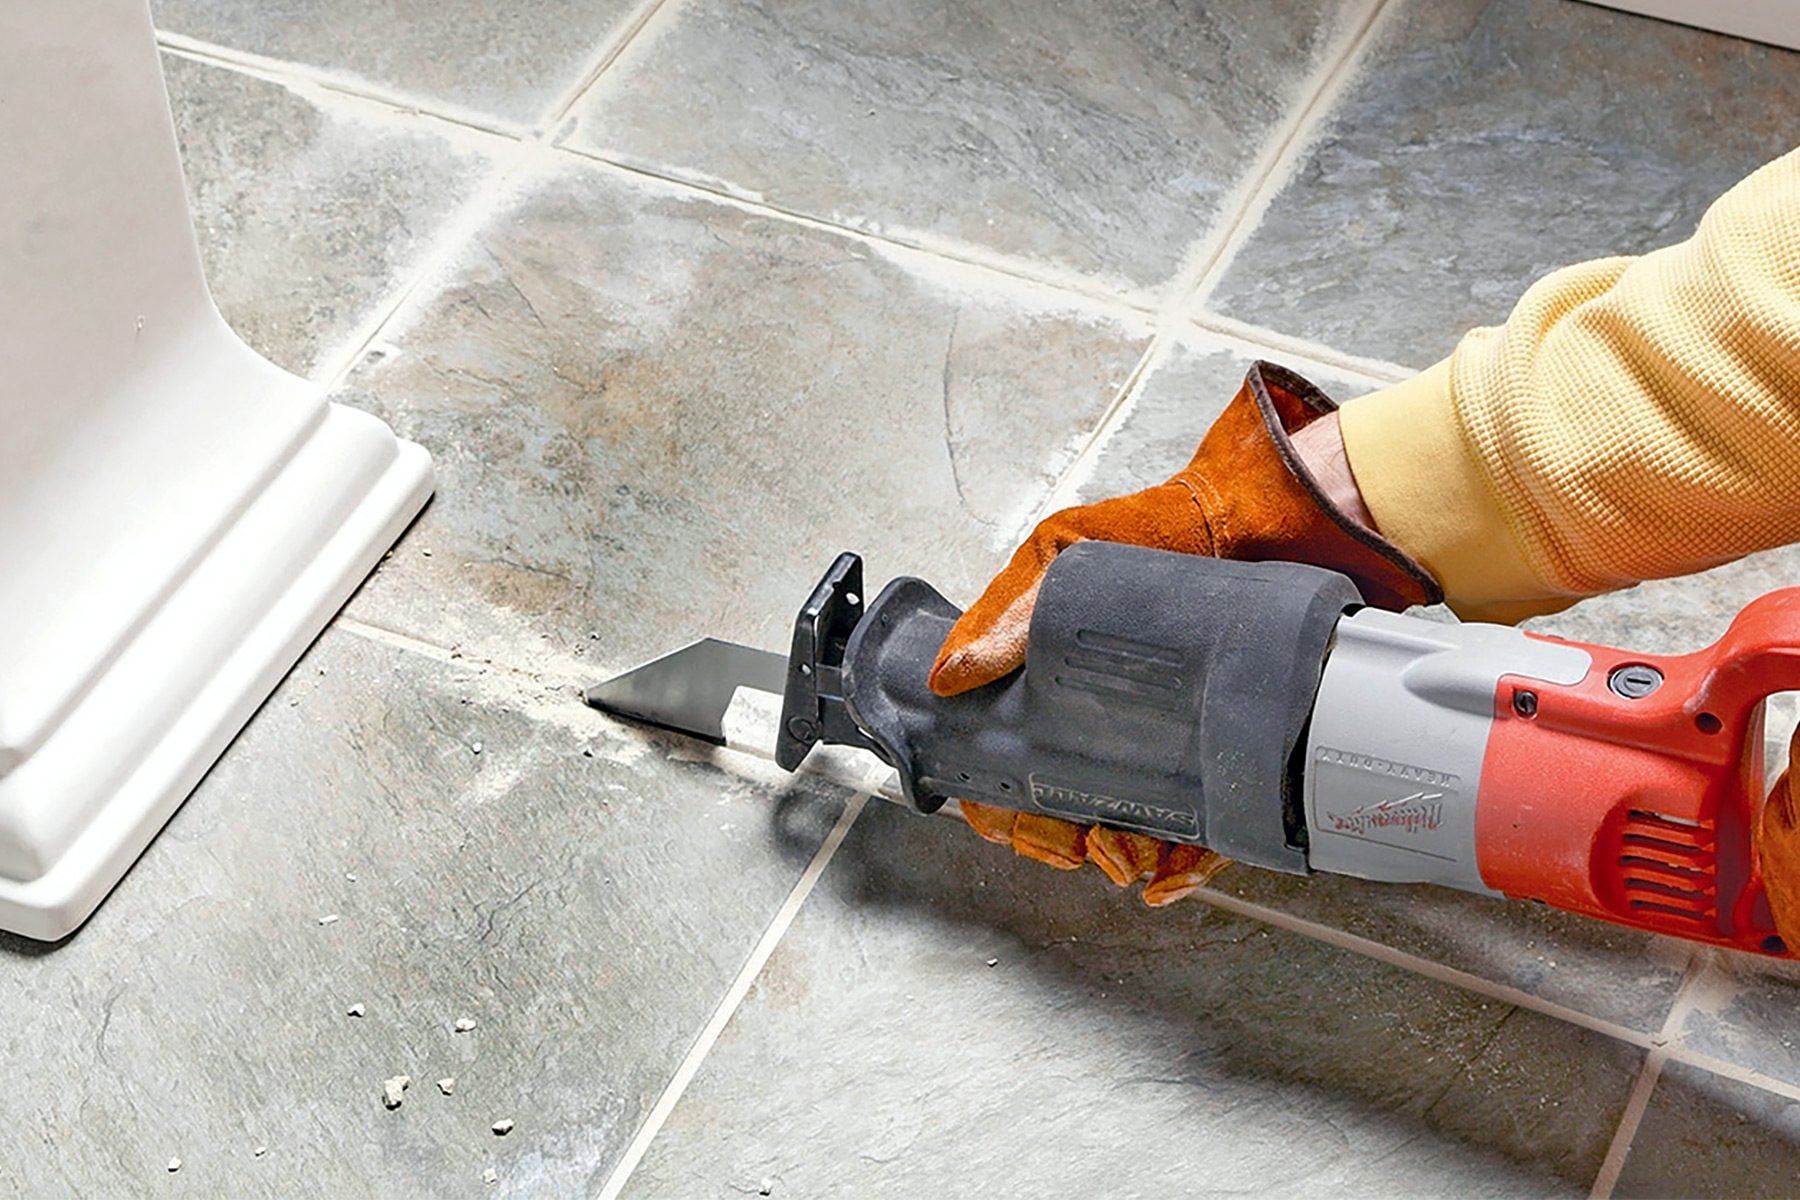
Removing old grout is one of those renovation jobs that looks harmless until you are crouched on a bathroom floor, surrounded by gray dust, wondering whether the previous installer used grout or reinforced concrete. Fortunately, the right power tool can turn hours of hand scraping into a far more manageable project.
A reciprocating saw fitted with a dedicated grout-removal attachment can clear wide, stubborn joints quickly. An oscillating tool offers better control around narrow lines, corners, backsplashes, and delicate tile. Both methods work, but they are not interchangeable in every situation. Tool choice, blade width, speed, pressure, and patience all affect whether you finish with clean joints or an exciting new collection of chipped tiles.
This guide explains how to remove grout with a reciprocating saw or oscillating tool, including safety preparation, blade selection, step-by-step techniques, cleanup, common mistakes, and practical lessons from real-world DIY situations.
Why Remove Old Grout?
Grout may need to be removed when it becomes cracked, loose, stained, moldy, uneven, or separated from the edges of the tile. Damaged grout is more than a cosmetic problem. In showers, tub surrounds, and other wet locations, open joints can allow moisture to move behind the tile assembly.
You may also need to remove grout when replacing a broken tile. Cutting away the surrounding grout isolates the damaged tile and reduces pressure on neighboring pieces during removal. For a full regrouting project, enough old material must be removed to expose clean tile edges and provide adequate depth for the replacement grout to bond.
A shallow cosmetic scrape is rarely sufficient when the existing grout is loose or contaminated. As a general working target, remove at least about 1/8 inch of grout and, where practical, roughly half the joint depth. Always consider the tile thickness and follow the replacement grout manufacturer’s requirements.
Research basis:
Reciprocating Saw vs. Oscillating Tool
When an Oscillating Tool Is the Better Choice
An oscillating multi-tool moves its blade through a very small side-to-side arc. With a carbide-grit or diamond-grit grout blade, that motion grinds grout away while giving the operator relatively precise control.
Choose an oscillating tool for:
- Narrow or medium-width grout joints
- Bathroom walls, backsplashes, and shower surrounds
- Small repairs or single-tile replacement
- Work near corners, trim, fixtures, or fragile tile
- Projects where accuracy matters more than maximum speed
A semicircular blade works efficiently along open grout lines, while a pointed or narrow blade can reach corners. The tool is easier to guide than a reciprocating saw, although it may work more slowly on large floors or extremely hard grout.
When a Reciprocating Saw Makes Sense
A reciprocating saw uses a longer push-and-pull stroke. It is more aggressive and is best paired with a grout-removal attachment specifically designed for reciprocating saws. Do not install an ordinary wood- or metal-cutting blade and hope for the best. That is not grout removal; that is a tile-demolition audition.
Choose a reciprocating saw for:
- Large floor areas with long, straight grout lines
- Wide joints containing sanded, epoxy, or especially hard grout
- Heavy-duty renovation or demolition work
- Projects where speed is important and the tile is not unusually delicate
Dedicated reciprocating-saw grout attachments are available in narrow and wide versions. Some cover joints from approximately 1/16 inch up to 3/4 inch, depending on the model. The attachment must be narrower than the grout line so its abrasive edge does not grind against the tile.
Which Tool Should a Beginner Use?
For most homeowners, an oscillating tool is the safer starting point. It is easier to control, works well in common residential grout joints, and is less likely to jump out of the joint. A reciprocating saw can be faster, but its longer stroke magnifies small steering mistakes.
Research basis:
Tools and Safety Equipment
Gather everything before starting so you do not have to walk through the house wearing dusty knee pads while searching for a vacuum attachment.
Tools and Materials
- Oscillating multi-tool or reciprocating saw
- Compatible carbide-grit or diamond-grit grout-removal blade
- Manual grout saw, carbide scraper, or utility knife
- Shop vacuum, preferably with a HEPA-rated filter
- Painter’s tape
- Drop cloths or plastic sheeting
- Stiff nylon brush
- Damp microfiber cloths or sponges
- Work light
Personal Protective Equipment
- Safety glasses or sealed goggles
- Appropriate respiratory protection
- Hearing protection
- Work gloves
- Long sleeves and durable pants
- Knee pads for floor projects
Grinding cement-based grout, mortar, masonry, or ceramic materials may release very fine dust. OSHA notes that cutting, sawing, grinding, and drilling silica-containing materials can create respirable crystalline silica particles. Control the dust at its source, ventilate the area, use a suitable vacuum, and wear respiratory protection appropriate for the task.
Do not casually spray water around a corded or battery-powered tool. Wet methods should be used only when the tool and accessory manufacturer explicitly permit them. For most indoor DIY projects, frequent vacuuming and damp cleanup are safer than introducing water beside electrical equipment.
Research basis:
How to Choose the Right Grout-Removal Blade
Blade selection is where successful grout removal begins. Measure several joints because older installations are not always consistent. A blade that fits comfortably in one joint may be too wide for another.
Carbide-Grit Blades
Carbide-grit blades are affordable and effective for common cement-based grout. They are a practical choice for small and medium projects. As the abrasive edge wears, removal becomes slower and the operator may begin pushing harder, which increases the risk of tile damage. Replace a worn blade instead of trying to motivate it with brute force.
Diamond-Grit Blades
Diamond-grit oscillating blades generally last longer and perform well on hard grout and larger jobs. They cost more initially, but their durability may make them more economical when removing grout from an entire shower or floor.
Blade Width and Shape
The abrasive cutting edge must be narrower than the grout joint. A 1/8-inch blade should not be forced through a joint that is only 1/16 inch wide. For narrow porcelain-tile joints, use a thin blade or complete the work manually. Wide sanded-grout joints can accept a broader attachment that removes material faster.
Semicircular oscillating blades are efficient on long runs. Pointed blades reach corners. Curved reciprocating-saw attachments can help keep the abrasive edge centered, but they still require two-handed control.
Check Tool Compatibility
“Universal fit” does not always mean compatible with every tool interface. Some oscillating accessories fit common open-back mounts but not certain Starlock-style systems. Confirm the blade’s mounting system, maximum operating specifications, and intended material before installation.
Research basis:
Preparing the Work Area
- Inspect the tile. Mark cracked, loose, hollow-sounding, or already-chipped tiles. Power tools can worsen existing damage.
- Determine why the grout failed. Recurring cracks may indicate movement, water intrusion, an unstable substrate, or missing movement joints. New grout will not permanently solve a structural problem.
- Clean the surface. Remove soap residue and grease so the blade and joint remain visible.
- Protect nearby surfaces. Tape along fixtures, tub edges, cabinets, and trim. Cover drains so debris cannot enter the plumbing.
- Improve visibility. Position a bright work light at a low angle. Shadows make the grout line easier to distinguish from tile edges.
- Test in an inconspicuous area. Practice on a hidden section before moving to the center of a wall or floor.
- Disconnect power before changing blades. Unplug corded tools or remove the battery whenever installing, adjusting, or inspecting an accessory.
Research basis:
How to Remove Grout With an Oscillating Tool
Step 1: Install the Blade
Attach a grout-removal blade that is narrower than the joint. Tighten it according to the tool manufacturer’s instructions. Orient a semicircular blade so a useful portion of the abrasive edge is exposed without forcing your wrist into an awkward position.
Step 2: Start at a Low or Medium Speed
Variable-speed tools offer better control. Begin at a moderate setting rather than immediately selecting maximum speed. Higher speed may remove grout faster, but it also creates dust, heat, and opportunities to damage glazed tile.
Step 3: Score a Shallow Guide Path
Place the blade in the center of the joint and hold it perpendicular to the tile surface. Make a light first pass. This shallow groove acts as a track for later passes and helps prevent the blade from skating sideways.
Step 4: Deepen the Joint Gradually
Guide the tool slowly along the grout line using light, steady pressure. Let the abrasive grit grind the grout instead of forcing the tool downward. Make several controlled passes rather than attempting full depth in one pass.
Step 5: Vacuum Frequently
Stop every few feet and vacuum the joint. Removing dust reveals remaining grout, keeps the blade from repeatedly grinding loose debris, and makes tile edges easier to see.
Step 6: Rotate the Blade Position
When the mounting system permits it, reposition the blade periodically so wear is distributed across the abrasive edge. If cutting slows dramatically or the blade becomes damaged, replace it.
Step 7: Finish Corners Manually
Do not twist a wide blade into a tight inside corner. Switch to a pointed accessory, manual grout saw, carbide scraper, or utility knife. The last half-inch is not worth sacrificing a whole tile.
Research basis:
How to Remove Grout With a Reciprocating Saw
Step 1: Install a Dedicated Grout Attachment
Use only a reciprocating-saw attachment designed for grout removal. Inspect it for cracks, excessive wear, bending, or other damage. Confirm that its width matches the grout joint.
Step 2: Turn Off Orbital Action
If the saw has an orbital mode, disable it unless the accessory manufacturer specifically states otherwise. Dedicated grout attachments are generally intended for straight reciprocating action. Orbital movement can reduce control and increase the chance of kickback or blade damage.
Step 3: Position the Attachment Parallel to the Tile
Hold the saw so the grout attachment lies as parallel as possible to the tiled surface. Depending on the accessory design, this may require pointing the saw handle away from the work. Keep both hands on the tool and make sure your body is balanced before pulling the trigger.
Step 4: Begin at the Lowest Practical Speed
Start slowly and allow the attachment to settle into the center of the joint. Do not begin with the abrasive edge touching the corner of a tile. Once the tool is tracking correctly, increase speed only as needed.
Step 5: Follow Long, Straight Lines
Guide the attachment forward without leaning it against either tile edge. Work in short sections and stop before reaching walls, cabinets, fixtures, or intersections where visibility decreases.
Step 6: Switch Tools for Detail Work
A reciprocating saw is excellent for clearing open runs but clumsy near tight corners. Use an oscillating tool or manual scraper for the final inches, narrow joints, and areas surrounding plumbing penetrations.
Research basis:
How to Avoid Chipping or Cracking Tile
- Use a blade narrower than the smallest joint.
- Keep the accessory centered and perpendicular.
- Begin with shallow passes.
- Do not use the blade as a pry bar.
- Stop if a tile vibrates, moves, or sounds loose.
- Reduce speed near intersections and corners.
- Replace worn accessories rather than applying more pressure.
- Take regular breaks before fatigue affects your control.
Glazed ceramic and porcelain tile can chip when the abrasive edge touches them, even briefly. Natural stone may scratch or spall more easily and can be expensive to replace. For marble, glass mosaics, handmade tile, or irreplaceable installations, manual removal or professional help may be the wiser choice.
Research basis:
Cleaning and Preparing the Joints for New Grout
After the bulk of the grout is removed, inspect every joint under bright light. Use a manual carbide scraper to remove ridges, loose fragments, and stubborn material along the tile edges. Avoid digging into the backer board, waterproofing membrane, or substrate beneath the tile.
- Vacuum the joints thoroughly.
- Brush them with a stiff nylon brush.
- Vacuum again to capture loosened particles.
- Wipe the tile faces with a damp cloth.
- Allow the installation to dry completely.
- Repair loose or damaged tiles before regrouting.
The new grout needs clean, stable joint walls. Dust, soap residue, old sealer, and loose particles can interfere with adhesion. Do not apply fresh grout as soon as the power tool stops humming; cleanup is part of the installation, not an optional epilogue.
Research basis:
Common Grout-Removal Mistakes
Using a Blade That Is Too Wide
A wide blade may seem faster until it removes the tile glaze along with the grout. Measure first and select the narrowest accessory that can work efficiently.
Applying Excessive Pressure
More pressure does not automatically mean more speed. It can overheat the accessory, wear the grit unevenly, push the blade into the tile, and make the tool harder to control.
Removing Grout Too Deeply
The goal is to create a clean, adequate cavity for new grout, not to excavate the wall assembly. Stop before reaching waterproofing membranes, heating cables, or the substrate.
Ignoring Plumbing or Electrical Hazards
Be especially cautious around shower valves, outlets, heated floors, and tiled walls that may conceal pipes or wiring. Never make an uncontrolled plunge cut into an area you have not inspected.
Trying to Do Everything With One Tool
Power tools remove the bulk material. Hand tools handle corners, transitions, and delicate cleanup. A hybrid approach is usually faster than forcing a large blade into every location.
Regrouting Before Solving the Original Problem
If grout repeatedly cracks in the same location, investigate movement, moisture, loose tile, or improper joint placement. Regrouting without correcting the cause merely schedules the same project for a future weekend.
Research basis:
Experience-Based Lessons From Common DIY Grout-Removal Projects
The most useful grout-removal lessons usually appear after the tool has been running for five minutes. On paper, the process is simple: place the blade in the joint and move forward. In practice, every tile installation has its own personality, and some of those personalities need a long vacation.
The First Pass Determines the Rest of the Job
One common experience among DIY renovators is that an inaccurate first pass creates problems for every pass afterward. When the initial groove wanders toward a tile edge, the blade naturally tries to return to that path. Starting with a shallow score line may feel slow, but it establishes a centered channel that makes deeper removal faster and safer.
A good routine is to practice on a grout line behind a toilet, beneath an appliance, or near an area that will be covered by trim. This reveals how quickly the grout cuts and how strongly the tool vibrates before you begin on the most visible section.
Old Grout Is Rarely Consistent
In older bathrooms, one joint may be soft and powdery while the next feels hard enough to have its own building permit. Repairs completed over many years may contain different grout products, sealers, caulk, patching compounds, or even thinset pushed into the joints.
When the cutting speed suddenly changes, stop and inspect the material rather than increasing pressure. A slower section may require a fresh carbide blade, a diamond-grit accessory, or a reciprocating-saw grout attachment. It may also indicate that the blade has contacted thinset, a tile spacer, or the edge of a tile.
Dust Management Saves More Time Than It Costs
Skipping cleanup seems efficient during the first few minutes. Soon, however, the grout lines disappear under dust, the blade repeatedly travels over loose debris, and the entire room develops the atmosphere of a tiny indoor quarry.
Vacuuming every few feet improves visibility and makes it easier to judge depth. For larger projects, a second person can hold a vacuum nozzle near the work area without touching the moving accessory. This arrangement reduces cleanup and helps the operator keep both hands on the tool.
Floor Work and Wall Work Feel Completely Different
On a floor, body position becomes the hidden challenge. Kneeling sideways while steering a reciprocating saw leads to fatigue, and fatigue leads to wandering cuts. Knee pads, adequate lighting, and working in short sections make a noticeable difference. Rotate your position so the tool moves away from your body along a visible line.
Wall grout is easier to see but harder to control because the tool’s weight pulls downward. An oscillating tool is usually more comfortable for backsplashes and shower walls. Supporting the tool with both hands prevents the blade from dropping into the lower tile edge.
The Last Ten Percent Takes Disproportionately Long
Power tools can remove most of the grout quickly, but corners, intersections, and material clinging to tile edges require slower hand work. This final cleanup is important because new grout needs sound joint walls and adequate depth. Attempting to complete every corner with a powered blade often causes the damage that careful operators avoided during the first ninety percent of the project.
A manual grout saw, carbide scraper, and sharp utility knife are therefore not backup tools. They are finishing tools. Used carefully, they remove small ridges without widening the joint.
Stopping Early Can Be the Smartest Decision
Some discoveries justify pausing the project: a moving tile, damp substrate, deteriorated backer board, widespread mold, cracked stone, or evidence that waterproofing has failed. Covering those warning signs with new grout does not repair them.
Professional help is also sensible for expensive natural stone, glass tile, extensive epoxy grout, heated floors, or large wet-area failures. The cost of expert assistance may be lower than replacing damaged tile or rebuilding a shower after an underlying leak is ignored.
Final Thoughts
An oscillating tool is the best all-around choice for controlled grout removal in most kitchens and bathrooms. A reciprocating saw equipped with a dedicated grout attachment is faster for wide joints, hard grout, and long floor runs, but it demands more discipline.
Whichever tool you use, match the blade to the joint, begin slowly, make shallow passes, vacuum frequently, and finish delicate areas by hand. The real goal is not merely to remove grout quickly. It is to remove enough grout for a durable repair while leaving every tile exactly where it belongs.
Note: Always follow the operating manual and safety instructions supplied with your power tool and grout-removal accessory. Stop work when you encounter loose tile, concealed utilities, water damage, failed waterproofing, or materials you cannot identify safely.











