Learning how to stretch an FL Studio sample is one of those producer skills that looks mysterious until you do it once. After that, you wonder why you ever spent 20 minutes nudging a loop around the Playlist like it owed you money. Whether you are working with a drum break, vocal chop, guitar loop, piano phrase, or a sample from a dusty record, time stretching helps you make audio fit your project tempo without destroying the groove.
The good news: FL Studio gives you several ways to stretch samples. The even better news: for most situations, you only need three simple steps. Import the sample, turn on the right stretch behavior, then adjust the clip until it locks with your project BPM. That is the clean version. The producer version includes a few tiny traps, such as accidentally changing pitch, choosing the wrong stretch mode, or stretching a vocal so hard it starts sounding like a robot having a stressful Monday.
This guide explains how to stretch samples in FL Studio clearly, practically, and without making your brain feel like it is loading a 400-track project on a potato laptop. You will learn how to stretch an audio clip in the Playlist, how to keep the pitch stable, when to use Fit to Tempo, and how to avoid common sound-quality problems.
What Does Stretching a Sample Mean in FL Studio?
In music production, stretching a sample means changing the length or speed of an audio file so it fits a new tempo or timing grid. For example, you may have a drum loop recorded at 90 BPM, but your project is set to 140 BPM. Without stretching, the loop will drift out of time and make your beat sound like two producers are arguing inside the same session.
Time stretching lets you make that loop shorter or longer. Depending on the mode you choose, FL Studio can either preserve the original pitch or change the pitch along with the speed. This matters because a sample stretched in the wrong mode may suddenly sound lower, higher, thinner, grainier, or just plain suspicious.
Time Stretching vs. Resampling
Time stretching and resampling are related, but they are not the same thing. Time stretching changes duration while trying to preserve pitch. Resampling changes speed and pitch together, like slowing down or speeding up a vinyl record. Resampling can sound musical and vintage, especially for hip-hop, lo-fi, jungle, and sample-based production. But if you want a vocal loop to stay in the same key while matching your beat, use a stretch mode designed to preserve pitch.
In FL Studio, the key setting lives in the audio clip or sampler channel settings. Modes such as Stretch or advanced stretching options are useful when you want the sample to follow tempo changes without shifting pitch. Resample is useful when you want that classic speed-up or slow-down effect.
Step 1: Import Your Sample and Find the Project Tempo
Start by dragging your sample into the Playlist. This can be a WAV, MP3, AIFF, or another supported audio file. Once the sample lands in the Playlist, FL Studio creates an audio clip channel for it. This is where much of the magic happens.
Before stretching anything, set your project tempo. You can do this from the BPM display at the top of FL Studio. If you already know your song is 128 BPM, 95 BPM, or 150 BPM, enter that value first. Stretching a sample before deciding the project tempo is like building a house before choosing which planet it lives on. Possible? Maybe. Wise? Absolutely not.
How to Guess or Detect the Sample BPM
If your sample is a clean loop, FL Studio may detect the tempo automatically or allow you to use tempo-related options from the audio clip menu. You can also right-click the sample or use the clip menu to access options such as detecting tempo or fitting the sample to tempo. If the loop is four bars long and has clear drums, detection is usually easier. If it is a loose live guitar recording with rubato timing, FL Studio may need more help.
For a simple loop, zoom into the Playlist and look at how the waveform lines up with the grid. A four-bar drum loop should begin on bar one and end exactly at the start of bar five. If the end lands before or after the bar line, the sample needs stretching. Do not panic. The grid is not judging you. It has seen worse.
Clean Up the Start and End Points
Before stretching, make sure the sample starts cleanly. If there is silence before the first transient, trim it. If there is extra audio after the loop ends, trim that too. Stretching a messy sample often gives messy results. Think of it like ironing a shirt: if the shirt is folded into a ball, the iron is not the real problem.
Use the Playlist trim handles to remove empty space, or open the sample in Edison for more precise editing. Edison is useful when you need to cut silence, normalize audio, detect tempo, or prepare the sample before bringing it back into the Playlist.
Step 2: Enable Stretch Mode and Drag the Clip to Fit the Grid
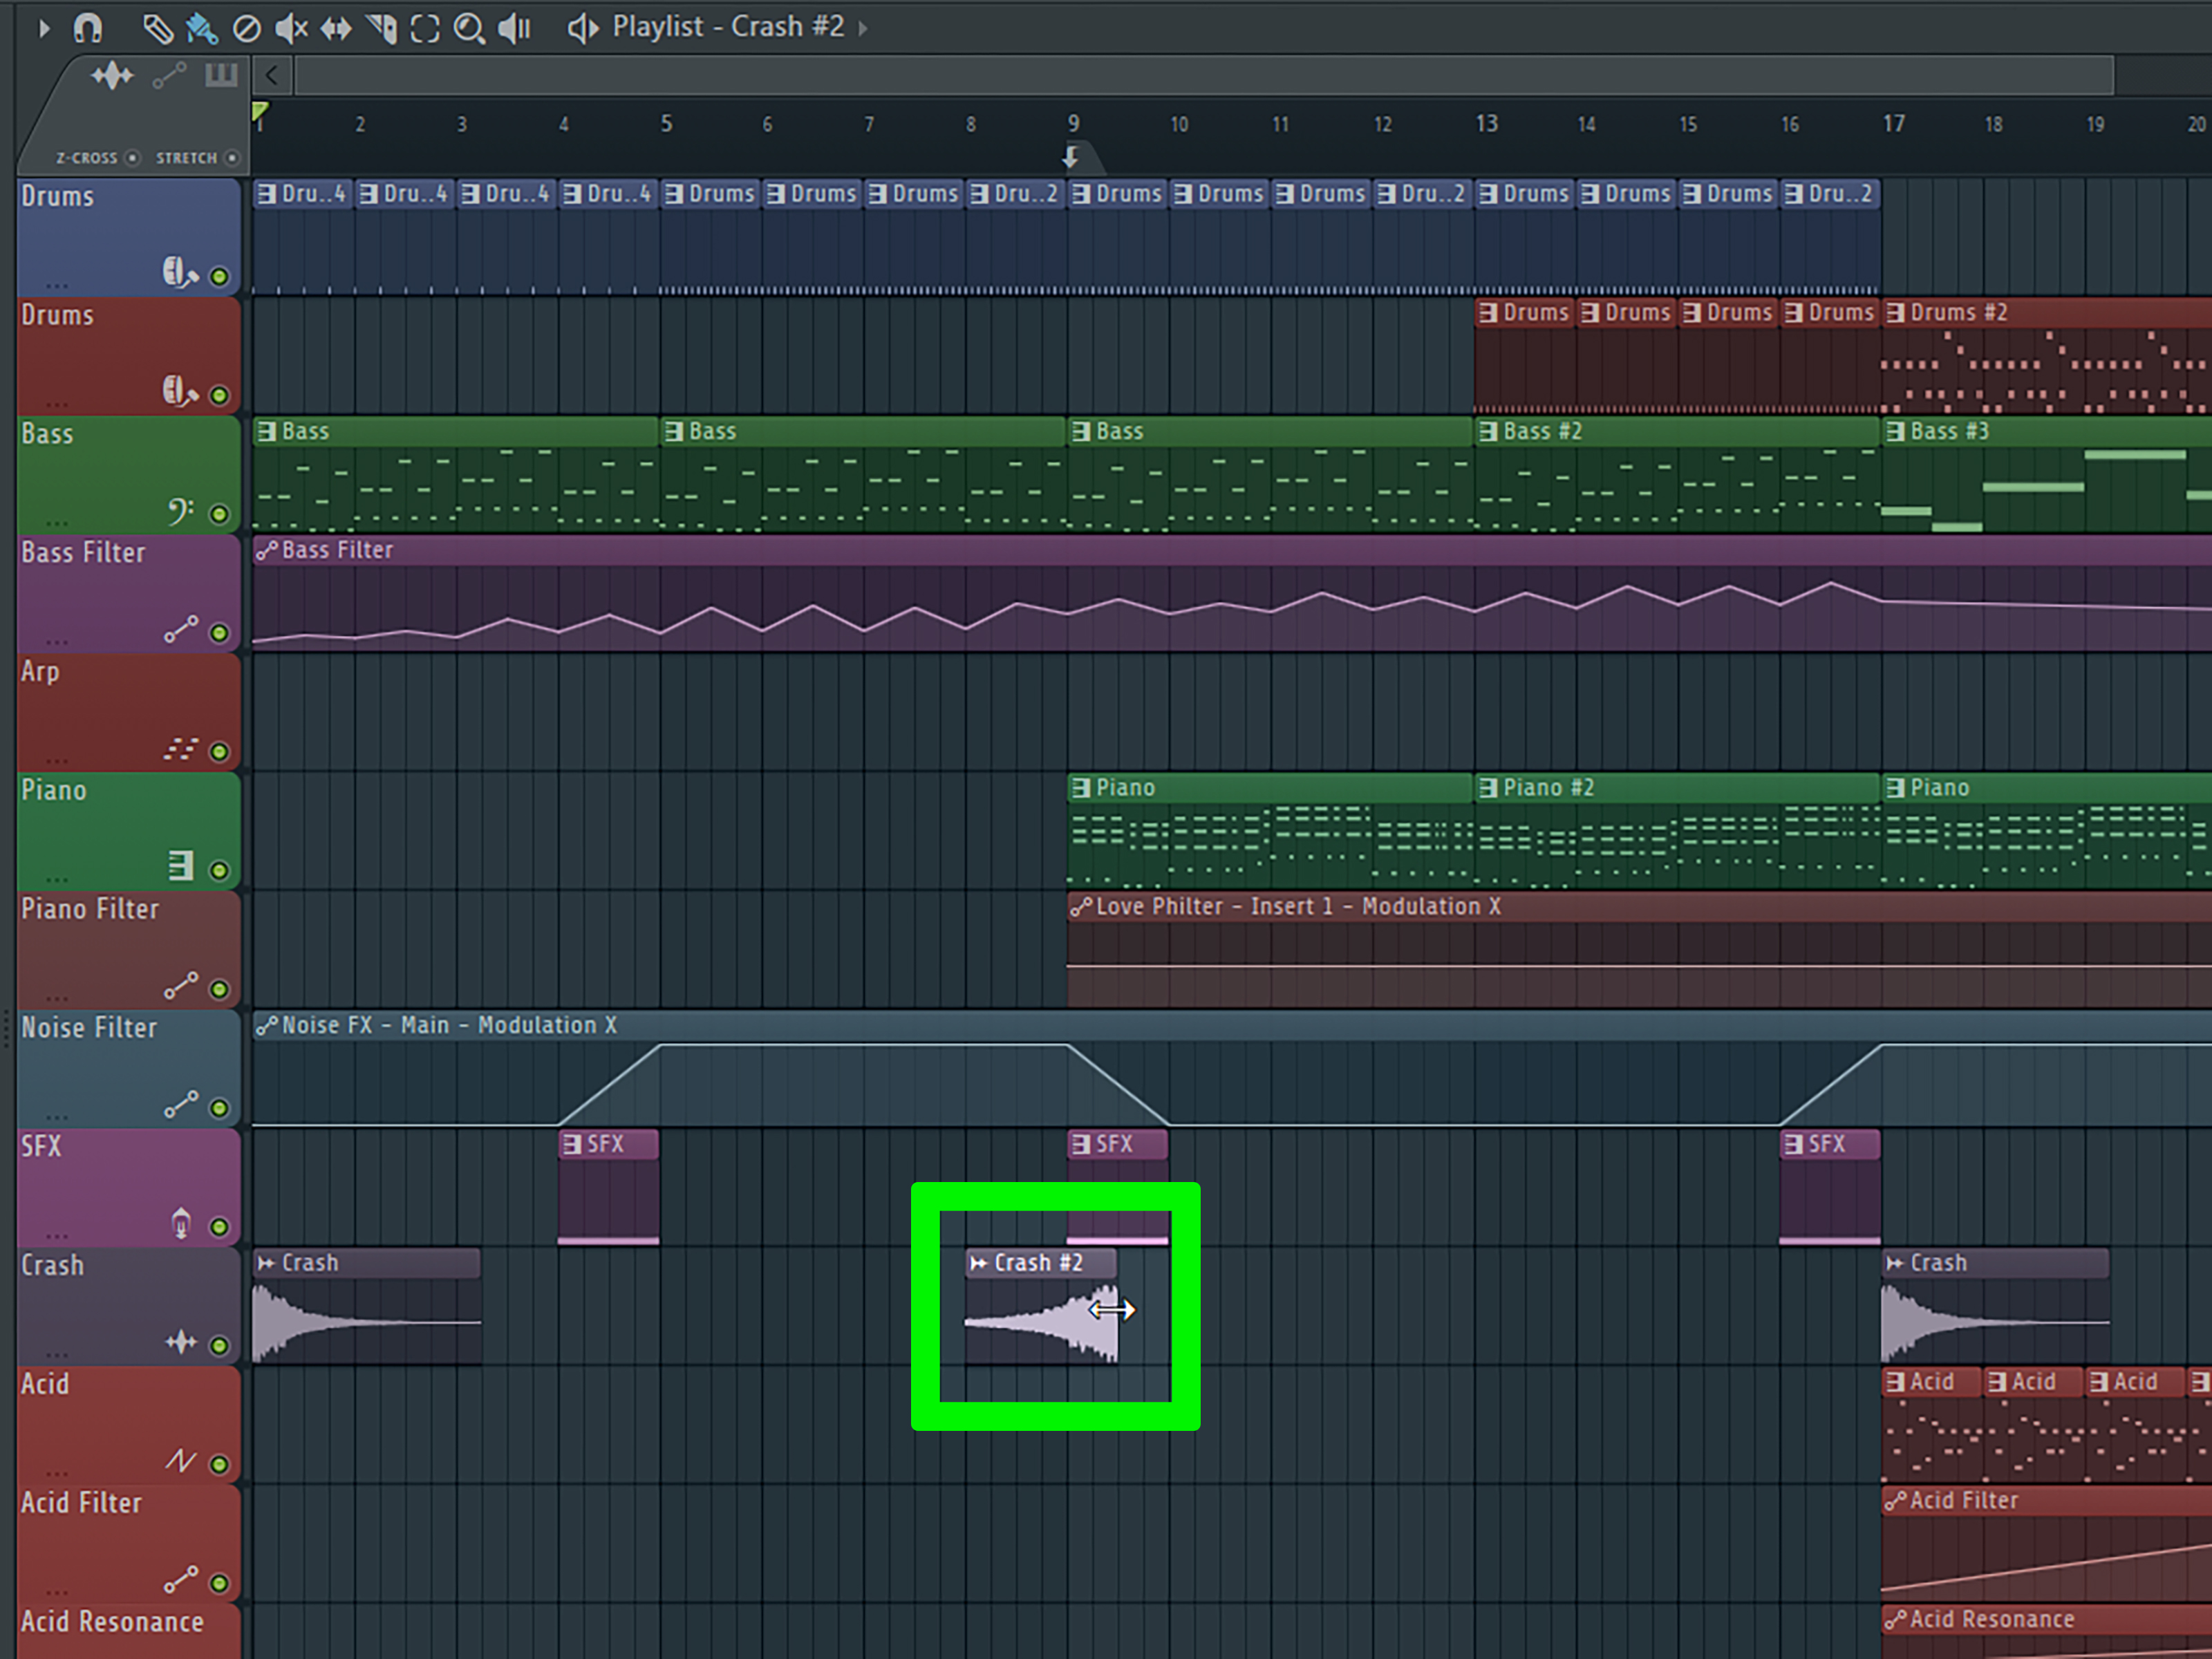
The fastest way to stretch a sample in FL Studio is by using the Playlist’s stretch behavior. In the Playlist, enable the Stretch option so that dragging the edge of an audio clip changes its timing instead of simply trimming it. Once Stretch is enabled, grab the left or right edge of the audio clip and drag it until the sample fits your desired bar length.
For example, if you have a two-bar loop, drag the clip edge until it ends exactly after two bars. If you have an eight-bar vocal phrase, line it up across eight bars. This method is quick, visual, and excellent for loops that are already close to the tempo of your project.
Example: Stretching a 90 BPM Drum Loop to 120 BPM
Imagine you import a 90 BPM drum loop into a 120 BPM FL Studio project. The loop is too slow, so it extends past the bar line. Turn on Playlist Stretch, drag the end of the clip left until it snaps to the correct bar length, and play it back with the metronome or your drums. If the kick and snare now land on the grid, congratulations: your loop has joined society.
If the sample sounds pitched up or down after stretching, check the time-stretching mode in the channel settings. You probably need a mode that preserves pitch rather than Resample.
Use Snap Settings for Cleaner Timing
Snap settings control how clips move and resize on the Playlist grid. If Snap is set too loose, you may accidentally stretch the sample slightly off-time. Set Snap to Line, Beat, Bar, or another useful value depending on the job. For drum loops, bar-based snapping is often easiest. For vocal chops, smaller snap values may give you better control.
When working with rhythmic material, zoom in and check the transients. The first kick, snare, chord hit, or vocal syllable should land where the groove expects it. A sample can be technically stretched to the right length but still feel late if the first transient has silence before it.
Step 3: Choose the Right Time-Stretching Mode and Preserve the Pitch
After the sample fits the grid, open the audio clip’s Channel Settings. Look for the time-stretching section. This area controls how FL Studio handles changes in sample length, pitch, and tempo behavior.
If your goal is to stretch the sample while keeping the original pitch, choose a pitch-preserving stretch mode such as Stretch or a higher-quality option available in your version of FL Studio. If your goal is to create an old-school pitched effect, use Resample. Neither option is “wrong.” They simply serve different creative purposes.
Best Stretch Modes for Common Samples
For drum loops, use a mode that keeps transients sharp. Drums can get smeared if stretched too aggressively. For vocals, use a cleaner pitch-preserving mode and avoid extreme changes unless you want robotic artifacts. For melodic loops, choose a mode that keeps the tone stable, then check whether the sample is still in key with your song.
If a stretched sample sounds watery, metallic, or phasey, try a different mode. Time-stretching algorithms are not magic elves living in your CPU. They are mathematical tools, and each one reacts differently depending on the audio source.
When to Use Fit to Tempo
Fit to Tempo is helpful when you know the original BPM of a sample or when FL Studio can estimate it. You can use it to tell FL Studio, “This loop was 100 BPM; make it fit my project.” This is often faster than manually dragging the clip edge, especially with loops that have embedded tempo information.
However, Fit to Tempo is not perfect for every recording. Live performances, tempo-drifting samples, chopped vinyl loops, and vocals with loose phrasing may require manual adjustment or NewTime. Use Fit to Tempo as a smart assistant, not as an all-knowing studio wizard wearing a tiny cape.
Alternative Method: Stretch a Sample with the Time Knob
Another way to stretch a sample in FL Studio is by using the Time knob in the audio clip or sampler channel settings. This knob lets you define how long the sample should play. You can right-click or adjust values more precisely depending on the workflow you prefer.
This method is useful when you want numeric control. For example, you may want a sample to last exactly one bar, two bars, or four bars. It is also useful when you are building one-shots, risers, impacts, transitions, or sound-design textures where the Playlist edge-drag method feels too broad.
Resetting Stretch Settings
If things get weird, reset the pitch, multiplier, or time settings in the channel window. Samples sometimes carry tempo metadata, pitch information, or previous stretch behavior that affects playback. Resetting values gives you a clean starting point.
This is especially helpful when a sample seems to fight the project tempo. If your loop changes speed unexpectedly when you adjust the project BPM, check whether the sample is set to follow tempo or whether it is using Resample. A tiny mode setting can create a big “why is my song haunted?” moment.
Using Edison for More Accurate Sample Preparation
Edison is FL Studio’s audio editor, and it is excellent for preparing samples before stretching. You can trim silence, clean clicks, normalize volume, detect tempo, and edit sample properties. If your sample is not looping correctly, Edison can help you fix the source before you ask the Playlist to do the stretching.
Open the sample in Edison, trim the start and end points, then save or drag the edited version back into the Playlist. For loops, make sure the sample length is musically clean. A perfect four-bar loop is much easier to stretch than a loop that is four bars plus one awkward sneeze of silence.
When Edison Is Better Than Playlist Stretching
Use Edison when the sample has technical issues: bad start points, clicks, silence, uneven volume, or unclear tempo. Use Playlist Stretching when the sample is already clean and you simply need to fit it to the beat. A good workflow is to clean in Edison, arrange in the Playlist, and fine-tune in Channel Settings.
Using NewTime for Vocals and Loose Recordings
NewTime is FL Studio’s audio time-manipulation tool for warping, slicing, and correcting timing. It is especially useful for vocals, live instruments, and performances that do not sit perfectly on the grid. Instead of stretching the whole sample evenly, NewTime lets you adjust timing points within the audio.
For example, a singer may start a phrase perfectly but rush the last two words. Stretching the whole clip may fix the ending while ruining the beginning. NewTime allows more detailed correction by moving timing markers where they are needed.
When to Use NewTime Instead of Simple Stretching
Use NewTime when the sample has internal timing problems. A drum loop with a steady tempo usually only needs simple stretching. A live vocal, guitar riff, or percussion recording may need warping. NewTime gives you more surgical control, though it also takes more time and patience.
For beginners, start with Playlist Stretch and Channel Settings. Once those feel comfortable, explore NewTime. Jumping into detailed audio warping too early can feel like trying to parallel park a spaceship.
Common Problems When Stretching Samples in FL Studio
The Sample Changes Pitch
If the sample changes pitch when you stretch it, you are probably using Resample or another mode that links speed and pitch. Switch to a pitch-preserving stretch mode. Then play the sample with your track and check whether it still matches the key.
The Sample Sounds Grainy or Metallic
Artifacts happen when audio is stretched too far or when the selected mode is not ideal for the material. Try a different stretch mode, reduce the amount of stretching, or chop the sample into smaller sections. Extreme stretching can be creative, but it rarely sounds invisible.
The Loop Still Does Not Fit the Beat
Check the start point, end point, and original tempo. Make sure the first transient starts exactly on the grid. If the loop was cut badly before you imported it, stretching will not magically know where the true bar begins. Clean the file in Edison or manually trim it in the Playlist.
The Sample Drifts Over Time
Some samples are not recorded to a steady tempo. Live drums, old vinyl, and human performances may drift. In that case, use NewTime or slice the audio into smaller sections and align each part separately.
Best Practices for Better-Sounding Stretched Samples
First, avoid stretching more than necessary. Small tempo changes usually sound clean. Large tempo changes may introduce artifacts. If you are turning a 70 BPM vocal into a 170 BPM hyperpop hook, expect the software to sweat a little.
Second, choose the right source. High-quality WAV files generally handle stretching better than low-bitrate MP3s. If a sample already sounds crunchy, stretching may exaggerate the crunch. Sometimes that is a vibe. Sometimes it is a crime scene.
Third, stretch before heavy effects. Reverb, delay, chorus, and distortion can make stretching artifacts more obvious. Get the timing right first, then add effects. Your mix will thank you by not sounding like a haunted fax machine.
Fourth, always listen in context. A sample that sounds slightly imperfect solo may work beautifully in the full beat. Producers sometimes obsess over tiny artifacts that disappear once drums, bass, vocals, and effects join the party.
Practical Workflow: Stretching a Vocal Chop
Let’s say you have a short vocal phrase at 100 BPM and your project is 125 BPM. Drag the vocal into the Playlist. Trim the start so the first syllable begins exactly on the grid. Enable Playlist Stretch and drag the end of the clip until the phrase fits the desired bar length. Open Channel Settings and select a pitch-preserving stretch mode.
Now play the beat. If the vocal sits rhythmically but sounds slightly unnatural, try another stretch mode. If only one word feels late, slice the vocal phrase and move that word manually, or use NewTime for a smoother correction. If the vocal is out of key, adjust pitch separately after the timing is correct.
Practical Workflow: Stretching a Drum Break
Drum breaks need special care because transients are everything. Import the break, trim the start, and identify the loop length. If it is a four-bar break, stretch the end to line up with four bars in the Playlist. Use a stretch mode that keeps the drums punchy, then listen carefully to the kick and snare.
If the break loses impact, consider slicing it instead of stretching the entire file. Many producers chop breaks into hits or smaller sections, then rearrange them on the grid. This can preserve punch and create a tighter groove. It also gives you more creative control over ghost notes, fills, and swing.
Practical Workflow: Stretching a Melodic Loop
Melodic loops require both timing and pitch attention. After stretching the loop to match your project BPM, check the key. A piano loop may be rhythmically perfect but harmonically wrong. Use FL Studio’s pitch controls, a tuner, or your ears to match the loop with your bassline and chords.
If the loop sounds unstable after stretching, try reducing the tempo change or using a higher-quality source. Pads and sustained sounds often reveal artifacts more than drums because long notes expose warbling and texture changes.
Extra Experience: What Stretching Samples Teaches You Over Time
After working with enough samples in FL Studio, you begin to realize that stretching is not just a technical function. It is a listening skill. Beginners often think the goal is to make every waveform snap perfectly to the grid. Experienced producers know the real goal is to make the sample feel right. Sometimes that means perfect grid alignment. Sometimes it means leaving a vocal slightly behind the beat because it adds emotion. Sometimes it means using Resample because the pitch change gives the sample character.
One of the biggest lessons is that not all samples want to be stretched the same way. A tight EDM drum loop can usually handle direct Playlist stretching. A dusty soul sample may sound better with a little resampled pitch change because that movement adds warmth. A vocal phrase may need careful warping because the consonants and breaths reveal every mistake. A guitar riff may need manual slicing because the player naturally pushed and pulled the timing. The more you stretch samples, the more you learn to ask, “What does this audio actually need?” instead of blindly applying the same setting every time.
Another practical lesson is to commit when something sounds good. Producers love endless tweaking. You stretch the sample, then try another mode, then another, then adjust the pitch, then decide the first version was better, then stare into the distance like a tragic movie character. A better approach is to save versions. Duplicate the clip before major changes. Keep one clean version and one experimental version. This gives you freedom without turning your project into a maze.
It also helps to stretch in context. A loop may sound slightly grainy when soloed, but once it sits under drums, bass, sidechain compression, and atmosphere, the artifact may disappear. On the other hand, a tiny timing issue in a vocal hook may become painfully obvious in the full mix. Context decides what matters.
Finally, sample stretching teaches restraint. Just because FL Studio can stretch a one-second vocal into a 32-bar ambient fog bank does not mean your beat needs that. Although, to be fair, sometimes it absolutely does. The best producers use stretching as both a correction tool and a creative instrument. They fix timing, match tempo, create transitions, build textures, and transform ordinary audio into something fresh. The trick is knowing when to be clean and when to be weird.
Conclusion
Stretching a sample in FL Studio is simple once you understand the workflow. Import your sample, set your project tempo, enable Stretch in the Playlist, drag the clip to fit the grid, and choose the right time-stretching mode in Channel Settings. For clean loops, this three-step method is usually enough. For messy recordings, Edison and NewTime give you deeper control.
The best results come from clean edits, smart stretch modes, careful listening, and a little producer patience. Start with small adjustments, preserve pitch when needed, use Resample when you want character, and always judge the sample inside the full mix. That is how you stretch an FL Studio sample without stretching your sanity.
Note: This article is written as a practical publishing guide based on real FL Studio time-stretching workflows, official feature behavior, and common audio-production practice. Source links are intentionally omitted for cleaner web publication.