
Switching between Dark Mode and Light Mode on a Mac is one of those tiny settings that feels surprisingly powerful. One minute your screen looks like a bright, clean notebook; the next, it turns into a calm, midnight workspace where your menu bar, Dock, windows, and built-in apps stop shouting at your eyeballs. Whether you are working late, editing photos, writing a report, watching a movie, or pretending to be productive while actually reorganizing your desktop icons for the fifth time, knowing how to change your Mac’s appearance can make the whole experience more comfortable.
The good news: Apple makes it easy. You can switch Mac Dark Mode and Light Mode manually, set your Mac to change automatically, or use Control Center when you want a faster toggle. The exact wording may vary slightly depending on your macOS version, but the main idea is the same: open Appearance settings, choose Auto, Light, or Dark, and enjoy a Mac that finally matches your mood, room lighting, and caffeine level.
What Are Dark Mode and Light Mode on Mac?
Light Mode is the traditional Mac appearance. It uses brighter windows, lighter menus, and a crisp visual style that works well during the day or in well-lit rooms. Dark Mode uses a darker color scheme across macOS, including the menu bar, Dock, Finder windows, many built-in Apple apps, and supported third-party apps. Instead of bright white backgrounds everywhere, the interface becomes deeper and more subdued.
Dark Mode is not just “Light Mode wearing sunglasses.” It changes the overall feel of macOS. Text, buttons, sidebars, panels, and app backgrounds are adjusted so the content you are working on stands out. This can be helpful when you are using your Mac at night, working in a dim room, or simply prefer a less glaring interface.
macOS also offers an Auto option. When you choose Auto, your Mac can shift between Light Mode and Dark Mode based on the schedule tied to Night Shift. That means your Mac can look bright during the day and darker later, without you needing to go hunting through settings every evening like a digital raccoon.
How to Switch Between Dark and Light Mode in System Settings
The main way to change your Mac’s appearance is through System Settings. This is the best method if you want to choose a permanent setting or turn on automatic switching.
For newer macOS versions
- Click the Apple menu in the top-left corner of your screen.
- Select System Settings.
- Click Appearance in the sidebar. You may need to scroll.
- At the top, choose Light, Dark, or Auto.
Choose Light if you want your Mac to stay in Light Mode all the time. Choose Dark if you want your Mac to stay in Dark Mode all the time. Choose Auto if you want macOS to switch between the two automatically.
This setting affects the general macOS interface, including the Dock, menu bar, built-in apps, and system windows. Many modern apps also follow your system appearance automatically. For example, if you switch your Mac to Dark Mode, apps like Safari, Notes, Mail, Calendar, Messages, and Finder usually follow along. Third-party apps may also match the system appearance if they support it.
For older macOS versions
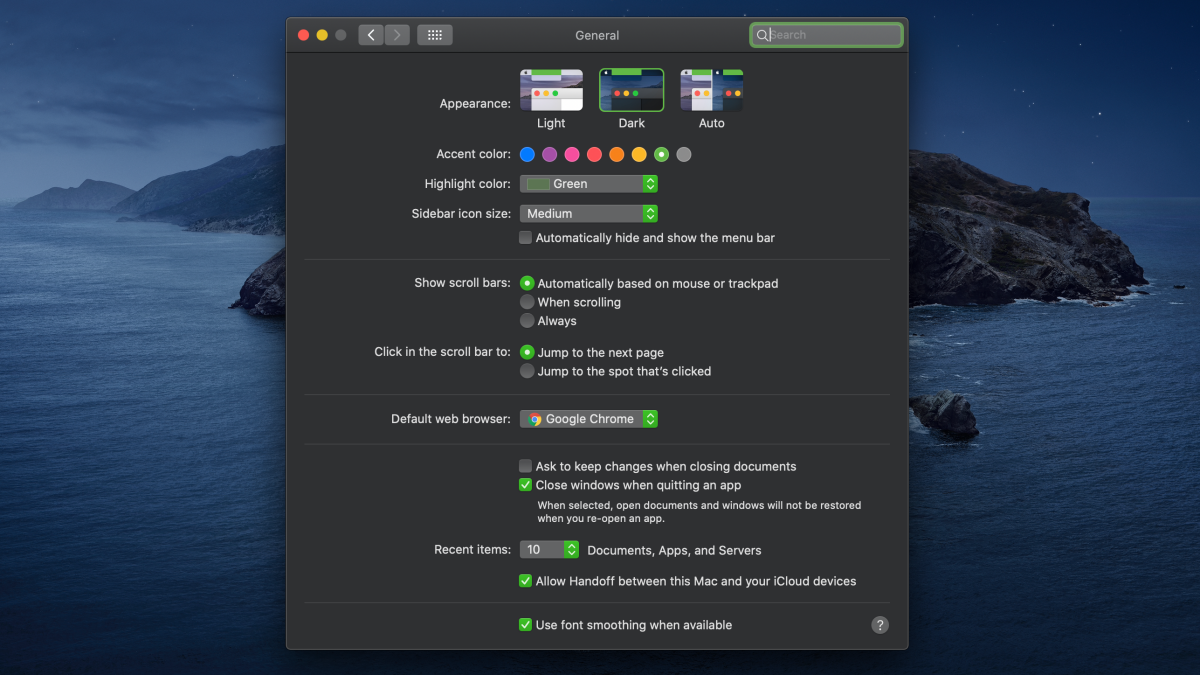
If your Mac is running an older version of macOS, such as macOS Monterey, Big Sur, Catalina, or Mojave, you may see System Preferences instead of System Settings.
- Click the Apple menu.
- Choose System Preferences.
- Click General.
- Find Appearance.
- Select Light, Dark, or Auto.
The feature itself works in a similar way, but the layout is different. Apple redesigned the settings app in newer macOS versions, so if you recently upgraded and feel like your settings moved house without leaving a forwarding address, you are not alone.
How to Quickly Toggle Dark Mode from Control Center
System Settings is great, but sometimes you want speed. Maybe the sun just hit your screen at the worst possible angle. Maybe you opened a white webpage at midnight and briefly saw your life flash before your eyes. In those moments, Control Center is your friend.
- Look at the top-right area of the menu bar.
- Click the Control Center icon.
- Click the arrow or display section next to Display.
- Click Dark Mode to turn it on or off.
This is one of the fastest ways to switch between Mac Dark Mode and Light Mode without opening the full settings panel. It is especially useful if you change modes several times a day. For example, you might use Light Mode while working near a window in the morning, Dark Mode while watching a video at night, and Light Mode again when editing a document that needs a paper-like background.
How to Use Auto Mode on Mac
Auto Mode is ideal if you like Light Mode during the day and Dark Mode at night. Instead of changing the appearance manually, your Mac handles the switch for you. To enable it, go to System Settings > Appearance and choose Auto.
On macOS, Auto Mode is connected to the Night Shift schedule. Night Shift is the feature that shifts your display colors toward warmer tones in the evening. While Night Shift and Dark Mode are different features, the schedule can influence when Auto appearance changes happen.
How to adjust the Night Shift schedule
- Open System Settings.
- Click Displays.
- Choose Night Shift.
- Select a schedule, such as Sunset to Sunrise or a custom time range.
If you choose Sunset to Sunrise, your Mac may need location-related settings enabled so it can understand local sunset and sunrise times. If you prefer full control, a custom schedule can be better. For example, you might set Night Shift to begin at 8:00 p.m. and end at 6:00 a.m., which can help your Mac’s automatic appearance changes feel more predictable.
One small detail: Auto switching may not happen instantly if your Mac is actively being used. In some cases, the change may wait until your Mac has been idle briefly. So if you stare at the screen at sunset waiting for the interface to dramatically transform like a movie scene, you may be disappointed. macOS is helpful, but it is not Broadway.
Which Mode Should You Use?
There is no universal winner in the Dark Mode vs. Light Mode debate. The best setting depends on your environment, your eyes, your work, and your personal preference. Some people swear by Dark Mode and use it 24/7. Others find Light Mode easier for reading long documents. Many Mac users prefer Auto because it offers the best of both worlds.
Use Light Mode when:
- You are working in a bright room or near daylight.
- You read or write long documents with white backgrounds.
- You prefer a clean, paper-like workspace.
- You are editing content where bright backgrounds help you judge layout clearly.
Use Dark Mode when:
- You are working at night or in low light.
- You want the interface to feel calmer and less bright.
- You watch movies, edit video, or use creative apps with dark interfaces.
- You want menus and panels to visually recede while your content stands out.
Use Auto Mode when:
- You want your Mac to adapt throughout the day.
- You like Light Mode in the morning and Dark Mode at night.
- You do not want to manually switch settings every day.
- Your room lighting changes often.
How Dark Mode Affects Apps
Most Apple apps support Dark Mode beautifully. Safari, Finder, Notes, Mail, Messages, Calendar, Photos, Music, and other built-in apps generally follow the appearance setting you choose. If your Mac is set to Dark Mode, those apps usually switch to darker windows, sidebars, and controls.
However, not every website or third-party app will look dark. A website may still have a white background even if Safari itself is in Dark Mode. That is because Dark Mode changes the browser interface, not necessarily every website’s design. Some websites support dark themes, but others remain bright enough to qualify as a small desk lamp.
Third-party apps can also behave differently. Many popular apps follow the system setting automatically, while others include their own theme controls. If an app does not match your Mac’s appearance, check that app’s preferences. You may find options such as System, Light, Dark, or Use device theme.
How to Customize the Look Beyond Dark and Light Mode
Switching between Dark and Light Mode is only the beginning. macOS also lets you adjust accent colors, highlight colors, icon styles, widget styles, and accessibility display options depending on your macOS version. These settings can make your Mac feel more personal and more readable.
Change accent and highlight colors
In System Settings > Appearance, you can choose an accent color. This affects buttons, pop-up menus, selected controls, and other interface details. You can also adjust the highlight color used when you select text. These small changes can make the interface feel more polished, especially if you want your Mac to look less generic.
Reduce transparency for better readability
If Dark Mode looks stylish but slightly too glassy or busy, try reducing transparency. Go to System Settings > Accessibility > Display, then turn on Reduce Transparency. This replaces some translucent interface effects with more solid backgrounds, which can improve contrast and readability.
Increase contrast
In the same Accessibility Display area, you can turn on Increase Contrast. This can make borders, controls, and text easier to distinguish. It is useful if you like Dark Mode but want sharper separation between interface elements.
Troubleshooting: Why Won’t My Mac Switch Modes?
If your Mac does not switch between Dark and Light Mode the way you expect, do not panic. The fix is usually simple.
Check your Appearance setting
Go to System Settings > Appearance and confirm whether your Mac is set to Auto, Light, or Dark. If it is set to Light or Dark, it will stay there until you change it. If you want automatic switching, choose Auto.
Check Night Shift settings
Because Auto appearance can be tied to the Night Shift schedule, open System Settings > Displays > Night Shift and review the schedule. If you use Sunset to Sunrise, make sure location-related settings are working correctly.
Restart the app
Some apps may not immediately update when you switch modes. Quit and reopen the app. This often forces it to reload using the current system appearance.
Update macOS
If your Mac is behaving strangely, install available macOS updates. Appearance features are part of the operating system, and updates can improve compatibility, fix visual bugs, and keep apps working smoothly with system themes.
Check app-specific settings
If one app refuses to follow your Mac’s theme, open that app’s settings. It may have its own appearance option overriding the system setting. Set it to follow the system theme if available.
Practical Examples: When to Switch Modes
Imagine you are writing a long school paper or business report in Pages or Google Docs. During the day, Light Mode may feel natural because the document resembles a printed page. The white background makes formatting easier to judge, especially if the final document will be printed or shared as a PDF.
Now imagine you are working at 11:30 p.m., the room is dim, and your Mac screen is the brightest object in the house. Dark Mode can make the interface feel softer. The Dock, menu bar, sidebars, and windows become less intense, which can make late-night writing, browsing, or messaging feel more comfortable.
For creative work, the choice depends on the task. Photo and video editors often prefer darker interfaces because they keep attention on the image or timeline. But if you are designing a bright webpage, flyer, or presentation, switching back to Light Mode can help you see how the final design will look to most viewers.
Real-World Experience: Living With Mac Dark and Light Modes
After using both Light Mode and Dark Mode on a Mac for everyday work, the biggest lesson is that neither mode is perfect all the time. Light Mode feels fresh and practical in the morning. It pairs well with natural daylight, makes documents look familiar, and keeps everything visually straightforward. If you are answering emails, organizing files, researching online, or working with spreadsheets, Light Mode can feel like a clean desk with a freshly sharpened pencil. Very responsible. Slightly suspicious, but responsible.
Dark Mode, on the other hand, shines when the environment gets darker or the work becomes more focused. It is excellent for writing in the evening, using creative apps, watching videos, or keeping multiple windows open without feeling like the screen is trying to interrogate you. The darker Dock and menu bar help the workspace feel quieter. When you are deep into a task, that visual calm can make a real difference.
Auto Mode is probably the best setting for most people because it removes one more small decision from the day. Instead of asking, “Should I switch modes now?” you let macOS handle it. In the morning, your Mac looks bright and energetic. Later, it becomes more relaxed. It is a small convenience, but small conveniences are basically the luxury candles of technology: not essential, but surprisingly nice.
There are a few habits that make the experience better. First, match your Mac appearance to your room lighting. If your room is bright, Light Mode usually feels clearer. If your room is dim, Dark Mode is usually more pleasant. Second, do not forget app-level settings. Some apps follow macOS perfectly, while others need their own theme adjusted. Third, use Control Center when you need a quick switch. It is much faster than digging through settings every time.
One underrated tip is to combine Dark Mode with Reduce Transparency if you find the interface too glossy or distracting. This can make menus and panels feel more solid, especially on newer macOS designs that use more visual layering. Increase Contrast can also help if you want clearer edges and more readable controls. These settings are not just for accessibility; they are also useful for anyone who wants a cleaner, easier-to-read Mac interface.
The final takeaway is simple: treat Dark Mode and Light Mode as tools, not teams. You do not have to pick a side forever. Use Light Mode when it helps you read, write, and organize. Use Dark Mode when it helps you focus, relax your eyes, or work comfortably at night. Use Auto when you want your Mac to handle the vibe shift without a committee meeting. The best Mac setup is the one that makes your screen feel comfortable for the work you are doing right now.
Conclusion
Switching between your Mac’s Dark and Light Modes is quick, useful, and worth customizing. The easiest path is System Settings > Appearance, where you can choose Light, Dark, or Auto. For faster changes, use Control Center > Display > Dark Mode. If you want your Mac to switch automatically, choose Auto and review your Night Shift schedule under Display settings.
Light Mode is great for bright rooms, long documents, and a classic Mac look. Dark Mode is ideal for evening work, low-light environments, and a more focused interface. Auto Mode gives you both without asking you to micromanage your screen like it is a dramatic houseplant. Add accent colors, reduce transparency, or increase contrast if you want an even more comfortable setup.
Note: This article is based on current macOS behavior and Apple’s official terminology. Menu names and visual layout may vary slightly depending on your macOS version, but the core steps remain the same.













