
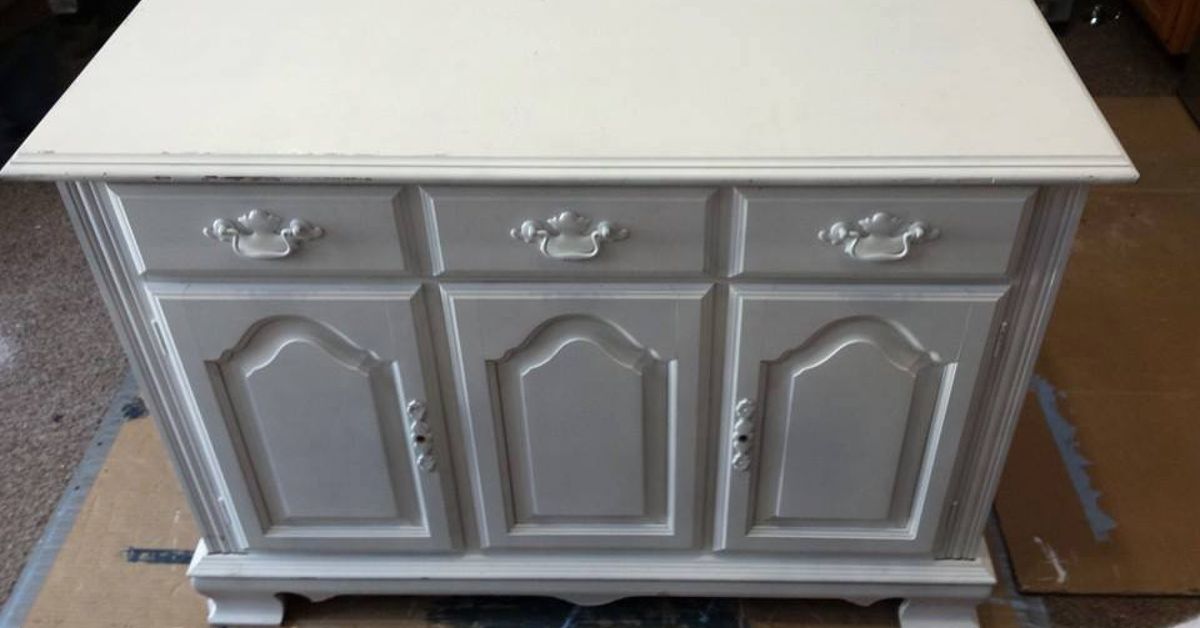
Some furniture pieces are born knowing their purpose. A dining buffet, for example, spends most of its life politely holding plates, napkins, gravy boats, and the good serving tray nobody is allowed to use unless company is coming. But with a little imagination, a weekend of work, and a respectable amount of sawdust, that old buffet can become the rustic kitchen island your kitchen has been secretly begging for.
Turning a buffet into a rustic kitchen island is one of the most satisfying DIY kitchen projects because it combines storage, character, sustainability, and budget-friendly design. Instead of buying a brand-new island that looks like everyone else’s, you get to rescue a piece of furniture with history and give it a useful new life. The result can be charming, practical, and wonderfully imperfectin other words, rustic in the best possible way.
This guide walks you through how to turn a buffet into a rustic kitchen island DIY style, from choosing the right piece to sanding, reinforcing, painting, staining, adding a butcher block top, installing hardware, and making sure the final island is sturdy enough for real kitchen life. Because yes, your island should look cute, but it also needs to survive chopping vegetables, storing mixing bowls, and holding everyone’s keys, mail, coffee mug, and emotional baggage.
Why a Buffet Makes a Great Rustic Kitchen Island
A buffet is already shaped like a kitchen island’s cousin. It usually has a long rectangular body, cabinets, drawers, and a solid frame. That means much of the hard work is already done before you even pick up a screwdriver. Unlike starting from raw lumber, repurposing a buffet gives you a ready-made base with built-in storage and decorative details.
Buffets also tend to have more personality than standard stock cabinets. Curved legs, paneled doors, carved trim, old brass pulls, and aged wood grain all help create that rustic kitchen island look. Even if the buffet starts out looking dated, tired, or slightly haunted by a 1980s dining room, those details can become design assets once you paint, distress, or stain the piece.
Another major benefit is cost. A thrifted buffet, Facebook Marketplace find, estate-sale score, or family hand-me-down can often be transformed for far less than the price of a new island. Your main expenses will likely include paint or stain, sandpaper, primer, hardware, a countertop, sealant, casters or feet, and basic supplies.
Before You Begin: Measure Your Kitchen Like a Responsible Adult
Before falling in love with a buffet, measure your kitchen. This is the part of the project where dreams meet tape measures, and tape measures do not care about your Pinterest board.
For a kitchen island to function well, you need enough walking space around it. A minimum of about 36 inches of clearance is commonly recommended, while 42 to 48 inches usually feels more comfortable, especially in busy kitchens. If the kitchen needs to support wheelchair access, more space may be necessary. Measure the length, width, and height of the buffet, then mark the footprint on the floor with painter’s tape. Walk around it, open nearby appliances, pretend to unload the dishwasher, and see whether the layout works in real life.
Ideal Buffet Dimensions
Most finished kitchen islands land around 34 to 36 inches high, similar to standard countertop height. If your buffet is too short, you can add bun feet, furniture legs, a thicker butcher block top, or locking casters. If it is too tall, you may need to remove legs or reconsider the piece.
For depth, a buffet between 18 and 24 inches can work beautifully in a smaller kitchen. A deeper piece can offer more storage and prep space, but it may overwhelm a narrow room. For length, choose a buffet that gives you useful surface area without turning your kitchen into an obstacle course.
Choose the Right Buffet for the Job
Not every buffet deserves island status. Some are sturdy, noble candidates. Others are wobbly disasters wearing veneer and confidence. Choose carefully.
Look for a buffet with a solid frame, working drawers, stable legs, and minimal structural damage. Open every drawer and cabinet. Check for loose joints, water damage, warped panels, missing backs, broken slides, and mystery smells. A faint old-furniture smell can usually be handled. A strong mildew odor is a red flag wearing a neon vest.
Solid wood is ideal, but quality veneer over a stable frame can also work if you handle it gently. Avoid pieces made from weak particleboard if they are already swollen, crumbling, or sagging. A kitchen island must handle weight, movement, and daily use, so strength matters more than cuteness.
Safety Note for Older Painted Furniture
If the buffet is old and painted, especially if it may date from before 1978, test for lead before sanding, scraping, or stripping. Lead dust is dangerous, and sanding old lead-based paint without proper precautions can spread contamination. Use an EPA-recognized lead test kit or consult a professional. If lead is present, follow lead-safe practices or choose a different piece.
Tools and Materials You May Need
You do not need a full professional woodshop to turn a buffet into a rustic kitchen island, but having the right tools makes the project smoother. Gather your supplies before starting so you are not standing in the garage at 9 p.m. holding one drawer pull and whispering, “Now what?”
Basic Tools
- Screwdriver or drill
- Orbital sander or sanding block
- Measuring tape
- Level
- Clamps
- Paintbrushes and foam rollers
- Putty knife
- Wood glue
- Brad nailer or hammer and finish nails, if needed
- Saw, if trimming a countertop or adding shelves
Materials
- Wood filler
- Medium- and fine-grit sandpaper
- Degreasing cleaner
- Primer
- Paint, stain, or both
- Clear protective topcoat
- Butcher block, wood plank, stone remnant, or countertop material
- Fender washers and screws for countertop attachment
- New cabinet hardware
- Locking casters, bun feet, or furniture legs
- Optional hooks, towel bar, open shelf, beadboard, or trim
Step 1: Clean the Buffet Thoroughly
Start by removing all drawers, hardware, shelves, and loose pieces. Vacuum inside the cabinets and drawers. Then clean the entire buffet with a degreasing cleaner or mild soap solution. Kitchen furniture needs an especially good cleaning because paint and stain do not bond well to grease, wax, dust, or old furniture polish.
Pay attention to corners, carved trim, drawer edges, and the top surface. If the buffet has been living in a dining room for decades, it may have a glossy finish that needs scuffing before primer or paint. If it has been living in a garage, you may also discover spider condos. Evict them politely but firmly.
Step 2: Repair and Reinforce the Structure
A buffet used as a kitchen island will take more abuse than it did as a dining room storage piece. Check the legs, back panel, drawer runners, cabinet floor, and side panels. Tighten loose screws, glue wobbly joints, and replace missing fasteners.
If the back of the buffet is thin or unfinished, consider adding a beadboard panel, plywood backing, or decorative planks. This is especially important because a kitchen island is visible from all sides. What used to face the wall will now face the room, and the room is judgmental.
You may also need to reinforce the inside top frame before adding a heavier countertop. Add wood cleats or plywood strips along the inside top edges so the new surface has solid attachment points. If the island will hold heavy cookware, small appliances, or a thick butcher block top, reinforcement is not optional. It is the difference between “beautiful rustic island” and “why is the mixer on the floor?”
Step 3: Sand the Surface
Sanding prepares the surface for primer, paint, or stain. If you are painting, you usually do not need to remove every bit of the old finish. A good scuff-sanding is often enough to dull the surface and help primer grip. If you are staining exposed wood, you will need to sand down to bare wood so the stain can absorb properly.
Start with medium-grit sandpaper, such as 120-grit, then move to finer grit, such as 220-grit, for a smoother finish. Always sand with the grain when working with visible wood. After sanding, remove dust with a vacuum and tack cloth or slightly damp microfiber cloth.
Step 4: Decide on Your Rustic Finish
The finish sets the mood for your DIY rustic kitchen island. Do you want farmhouse white with a stained wood top? A weathered gray base? A black distressed buffet with brass hardware? A natural wood island that says “I churn butter emotionally”? Your finish should match the kitchen while still giving the buffet a second-life glow-up.
Rustic Paint Ideas
Paint is the easiest way to unify a mismatched or dated buffet. Soft white, cream, sage green, charcoal, navy, warm gray, and muted clay tones all work well for a rustic kitchen island. For a farmhouse look, paint the base and lightly distress edges with fine sandpaper after the paint cures. Focus distressing on places that would naturally wear over time, such as corners, raised trim, drawer edges, and legs.
Rustic Stain Ideas
If the buffet has attractive wood grain, stain can highlight its character. Warm walnut, honey oak, weathered oak, espresso, and gray-brown stains can all create a rustic effect. Test stain on a hidden area first because different woods absorb color differently. A color that looks charming on pine may look like regret on cherry.
Two-Tone Finish
One of the most popular approaches is a painted base with a natural wood or butcher block top. This gives you contrast, warmth, and that “custom kitchen island” look without needing custom-cabinet money.
Step 5: Prime and Paint the Buffet Base
If you are painting, apply a bonding primer suited to your surface. Primer helps cover old finishes, blocks stains, and gives paint something to grip. Let it dry according to the manufacturer’s instructions, then lightly sand any rough spots.
Apply paint in thin, even coats using a brush for details and a foam roller for flat surfaces. Two coats are usually better than one thick coat. Thick paint is like too much frosting: tempting at first, regrettable later.
For durability, finish with a clear protective topcoat unless your paint already includes strong built-in protection. Kitchen furniture faces spills, fingerprints, crumbs, and the occasional spaghetti sauce incident, so choose a finish that can be wiped clean.
Step 6: Add a New Countertop
The countertop is what makes the buffet feel like a real island instead of a buffet wearing an apron. Butcher block is a favorite choice for rustic kitchen island DIY projects because it is warm, practical, widely available, and relatively easy to cut compared with stone.
You can also use reclaimed wood planks, a salvaged tabletop, a remnant of quartz or granite, or a thick pine panel. If you plan to use the surface for food prep, make sure the material and finish are appropriate for kitchen use. For chopping directly on the top, use a food-safe finish and maintain it properly. For general prep, serving, and storage, a sealed countertop is usually more practical.
Countertop Overhang
A small overhang of 1 to 2 inches on the sides can make the island look intentional. If you want seating, you will need a deeper overhang, often around 10 to 12 inches for comfortable knees, plus proper support brackets. For a converted buffet, seating may not always be practical unless the piece is deep and stable enough.
Attaching the Top
Wood countertops expand and contract with humidity, so attach them in a way that allows slight movement. Many wood countertop installations use screws with washers through elongated or centered holes in support strips. Avoid simply gluing the entire top rigidly to the base. That may seem strong, but wood movement can cause cracks or warping over time.
Step 7: Finish the Butcher Block or Wood Top
If you buy unfinished butcher block, finish all sides before installation, including the top, bottom, edges, and ends. This helps reduce uneven moisture absorption. For a food-prep surface, mineral oil and beeswax are common options, though they require regular maintenance. For a more sealed furniture-style top, stain and polyurethane can provide a durable surface, but always follow product instructions and confirm whether the finish is suitable for your intended use.
Sand the butcher block smooth, clean away dust, apply your chosen stain if desired, then seal. Let the finish cure fully before using the island. “Dry to the touch” does not always mean “ready for a casserole dish and a family of hungry snackers.”
Step 8: Upgrade the Hardware
Hardware is jewelry for furniture, and your rustic kitchen island deserves better than sad, tarnished handles that look like they gave up in 1996. Swap old pulls and knobs for black iron, aged brass, oil-rubbed bronze, cup pulls, wood knobs, or simple farmhouse-style handles.
If the original hardware is beautiful, clean and reuse it. Vintage brass or antique drawer pulls can add authentic charm. If the old holes do not match your new hardware, fill them with wood filler, sand smooth, and drill new holes.
Step 9: Add Rustic Function
Now comes the fun part: turning the buffet into a hardworking kitchen helper. Add features based on how you actually cook and live.
Smart Add-Ons
- Install hooks on one side for towels, mugs, or utensils.
- Add a towel bar for dish towels or paper towels.
- Replace a cabinet door panel with chicken wire or cane webbing.
- Add open shelving for mixing bowls or baskets.
- Use drawer dividers for utensils, spices, or baking tools.
- Add a pull-out trash bin if the cabinet space allows.
- Install locking casters for mobility.
When adding casters, choose heavy-duty locking wheels rated for more weight than the island will carry. A rolling island should move when you want it to movenot when someone leans on it while eating toast.
Step 10: Style the Back Side
Because a buffet usually sits against a wall, its back may be plain, thin, or unfinished. Once it becomes an island, that back side becomes visible. Give it a finished look with beadboard, shiplap-style planks, painted plywood, decorative trim, or reclaimed wood.
This one step can make the difference between “clever DIY island” and “obvious furniture pushed into the middle of the kitchen.” Paint or stain the back to coordinate with the rest of the piece, then seal it for durability.
Step 11: Make It Stable and Safe
Stability matters. A buffet converted into an island should not rock, tip, slide, or wobble. Check that the piece sits level on the floor. Add adjustable feet if needed. If you install casters, make sure they lock securely. If the island is tall, narrow, top-heavy, or used around children, consider whether it needs additional anchoring or a wider base.
Also think carefully before storing extremely heavy items in upper drawers or placing heavy appliances on an overhanging top. Keep weight balanced. Rustic charm is lovely; rustic collapse is less popular.
Cleaning and Maintaining Your DIY Rustic Kitchen Island
Once your island is complete, maintain it like a kitchen workhorse, not a museum artifact. Wipe spills quickly, especially on wood. Clean painted surfaces with mild soap and water. Avoid harsh abrasives that can damage the finish.
If you use the top as a cutting surface, clean and sanitize it properly. Wooden cutting surfaces should be washed by hand, dried thoroughly, and oiled as needed to prevent cracking. For extra sanitation, food-safety guidance commonly recommends diluted unscented bleach solutions for cutting boards and food-contact surfaces. Always use the correct dilution, never mix bleach with vinegar or other cleaners, and rinse or dry according to the guidance for your surface.
Common Mistakes to Avoid
Choosing a Weak Buffet
If the buffet is already unstable, a countertop will not magically fix it. Start with a solid piece or be prepared to reinforce it properly.
Skipping Surface Prep
Paint does not stick well to glossy, dirty, or waxy surfaces. Cleaning and sanding are not glamorous, but they are the foundation of a durable finish.
Forgetting the Back
The unfinished back of a buffet can ruin the illusion. Finish all visible sides so the piece looks intentional from every angle.
Using the Wrong Finish on the Top
A decorative topcoat may not be right for direct food cutting. Decide whether your island top is a cutting surface, serving surface, or general prep surface, then choose the finish accordingly.
Ignoring Kitchen Clearance
An island that blocks the refrigerator, oven, dishwasher, or main walkway will become annoying fast. Test the footprint before committing.
Budget Breakdown: What This Project Might Cost
Your final cost depends on what you already own and how fancy you get. A thrifted buffet might cost $75 to $300. Paint, primer, sandpaper, and topcoat may run $50 to $150. A butcher block top can vary widely depending on size and wood species. Hardware might cost $20 to $100, while casters, trim, hooks, and accessories can add another $30 to $150.
In many cases, a DIY buffet kitchen island can be completed for a few hundred dollars, especially if you find a low-cost secondhand piece. Compared with custom cabinetry, that is a friendly number. Your wallet may even make eye contact with you again.
Design Example: A Simple Rustic Buffet Island Makeover
Imagine starting with a dark cherry buffet with brass handles, a scratched top, and a back panel that looks like cardboard’s older cousin. First, you remove the hardware and clean the piece thoroughly. Next, you sand the glossy finish, repair a loose drawer glide, and add beadboard to the back. You paint the base a warm creamy white, lightly distress the raised edges, and seal it with a satin clear coat.
Then you attach a 1.5-inch butcher block top with a 1.5-inch overhang on each side. You stain the top a warm walnut color and seal it. Finally, you add black cup pulls, a towel bar on one end, hooks on the other, and baskets inside the lower cabinet. The final island looks custom, adds storage, and makes the kitchen feel warmer without a full remodel.
Extra Experience: Lessons Learned from Turning a Buffet into a Rustic Kitchen Island
The first lesson from this kind of project is that old furniture always has secrets. A buffet may look perfect in the seller’s photo, but once you bring it home, you might discover one sticky drawer, two missing screws, and a mysterious stain that seems emotionally attached to the wood. Do not panic. Most problems are fixable with patience, wood filler, glue, sanding, and a willingness to pause before making dramatic decisions.
One practical experience is to live with the buffet in the kitchen before permanently modifying it. Set it in place for a day or two if possible. Walk around it while making coffee, unloading groceries, opening the oven, and pretending to cook a large meal. This test can reveal whether the island is too wide, too long, or awkwardly placed. A piece can look perfect in theory but become a hip-bruising machine in practice.
Another lesson is that height matters more than people expect. A buffet that is too low may look charming but feel uncomfortable for chopping or mixing. Adding a butcher block top and feet can help bring it closer to counter height. However, do not add height carelessly. The taller the piece becomes, the more important stability becomes. Check for wobble after every change.
When it comes to finish, sample first. Paint colors change dramatically in kitchen lighting. A soft sage green in the garage may turn minty under bright LEDs. A warm white may look yellow beside cool cabinets. Test paint and stain on hidden areas or sample boards, then view them morning, afternoon, and evening. This small step can prevent a big repainting episode, which is less “fun DIY” and more “character-building inconvenience.”
Hardware also deserves more attention than it usually gets. Handles and knobs affect both style and function. Tiny knobs may look cute but feel annoying on heavy drawers. Wide pulls are easier to grab with messy cooking hands. If you cook often, choose hardware that feels good, cleans easily, and does not snag every apron string within a three-foot radius.
One of the best upgrades is adding storage zones. Use one drawer for prep tools, one for baking supplies, and one cabinet for mixing bowls or small appliances. Baskets can hide less attractive items while keeping the rustic style. If the buffet has deep cabinets, consider pull-out organizers so nothing disappears into the dark cave of forgotten kitchen gadgets.
Finally, accept that rustic does not mean careless. The best rustic kitchen island DIY projects look relaxed but are built thoughtfully. Distressed paint should be sealed. Wood tops should be protected. Casters should lock. Drawers should slide. The island should feel sturdy enough for daily use, not like a theatrical prop from a farmhouse musical.
The joy of turning a buffet into a rustic kitchen island is that the final piece carries a story. It is not a showroom item. It has dents, grain, patched holes, and personality. You made design decisions, solved problems, and created something useful from something overlooked. That is the heart of DIY: not perfection, but transformation. Also, bragging rights. Definitely bragging rights.
Conclusion
Turning a buffet into a rustic kitchen island is a smart, creative, and rewarding way to add storage, prep space, and character to your kitchen without paying for a full remodel. The key is choosing a sturdy buffet, measuring your space carefully, reinforcing the structure, preparing the surface properly, selecting a durable finish, and adding a countertop that fits your cooking style.
Whether you go for farmhouse white paint, weathered wood, black hardware, butcher block warmth, or a cozy vintage look, the finished island can feel custom because it is custom. It reflects your space, your taste, and your willingness to look at an old buffet and say, “You, my friend, are getting promoted.”














