
Few things in Photoshop feel more dramatic than trying to move, erase, paint, transform, or delete something and getting absolutely nowhere. You drag. Nothing happens. You click. Photoshop stares back. Then you notice it: the tiny lock icon in the Layers panel, sitting there like a nightclub bouncer guarding your pixels.
The good news is that unlocking layers in Photoshop is usually fast. In many cases, you only need to click the lock icon beside the layer name. In other situations, especially with a Background layer, locked group, hidden layer, or partially locked layer, you may need a slightly different fix. This guide explains how to unlock layers in Photoshop quickly, why layers become locked, what each lock type means, and how to avoid accidentally flattening your hard work into one stubborn, uneditable pancake.
What Does a Locked Layer Mean in Photoshop?
A locked layer is a layer that Photoshop protects from certain edits. Depending on the type of lock, you may be prevented from moving the layer, painting on it, changing transparent areas, editing pixels, or adjusting its order in the layer stack. Photoshop uses locks to protect important image information, prevent accidental edits, and keep complex documents organized.
For example, when you open a flat JPEG, PNG, or scanned image, Photoshop may place it on a special Background layer. This Background layer is partially locked by default. It cannot be moved freely, placed above other layers, or contain transparent pixels until you convert it into a regular layer.
That sounds annoying until you realize Photoshop is basically saying, “Are you sure you want to mess with the foundation of this house?” Helpful? Yes. Overprotective? Also yes.
How to Unlock a Layer in Photoshop Quickly
The fastest way to unlock a regular locked layer is through the Layers panel.
Method 1: Click the Lock Icon
- Open your project in Photoshop.
- Go to the Layers panel.
- Select the locked layer.
- Find the small lock icon beside the layer name.
- Click the lock icon once to remove it.
Once the lock disappears, you should be able to move, edit, transform, erase, or paint on that layer, depending on the layer type and active tool. This is the most common fix and the one you should try first.
Method 2: Use the Keyboard Shortcut
You can also unlock or lock a selected layer using a shortcut:
- Windows: Ctrl + /
- Mac: Command + /
This shortcut is especially handy when you are working with many layers and do not want to keep moving your mouse back to the Layers panel. Select the layer, press the shortcut, and the lock should toggle on or off.
How to Unlock the Background Layer in Photoshop
The Background layer is the classic Photoshop troublemaker. It looks like a normal layer, but it behaves differently because Photoshop treats it as the base canvas of your image. You cannot move it above other layers, you cannot drag it freely with transparency, and some edits may be unavailable until you convert it.
Option 1: Click the Lock Icon on the Background Layer
In modern versions of Photoshop, the simplest way to unlock a Background layer is to click the lock icon beside the word Background in the Layers panel. Photoshop converts it into a regular layer, usually named Layer 0.
After that, you can move it, add transparency, reorder it, mask it, transform it, and treat it like any other regular layer.
Option 2: Double-Click the Background Layer
If clicking the lock icon does not work or you prefer the older method, double-click the Background layer. Photoshop will open a dialog box asking you to name the new layer. You can keep the default name or type something useful, such as Original Photo, Base Image, or Do Not Ruin This Please.
Click OK, and Photoshop converts the Background into a normal editable layer.
Option 3: Use the Layer Menu
You can also unlock the Background layer from the top menu:
- Select the Background layer.
- Go to Layer.
- Choose New.
- Select Layer from Background.
- Name the layer and click OK.
This method is useful if you like menu-based workflows or if you are teaching Photoshop to beginners who need to see each step clearly.
Understanding Photoshop’s Different Lock Types
Not every locked layer is locked the same way. Photoshop offers several partial lock options. Knowing the difference can save you from panic-clicking every button in the interface like you are defusing a bomb in a movie.
Lock Transparent Pixels
Lock Transparent Pixels protects the transparent areas of a layer. When this option is enabled, you can only edit pixels that already exist on the layer. If you paint with a brush, the paint stays inside the visible object and does not spill into transparent areas.
This is incredibly useful for digital painting, product retouching, lettering, icons, and illustrations. For example, if you have a red apple cut out on a transparent background, locking transparent pixels lets you shade the apple without accidentally painting outside its edges.
Lock Image Pixels
Lock Image Pixels prevents you from changing the actual pixel content of a layer. Painting, erasing, cloning, healing, and similar pixel-editing tools may not work while this lock is active.
Use this when a layer looks right and you want to protect its image details while still allowing certain other adjustments, such as moving the layer if position is not locked.
Lock Position
Lock Position prevents a layer from being moved. You may still be able to edit the layer’s pixels, but you cannot drag it around the canvas. This is helpful for logos, layout elements, background decorations, and interface mockups that need to stay perfectly aligned.
If you are trying to move a layer and nothing happens, check whether the position lock is enabled before blaming your mouse, your coffee, or Mercury retrograde.
Lock All
Lock All fully locks the layer. You cannot move it, paint on it, erase it, or edit its pixels until you unlock it. This is the “hands off” setting. Designers often use it after finishing a layer they do not want to accidentally disturb.
How to Unlock a Partially Locked Layer
A partially locked layer usually shows a lock symbol, but only one or more specific lock controls are active. To unlock it:
- Select the layer in the Layers panel.
- Look at the lock icons near the top of the Layers panel.
- Click the active lock option, such as transparent pixels, image pixels, position, or full lock.
- Check that the lock symbol disappears or changes.
If the layer still will not behave the way you expect, check whether it is inside a locked group. A layer can look editable on its own but still be restricted because its parent group is locked.
How to Unlock Multiple Layers at Once
If your Photoshop file has several locked layers, you do not have to unlock them one by one like you are opening tiny digital treasure chests.
- In the Layers panel, select the first locked layer.
- Hold Shift and click another layer to select a range, or hold Ctrl on Windows / Command on Mac to select separate layers.
- Click the lock icon or use Ctrl + / on Windows or Command + / on Mac.
This can unlock multiple selected layers quickly. If some layers remain locked, they may be Background layers, hidden layers, smart objects, locked groups, or special layer types that need a different approach.
Why Can’t I Unlock a Layer in Photoshop?
If the usual unlock methods do not work, do not worry. Photoshop may be protecting the layer for a specific reason. Here are the most common causes and fixes.
The Layers Panel Is Not Visible
If you cannot find the lock icon because the Layers panel is missing, go to Window > Layers. You can also reset the workspace by choosing Window > Workspace > Essentials. Once the Layers panel appears, select the layer and try unlocking it again.
The Layer Is Hidden
If a layer’s visibility is turned off, some controls may appear unavailable. Click the empty box where the eye icon should be to make the layer visible. Then select the layer and try unlocking it.
The Layer Is Inside a Locked Group
Groups can also be locked. If your layer sits inside a folder group, check the group itself. Unlock the group first, then unlock the individual layer if necessary.
You Are Editing a Mask Instead of the Layer
Sometimes the layer is not the problem. You may have selected the layer mask thumbnail instead of the image thumbnail. In the Layers panel, click the actual layer thumbnail, then try your edit again.
The Layer Is a Smart Object
Smart Objects are editable, but not in the same direct pixel-based way as normal raster layers. If you try to paint or erase directly on a Smart Object, Photoshop may stop you. You can either double-click the Smart Object thumbnail to edit its contents, add a mask for non-destructive edits, or rasterize it by right-clicking and choosing Rasterize Layer. Be careful: rasterizing removes Smart Object flexibility.
The File Uses a Restricted Color Mode
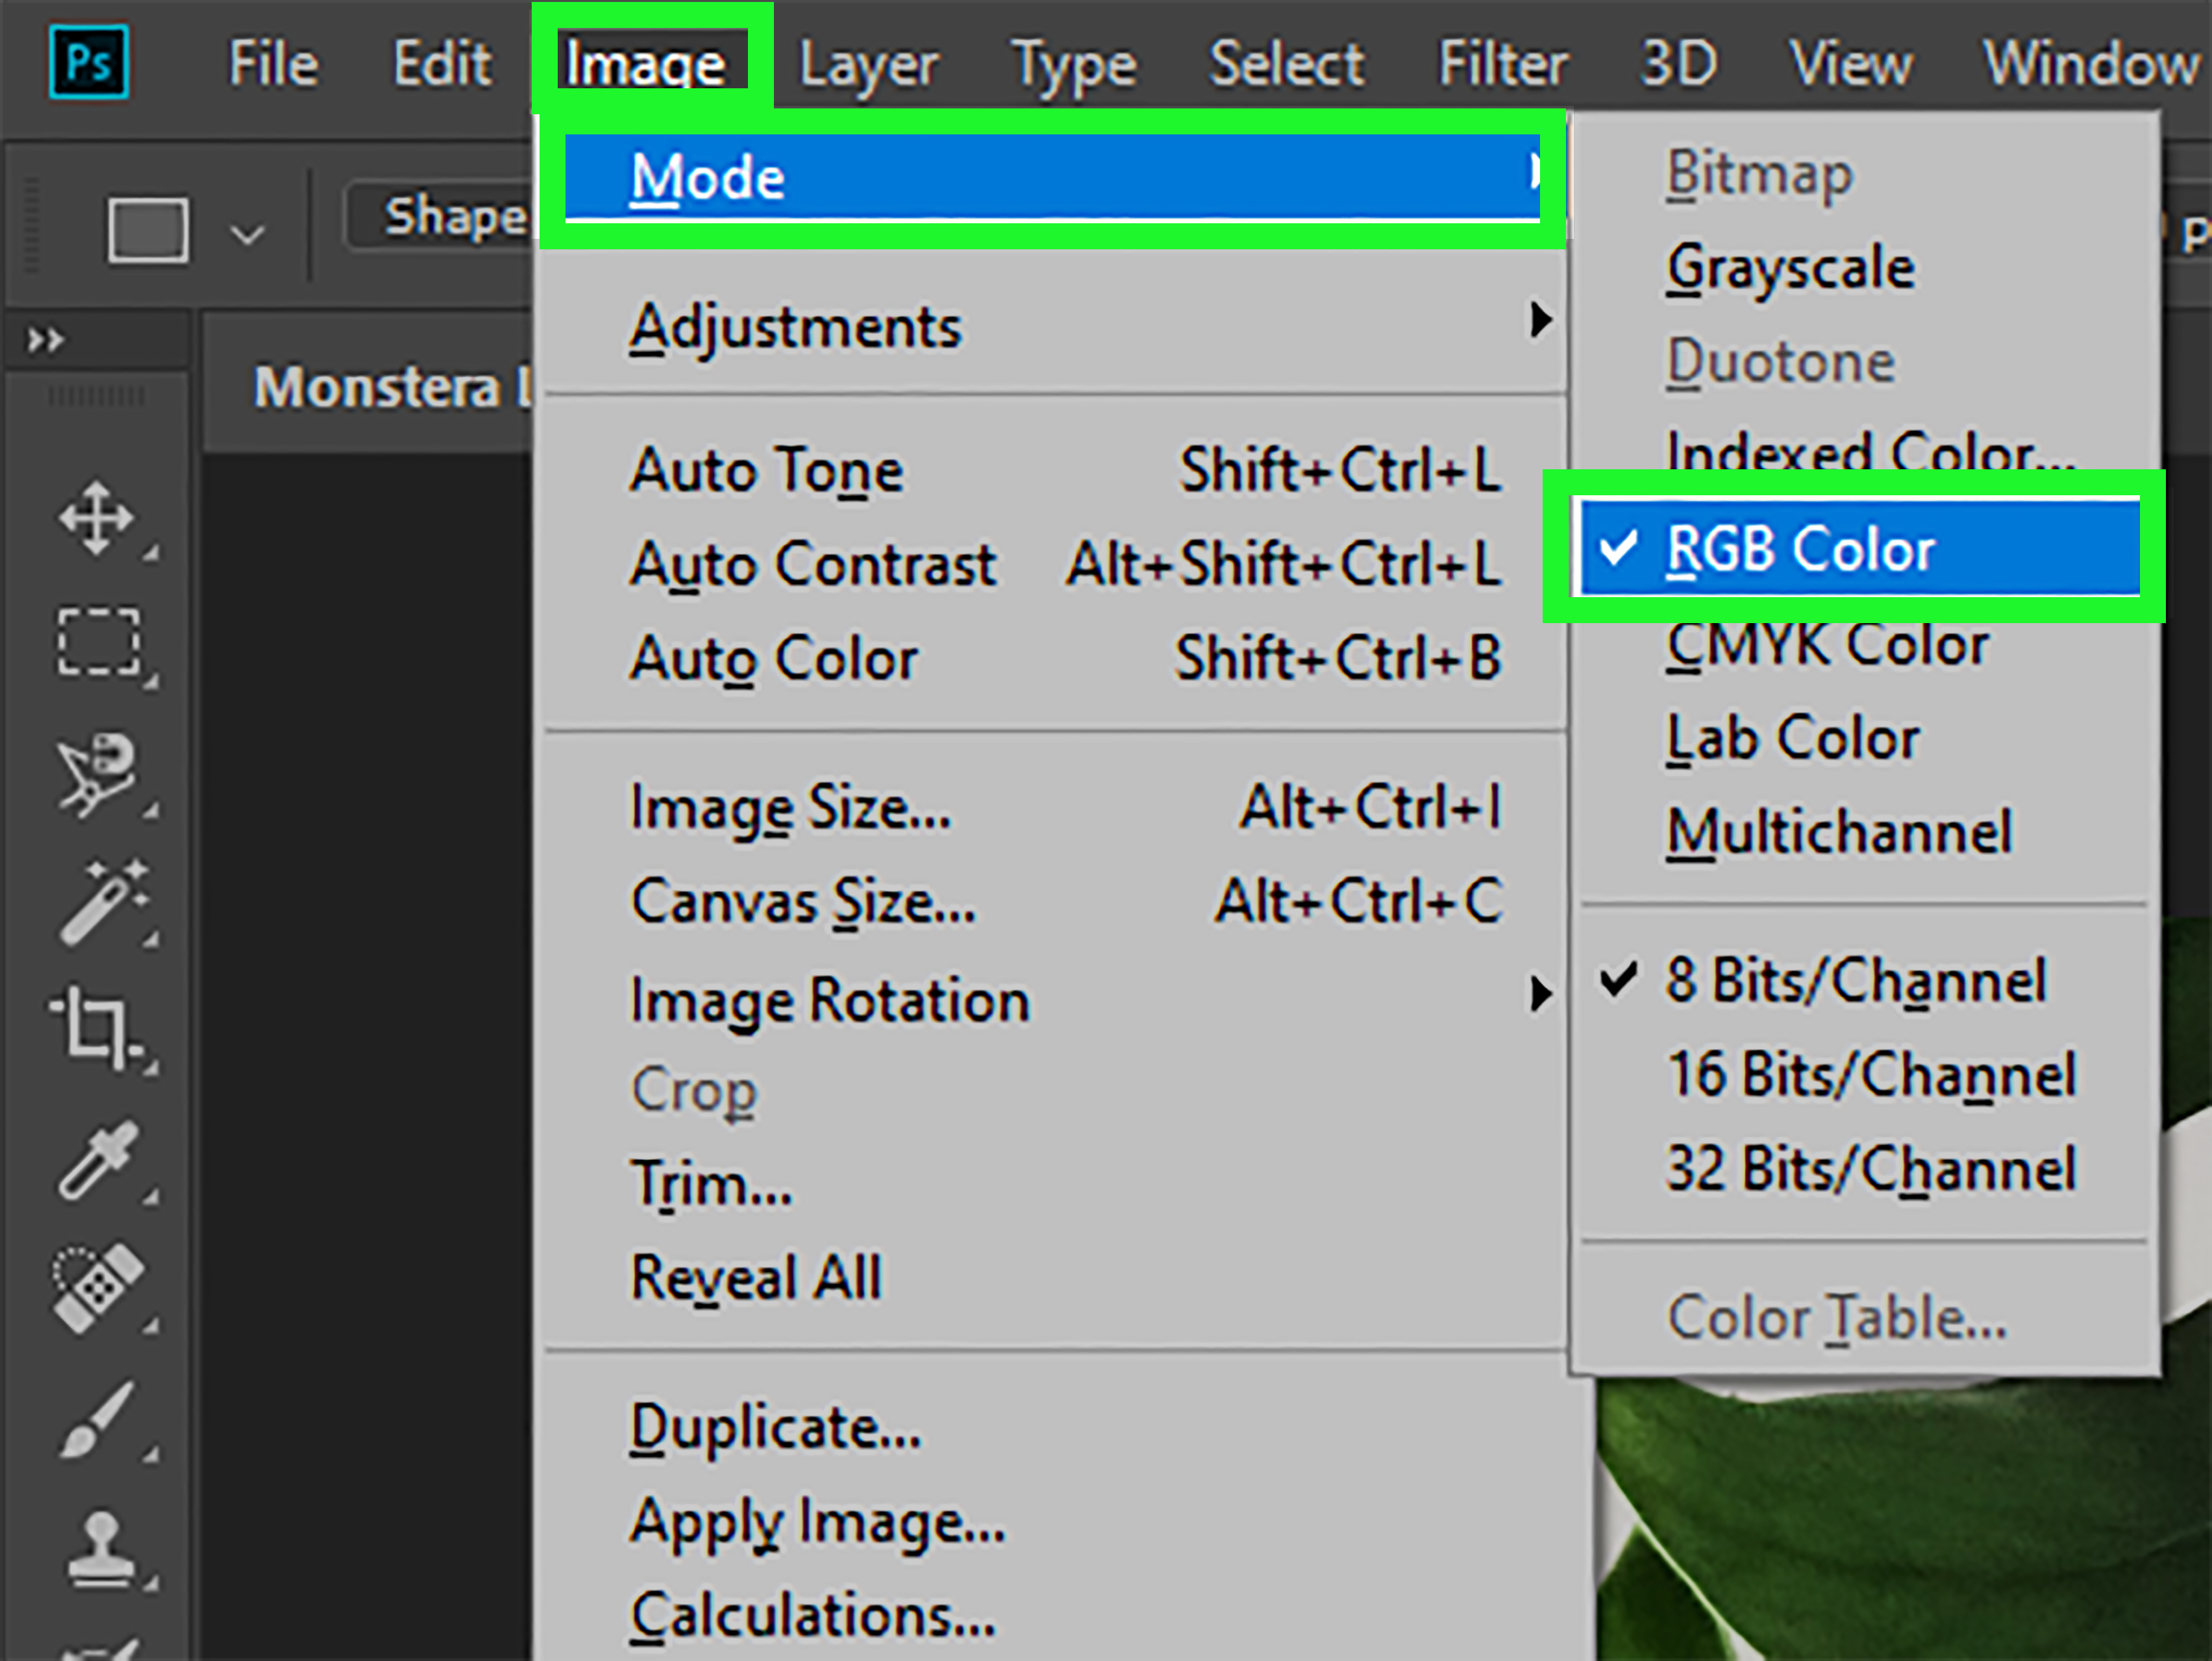
Certain modes, such as Indexed Color or Bitmap, can limit layer behavior. If tools or layer options seem strangely unavailable, check Image > Mode. Converting to RGB Color may restore normal editing options, depending on your project needs.
Should You Unlock or Duplicate the Layer?
Here is a practical rule: if you are working on an important image, duplicate the locked layer before editing. Unlocking is fast, but duplicating is safer.
To duplicate a layer, right-click it and choose Duplicate Layer, or press Ctrl + J on Windows or Command + J on Mac. Then edit the copy while keeping the original intact.
This is especially useful for photo retouching, background removal, product images, client work, restoration projects, and anything involving a deadline. Nothing improves your mood like knowing you can delete a bad edit and return to the original layer instead of whispering, “What have I done?” at 1:37 a.m.
Best Practices for Working With Locked Layers
Rename Important Layers
After unlocking a Background layer, rename it immediately. Names like Layer 0, Layer 1 copy 7, and Final_final_REALLYfinal are how chaos enters the room. Use clear names such as Hero Image, Retouched Skin, Shadow, Logo, or Background Texture.
Use Locks Intentionally
Layer locks are not the enemy. They are useful when you choose them on purpose. Lock a finished logo to prevent accidental movement. Lock transparent pixels when shading an illustration. Lock position when building a precise layout. Unlock only when you actually need to edit.
Use Layer Masks Instead of Erasing
If your goal is to remove part of an image, consider using a layer mask instead of erasing pixels. A mask hides parts of a layer without deleting them permanently. This gives you more flexibility if you need to restore details later.
Keep an Original Copy
Before major edits, duplicate the original layer or save a separate version of the file. Professional Photoshop work is not about never making mistakes. It is about leaving yourself enough escape routes when the mistakes arrive wearing tap shoes.
Quick Examples: When Unlocking a Layer Matters
Example 1: Removing a White Background
You open a product photo and want to remove the white background. The image appears as a locked Background layer. Click the lock icon to convert it into a regular layer. Now you can use Select Subject, Remove Background, a layer mask, or the Object Selection Tool to isolate the product with transparency.
Example 2: Moving a Logo
You are designing a flyer and the logo refuses to move. Select the logo layer and check whether Lock Position is active. Turn off the position lock, then use the Move Tool to place the logo correctly.
Example 3: Painting Inside an Illustration
You have a cartoon character on a transparent layer and want to add highlights without painting outside the shape. In this case, do not unlock transparent pixels. Lock Transparent Pixels is exactly what you want. It keeps your brush strokes inside the existing artwork.
Experience Notes: What Working With Locked Layers Teaches You
After enough time in Photoshop, locked layers stop feeling like random obstacles and start feeling like road signs. A lock usually means Photoshop is protecting something: the base image, the transparent edges, the layer’s position, or finished artwork that should not be nudged by accident. The trick is learning whether the lock is helping you or slowing you down.
One common beginner experience is opening a downloaded image, trying to erase the background, and wondering why the eraser seems to create a solid color instead of transparency. The reason is often the Background layer. Once that layer is unlocked and converted into a normal layer, transparency becomes possible. This single step can make Photoshop feel much less mysterious.
Another real-world lesson is that unlocking everything is not always smart. On a busy social media graphic, for example, you may have text, photos, icons, overlays, adjustment layers, and background shapes stacked together. If every layer is unlocked, it is easy to bump an aligned element by a few pixels and not notice until export. Locking finished layers protects the design from tiny accidents that become big annoyances later.
For photo editors, duplicating before unlocking is a habit worth building. Suppose you are retouching a portrait. You unlock the Background layer and begin removing blemishes directly on the original image. Ten minutes later, the edit looks too heavy. Without a backup layer, fixing the problem is harder. If you duplicated the layer first, you can reduce opacity, add a mask, compare before and after, or delete the edit entirely.
Designers also learn that partial locks can speed up work. Lock Transparent Pixels is a favorite for illustrators because it lets you recolor or shade an object without carefully selecting it every time. Lock Position is useful when creating templates, thumbnails, banners, or print layouts where alignment matters. Instead of fighting these features, experienced users treat them like small safety switches.
The biggest takeaway is simple: when Photoshop will not let you edit something, look at the Layers panel before assuming the file is broken. Check the lock icon, visibility eye, group lock, selected thumbnail, layer type, and color mode. Most “Photoshop is broken” moments are really “Photoshop is protecting this layer, and it forgot to explain itself politely” moments.
Conclusion
Unlocking layers in Photoshop is usually as simple as clicking the lock icon in the Layers panel or pressing Ctrl + / on Windows or Command + / on Mac. For a Background layer, click the lock icon, double-click the layer, or choose Layer > New > Layer from Background. If a layer still will not unlock, check for hidden layers, locked groups, masks, Smart Objects, or restrictive color modes.
Once you understand what each lock does, Photoshop becomes much less frustrating. Locks are not there to ruin your day. They are there to protect your work until you decide it is time to edit, move, paint, or transform those pixels like the creative boss you are.
Note: Photoshop menus and interface details can vary slightly by version, workspace, and operating system, but the layer-locking principles remain consistent across modern Photoshop workflows.











