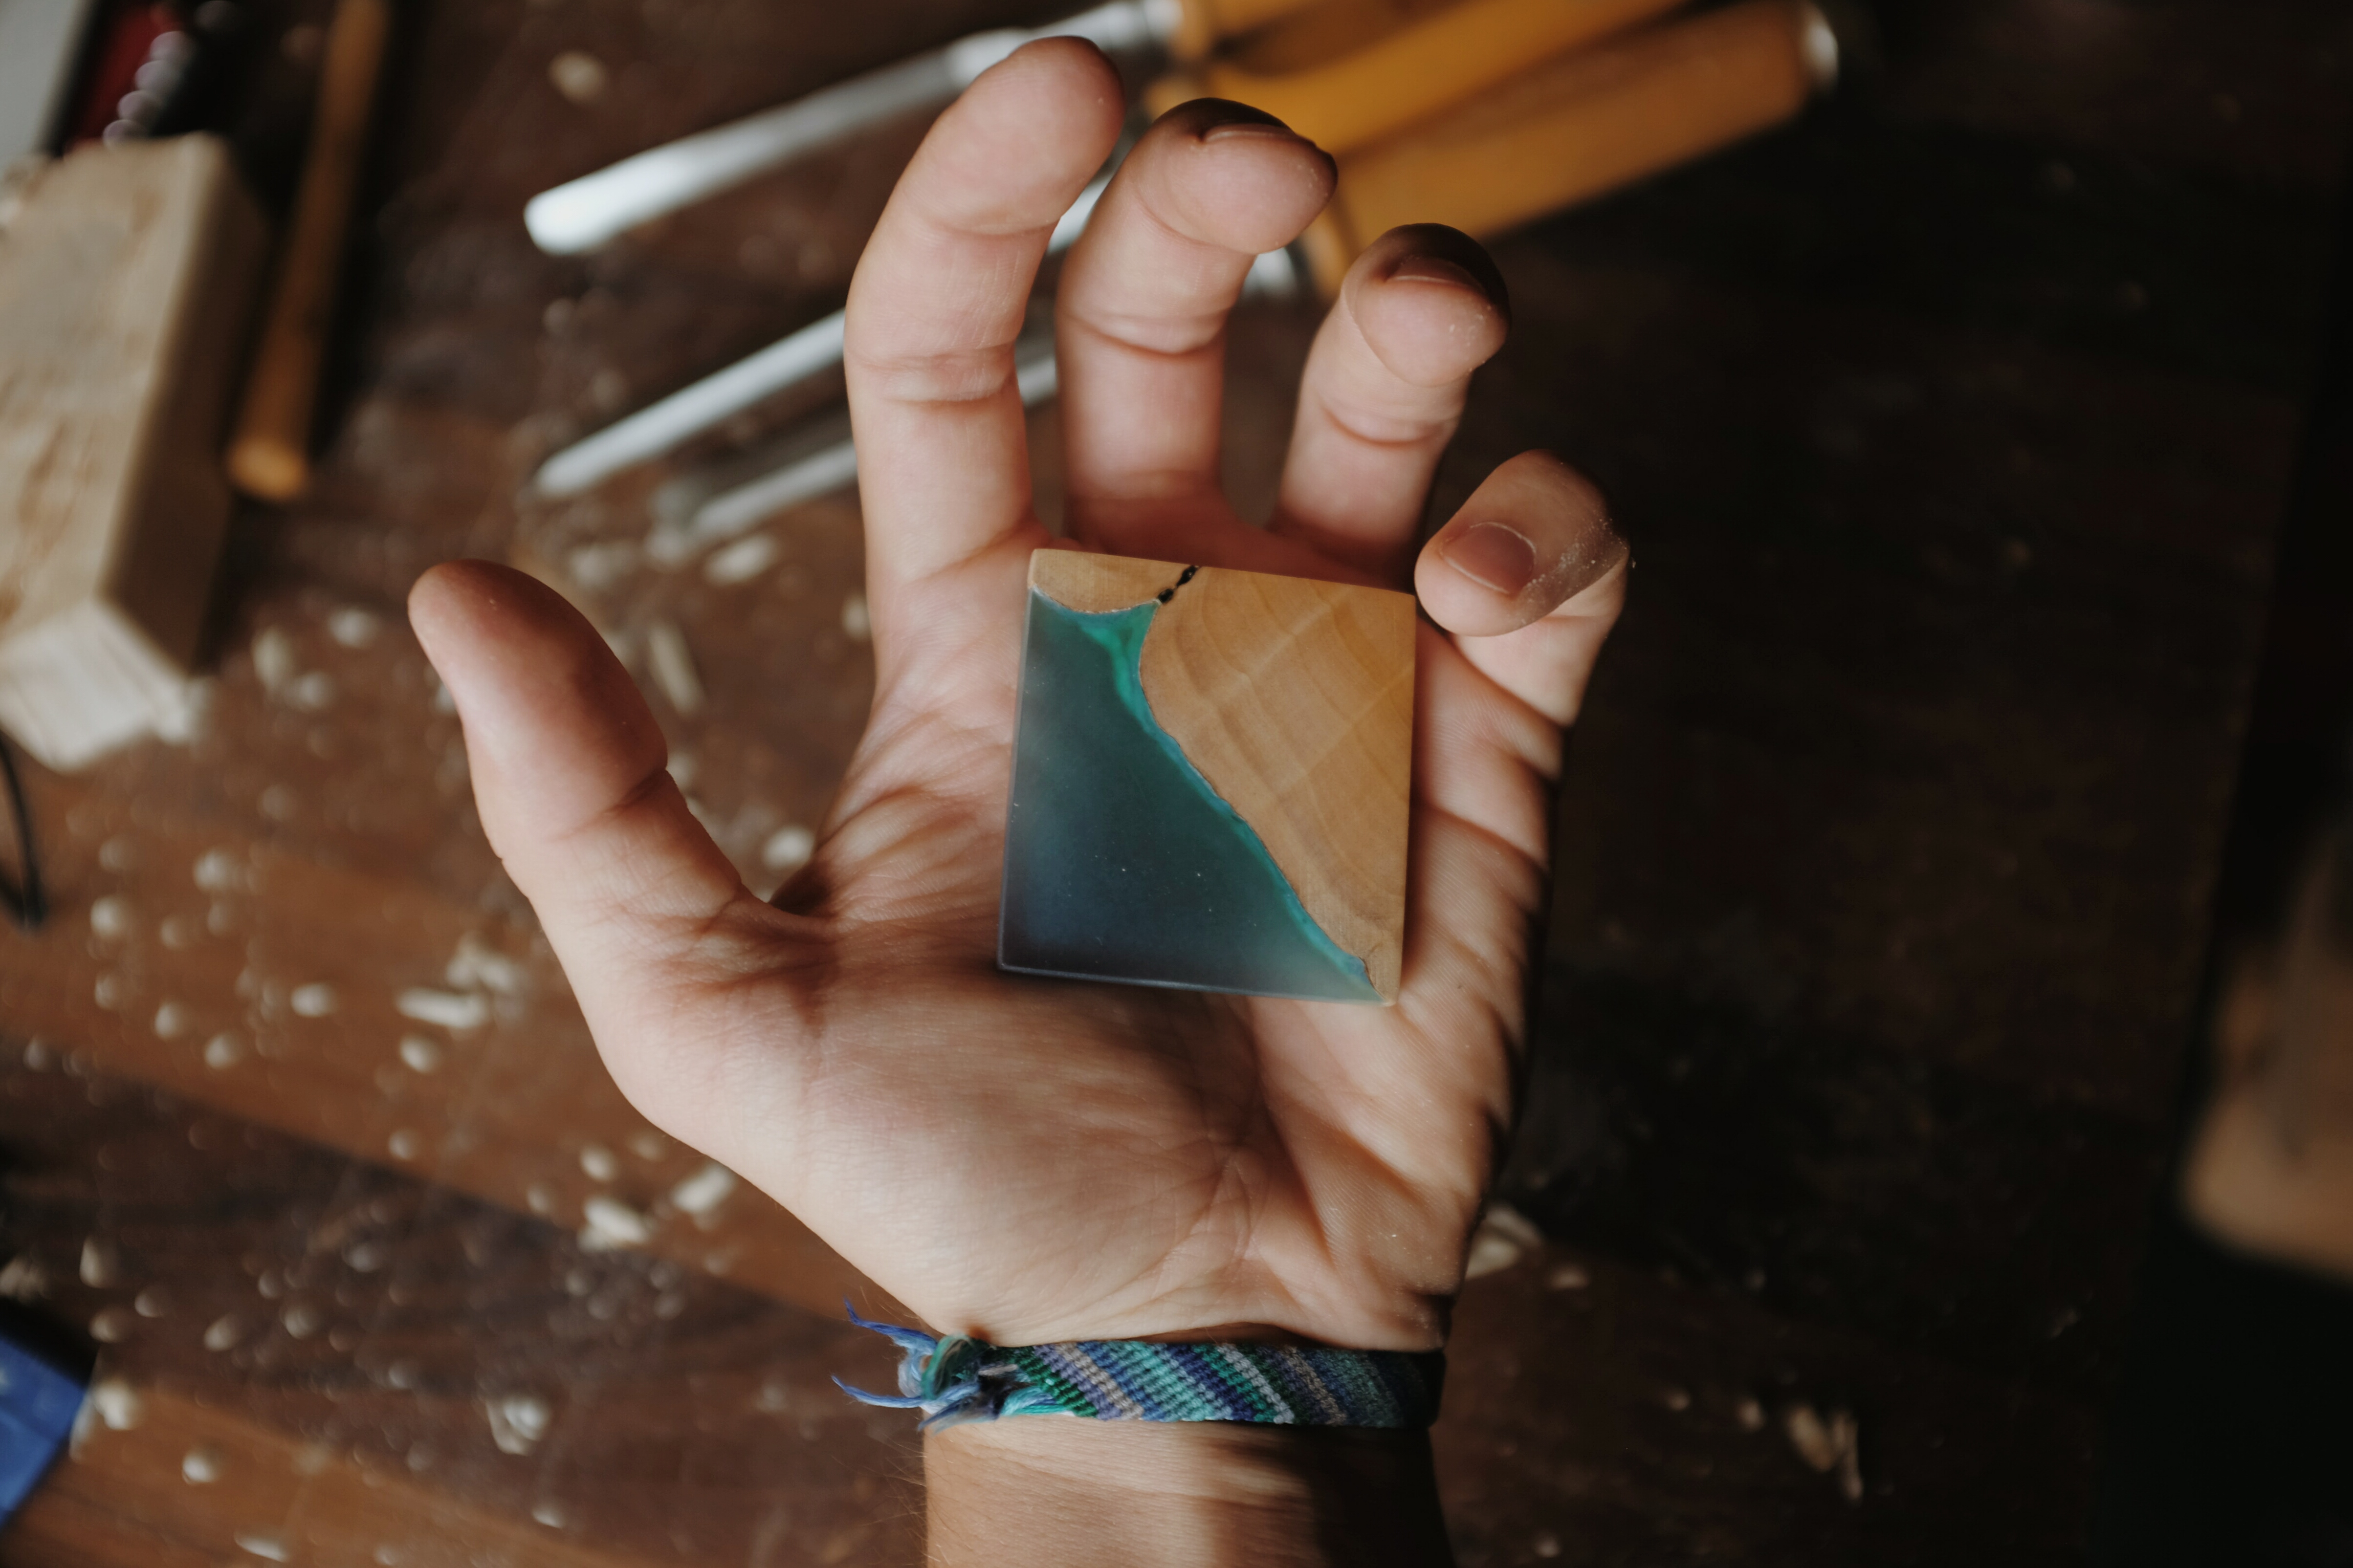
Some people bring home seashells from the beach. I apparently bring home the entire emotional concept of the ocean, then try to trap it inside a piece of birch and resin like a tiny coastal wizard with a mixing cup. The project began with a simple idea: create a small ocean miniature using birch-tree wood as the natural base and clear epoxy resin as the water. Simple, right? Famous last wordsright after “this will only take one afternoon.”
Making an ocean miniature out of birch-tree and resin is part woodworking, part painting, part science experiment, and part negotiation with gravity. The birch gives the piece warmth, texture, and an earthy shoreline. The resin brings depth, shine, blue-green movement, and that glassy “please don’t touch me, I took three days to cure” finish. Together, they create a miniature seascape that feels like a frozen tide pool, a tiny island, or a pocket-sized vacation your desk desperately deserves.
This guide walks through the inspiration, materials, process, lessons learned, and practical tips behind creating a birch and resin ocean miniature. It is written for artists, DIY crafters, woodworkers, and curious humans who have looked at a tree branch and thought, “That could be a beach.”
Why Birch Wood Works So Well For Ocean Miniatures
Birch is a beautiful choice for resin art because it has a clean, pale appearance, a fine grain, and a naturally smooth texture. Unlike dramatic woods with heavy, dark grain, birch often feels calm and coastal. Its light sapwood can resemble sand, limestone, driftwood, or a sun-bleached cliff. That makes it a perfect partner for blue resin, especially when the goal is to create a soft, realistic ocean miniature rather than a neon aquarium from outer space.
Birch wood is also sturdy enough for small craft projects. It sands smoothly, accepts sealers well, and can show subtle patterns that look surprisingly like natural shoreline erosion. When cut into a slice, block, or irregular shape, birch can become a tiny island, a rocky coast, or a floating landmass surrounded by resin water. In miniature art, those little imperfections are not flaws. They are geography with good lighting.
The Natural Shoreline Effect
One of the best parts of using birch-tree wood is that the edge of the wood rarely looks perfectly straight. A natural edge, knot, bark line, or uneven grain can become the border between land and sea. When tinted resin flows beside it, the wood suddenly looks intentional. A crack becomes a cove. A knot becomes a tide pool. A rough corner becomes a cliff. Nature does half the design work, then politely lets you take credit.
Materials Used For The Birch And Resin Ocean Miniature
For this project, the goal was to keep the materials simple but effective. A resin ocean miniature does not require a warehouse full of tools, although it may convince you that you need one. The basic materials include a dry piece of birch wood, clear epoxy resin, pigments, mixing cups, stir sticks, gloves, masking tape, a level work surface, and a dust cover. Optional materials include white pigment paste, mica powder, sand, tiny stones, clear coat, polishing pads, and a heat gun used carefully for bubbles and wave movement.
The most important material is not actually resin or wood. It is patience. Epoxy resin has a working time, a cure time, and a mysterious ability to punish anyone who says, “I’ll just rush this part.” Good results usually come from slow preparation, careful mixing, and letting each layer cure properly.
Safety First, Because Art Should Not Bite Back
Epoxy resin should be handled with respect. Wear nitrile gloves, protect your eyes, work in a well-ventilated area, and read the product’s safety instructions before mixing anything. Avoid skin contact with uncured resin and hardener. If sanding cured resin or wood, use dust protection and keep the workspace ventilated. Resin art is fun, but breathing dust or getting sticky chemicals on your skin is not part of the aesthetic.
Heat tools should also be treated carefully. A heat gun can help pop bubbles and move white pigment into foamy wave shapes, but it should be kept moving and used briefly. Too much heat can scorch resin, yellow the white pigment, or turn your peaceful ocean scene into a tiny plastic weather event. Younger makers should ask an adult for help with cutting, sanding, and heat tools.
Preparing The Birch Wood Base
The first step is choosing the right birch piece. A small slice, offcut, or shaped block works well. The wood should be fully dry, clean, and free of loose bark or dust. Moisture trapped inside wood can cause bubbles, cloudiness, or curing problems in resin. In other words, resin does not enjoy surprises. It wants a stable, dry surface and a calm environment, like a cat with better chemistry.
After choosing the wood, sand the surface until it feels smooth. Start with a medium grit and move toward a finer grit. The goal is not to erase every natural mark. The goal is to remove splinters, rough fibers, and anything that might trap air. Once sanded, wipe away the dust thoroughly. A tack cloth, soft brush, or lint-free cloth can help keep the surface clean.
Sealing The Wood Before Pouring Resin
Sealing the birch is one of the most important steps. Wood is porous, and porous surfaces release air bubbles when covered with resin. A thin seal coat of clear resin or compatible sealer helps lock the surface before the main pour. This reduces bubbles and keeps the ocean layer looking clear instead of fizzy. Unless the goal is “sparkling soda beach,” sealing is worth the time.
Brush a thin coat over the wood and especially along the shoreline edge where resin will touch the grain. Let it cure according to the product instructions. This step may feel boring, but it is the difference between a clean miniature ocean and a bubble festival hosted by a tree.
Designing The Miniature Ocean Scene
Before mixing resin, plan the composition. Decide where the water will sit, where the shoreline will curve, and whether the finished piece will look like a beach, island, cliff, river mouth, or abstract ocean scene. A pencil sketch can help, but the natural shape of the birch often suggests the design on its own.
For a realistic ocean effect, use at least three color zones: deep blue for the outer water, turquoise or aqua for shallow areas, and clear resin near the shore. This creates depth even in a small piece. A little white pigment can be used to create waves, foam, and surf. The trick is restraint. Too much white can turn a graceful coastline into shaving cream. The ocean is dramatic, yes, but it still understands moderation.
Choosing Resin Colors
Transparent pigments work beautifully for ocean resin because they let light pass through the layers. Deep blue suggests deeper water. Teal creates a tropical shallows effect. A small amount of green can make the water feel more natural. Pearl or mica powder can add shimmer, but use it sparingly if you want realism. The ocean sparkles; it does not usually look like a disco ball unless Poseidon is hosting a wedding.
White pigment paste or opaque white resin is useful for waves. When moved gently with air from a heat gun, the white resin can spread into lacing and cell patterns that resemble sea foam. This is one of the most satisfying parts of ocean resin art, mostly because it feels like controlling the tide with a hair dryer’s more serious cousin.
Mixing And Pouring The Resin
Epoxy resin usually comes in two parts: resin and hardener. Measure carefully according to the manufacturer’s ratio. Mix slowly, scraping the sides and bottom of the cup. Fast mixing creates bubbles, and bubbles are the tiny gremlins of resin art. After mixing, separate the resin into smaller cups for different colors.
Start with the deepest blue and pour it where the water should appear deepest. Add teal closer to the birch shoreline, then clear resin right along the wood edge. Use a stir stick or gloved finger to gently blend the boundaries. The colors should transition naturally, not look like three stripes from a suspiciously aquatic flag.
Creating Waves And Sea Foam
Once the base water colors are poured, add a thin line of white resin near the shoreline or across the water where a wave would break. Use gentle air movement to push the white over the clear and colored resin. A quick pass with heat can help bubbles rise, but avoid holding heat in one place. The best wave effects usually come from small movements and patience rather than blasting the resin like it owes you money.
For a miniature piece, less is more. A few fine foam lines can look realistic. Heavy white blobs can overwhelm the scale. Study real coastlines if needed: waves are irregular, layered, and uneven. Nature rarely uses a ruler, and honestly, that is one of her better design choices.
Adding Depth With Multiple Resin Layers
A single resin pour can look beautiful, but multiple thin layers create more depth. After the first layer cures, add another transparent layer with a slightly different tint. This makes the miniature ocean feel deeper and more dimensional. A second layer can also hold tiny details such as sand, pebbles, shells, or painted underwater shadows.
Layering is especially useful when working with birch because the pale wood reflects light through the resin. Clear and tinted layers can glow against the light grain, making the water look brighter near the shore. The effect is subtle but powerful, like putting a tiny vacation inside a paperweight.
Avoiding Common Resin Problems
The most common problems in resin ocean miniatures are bubbles, dust, uneven curing, muddy colors, and heat damage. Bubbles often come from unsealed wood, aggressive mixing, or pouring too thick. Dust appears because resin apparently sends invitations to every floating particle in the room. Uneven curing can happen when the resin ratio is inaccurate or the workspace is too cold. Muddy colors usually happen when pigments are overmixed. Heat damage happens when enthusiasm outruns caution.
The best prevention is simple: seal the wood, measure accurately, mix slowly, pour in a level area, cover the piece while it cures, and test color combinations on scraps first. Every resin artist eventually learns that testing is cheaper than regret.
Finishing The Birch And Resin Ocean Miniature
Once the resin has cured fully, inspect the surface. If the edges are rough, they can be sanded and polished. If the top needs more shine, a final clear coat can create a glossy, water-like finish. Some artists prefer a satin finish on the wood and a high-gloss finish on the resin, which creates a pleasing contrast between land and sea.
UV exposure can cause some resins to yellow over time, so choosing a UV-resistant resin or adding a compatible UV-protective finish can help preserve the ocean colors. It is also smart to keep finished resin pieces away from harsh direct sunlight. Tiny oceans deserve shade too.
Display Ideas
A birch and resin ocean miniature can become wall art, a desk ornament, a shelf display, a coaster-style decorative piece, or a small gift. If the piece is functional, make sure the resin system and finish are suitable for that use. Decorative art has fewer demands than something meant to hold hot mugs, food, or daily wear. When in doubt, treat the finished piece as art rather than kitchen equipment. Your miniature ocean does not need to become a cutting board with identity issues.
What This Project Teaches About Craftsmanship
This project teaches that small objects can carry a surprising amount of story. Birch brings the forest. Resin brings the sea. Together, they create a meeting point between two landscapes that normally do not fit on a workbench. The process also teaches patience, planning, and the value of respecting materials. Wood moves, absorbs, and breathes. Resin flows, cures, and remembers every mistake you made while mixing it.
There is also something satisfying about turning raw materials into a miniature world. A piece of birch that might have been firewood becomes a coastline. Clear liquid becomes water. A few drops of pigment become depth, tide, and movement. The finished object feels bigger than its size because it suggests a place. That is the quiet magic of miniature art: it lets the imagination do the scaling.
Tips For Beginners Making Birch And Resin Ocean Art
If you are new to resin art, start small. A miniature piece is easier to control than a large river table or wall panel. Use a test piece before pouring on your favorite birch slice. Keep notes about pigment amounts, room temperature, cure time, and wave techniques. Resin art improves quickly when you treat every pour like both an artwork and a tiny lab report.
Do not chase perfection too aggressively. Real oceans are messy. Shorelines shift. Foam breaks unevenly. A slightly unpredictable wave line can make the piece look more natural. The goal is not to create a mathematically perfect beach. The goal is to create something that makes people lean closer and say, “Wait, is that wood?”
Beginner-Friendly Checklist
- Use dry, clean birch wood with an interesting natural edge.
- Sand and seal the wood before the main resin pour.
- Measure resin and hardener accurately.
- Use transparent blues and teals for realistic water depth.
- Add white pigment sparingly for waves and foam.
- Cover the project while curing to protect it from dust.
- Let the resin fully cure before sanding, polishing, or displaying.
My Experience Making An Ocean Miniature Out Of Birch-Tree And Resin
Making this ocean miniature felt like building a tiny planet and then arguing with it politely. The birch piece I chose had a pale surface, a slightly curved natural edge, and a small knot near one corner. At first, I saw it as a flaw. Later, it became my favorite part because it looked like a little rocky outcrop where imaginary crabs could hold very serious meetings.
The preparation took longer than expected. Sanding the birch was peaceful, almost meditative, until the dust reminded me that “rustic” does not mean “skip cleanup.” After smoothing the surface, I sealed the wood carefully. That step felt unnecessary at first, but once the resin went on, I was grateful. The sealed edge released far fewer bubbles, and the shoreline stayed crisp instead of looking like carbonated soup.
Mixing the resin was the moment when the project became real. The clear resin looked calm in the cup, but once pigment entered the scene, it turned into ocean magic. I used deep blue for the outer edge, turquoise near the shore, and a little clear resin where the water met the birch. The colors blended better when I stopped poking them every three seconds. Apparently, resin does not appreciate micromanagement.
The wave foam was the most exciting and nerve-wracking part. I added a thin white line along the shoreline and used gentle heat and air to move it outward. The first attempt looked slightly too thick, like the ocean had ordered extra whipped cream. On the next pass, I used less white and moved more slowly. That created delicate lacing that actually resembled sea foam. It was the kind of small victory that makes a person stare at a craft table like they just discovered electricity.
Waiting for the resin to cure tested my personality. I wanted to touch it. I wanted to tilt it. I wanted to check it every ten minutes like a nervous parent watching bread rise. But resin rewards restraint. I covered the piece and left it alone. When I finally uncovered it, the surface had a glossy depth that made the birch look like a real shoreline under clear water. The knot became a rocky point. The grain became sand. The blue resin looked deeper than it actually was.
The biggest lesson was that miniature resin art is not about forcing the material to obey. It is about guiding it. Resin flows in its own way, and wood has its own history. The best results came when I worked with those qualities instead of fighting them. I let the birch shape suggest the coastline. I let the pigments drift slightly. I accepted tiny imperfections because they made the ocean look alive.
By the end, the piece felt less like a craft experiment and more like a small memory. It reminded me of standing near the water, watching foam slide over sand, except this version fit in my hand and did not involve wet socks. That is the charm of making an ocean miniature out of birch-tree and resin: it captures a huge feeling in a tiny space. It is part sculpture, part souvenir, and part proof that a scrap of wood can become a coastline if you give it enough patience, color, and glossy ambition.
Conclusion
Creating an ocean miniature out of birch-tree and resin is a rewarding project for anyone who loves natural materials, coastal art, and hands-on creativity. Birch provides warmth, grain, and shoreline character, while resin creates depth, movement, and shine. The process requires preparation, safety, careful mixing, and patience, but the result is worth it: a tiny ocean scene that feels peaceful, personal, and completely unique.
Whether displayed on a desk, shelf, wall, or gift table, a birch and resin ocean miniature proves that art does not need to be huge to feel immersive. Sometimes all it takes is a small piece of wood, a little blue resin, and the willingness to let your craft table become a coastline for a while.