
Note: This original article synthesizes real maker documentation, manufacturer specifications, and hands-on project information. No source links are embedded in the article body so it is ready for clean web publishing.
When an AI Board Decides to Become a Clock
The UNIHIKER K10 is marketed as an AI learning board, which sounds very futuristic, like something that should be recognizing faces, listening for voice commands, or quietly judging your soldering technique. But one of the joys of maker hardware is that a board does not have to stay inside the box printed on its packaging. Give it Wi-Fi, a color display, a programmable microcontroller, and a little stubborn curiosity, and suddenly it can become something wonderfully old-fashioned: a clock.
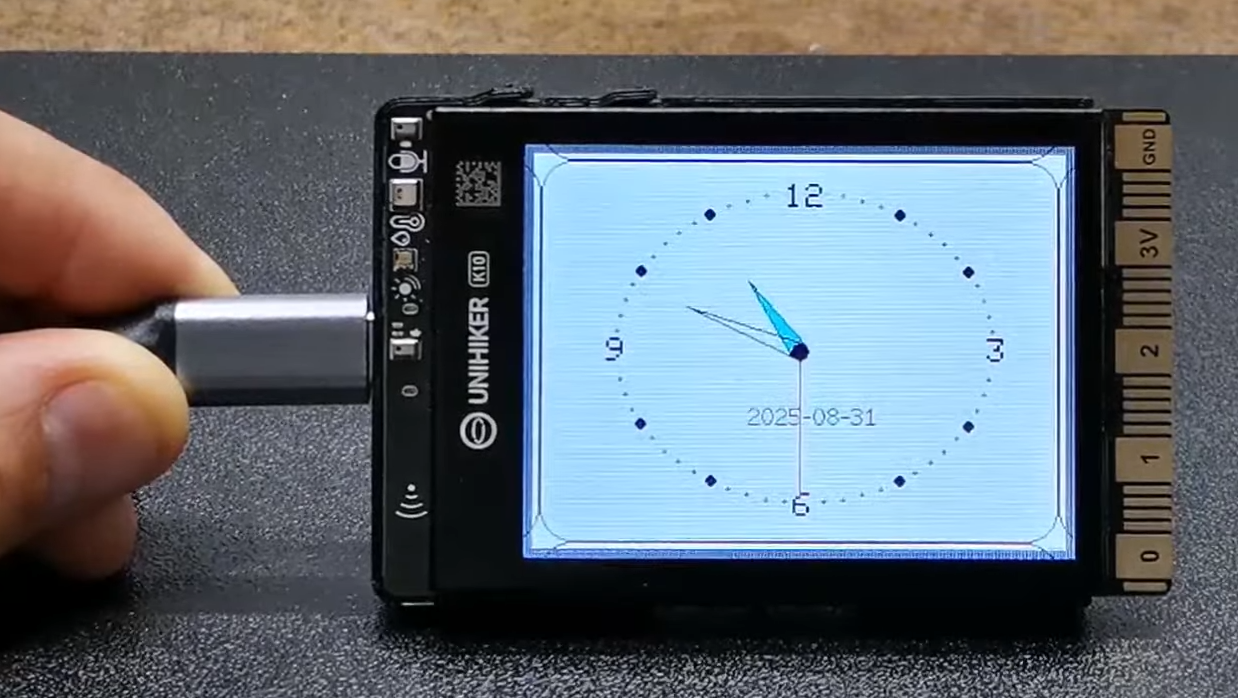
Making a clock with a retooled UNIHIKER K10 is appealing because it turns a compact AI-oriented board into a practical desktop project. Instead of using the K10 only for machine learning demos, the build repurposes its ESP32-S3 brain, built-in 2.8-inch display, Wi-Fi connectivity, buttons, and graphics capability to create a retro analog NTP clock. In plain English, that means the board connects to the internet, asks a time server what time it is, and then draws a clock face on its own screen. No external display. No extra real-time clock module. No wires trying to escape the table like spaghetti.
This project is also a neat reminder that “educational hardware” can be more than classroom equipment. The UNIHIKER K10 is approachable enough for beginners, yet flexible enough for tinkerers who want to push it beyond its default software environment. It sits in a useful middle ground: friendlier than a bare microcontroller board, but still hackable enough to reward anyone willing to dig into Arduino libraries, display drivers, and time synchronization.
What Is the UNIHIKER K10?
The UNIHIKER K10 is a compact development and learning board from DFRobot. At its core is an ESP32-S3 microcontroller, a chip family known for built-in Wi-Fi, Bluetooth Low Energy, and enough processing power to handle graphics, sensors, and lightweight AI tasks. The K10 adds a ready-to-use hardware package around that chip: a color screen, camera, microphone, speaker, RGB LEDs, environmental sensors, motion sensing, buttons, and expansion interfaces.
That combination is important because many maker projects begin with a pile of parts. You need a microcontroller, then a display, then buttons, then a sensor, then a way to mount everything, then five minutes later the project has become a wiring nest with ambition. The K10 reduces that friction. For a clock build, the screen is already there, the Wi-Fi is already there, the buttons are already there, and the board is small enough to sit on a desk without looking like it escaped from a laboratory cart.
Why the K10 Makes Sense for a Clock
A clock may sound simple, but it is actually a nice test of embedded hardware. It needs networking if you want accurate internet time. It needs display performance if you want smooth graphics. It needs user input if you want to switch views or change colors. It needs stable code because a clock that freezes is just a tiny abstract painting.
The K10 checks those boxes nicely. Its 240 x 320 color display is large enough for an analog clock face, date text, and a digital time screen. The ESP32-S3 gives enough speed for drawing hands, updating seconds, and managing Wi-Fi. The A and B buttons can be used to switch between analog and digital display modes or cycle through background colors. The board’s built-in features let the project stay clean and beginner-friendly while still feeling like a proper embedded systems experiment.
What “Retooled” Means in This Build
In this context, “retooled” does not mean taking a screwdriver to the K10 and performing questionable surgery. It means adjusting the software workflow so the board can run a project that uses familiar Arduino-style libraries. Out of the box, the UNIHIKER K10 is designed around educational programming, AI demos, and DFRobot’s recommended software environment. That is great for learning, but many makers already have a long relationship with Arduino libraries. Some of those libraries are like old shop tools: maybe a little scratched, but dependable.
The clever part of the clock project is using the K10 in an Arduino-oriented way. The build combines the UNIHIKER-specific library with standard libraries such as WiFi, time handling, math functions, and TFT_eSPI for graphics. This opens the door to traditional maker projects on a board that was primarily promoted for AI, IoT, and Python learning. It is a little like discovering your smart refrigerator can also play the harmonica. Unexpected? Yes. Useful? Strangely, also yes.
The Core Idea: A Retro Analog NTP Clock
The clock uses NTP, or Network Time Protocol, to get accurate time over the internet. Instead of relying on a battery-backed real-time clock module, the K10 connects to Wi-Fi and synchronizes its internal time with a network time server. Once the current time is available, the code draws an analog clock face on the TFT display.
The analog clock face is the visual star of the project. The hour hand, minute hand, and second hand are drawn with simple geometry. The code uses trigonometry to calculate where each hand should point. That sounds serious, but the basic idea is friendly: convert hours, minutes, and seconds into angles, then draw lines from the center of the screen to the correct positions. Congratulations, your microcontroller has learned to point dramatically.
The project can also display the time and date digitally. Pressing one button can switch from analog mode to a digital time screen, while another button can cycle through background colors. These small interactions make the build feel finished rather than merely functional. A clock that changes colors may not improve productivity, but it does improve the odds that someone will walk by and say, “Wait, what is that?”
Hardware Needed for the Project
The minimal hardware list is refreshingly short. At the center is one UNIHIKER K10 board. You need a USB-C cable for power and programming, a computer for uploading code, and a stable Wi-Fi network so the clock can synchronize time. That is essentially it for the basic version.
No external display is required because the K10 already includes one. No external buttons are required because the K10 has built-in buttons. No soldering is required for the simple clock build, which makes it appealing for classrooms, weekend makers, and anyone whose soldering iron still looks at them with suspicion.
Optional Add-Ons
If you want to expand the project, the K10’s interfaces make that possible. You could add a buzzer or speaker-based alarm, use RGB LEDs as a visual chime, connect an environmental sensor, or mount the board in a 3D-printed case. A battery-powered expansion setup could turn it into a portable desk clock, though power management would then become part of the design. The simple version is excellent as a proof of concept; the expanded version can become a full smart clock platform.
Software Setup: Where the Tinkering Begins
The retooled K10 clock project is especially interesting because the software setup is not merely “install library, click upload, sip coffee.” The K10 can be used with beginner-friendly environments, but using standard Arduino libraries requires a more careful setup. The Arduino IDE legacy workflow has been used in documented examples, particularly version 1.8.19 or older for compatibility with the available board support package.
The typical setup involves adding the UNIHIKER board manager package URL in Arduino IDE preferences, installing UNIHIKER support through the Boards Manager, and selecting the UNIHIKER K10 as the target board. After that, the code can include K10-specific support alongside familiar Arduino libraries.
For the display, TFT_eSPI plays a key role. It is a widely used graphics library for 32-bit microcontrollers and TFT screens, including ESP32-family boards. However, display libraries often need the correct pin and driver configuration. In the K10’s case, the display connection is already built into the board, so the software has to match the board’s internal wiring. That is where the “retooled” part becomes more than a catchy headline. The setup must be adjusted so the library knows how to talk to the screen correctly.
How the Clock Works Step by Step
1. Connect to Wi-Fi
When the K10 starts, the code first connects to the Wi-Fi network using the SSID and password you provide. This step is essential because the clock gets its time from the internet. Without Wi-Fi, the board can still draw a beautiful clock face, but it will have the confidence of a rooster crowing at 3:17 p.m.
2. Request Time from an NTP Server
After connecting, the board requests current time data from an NTP server. NTP is commonly used by computers and network devices to synchronize clocks. For a maker clock, it is a convenient way to avoid manually setting the time every time the board restarts. You can configure the time zone and daylight saving offset in the code so the displayed time matches your location.
3. Draw the Clock Face
Once the time is available, the K10 draws the analog clock on its TFT screen. The clock face may use a circular or elliptical design, tick marks, color backgrounds, and stylized hands. The hour hand moves slowly, the minute hand updates with the minutes, and the second hand gives the whole display that satisfying “yes, I am alive” feeling.
4. Handle Button Input
The A and B buttons add interaction. One button can switch between analog and digital views. Another can cycle through preset background colors. This is a small feature, but it matters. Buttons turn a display demo into a device. They also give users something to press, which is apparently a deep human need.
5. Refresh Without Making a Mess
A clock display must update regularly, but redrawing everything too aggressively can cause flicker or waste processing time. A practical approach is to update only what needs updating or redraw the screen cleanly at controlled intervals. For simple versions, full redraws may be acceptable. For more polished versions, sprites or buffered drawing can improve smoothness.
Why This Project Is More Than a Clock
The most valuable part of this project is not that it tells time. Your phone already does that, along with distracting you from every meaningful goal you ever had. The value is that the project demonstrates a larger idea: hardware designed for one purpose can often be adapted for another.
The UNIHIKER K10 is positioned as an AI and STEM learning device, but this build shows it can also behave like a general-purpose maker board. That matters for educators and hobbyists. A board becomes more useful when it can support multiple teaching paths: AI demos on Monday, sensor dashboards on Wednesday, and a retro internet clock by the weekend.
It also teaches practical embedded development concepts. Wi-Fi setup, time synchronization, graphics drawing, library configuration, button input, display refresh, and user interface design all appear in one compact project. Beginners can see immediate results, while more experienced makers can use the project as a launchpad for deeper experiments.
Ideas for Improving the K10 Clock
Add an Alarm Function
An obvious upgrade is an alarm. The K10 already has audio hardware, so an alarm could use sound, screen flashing, RGB LEDs, or all three if you want a wake-up experience somewhere between “gentle reminder” and “spaceship evacuation.” The alarm interface could use the A and B buttons for setting hours and minutes.
Create Multiple Clock Faces
Different clock faces could make the project more personal. One mode could be a clean analog design. Another could be a chunky retro digital clock. A third could display sensor data, such as temperature and humidity, alongside the time. Because the K10 has a color display, visual customization is one of the easiest ways to make the build feel unique.
Use Sensors for Smart Behavior
The light sensor could adjust screen brightness automatically. The accelerometer could rotate the display or trigger a mode change when the board is tilted. Temperature and humidity readings could appear at the bottom of the clock face. These features would turn the clock into a small environmental dashboard.
Make a Case
A 3D-printed case would make the project look more finished. A simple angled stand could turn the K10 into a desk clock. A wall mount could make it a tiny internet-connected timepiece for a workshop. A transparent acrylic case would show off the board, which is perfect for people who believe electronics deserve to be seen, not hidden like embarrassing cable management.
Common Troubleshooting Tips
If the clock does not connect to Wi-Fi, check the SSID and password first. Then confirm that the network uses 2.4 GHz Wi-Fi, because ESP32-based boards typically do not connect to 5 GHz-only networks. If the display stays blank, verify that the correct board is selected and that the TFT_eSPI configuration matches the K10 hardware. If the time appears wrong, check the time zone and daylight saving settings in the code.
If the code fails to compile, the issue is often related to library versions, board support, or IDE compatibility. Start with the known working environment, install only the needed libraries, and avoid changing too many variables at once. Debugging embedded projects is much easier when you do not turn the setup into a mystery novel with twelve suspects.
Experience Notes: What Building a Retooled K10 Clock Feels Like
Building a clock with a retooled UNIHIKER K10 feels different from building the same project on a bare ESP32 board. With a bare board, you usually spend the first chunk of time wiring a display, checking pinouts, wondering why the screen is white, and questioning whether the jumper wire labeled “good enough” was, in fact, good enough. With the K10, the hardware is already integrated, so the project shifts from wiring anxiety to software exploration.
The first pleasant surprise is how quickly the project can look like something. Once the display works, the clock face gives immediate feedback. Even a rough analog dial feels satisfying because it uses the board’s built-in screen in a polished way. Watching the second hand sweep around a display you just programmed is one of those small maker victories that feels much larger than it should. Nobody throws a parade, but internally, there is definitely confetti.
The second lesson is that compatibility matters. The K10 is powerful and friendly, but using it outside the most documented path requires patience. Arduino users may expect every common library to work instantly, yet boards with integrated displays and custom hardware layouts often need special configuration. The TFT setup is the part where many builders learn the difference between “ESP32-based” and “drop-in compatible with every ESP32 tutorial on the internet.” Those are cousins, not twins.
The third experience is that NTP makes the project feel modern. A clock that gets its time from the internet has a different personality from a manually set clock. Restart it, and it recovers. Move it to another desk, and it still knows what time it is after connecting. Add the correct time zone, and the device becomes surprisingly practical. It is the kind of project that begins as a demo and then quietly earns a permanent place near your keyboard.
The buttons also add more joy than expected. Switching between analog and digital modes gives the clock a sense of interaction. Cycling background colors makes it feel less like a fixed appliance and more like a tiny gadget with moods. One day it is yellow and cheerful. Another day it is dark and serious. The clock may not have emotions, but the UI can pretend, and that is close enough for a desk companion.
For educators, this project is especially useful because it combines multiple concepts without overwhelming the hardware setup. Students can learn about time servers, Wi-Fi connection logic, display coordinates, angles, user input, and interface design from one build. For hobbyists, it is a reminder that AI boards do not need to spend every day doing AI. Sometimes the best project is not the most advanced one; it is the one that makes a device understandable, useful, and fun.
The biggest takeaway is that the UNIHIKER K10 becomes more interesting when treated as a flexible platform rather than a single-purpose learning device. Retooling it for an Arduino-style clock project reveals a practical side of the board. It is compact, visual, interactive, and capable. The result is a clock, yes, but also a small argument in favor of playful reuse. Good maker hardware should invite experiments. The K10 does exactly that, and the clock is a charming way to prove it.
Conclusion
Making a clock with a retooled UNIHIKER K10 is a compact, clever project that turns an AI-focused learning board into a useful internet-connected timepiece. It uses the K10’s built-in display, ESP32-S3 processing power, Wi-Fi, buttons, and graphics capability to create a retro analog NTP clock without extra hardware. More importantly, it shows how flexible modern development boards can be when makers are willing to explore beyond the default use case.
The project is beginner-friendly in hardware, moderately educational in software, and surprisingly expandable. You can keep it as a simple desk clock, add alarms, design custom clock faces, display sensor data, or build a case that makes it look like a finished product. In classic maker fashion, the clock is both the destination and the excuse. You end up with a working timepiece, but you also learn enough about the K10 to start imagining the next build.














