
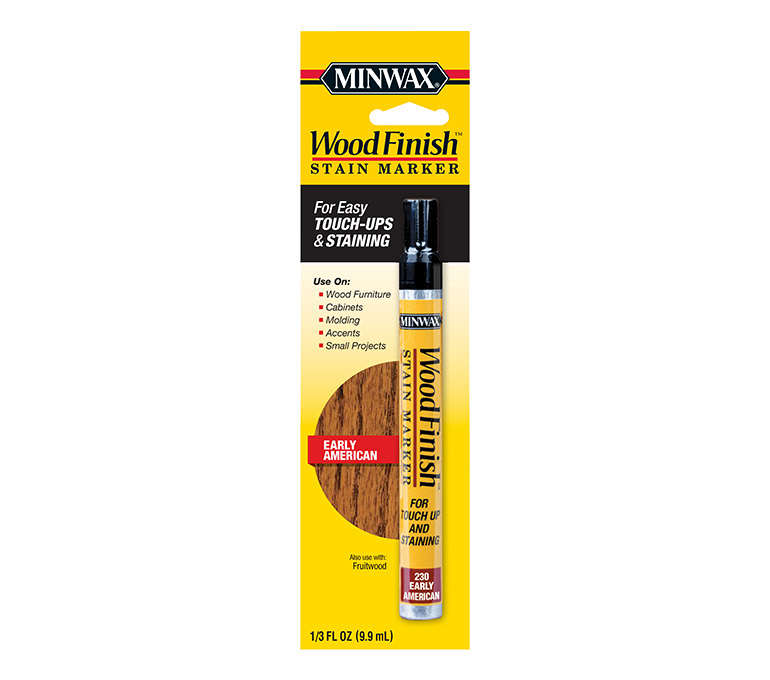
Some home repairs arrive wearing tool belts and demanding half a Saturday. Others fit in a junk drawer, look suspiciously like a marker, and quietly save a dining table from looking as if it survived a raccoon convention. The Minwax Wood Finish Stain Marker belongs to the second group: small, simple, and surprisingly useful when wood furniture, cabinets, trim, doors, floors, or craft projects need a quick color touch-up.
This wood stain pen is designed for those everyday “oops” moments: a chair leg scraped by the vacuum, a cabinet edge nicked by a pan, a floor scratch left by furniture, or a craft project that needs a little decorative shading. It is not a magic wand, though it may feel like one when a pale scratch disappears into dark walnut grain. Think of it as a targeted touch-up tool, not a full refinishing system. Used correctly, it can make minor damage far less noticeable without dragging out sandpaper, brushes, drop cloths, and the emotional support snacks required for a full wood restoration project.
What Is the Minwax Wood Finish Stain Marker?
The Minwax Wood Finish Stain Marker is a marker-style applicator filled with real Minwax Wood Finish stain. It is made for interior wood surfaces and is especially useful for quick touch-ups on small nicks, scratches, worn edges, and exposed lighter spots where the original finish has been disturbed. The product is semi-transparent, which means it adds color while allowing some wood grain to remain visible instead of covering the area like paint.
Its biggest advantage is convenience. Instead of opening a can of stain, stirring it, finding a brush, applying the stain, wiping it back, cleaning everything with mineral spirits, and wondering why one “tiny scratch” has turned into a full renovation subplot, you can use the marker directly on the damaged area. Shake it, prime the tip, apply the stain, wipe off excess, and replace the cap tightly.
The marker is commonly sold in a compact 0.33-ounce size, making it easy to store in a toolbox, kitchen drawer, craft cabinet, or the mysterious household basket where batteries, Allen wrenches, and expired coupons go to retire. It is intended for indoor use and is often used on wood furniture, kitchen cabinets, doors, floors, molding, trim, and small wood crafts.
Why Homeowners Like Wood Stain Markers
Wood is beautiful, warm, and full of character. Unfortunately, it is also excellent at announcing every scratch like a dramatic actor on opening night. A tiny pale line on a dark table can look much worse than it actually is because the exposed raw wood contrasts sharply with the surrounding stain.
A wood stain marker helps reduce that contrast. It adds color to the exposed area so the eye no longer jumps straight to the scratch. That is the real trick: the goal is not to create an invisible museum-grade repair under bright inspection lights. The goal is to make the flaw blend in during normal life, when people are eating dinner, walking through the room, or looking for their coffee instead of auditing your baseboards.
The Minwax Wood Finish Stain Marker is especially useful because it uses stain rather than a flat ink-like color. The semi-transparent formula can work with the existing wood grain, which helps repairs look more natural than simply drawing over the surface with an ordinary marker. Please do not use a regular marker on your wood furniture unless your desired design style is “office supply panic.”
Best Uses for Minwax Wood Finish Stain Marker
1. Furniture Scratches
Tables, chairs, desks, dressers, nightstands, and bookcases are prime candidates for touch-up. The marker works well on light scratches where the finish has been scuffed and the damaged area needs color correction. For example, if a dining chair rubs against a table leg and leaves a pale mark, a matching stain marker can help blend it into the surrounding finish.
2. Cabinet Edges
Kitchen cabinets live hard lives. They deal with pots, pans, elbows, steam, snack raids, and the occasional person who closes doors with the enthusiasm of a game show buzzer. Cabinet corners and edges can lose color over time. A stain marker can refresh those worn spots quickly, especially on darker stained cabinets where bare edges stand out.
3. Interior Doors and Trim
Baseboards, door frames, molding, and stained trim often collect nicks from shoes, pet claws, moving boxes, and vacuum cleaners. A Minwax stain marker can help restore color to those small marks without repainting or restaining the entire run of trim.
4. Hardwood Floor Touch-Ups
For minor scratches on stained wood floors, a stain marker can help disguise lighter marks. It is best for small cosmetic scratches rather than deep gouges, water damage, or finish failure. If the floor has wide damage, peeling finish, swelling, or deep cuts, the repair may require filler, sanding, protective topcoat, or professional refinishing.
5. Wood Crafts and Decorative Details
The marker is also handy for hobby projects. It can add quick color to small wood pieces, highlight edges, darken engraved lines, touch up small mistakes, or add decorative accents. For crafters, the marker format offers better control than dipping a brush into a can of stain for a tiny detail.
How to Choose the Right Stain Marker Color
Color matching is the difference between a repair that whispers and a repair that walks into the room wearing tap shoes. Minwax Wood Finish Stain Markers are available in multiple stain colors, and common choices include shades such as Golden Oak, Early American, Provincial, Red Oak, Red Mahogany, Cherry, Dark Walnut, Classic Gray, Ebony, and other wood-tone options depending on retailer availability.
The safest approach is to start slightly lighter than the surrounding finish. You can usually darken a repair with another pass, but making a dark blotch lighter is much harder. Wood species also affect the final appearance. Oak, pine, maple, cherry, walnut, and veneer surfaces can absorb or display stain differently. Existing topcoats, age, sunlight exposure, and cleaning products can also change the way a stain color appears.
Before applying the marker to a visible area, test it in a hidden spot. The underside of a table, the inside edge of a cabinet door, or the back of a trim piece can tell you whether the color is close enough. This step takes less than a minute and can prevent the classic DIY tragedy known as “I fixed the scratch and created a much larger conversation piece.”
How to Use Minwax Wood Finish Stain Marker
The process is simple, but simple does not mean sloppy. A careful application gives the best result.
Step 1: Clean the Surface
Dust, grease, wax, and old polish can interfere with color blending. Wipe the area with a clean, dry cloth. If the surface is grimy, use a wood-safe cleaner and let the area dry completely before applying stain. Avoid soaking wood with water, especially around veneer, seams, or unfinished edges.
Step 2: Shake the Marker
Shake the Minwax Wood Finish Stain Marker well. This helps distribute the stain evenly inside the applicator. A poorly mixed marker can apply uneven color, and nobody wants a scratch repair with mood swings.
Step 3: Prime the Tip
Remove the cap and gently press the tip on scrap paper or scrap wood until the stain begins to flow. Do not smash the tip like you are trying to win a carnival strength game. A few gentle presses are enough.
Step 4: Apply to the Scratch
Color directly over the damaged area, following the direction of the grain when possible. Use light strokes rather than flooding the surface. For narrow scratches, let the tip ride inside the scratch. For worn edges, apply a thin, controlled line.
Step 5: Wipe Off Excess
Use a clean cloth to wipe away excess stain from the surrounding finished surface. This is important because the stain is meant to color the damaged area, not create a shiny halo around it. Work gently and blend outward.
Step 6: Let It Dry
The official product information lists a dry time of about four to six hours for the marker. Drying can vary depending on temperature, humidity, surface condition, and how much stain was applied. Avoid touching, rubbing, or placing objects on the repaired spot too soon.
Step 7: Cap and Store Properly
Replace the cap tightly after use and store the marker on its side. If the tip dries or hardens after extended storage, Minwax notes that the tip can be removed and soaked in mineral spirits overnight. That small storage habit can keep the marker useful longer.
What the Marker Can and Cannot Fix
The Minwax Wood Finish Stain Marker is excellent for cosmetic color touch-ups. It can disguise small scratches, worn corners, tiny nicks, and minor areas where stain color has been removed. It is fast, affordable, and beginner-friendly.
However, it will not fill missing wood. If a table corner is chipped, a floor has a deep gouge, or a cabinet door has a dent you can feel with your fingertip, you may need a wood filler, putty, wax repair stick, or Blend-Fil pencil before using a stain marker. The marker adds color; it does not rebuild structure. Asking it to fill a crater is like asking a Band-Aid to remodel a kitchen.
It also does not replace a protective topcoat. If the damaged area is on a high-wear surface, such as a floor, tabletop, stair tread, or cabinet handle area, you may need to add an appropriate clear protective finish after the stain dries. For very small scratches, wiping and blending may be enough. For larger exposed areas, a topcoat helps protect the repair from moisture, abrasion, and daily use.
Minwax Stain Marker vs. Wood Putty vs. Wood Filler
Choosing the right repair product depends on the type of damage. A stain marker is best for color loss. A wood putty is useful for small holes and shallow imperfections in finished wood. A wood filler is usually better for deeper repairs that may need sanding, shaping, staining, or painting.
For example, a pale scratch across a dark dresser may only need the stain marker. A small nail hole in stained trim may call for color-matched wood putty. A broken corner on a cabinet or deep floor gouge may need filler first, then color matching, then a protective finish. The best repairs often combine products in the right order instead of forcing one product to solve every problem.
Tips for a More Natural-Looking Touch-Up
For the best results, do not overapply. It is better to make two light passes than one heavy pass. Heavy stain can pool, smear, or darken the surrounding finish too much. Keep a clean cloth nearby and wipe excess quickly.
Match the grain direction. If the wood grain runs vertically, apply the marker vertically. If the grain curves, follow the curve. This small detail helps the repair blend into the natural movement of the wood.
Use more than one color when needed. Real wood is rarely one flat shade. A dark walnut table may have golden highlights, reddish undertones, and nearly black grain lines. For tricky repairs, a lighter marker can create the base color, while a darker one can add small grain-like lines. The key word is “small.” You are not painting tiger stripes unless your coffee table has joined a jungle-themed restaurant.
Feather the edges. After applying the stain, gently wipe outward so there is no obvious start-and-stop point. A hard-edged repair can be more noticeable than the original scratch.
Safety and Cleanup
The Minwax Wood Finish Stain Marker is an oil-based stain product, so use it with good ventilation. Open a window or work in an area with fresh air. Avoid contact with eyes and skin, keep it away from children, and follow the product label directions. Cleanup for oil-based stain products typically involves mineral spirits, not soap and water.
Be careful with stain-soaked cloths, paper towels, or other waste. Oil-based finishing materials can create a fire risk if improperly discarded. Place used rags in a sealed, water-filled metal container and dispose of them according to local rules. This may sound dramatic for a tiny marker repair, but shop safety is one of those things that only feels excessive until it prevents a very bad day.
Is Minwax Wood Finish Stain Marker Worth It?
For most homeowners, renters, DIYers, and woodcraft hobbyists, yes. The Minwax Wood Finish Stain Marker is worth keeping around if your home includes stained wood furniture, cabinets, trim, or floors. It is inexpensive compared with refinishing supplies, easy to use, and small enough to store without sacrificing half a garage shelf.
It is especially useful before hosting guests, staging a home for sale, refreshing thrifted furniture, repairing rental wear, or cleaning up the little marks that seem to appear whenever life happens indoors. It will not replace professional refinishing, but it can delay it, reduce visible wear, and help wood surfaces look cared for.
Common Mistakes to Avoid
Choosing a Color That Is Too Dark
A too-dark marker can create a patch that looks like a permanent eyebrow on your furniture. Start lighter when possible and build color slowly.
Skipping the Test Spot
Always test first. Stain colors can look different on different woods and finishes. A hidden test spot is the cheapest insurance in DIY.
Leaving Excess Stain on the Surface
After applying the stain, wipe the surrounding area. The marker should color the scratch, not glaze the whole neighborhood.
Expecting It to Fill Deep Damage
If the damage has depth, fill it first with the appropriate repair product. Then use the stain marker for color matching.
Using It Outdoors
The marker is intended for interior wood surfaces. Outdoor furniture, decks, and exterior doors face sunlight, moisture, temperature swings, and wear that require exterior-rated products.
Real-World Experience: Living With a Minwax Wood Finish Stain Marker
The first time you use a Minwax Wood Finish Stain Marker, it feels almost too easy. You look at a scratch, color it in, wipe it back, and suddenly the scratch stops shouting. That is the kind of tiny household victory that makes you briefly believe you have your entire life organized. The laundry may disagree, but the table looks better.
One of the best uses is on dark furniture. Dark stained pieces are elegant, but they are also merciless. A tiny white scratch on a dark walnut or espresso finish can look like a neon sign. A well-matched stain marker can tone that mark down in seconds. The repair may not vanish under a flashlight, but from normal standing distance, the difference can be impressive.
Cabinet touch-ups are another satisfying project. Around handles, lower doors, and drawer edges, finish wear tends to collect slowly. You may not notice it day to day until the light hits just right and the cabinet looks tired. Using a stain marker along those worn edges can refresh the appearance without removing hardware or committing to a full cabinet refinishing job. It is a great “Sunday afternoon before dinner” project, not a “cancel your plans and question your choices” project.
For floors, the marker works best when expectations are realistic. A small surface scratch can often be toned down nicely. A deep gouge from dragging furniture may need filler, sanding, and topcoat. The marker is still helpful as part of that repair, but it should not be asked to perform carpentry. If your floor has a groove deep enough to collect crumbs, color alone is not the whole solution.
On craft projects, the marker can be a quiet hero. It is useful for small wooden ornaments, picture frames, shelf brackets, unfinished boxes, and decorative trim pieces. It lets you add color to tight areas where a brush would be clumsy. It also helps touch up cut edges after assembly, especially when a project looks great except for one pale corner that insists on making eye contact.
The biggest lesson from using stain markers is restraint. Apply less than you think you need, wipe quickly, and check the result after it dries. Wood stain has personality. It can darken as it sits, and different grain patterns may grab color unevenly. Going slowly produces a more natural repair.
Another useful habit is labeling the marker or keeping a note of which stain color matches which item in your home. If Dark Walnut works on the coffee table but Early American works on the stair rail, write it down. Future you will be grateful, especially when standing in a hardware aisle trying to remember whether the table was “walnut,” “mahogany,” or “brown, but emotionally complicated.”
Overall, the Minwax Wood Finish Stain Marker is one of those small tools that earns its place because it solves common problems quickly. It will not make damaged wood brand-new, but it can make everyday wear look less obvious and more intentional. In a home full of real life, pets, guests, furniture movement, and occasional clumsy moments, that is a pretty good bargain.
Conclusion
The Minwax Wood Finish Stain Marker is a practical, beginner-friendly solution for touching up small scratches, nicks, and worn spots on interior wood surfaces. It is best for furniture, cabinets, trim, doors, floors, molding, and small craft projects where the main issue is lost color rather than missing material. With the right color match, light application, careful wiping, and proper drying time, this simple stain pen can make wood surfaces look cleaner, warmer, and better maintained.
It is not a substitute for sanding, filling, sealing, or refinishing when damage is deep or widespread. But for the everyday marks that make otherwise nice wood look neglected, it is a smart little repair tool to keep close. Wood may deserve Minwax, but your scratched cabinet edge also deserves a second chance.
Note: This article is written for web publishing in standard American English and is based on real product characteristics, practical woodworking guidance, and commonly available information about Minwax Wood Finish Stain Marker.











