
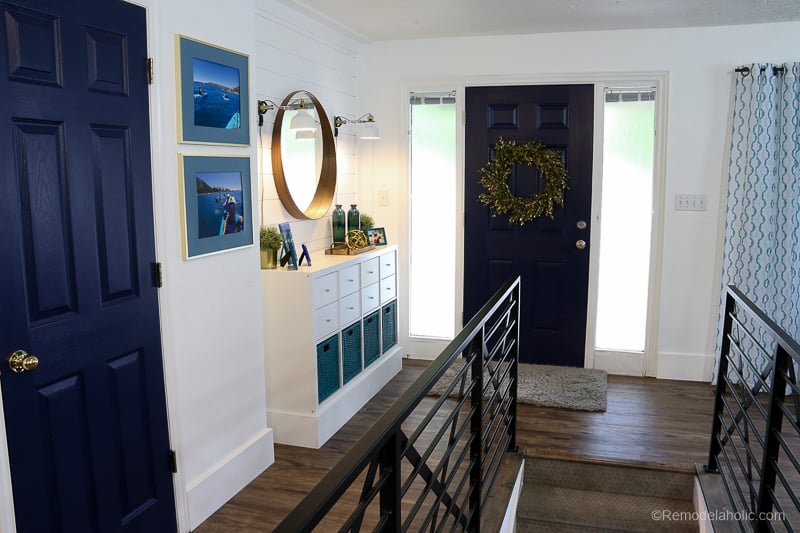
For years, my interior doors lived a very quiet life. They were white, practical, and about as exciting as blank index cards. Then I realized the walls had color, the furniture had personality, the rugs were doing their best, and the doors were still standing around like they had never received the party invitation.
Painting interior doors is one of those deceptively powerful home updates. It costs less than replacing doors, requires fewer supplies than repainting an entire room, and can make a hallway, bedroom, pantry, or home office feel deliberately designed. A saturated blue can turn a basic hollow-core door into an architectural feature. A warm beige can soften a high-contrast space. A glossy berry shade can make an ordinary closet look as though it has opinionsand excellent ones.
This guide explains how to choose a color, select the right finish, prepare the surface, paint flat or paneled doors, avoid common mistakes, and survive the emotional roller coaster known as “the first coat looks terrible.” Spoiler: the second coat usually arrives wearing a cape.
Why Painted Interior Doors Make Such a Big Difference
Doors occupy more visual space than we tend to notice. In a hallway with four or five openings, they create a repeating rhythm. When every door is plain white, that rhythm disappears into the background. When the doors share a coordinated color, they connect rooms, frame sightlines, and emphasize architectural details.
Unlike a large accent wall, a colorful door delivers a controlled dose of drama. You can paint every interior door one signature shade, assign different colors to different zones, match doors to their walls, or paint only the side facing a particular room. That final option is helpful when two neighboring rooms have completely different palettes and refuse to negotiate.
Color can define a transition
A deep green door between a cream hallway and a botanical bedroom creates a visual bridge. A black pantry door adds contrast in a light kitchen. A muted terracotta office door announces that the workspace begins here, even when the “office” is technically a converted corner with heroic ambitions.
Color can make inexpensive doors look custom
Paint cannot change a door’s construction, but it can change how the eye reads it. Dark colors emphasize molded panels and shadows. A monochromatic door-and-trim treatment reduces visual clutter. A subtle sheen adds light reflection and gives the surface a more polished, furniture-like appearance.
Choosing the Right Interior Door Color
The best door color is not automatically the trendiest one. It is the shade that works with the home’s fixed elements, including flooring, tile, countertops, wood tones, and major furniture. Tape large color samples to the door and observe them in morning light, afternoon light, and artificial light. A sophisticated olive at noon can become “swamp documentary” after sunset.
Use a deeper version of the wall color
This is one of the easiest ways to create a cohesive palette. Pair pale blue-gray walls with a deeper slate door, warm greige walls with mushroom brown, or soft sage walls with forest green. The combination feels intentional because the shades share similar undertones.
Try color drenching for a seamless look
Painting the walls, trim, and doors in the same hue can make a small room or narrow hallway feel less visually divided. The finishes can still vary: use matte or eggshell on walls and satin or semi-gloss on doors for durability and subtle contrast.
Choose contrast for maximum personality
White or cream walls paired with navy, charcoal, burgundy, coral, teal, or black doors create an immediate focal point. Repeating the door color in artwork, textiles, rugs, or accessories helps the choice feel connected rather than random. Think “curated echo,” not “paint-store accident.”
Plan both sides and the door edge
A door belongs to two rooms, and each side can be painted differently. Decide in advance how the hinge edge and latch edge should look when the door is open. There is no universal decorating police force, but planning prevents an awkward strip of mystery color from appearing later.
Best Paint and Sheen for Interior Doors
Interior doors are high-touch surfaces. Hands, bags, pets, vacuum cleaners, and laundry baskets with poor spatial awareness all make contact with them. A durable door-and-trim enamel or high-quality interior acrylic paint is usually a better choice than ordinary flat wall paint.
Satin provides a soft glow and tends to be forgiving of minor imperfections. Semi-gloss is easier to wipe clean and creates a crisper, more traditional finish. High gloss can look spectacular, but it highlights dents, uneven sanding, and brush marks with the enthusiasm of a spotlight operator.
Always confirm that the product is compatible with the existing coating and door material. Wood, medium-density fiberboard, metal, laminate, and previously oil-painted surfaces may require different preparation or primers.
Tools and Supplies
- Durable interior door-and-trim paint
- Bonding or stain-blocking primer when required
- Degreasing cleaner and lint-free cloths
- Medium- and fine-grit sandpaper or sanding sponges
- Wood filler or paintable patching compound
- A quality angled sash brush
- A small high-density foam or microfiber roller
- Paint tray and disposable liner
- Painter’s tape and drop cloths
- Screwdriver and labeled hardware bags
- Sawhorses if the door will be removed
A good brush and roller matter. Cheap applicators can shed fibers, leave heavy texture, and turn a straightforward weekend project into an archaeological dig through wet paint.
How to Paint Interior Doors Step by Step
1. Decide whether to remove the door
Removing the door and laying it flat reduces the risk of drips and makes sanding easier. It is useful for damaged doors, dramatic color changes, or glossy finishes. Painting in place is faster and works well when the door is already in good condition. Secure it so it cannot swing and protect the surrounding floor.
2. Remove or mask the hardware
Taking off knobs, latch plates, hooks, and other hardware produces cleaner edges and usually saves time. Place the screws and parts in labeled bags. If hinges must remain, cover them neatly with painter’s tape and carefully trim the tape around their outlines.
3. Clean before sanding
Paint adheres poorly to skin oils, grease, dust, and cleaning-product residue. Wash the door with a suitable degreasing cleaner and allow it to dry. Concentrate on the areas around the knob and lower panels, where grime tends to build a small but determined civilization.
4. Repair and sand the surface
Scrape away loose paint, fill dents and holes, and let the repair material dry fully. Sand repaired areas until they blend into the surrounding surface. Scuff-sand glossy coatings so the primer or paint can grip. Remove all dust before continuing.
5. Prime when necessary
Primer is particularly helpful on bare wood, repaired areas, stained surfaces, slick finishes, and dramatic color changes. A stain-blocking primer can reduce discoloration or tannin bleed, while a bonding primer improves adhesion on challenging surfaces. Do not assume that a paint-and-primer product eliminates every preparation step.
6. Use the correct painting sequence
For a flat slab door, work in manageable sections with a small roller. Finish each section in the same direction while the paint remains wet, maintaining a wet edge to prevent visible overlap marks.
For a paneled door, begin with recessed moldings and panel edges using an angled brush. Paint the centers of the panels, followed by the horizontal rails and then the vertical stiles. Work from top to bottom and inspect corners for pooled paint or drips.
7. Apply thin, even coats
Heavy coats are more likely to sag, wrinkle, or remain soft. Two thin coats generally create a smoother and more durable result than one overfed coat. Respect the manufacturer’s recoat time, which can vary with humidity, temperature, color, ventilation, and film thickness.
8. Smooth between coats when needed
If the first coat feels rough after drying, lightly sand it with fine-grit paper. Remove every trace of dust before applying the next coat. Do not repeatedly brush areas that have begun to set; disturbing half-dry paint often creates ridges and drag marks.
9. Let the finish cure
Dry-to-touch does not mean fully cured. Fresh paint can stick to the jamb or become dented under hardware. Leave the door open as long as practical, reinstall hardware carefully, and avoid aggressive cleaning until the coating has hardened according to the product directions.
Common Door-Painting Mistakes
Skipping the cleaning step
Sanding dirt into the surface does not count as cleaning. It simply redistributes the problem. Clean first, then repair and sand.
Loading the applicator with too much paint
Excess paint creates runs, thick edges, and sagging around panel details. Load the brush or roller evenly, remove the excess, and build coverage gradually.
Closing the door too soon
A door may feel dry while remaining soft enough to stick. Leave it open during the early drying period and avoid pressing freshly painted edges against the frame.
Choosing color from a tiny chip
Color appears stronger across a large vertical surface. Test a generous sample and compare it with the flooring, trim, walls, lighting, and adjacent rooms.
Interior Door Color Ideas by Room
- Hallway: Use one deep neutral, such as charcoal, navy, or mushroom, to create a repeating rhythm.
- Bedroom: Try dusty rose, muted blue, lavender-gray, or warm green for a restful accent.
- Home office: Consider ink blue, oxblood, dark olive, or aubergine for a focused, substantial entrance.
- Pantry: Pull a playful color from kitchen tile, cabinetry, dishes, or accessories.
- Bathroom: Coordinate with tile undertones and choose a washable product suitable for humid spaces.
- Kids’ room: Paint the room-facing side a cheerful color while keeping the hallway side consistent.
My Color-Binge Door-Painting Experience
The color decision took longer than the painting
I began with the calm confidence of someone who had saved twelve paint colors online and assumed they were “basically the same.” They were not. One green leaned yellow beside the oak floor. Another looked beautiful during the day and nearly black at night. A third made the hallway feel like an upscale library, which was charming until I remembered the hallway mainly contained a laundry basket and a smoke detector.
The winning shade was a rich blue-green with enough gray to keep it grounded. I tested it on large sample boards and moved them from door to door for several days. That extra step prevented an impulse purchase and revealed that the darkest hallway needed better lighting, not necessarily lighter paint.
Preparation was the unglamorous hero
I wanted to skip directly to the colorful part because cleaning a door is not why anyone develops a paint obsession. Then I wiped around the knob and discovered a surprising amount of invisible grime. After cleaning, I filled small dents, sanded the shiny old finish, and removed the dust. The doors looked worse before they looked better, which is apparently a standard clause in every DIY project.
I removed the knobs but left the doors on their hinges. That saved space, although it demanded more vigilance against drips. I wedged each door open, placed a drop cloth underneath, and labeled every bag of hardware. The labels felt unnecessarily organized until the third door, when every screw suddenly looked related.
The first coat caused unnecessary drama
The initial coat was streaky and deeply committed to exposing the white underneath. For several minutes, I became convinced I had ruined the hallway. Then I remembered that deep colors often require more than one coat and that paint can level as it dries. I resisted the urge to “fix” half-dry areas, which may have been the most mature decision made during the entire project.
An angled brush worked well for the panel details, while a small roller handled the broad sections. Thin coats were essential. Whenever I overloaded the roller, paint gathered in the panel corners as though it had booked a group vacation there.
The second coat delivered the transformation
After the recommended recoat interval, I lightly smoothed several rough spots and applied the next coat. That was the moment the doors stopped looking like a project and started looking like a design decision. The blue-green sharpened the white trim, repeated tones in the hallway runner, and made the artwork feel more connected.
I also learned how much sheen affects color. The satin finish reflected enough light to reveal the panel profiles without becoming mirror-like. In the evening, the doors appeared moodier. During the day, the green undertone became more visible. The color felt alive rather than inconsistent.
Living with colored doors changed the whole house
The biggest surprise was how much the painted doors improved rooms I had not touched. From the living room, a glimpse of blue-green at the end of the hall created depth. In the bedrooms, the darker doors framed the pale walls. Even the inexpensive hardware looked better after it was cleaned and reinstalled against the richer background.
Not every detail was perfect. One edge stuck because I closed the door too soon, and one tiny drip survived my inspection like a smug monument to impatience. Both were sanded and repaired. The project taught me that a successful DIY finish does not require factory-level perfection. It requires preparation, patience between coats, and enough perspective to stop examining the surface from three inches away.
I would happily paint interior doors again. Next time, I would work in smaller batches, allow more curing time, and decide every edge color before opening the can. A colorful door is a relatively small surface, but repeated throughout a house, it becomes a strong design languageone that says the home is personal, considered, and no longer afraid of a paint swatch.
Conclusion: Let the Doors Join the Color Story
Painting interior doors is a practical makeover with an outsized visual reward. The key is to treat each door as a working surface rather than merely a decorative rectangle. Clean it thoroughly, repair imperfections, scuff glossy coatings, prime when necessary, apply thin coats, and allow enough drying and curing time.
Color can unify a hallway, define a room, emphasize panel details, or provide the bold accent that neutral walls are quietly begging for. Start with one door, test the color in changing light, and coordinate it with nearby finishes. Before long, those plain white doors may look less like safe choices and more like missed opportunities.














