Removing an old carpet sounds simple until you meet the army of staples waiting underneath. The carpet comes up, the padding peels away, and thensurpriseyour subfloor looks like it lost a fight with a porcupine. Fortunately, carpet removal is one of those DIY jobs that becomes much easier when you know the order of operations, use the right tools, and resist the urge to attack everything with brute force.
This guide explains how to remove old carpet, pull carpet padding, take out staples, deal with tack strips, protect the subfloor, and prepare the room for new flooring. Whether you are replacing carpet with hardwood, laminate, vinyl plank, tile, or fresh carpet, the secret is patience, safety, and a trash plan that does not involve dragging one giant carpet burrito through your hallway.
Why Removing Old Carpet Is Worth Doing Carefully
Old carpet can hide more than outdated color choices. Beneath it, you may find dust, pet stains, deteriorated padding, squeaky boards, water damage, moldy areas, rusted tack strips, or hundreds of staples embedded in plywood. Removing it carefully helps you inspect the condition of the subfloor before installing anything new.
A clean, flat subfloor matters. If staples, padding chunks, glue ridges, or tack strip fragments remain, they can telegraph through new flooring, create bumps under carpet, interfere with floating planks, or cause annoying clicks and gaps. In other words, the work you do before the new floor goes down determines whether the finished floor looks professional or like it was installed during a caffeine emergency.
Tools and Supplies You Will Need
You do not need a contractor’s truck to remove carpet, but you do need more than optimism. Gather the tools before you start so you are not walking across exposed staples in socks while searching for pliers. That is not DIY; that is a horror movie with baseboards.
Basic Carpet Removal Tools
- Heavy-duty work gloves
- Safety glasses
- Knee pads
- Dust mask or N95 respirator, especially for dusty or moldy carpet
- Utility knife with sharp replacement blades
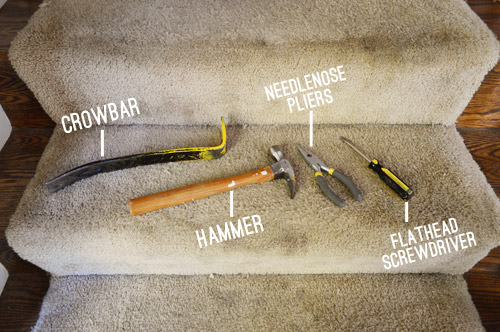
- Pliers, locking pliers, or end-cutting pliers
- Flat pry bar
- Hammer
- Floor scraper or long-handled scraper
- Flathead screwdriver
- Duct tape or contractor tape
- Heavy-duty trash bags
- Broom, shop vacuum, and magnet sweeper if available
A floor scraper is especially helpful for removing carpet staples quickly over large areas. End-cutting pliers are excellent when staples are stubborn or broken. A flathead screwdriver works well as a small pry tool when you need to lift one side of a staple without gouging the wood.
Step 1: Prepare the Room Before You Pull Anything
Start by clearing the room completely. Remove furniture, rugs, floor vents, closet doors if needed, and anything that may trip you while you are carrying rolled carpet. Open windows if weather allows, and close doors to nearby rooms to keep dust from traveling like it pays rent.
If the carpet runs under shoe molding or quarter-round trim, gently remove that trim first. Use a utility knife to score any paint line, then slide a putty knife or pry bar behind the trim and loosen it gradually. Label trim pieces if you plan to reinstall them later. A quick pencil mark on the back can save you from solving a tiny wooden puzzle at the end of the project.
Step 2: Check for Moisture, Mold, or Old Flooring Hazards
Before you start ripping, inspect suspicious areas. If the carpet smells musty, has black or green staining, or feels damp, slow down. Moldy carpet and padding are porous, which means cleaning may not fully remove contamination. If you find widespread mold, standing moisture, or water-damaged materials, consider professional remediation.
Older homes require another caution: asbestos. Some old flooring, adhesive, backing, or tiles beneath carpet may contain asbestos, particularly in homes built before the 1980s. You cannot reliably identify asbestos just by looking. If pulling the carpet disturbs old vinyl tile, black mastic, brittle backing, or unknown flooring layers, stop and consider testing or professional help. Do not sand, grind, or aggressively scrape suspect materials.
Step 3: Cut the Carpet Into Manageable Strips
One of the biggest beginner mistakes is trying to remove carpet in one enormous piece. Carpet is bulky, floppy, dusty, and surprisingly heavy. Instead, cut it into strips about two to four feet wide. Smaller strips are easier to roll, tape, carry, and fit into a vehicle or disposal container.
Start in a corner. Use pliers to grab the carpet and pull it free from the tack strip along the wall. If you cannot get a grip, cut a small square from the corner and use that opening to grab the backing. Once you have a loose edge, pull the carpet back several feet. Then cut from the backing side using a sharp utility knife. Cutting from the back is easier and helps protect the blade from carpet fibers.
Roll each strip tightly as you go and secure it with duct tape. Think of it as making a carpet sleeping bag that nobody should sleep in. Keep the rolls compact so they do not bang into walls, scratch doorframes, or shed dust across the house.
Step 4: Remove the Carpet Padding
After the carpet is out, you will usually find padding underneath. Carpet padding may be stapled to wood subfloors or glued to concrete. Pull it up in sections and roll it separately. Padding often tears easily, especially if it is old, crumbly, or foam-based, so do not expect it to behave politely.
On wood subfloors, padding staples are the main enemy. On concrete, you may encounter adhesive spots or stuck foam residue instead. If padding is damp, moldy, or heavily stained, bag it promptly and avoid shaking it indoors. This is not the time to see what mystery dust smells like.
Step 5: Remove Carpet Staples the Right Way
Removing carpet staples is the part of the job that separates casual DIY energy from true flooring determination. Staples hold padding in place, and installers often use a lot of them. The goal is to remove them cleanly without tearing up the subfloor.
Use a Floor Scraper for Large Areas
For a room full of staples, a long-handled floor scraper can save your back. Hold it at a low angle and push it across the subfloor. The blade catches staples and pops them loose. Work in rows so you do not miss sections. When a staple breaks or bends, mark it mentally or pull it immediately with pliers.
Use End-Cutting Pliers for Stubborn Staples
End-cutting pliers, sometimes called end nippers, are excellent for gripping staples close to the floor. Grab the crown of the staple, rock the tool gently, and pull upward. Do not squeeze so hard that you cut the staple in half unless that is your plan. A broken staple can still be removed, but it adds extra work.
Use a Flathead Screwdriver for Gentle Lifting
If a staple is buried or flush with the wood, slide a flathead screwdriver under one side and twist gently. Once the staple lifts, grab it with pliers. This technique is slower but useful near edges, corners, stairs, or hardwood you hope to preserve.
Do Not Just Hammer Staples Flat
Hammering staples flat may seem like a shortcut, but it can create problems under hard flooring. Floating laminate, vinyl plank, engineered wood, and thin underlayment need a smooth surface. A flattened staple can still leave a bump, scratch, or squeak point. Pull the staples whenever possible. Future you will be grateful, and future flooring will be less dramatic.
Step 6: Remove Tack Strips Carefully
Tack strips are narrow wooden strips covered with sharp angled nails. They sit around the room perimeter and hold the carpet tight. If you are installing new wall-to-wall carpet and the tack strips are solid, clean, and positioned correctly, you may be able to leave them. If they are damaged, rusted, moldy, loose, or you are installing hard flooring, remove them.
To remove a tack strip, slide a pry bar under the strip near a floor nail. Tap the pry bar with a hammer if needed, then lift gently. Move along the strip nail by nail rather than trying to rip the entire piece out at once. This reduces splintering and helps protect the subfloor. Wear gloves because tack strips are sharp enough to remind you of every questionable life choice.
Step 7: Clean the Subfloor Thoroughly
Once carpet, padding, staples, and tack strips are gone, sweep the floor slowly. Then vacuum with a shop vacuum, paying close attention to corners, baseboards, closets, and heating vents. A magnet sweeper can help catch stray staples and nails. Run a gloved hand lightly over the floor to feel for raised metal, but do not press hard. Staples are small, sneaky, and rude.
Scrape away foam residue, dried padding, or loose adhesive. For wood subfloors, avoid soaking the surface. For concrete, remove high spots and leftover glue according to the flooring manufacturer’s instructions. The goal is not to make the subfloor beautiful; it is to make it clean, dry, flat, and ready for the next material.
Step 8: Inspect and Repair the Floor Before Installation
With the room stripped, inspect the subfloor. Look for squeaks, loose panels, rot, stains, cracks, uneven seams, and damaged areas. This is your best chance to fix problems before they are covered again. Drive screws into loose plywood where appropriate, replace damaged sections, and level uneven spots based on the flooring you plan to install.
If you are installing vinyl plank or laminate, check the flatness requirements from the manufacturer. Many floating floors require the subfloor to stay within a specific tolerance over a set distance. If the floor has dips or ridges, deal with them now. New flooring is not a magic blanket; it will not hide everything.
Common Mistakes to Avoid
Skipping Protective Gear
Old carpet contains dust, allergens, pet dander, debris, and sometimes mold. Gloves, eye protection, and a mask are not overkill. They are the difference between a productive Saturday and spending the evening wondering why your nose feels like a dusty attic.
Cutting Carpet From the Fuzzy Side
Cutting from the top can snag fibers and dull your blade faster. Pull the carpet back and cut from the backing side whenever possible. Replace blades often. A dull utility knife is more dangerous because it requires more force.
Leaving Staples Behind
Even a few leftover staples can interfere with new flooring. Check twice, vacuum twice, and inspect with good lighting. If you are refinishing hardwood hidden beneath carpet, staple removal becomes even more important because careless pulling can gouge the wood.
Forgetting Disposal Rules
Carpet disposal rules vary by city, hauler, and landfill. Some areas require carpet rolls to be cut to a certain length, tied, or scheduled for bulk pickup. Before you stack rolls at the curb, check local waste guidelines. Nobody wants a rejected pile of carpet rolls giving the house “abandoned bowling alley” energy.
Removing Carpet From Stairs
Stairs require extra patience because they have more staples, more edges, and less room to work. Start at the top or bottom depending on how the carpet is installed. Cut manageable sections, pull carefully, and watch for staples along stair treads, risers, and nosing. Use pliers and a small pry bar rather than swinging large tools in tight spaces.
If you plan to stain or paint the stair treads, remove staples gently and fill holes as needed. Sand only after confirming there are no hazards from old adhesive or flooring materials. Stair carpet removal can be tedious, but the reveal is often satisfyingunless you discover 1970s orange paint underneath, in which case congratulations, you have met history.
How Long Does Carpet and Staple Removal Take?
A small bedroom may take a few hours. A larger room, hallway, or stairway can take most of a day, especially if there are many staples or glued padding areas. The carpet itself usually comes up quickly; staple removal and cleanup take the time.
Professional carpet removal typically costs by the square foot and may include labor, hauling, and disposal. DIY removal can save money, especially if you are comfortable with basic tools and have a disposal plan. However, hiring a pro makes sense for large areas, glued-down carpet, heavy furniture, stairs, suspected mold, or possible asbestos-containing materials.
Best Tips for Faster Staple Removal
Good lighting makes staple removal faster. Use a work light angled low across the floor so staples cast shadows. Sweep loose padding first because foam crumbs can hide staple crowns. Work in sections instead of wandering randomly. Keep a small container nearby for pulled staples so they do not end up in shoes, tires, or paws.
If staples are stuck in hardwood you want to save, use slow, controlled movements. Place a thin putty knife under your tool if you need to protect the wood surface. If the staple snaps, use needle-nose pliers or end nippers to grab the remaining leg. Take breaks. Staple removal uses small muscles in your hands, and those muscles will absolutely file a complaint.
Experience Notes: What Removing Old Carpet Really Feels Like
Here is the honest, experience-based version: removing old carpet is not technically hard, but it is messier and more physical than most people expect. The first few minutes feel heroic. You pull up a corner, the carpet releases from the tack strip, and you think, “Why do people hire professionals for this?” Then you roll your first strip and realize carpet has the density of a sleepy bear.
The biggest practical lesson is to keep everything small. Small cuts, small rolls, small work zones, small piles of debris. When people try to pull the whole room at once, the job becomes chaotic. The carpet folds over itself, the padding tears everywhere, and someone usually ends up trapped in a dusty fabric taco. Cutting the carpet into strips may feel slower at first, but it makes carrying, taping, and disposal much easier.
Another lesson: staples are not a side quest. They are the main boss. You may remove the carpet in twenty minutes and spend two hours pulling staples. That is normal. A long-handled scraper is great for speed, but it will not get every staple. End-cutting pliers are worth having because they grip low and pull cleanly. A flathead screwdriver is still useful for staples that sit sideways, sink into plywood, or hide under bits of foam.
Good knee pads make a bigger difference than most tools. So does a bright work light. Staples are hard to see when they blend into plywood or old padding dust. Shine light across the floor instead of straight down, and the metal pieces become easier to spot. Keep a magnet or small cup nearby for collected staples. The only thing worse than pulling staples is stepping on one you already pulled.
Disposal planning also matters. Carpet rolls look innocent until you have ten of them leaning against the garage wall. Tape each roll tightly, check local pickup rules, and avoid making rolls so large that one person cannot lift them. If you are working alone, carry fewer pieces more often. Your back is not impressed by efficiency theater.
Finally, expect surprises. You may find beautiful hardwood, stained plywood, mystery glue, pet damage, squeaks, or old floor vents full of dust from another era. Do not rush past those discoveries. The best part of removing carpet is that it gives you a rare look at what is happening under your floor. Fixing squeaks, cleaning debris, and pulling every staple may not be glamorous, but it sets up the next floor to look better and last longer.
Conclusion
Removing an old carpet and staples is a manageable DIY project when you approach it in the right order: prepare the room, cut carpet into strips, roll and tape each section, remove padding, pull every staple, deal with tack strips, clean the subfloor, and inspect for repairs. The job is dusty, awkward, and occasionally annoying, but it is also satisfying. Few home projects deliver such an instant transformation for the cost of blades, tape, gloves, and determination.
The key is not speed; it is control. Work in sections, protect yourself, handle mold or asbestos concerns responsibly, and do not skip subfloor prep. A smooth, clean, staple-free floor is the foundation for whatever comes nextnew carpet, hardwood, vinyl plank, laminate, tile, or simply the joy of knowing the old carpet is finally gone.