
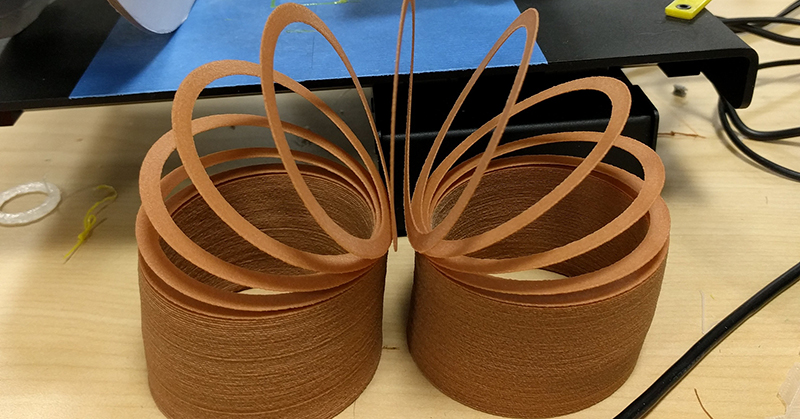
Somewhere between a childhood toy box and a desktop fabrication lab, a tiny miracle has happened: we can now 3D print Slinkys. Yes, the same springy, stair-walking coil that has been mesmerizing children, adults, engineers, cats, and mildly bored office workers for generations can now come off a 3D printer bed instead of a factory coiling machine. It is silly. It is clever. It is deeply unnecessary in the best possible way.
But the idea is also more interesting than it sounds. A 3D printed Slinky is not just a novelty object for people who enjoy making their printer suffer politely at 2 a.m. It is a surprisingly good example of how far consumer 3D printing has come. To print a working Slinky, a machine has to manage geometry, material behavior, clearance, flexibility, layer control, and print path planning. In other words, it is a toy-shaped engineering exam.
The classic Slinky was invented in the 1940s after engineer Richard James noticed that a spring could “walk” when it fell and transferred energy from coil to coil. The original toy depended on carefully formed steel wire, gravity, momentum, and just the right amount of springiness. A 3D printed Slinky has to imitate that behavior using plastic, layer-by-layer deposition, and a design that does not accidentally weld itself into a sad plastic bracelet.
That challenge is exactly what makes it fun. When 3D printing works well, it feels like a superpower. When it fails, it feels like a toaster with trust issues. The printed Slinky sits right in the middle: playful enough to make people smile, technical enough to make makers obsess over nozzle size, filament choice, extrusion width, and whether the coil spacing is generous enough to survive the first peel from the build plate.
Why a 3D Printed Slinky Is Such a Big Little Deal
At first glance, printing a Slinky sounds simple. It is just a spiral, right? A coil. A spring. A noodle with ambition. But a real Slinky is not simply a shape. It is a moving mechanical system. Each loop must behave as part of a flexible chain. The coils need to separate, compress, slide, and rebound without sticking together. That means a 3D printed version has to be designed not only to look like a Slinky but to act like one.
Most FDM 3D printing relies on layer adhesion. The printer lays down melted thermoplastic, and each new line fuses to the material below it. Strong layer bonding is usually a sign of a good print. A Slinky flips that logic on its head. The coils must remain distinct, so the model has to preserve intentional gaps. If those gaps are too small, the result is a fused cylinder. If they are too large, the toy may lack the tension and bounce that make it satisfying.
This is where the magic happens. Designers have to balance coil thickness, helix pitch, material stiffness, and print orientation. The printed object must be flexible but not floppy, strong but not rigid, light but not fragile. That is a lot of pressure for something whose main job is to fall down stairs with style.
A Quick Bounce Through Slinky History
The Slinky began as an accident, which is how many of the best inventions start, usually right after someone says, “Well, that was weird.” In 1943, Richard James was working with springs for naval equipment when one fell and appeared to step downward instead of simply dropping. He and his wife, Betty James, later turned that observation into a toy. Betty also gave the Slinky its memorable name, choosing a word that suggested smooth, graceful movement.
When the Slinky was demonstrated at Gimbels department store in Philadelphia in 1945, shoppers understood the appeal immediately. Hundreds sold in a short time, proving that people will absolutely buy a spring if it walks down a ramp in public. The toy went on to become one of the most recognizable American playthings of the twentieth century, later earning a place in toy-history collections and the National Toy Hall of Fame.
The traditional Slinky is made from metal wire wound into a precise helical spring. Later plastic versions added color and a softer feel, but the essential concept stayed the same: a coil that stores and releases energy in a visible, rhythmic way. The Slinky is physics in its most charming outfit.
How 3D Printing Changes the Slinky
Traditional manufacturing makes a Slinky by forming wire or plastic into a continuous spring. 3D printing approaches the problem differently. Instead of bending a material into shape, the printer builds the shape from scratch. That allows makers to experiment with coil geometry in ways that would be difficult or expensive with conventional tooling.
A 3D printed Slinky can be made wider, taller, chunkier, flatter, glow-in-the-dark, translucent, rainbow-colored, or customized with decorative details. A designer can change the pitch of the coil, vary the wall thickness, add textures, or create versions that behave more like fidget toys than classic stair-walkers. The result may not replace the factory-made Slinky, but it expands the idea of what a Slinky can be.
This is one of the biggest strengths of additive manufacturing. 3D printing is not always the fastest or cheapest way to make simple mass-produced objects. A factory can still produce thousands of identical toys more efficiently than a hobby printer. But 3D printing shines when the goal is customization, iteration, experimentation, or making one odd little thing because your brain whispered, “What if?”
The Materials That Make It Possible
Material choice matters. A Slinky needs flexibility and resilience, so common rigid filaments such as PLA can be tricky. PLA is easy to print and great for decorative models, but it tends to be stiff. A PLA Slinky may look fantastic and still move like a spring that forgot its résumé.
PETG offers more toughness and a little more flexibility, making it a useful middle ground for some coil designs. TPU, a flexible filament, is often the most natural candidate for springy printed toys. TPU can bend, stretch, and recover better than many rigid plastics, which makes it popular for phone cases, gaskets, flexible hinges, wearable parts, and impact-resistant components.
However, TPU has a personality. It can absorb moisture from the air, print slowly, string between travel moves, and behave badly in printers that are not tuned for flexible filament. Printing TPU is a bit like walking a very enthusiastic puppy on a loose leash: possible, rewarding, but not something to rush.
For a printed Slinky, the best material depends on the desired behavior. A decorative desk toy might print beautifully in PLA. A fidget-friendly coil may work better in PETG. A flexible, compressible, playful version may call for TPU or another elastomeric material. The printer, slicer settings, model design, and user patience all join the committee.
Why Coil Geometry Is Everything
The secret of a working Slinky is not just the material. It is the relationship between the coils. The height of each loop, the distance between loops, the diameter of the spring, and the cross-section of the printed strand all affect how the toy behaves.
If the coil is too thick, it may become too heavy or stiff. If it is too thin, it may snap, sag, or deform. If the gap between coils is too narrow, adjacent loops can fuse during printing or stick during movement. If the gap is too wide, the spring may lose its satisfying compression. The sweet spot lives somewhere between “beautifully springy” and “congratulations, you printed a pasta accident.”
Print orientation also matters. A vertical helix may look natural, but the printer must handle continuous curves, overhangs, and layer transitions. Some designs rely on careful spacing so each loop prints cleanly without support material. Supports can be a problem because removing them from a delicate coil is the kind of task that makes grown adults stare silently into the middle distance.
Print-in-Place Design and the Art of Not Sticking
A 3D printed Slinky belongs to the broader world of print-in-place objects. These are models that come off the printer already assembled or mechanically functional. Hinges, chains, articulated dragons, collapsible swords, and flexi animals all use carefully planned clearances so moving parts do not fuse together.
The Slinky is a particularly elegant version of this idea because its entire function depends on separation. Every coil is part of the same object, but each loop must still have enough freedom to move. That means the designer must think like both a sculptor and a mechanical engineer. The shape has to be attractive, printable, and functional.
In practical terms, that often means testing. A maker may print a short sample coil before committing to a full-size Slinky. They may adjust extrusion width, temperature, cooling, flow rate, and horizontal expansion. They may also test different filament brands because two spools labeled the same material can behave differently. In 3D printing, “same material” can sometimes mean “cousins who do not speak at family gatherings.”
What a 3D Printed Slinky Teaches About Modern Making
The printed Slinky is a great example of how desktop fabrication turns ordinary objects into learning opportunities. A child sees a toy. A maker sees a geometry challenge. A teacher sees a physics demonstration. An engineer sees a spring system with nonlinear deformation. A 3D printer sees a chance to clog five minutes before bedtime.
In classrooms, a 3D printed Slinky can introduce students to force, gravity, elasticity, momentum, resonance, and material science. It can also teach design iteration. Students can compare a rigid printed version with a flexible one, test different coil diameters, measure how far each version stretches, and observe how materials store and release energy.
For hobbyists, the project teaches practical 3D printing lessons. It shows why clearance matters, why flexible materials need different settings, and why a beautiful model is not automatically a functional model. It also proves that toys can be serious teaching tools without becoming boring. The Slinky has always been a physics lesson disguised as a tiny metal staircase goblin.
Can a 3D Printed Slinky Walk Down Stairs?
This is the big question. Can a 3D printed Slinky actually do the classic stair-walking trick? The honest answer is: sometimes, depending on the design, material, scale, and stairs. A factory-made metal Slinky has decades of refinement behind it. Its weight, coil count, wire diameter, and spring behavior are tuned for that familiar end-over-end motion.
A 3D printed version may behave differently. It might bounce, flop, stretch, compress, or tumble rather than walk smoothly. Larger coils may move more dramatically, while smaller ones may work better as fidget toys. TPU versions may feel fun in the hand but lack the precise snap of steel. Rigid plastic versions may hold their shape but struggle to flow from step to step.
That does not make the printed version a failure. It makes it an experiment. The joy is in tuning the design and watching small changes create different behavior. A printed Slinky may not outperform the original, but it can become something more personal: a custom spring toy that exists because someone asked a delightfully impractical question and then made the machine answer.
Customization: The Superpower Factory Slinkys Never Had
The classic Slinky is iconic because it is simple. The 3D printed Slinky is exciting because it can be customized. Want a tiny desk Slinky? Print one. Want a giant coil for a science fair demonstration? Scale the model carefully and prepare to explain why the printer has been humming for half the day. Want glow-in-the-dark filament, silk rainbow colors, or translucent TPU? Go for it.
Customization also opens the door to branded, educational, or artistic versions. A school could print Slinkys in team colors. A maker could create a coil with alternating color segments using a multi-material printer. A designer could produce a sculptural Slinky that doubles as a kinetic desk object. Someone, somewhere, is probably already considering an LED Slinky, because makers cannot leave anything unlit for long.
This is where 3D printing becomes more than reproduction. It becomes reinterpretation. The goal is not merely to copy the original toy. The goal is to explore what happens when a familiar object becomes editable.
The Limitations: Because Physics Still Has a Clipboard
As fun as 3D printed Slinkys are, they do have limitations. Printed plastics do not behave exactly like spring steel. Layer lines introduce anisotropy, meaning the object may be stronger in one direction than another. Flexible filaments can fatigue over time. Thin coils can break. Large prints can take hours. Failed prints can look like a robotic spider tried to knit.
There is also the issue of surface finish. A metal Slinky has smooth wire that slides easily against itself. A printed coil may have tiny ridges from the layer lines. Those ridges can add friction, changing how the coils move. Slicer settings, nozzle quality, and material choice all affect the final feel.
Still, these limitations are part of the appeal. The printed Slinky is not perfect, and that makes it interesting. It invites experimentation. It rewards small improvements. It gives makers a reason to learn more about design for additive manufacturing while pretending they are just making a toy. This is the best kind of educational trickery.
Why This Matters Beyond Toys
A 3D printed Slinky may seem like a novelty, but the same principles apply to serious products. Flexible printed structures are used in robotics, wearables, soft grippers, protective parts, vibration-damping components, and custom medical or ergonomic devices. Coil-like geometries, lattices, and compliant mechanisms can create movement without traditional assembly.
That is a major theme in modern additive manufacturing. Designers are learning to create objects that get their function from geometry as much as from material. A spring does not have to be metal if the shape and material work together. A hinge does not have to contain a pin if the body can flex. A cushion does not need foam if a printed lattice can compress and rebound.
The Slinky is a friendly doorway into that larger idea. It shows how shape creates behavior. It shows how manufacturing methods influence design. It shows that a simple coil can teach lessons that apply to advanced engineering. Not bad for a toy that mainly wants to fall down stairs.
Experiences With 3D Printed Slinkys: What It Feels Like to Make One
The first experience of printing a Slinky is usually optimism. You load the model, slice it, preview the toolpath, and think, “This looks easy.” That is how the printer gets you. The first few layers go down nicely, the coil begins to form, and you start imagining yourself as a small-scale toy manufacturer with excellent taste. Then one section curls slightly, a strand gets too close to its neighbor, or the filament strings across the gap like a tiny plastic spiderweb. Suddenly, the humble Slinky has become a negotiation.
Removing the print from the bed is its own little ceremony. A rigid model can be popped off without much drama, but a flexible coil asks for patience. Pull too quickly and you may stretch or deform it. Lift too aggressively and one delicate section may complain permanently. The best approach is slow, careful, and slightly reverent, as if you are rescuing a sleeping caterpillar from a glass table.
The first compression test is the moment of truth. A good printed Slinky gives a satisfying springy response. It may not have the crisp metallic snap of the original, but it has its own charm. TPU versions feel rubbery and playful. PETG versions can feel snappy but less forgiving. PLA versions often look the sharpest but may act more like decorative coils than real springs. Each material has a personality, and each one tells you something about the design.
Trying it on stairs is both thrilling and humbling. Sometimes it takes a step or two and then collapses sideways like it has remembered an appointment. Sometimes it rolls, tumbles, or performs a strange half-walk that still earns applause because expectations were already flexible. When it works, even briefly, the feeling is ridiculously satisfying. You made a machine print a toy that moves because gravity said so. That is a tiny victory, but tiny victories are the fuel of making.
The best part is how quickly the project turns into iteration. You start asking better questions. What if the coil were taller? What if the loop were thinner? What if the filament were softer? What if the print speed changed? What if the first version was not a failure but a prototype wearing a funny hat? That mindset is the real reward. A 3D printed Slinky teaches patience, curiosity, and the maker’s most important survival skill: laughing when the first attempt looks like modern art.
It is also a surprisingly social print. People understand it immediately. You do not have to explain what it is for. You hand it to someone, and they compress it, stretch it, smile, and usually ask whether it can go down stairs. That instant recognition makes it a great conversation piece. It connects old-school play with modern fabrication, turning nostalgia into something editable, printable, and wonderfully weird.
Conclusion
We can now 3D print Slinkys, and while that may not change civilization overnight, it says a lot about where desktop manufacturing is headed. The project combines toy history, material science, mechanical design, and the joy of making something just because it is possible. It reminds us that innovation does not always arrive wearing a lab coat. Sometimes it arrives as a bouncy coil of plastic that may or may not survive the staircase.
The original Slinky became famous because it made physics visible. The 3D printed Slinky continues that tradition in a new way. It makes design visible. It shows how digital models, materials, printer settings, and real-world testing come together. It proves that even familiar objects can become fresh again when we rebuild them layer by layer.
So yes, we can now 3D print Slinkys. Some will walk. Some will wobble. Some will fail in hilarious, educational ways. But all of them represent the same irresistible idea: when creativity meets a 3D printer, even a spring can get a second act.
SEO Tags
Note: This article is original, written in standard American English, and synthesized from real information about Slinky history, additive manufacturing, flexible filaments, print-in-place design, and maker experimentation.













