
If you have ever stared at your Illustrator file and thought, “Why is my design perfect but my artboard is acting like it pays rent by the square foot?” you are not alone. Changing artboard size in Adobe Illustrator sounds simple, but there are a few different ways to do it, and each one works best in a different situation. Sometimes you want to drag the edges quickly. Sometimes you need exact dimensions down to the pixel. And sometimes you just want Illustrator to stop being dramatic and fit the artboard to your artwork automatically.
This guide breaks down three ways to change artboard size in Adobe Illustrator in plain English, with specific examples, practical tips, and zero robotic filler. Whether you design logos, social media graphics, print materials, stickers, packaging, or digital ads, knowing how to resize an artboard properly can save time, reduce export mistakes, and keep your file organized.
Let’s clear up one important thing first: in Illustrator, the artboard is the working area that behaves like your page. It defines what gets exported, printed, or framed as the final design area. So if your artboard is too big, too small, or oddly shaped, your output can look messy even when your artwork itself is great.
Why Artboard Size Matters More Than People Think
A lot of beginners treat the artboard like wallpaper. It sits there in the background and seems harmless. But the truth is, artboard size affects several important parts of your workflow.
First, it affects export accuracy. If you export a PNG, JPG, or PDF and the artboard is much bigger than your design, you may get awkward white space around the edges. If the artboard is too tight, you may accidentally crop part of your work.
Second, it affects design planning. When you are building a YouTube thumbnail, Instagram post, flyer, poster, label, or business card, starting with the correct artboard size helps you design with the final format in mind. That means fewer surprises later and fewer moments of whispering “why is this off-center?” to your monitor.
Third, it affects multi-artboard organization. Illustrator is great for working with multiple artboards in one document. That is helpful when you are creating several ad sizes, logo variations, or print layouts in a single file. But if those artboards are not sized properly, your file can turn into a digital junk drawer.
Way 1: Resize the Artboard Manually With the Artboard Tool
This is the fastest and most visual method. If you want to change artboard size by dragging edges and corners, the Artboard Tool is your best friend.
When to Use This Method
Use this method when you want speed and flexibility. It is ideal for rough layout work, quick adjustments, or early-stage design when you are still deciding how much room your artwork needs.
How to Do It
- Select the Artboard Tool from the toolbar, or press Shift + O.
- Click the artboard you want to resize.
- Drag any side or corner handle to make the artboard larger or smaller.
- Press Esc when you are finished to exit artboard editing mode.
Why It Works Well
This method is quick because it lets you resize the artboard visually. You do not need to stop and think about exact numbers unless you want to. You can simply pull the edges until the artboard feels right.
For example, imagine you are creating a logo mockup and realize the artboard is too tight around the symbol and text. Instead of opening menus and typing dimensions, you can press Shift + O, drag the side handles outward, and give your artwork more breathing room in seconds.
Best Use Cases
- Adjusting space around a logo concept
- Expanding a social graphic layout
- Testing different crop areas visually
- Resizing artboards during early design exploration
Common Mistake to Avoid
The artboard changes size, but your artwork does not automatically scale with it. This is where many users get confused. They resize the artboard and expect the design to grow or shrink too. Illustrator usually treats the artboard as a boundary, not as a stretchy rubber sheet.
If you want the artboard and artwork to resize together, that is a separate option called Scale Artwork with Artboard. Think of it as the difference between resizing a picture frame and resizing the picture inside it.
Way 2: Change Artboard Size by Entering Exact Dimensions
If manual dragging is the fast-and-loose method, this is the clean-shirt, clipboard, exact-measurement method. When precision matters, you should resize the artboard by typing in a specific width and height.
When to Use This Method
Use this approach when you already know the final dimensions you need. It is perfect for print work, social media formats, ad specs, web graphics, packaging layouts, and anything else where “close enough” is not actually close enough.
How to Do It in the Properties Panel
- Open Window > Properties if the Properties panel is not visible.
- With nothing selected, click Edit Artboards.
- Click the artboard you want to resize.
- Enter new values in the W (width) and H (height) fields.
- Press Enter to apply the new size.
How to Do It With Artboard Options
- Select the Artboard Tool.
- Double-click the artboard.
- In the Artboard Options dialog box, enter your desired width and height.
- Choose orientation if needed.
- Use the reference point grid if you want the artboard to grow from a specific anchor point.
- Click OK.
Why This Method Is So Useful
This is the best way to get exact output sizes. Let’s say you need an Instagram portrait post at 1080 x 1350 px. Or maybe you need a U.S. letter flyer at 8.5 x 11 inches. Typing exact values removes guesswork and gives you a cleaner workflow.
It also helps when clients send strict size specs. If a client says, “Please deliver a 300 x 250 banner, a 728 x 90 leaderboard, and a 1080 x 1920 story graphic,” this method helps you hit the target without squinting at the screen and hoping your drag movement was blessed by the pixel gods.
Why the Reference Point Matters
The reference point controls where the artboard expands or contracts from. For example, if the top-left reference point is active, Illustrator will treat that corner like the anchor while resizing. That can be useful when your artwork is aligned to a certain edge and you do not want the artboard shifting unpredictably.
This sounds like a tiny detail, but it can be a lifesaver in production work. One small click in the reference point grid can save you from having to reposition everything afterward.
Best Use Cases
- Business cards, postcards, flyers, and posters
- Social media templates with platform-specific dimensions
- Web banners and display ads
- Packaging designs and label layouts
- Client projects with strict delivery specs
Way 3: Fit the Artboard to Your Artwork Automatically
This method is the closest thing Illustrator has to reading your mind. If your design is already finished and you want the artboard to wrap tightly around it, use the automatic fit commands.
When to Use This Method
Use this when the artwork already exists and the artboard is the wrong size. It is especially useful for logos, icons, stickers, product graphics, and exported assets where you want the boundaries to match the artwork more closely.
How to Fit the Artboard to Selected Art
- Select the artwork you want the artboard to match.
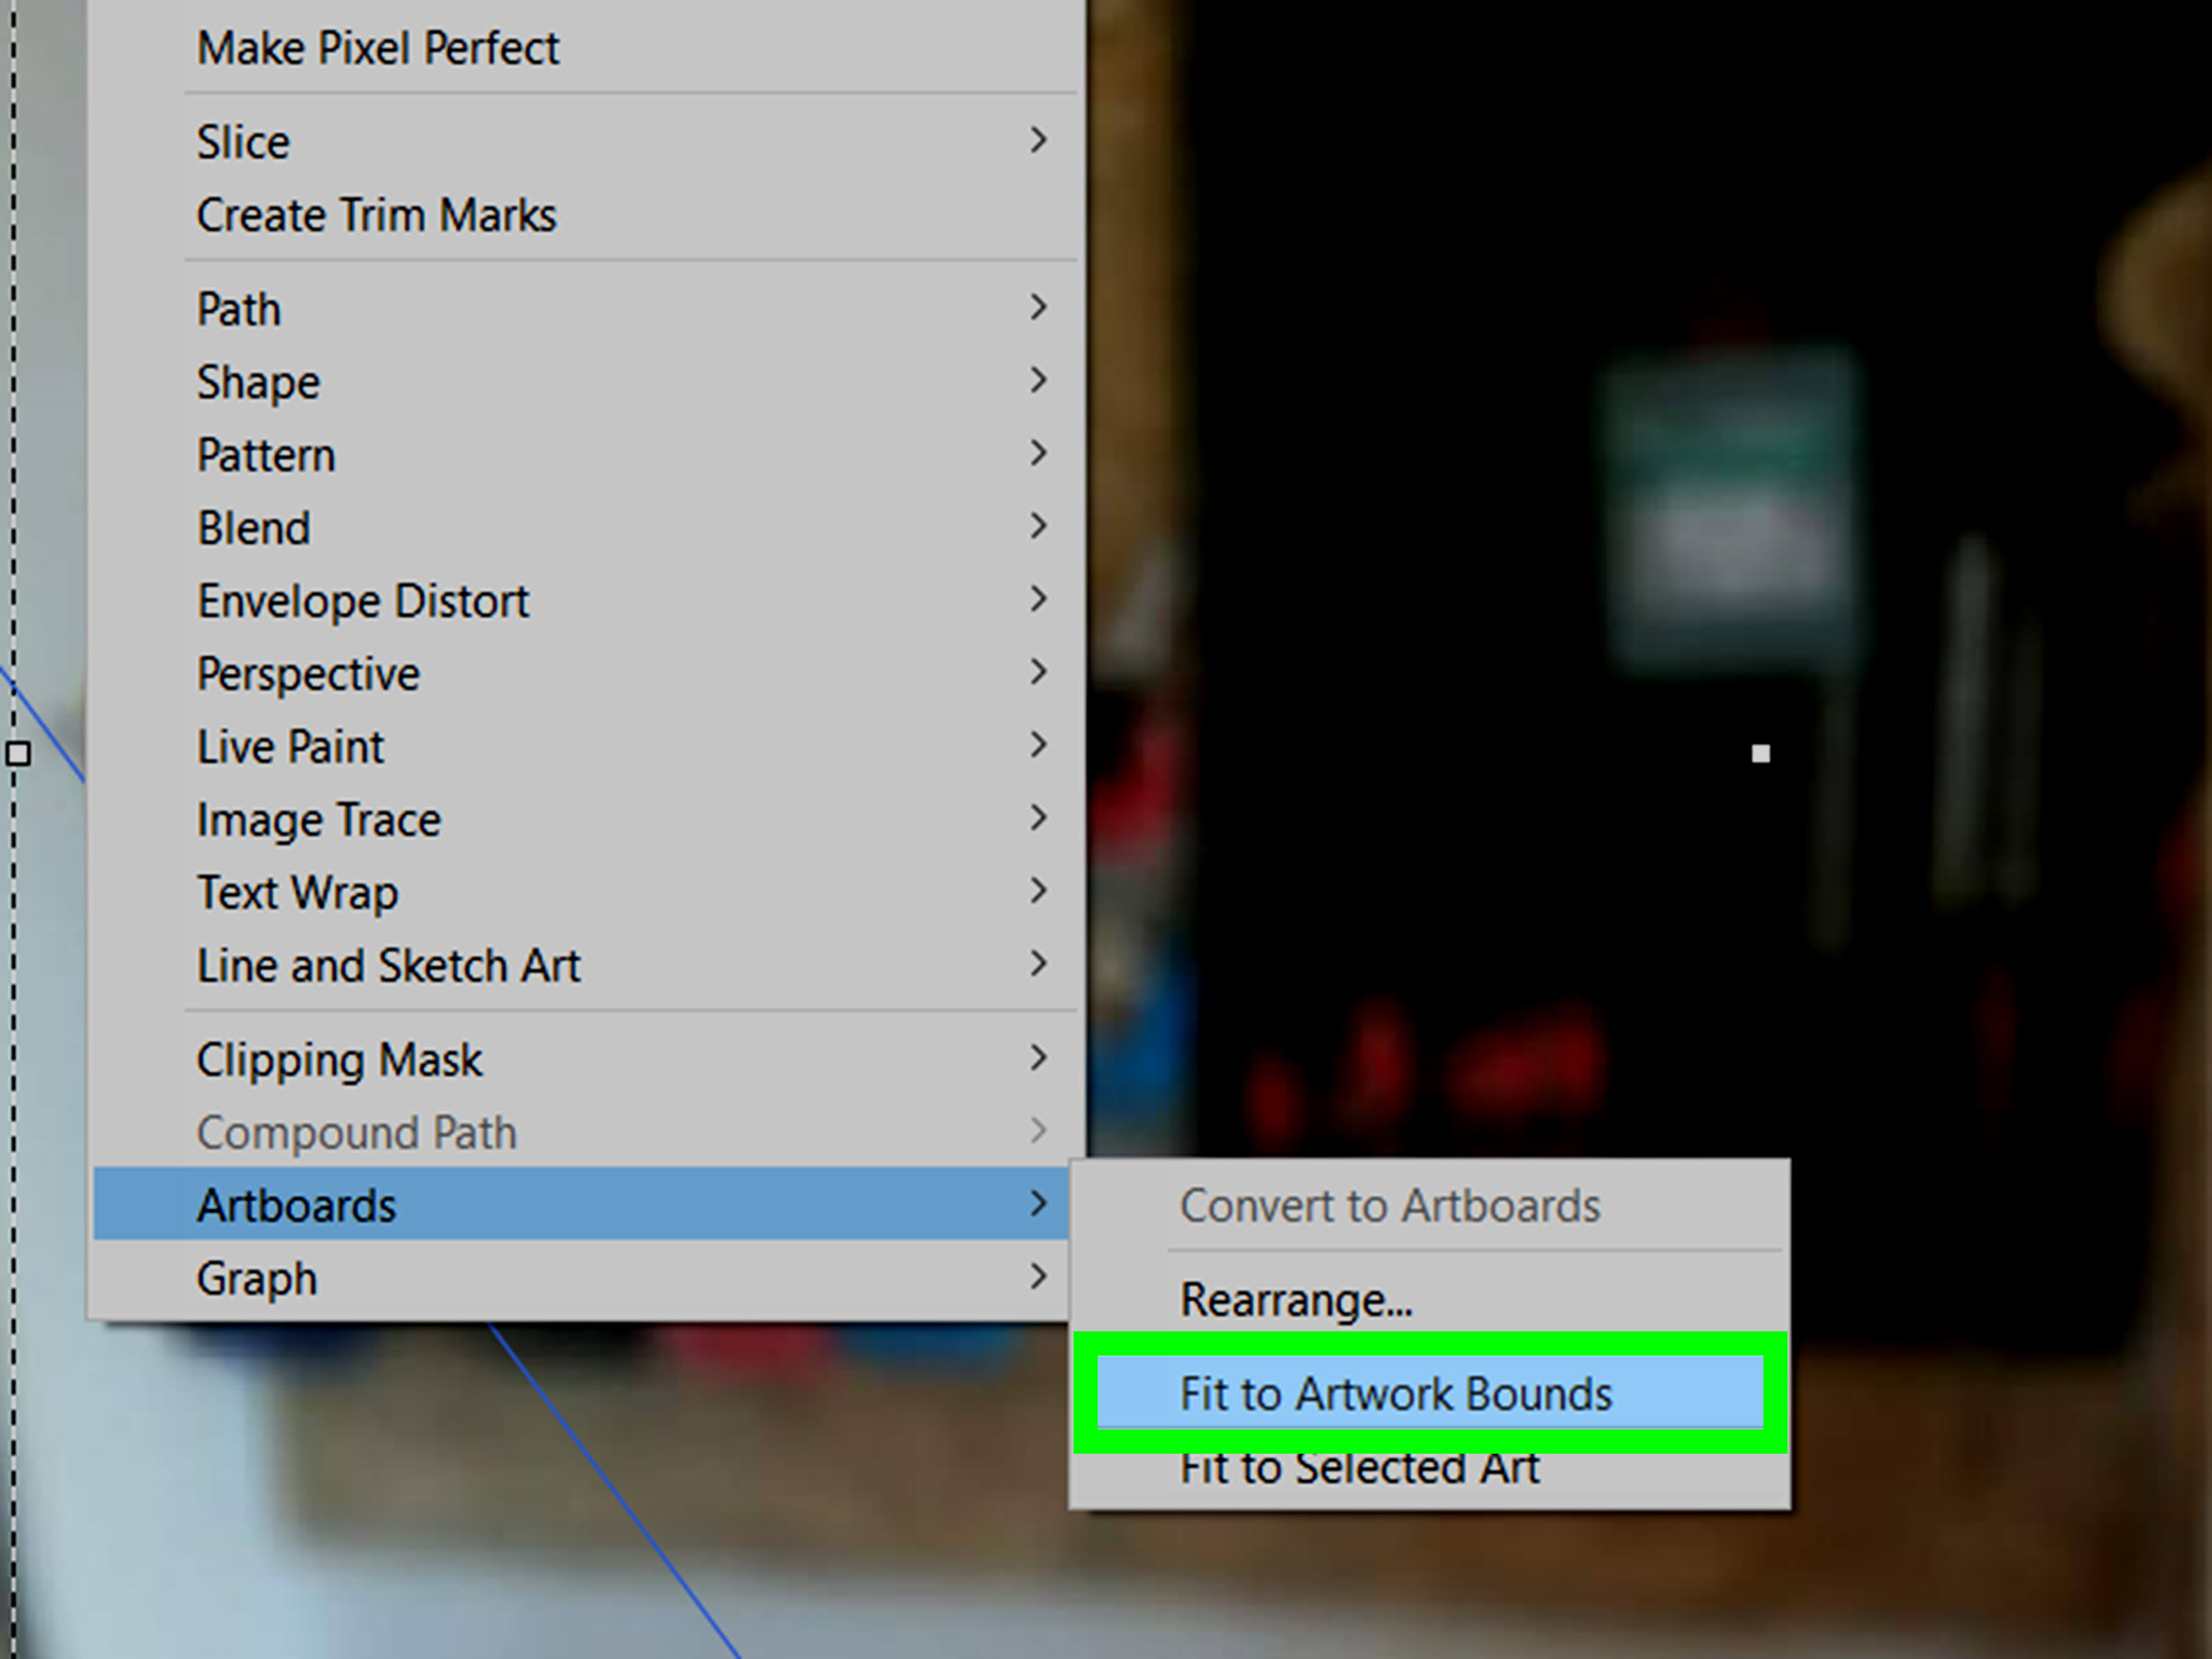
- Go to Object > Artboards > Fit to Selected Art.
- Illustrator will resize the artboard so it fits the selected artwork.
How Fit to Artwork Bounds Differs
If you use Fit to Artwork Bounds, Illustrator fits the artboard around the artwork bounds of the selected artboard. In practical terms, this is useful when you want the artboard to hug the artwork that belongs to that artboard rather than manually adjusting the edges yourself.
Why This Method Is Great
This is the easiest way to clean up a file before exporting. Suppose you designed a logo in the middle of a giant artboard and now want to export a compact SVG or PNG. Instead of dragging the edges manually or typing new dimensions, you can select the logo and fit the artboard to it instantly.
That is a major time-saver when you are preparing multiple assets. It also reduces accidental empty margins that can make exported graphics look sloppy.
Best Use Cases
- Logos and icon sets
- Sticker and decal artwork
- Exporting clean assets for web or app use
- Trimming unnecessary blank space before saving or exporting
A Practical Warning
Be careful about what you have selected. Hidden details, stray points, clipping masks, or objects sitting far outside your visible design can affect the result. If the artboard suddenly becomes much larger than expected, you may have extra objects somewhere in the file.
This is one of Illustrator’s favorite pranks. The design looks perfectly normal, but one invisible object a mile away decides it is part of the family.
Bonus Tip: Use “Scale Artwork with Artboard” When You Need Everything to Resize Together
Although this article focuses on changing artboard size, there is one extra feature worth knowing: Scale Artwork with Artboard. This option lets you resize the artboard and have the artwork scale proportionally with it.
This is especially useful when you already have a complete design and need to resize the whole composition to a different format while maintaining proportions. For example, you might have built a square promotional graphic and want to scale it down into a smaller version without manually resizing every object inside.
Just remember that this is not always the best solution for every layout. Some designs need thoughtful reformatting, not just scaling. Text-heavy layouts, for instance, may need spacing adjustments rather than simple uniform shrinkage.
Which Method Should You Choose?
If you are in a hurry and want a visual adjustment, use Way 1. If you need accuracy and professional specs, use Way 2. If your artwork is finished and you want the artboard to snap neatly around it, use Way 3.
Here is the simple version:
- Way 1: Best for fast manual resizing
- Way 2: Best for exact dimensions and production work
- Way 3: Best for matching the artboard to existing artwork
Professional Illustrator users usually switch between all three depending on the project. That is not inconsistency. That is just good workflow.
Common Problems When Changing Artboard Size
The Artboard Changes, but the Artwork Does Not
That is normal. Resize the artwork separately, or turn on Scale Artwork with Artboard if that is the effect you want.
The Export Has Too Much White Space
Your artboard is probably larger than your artwork. Use Fit to Selected Art or resize the artboard manually.
The Artboard Resized Wrong
Check for hidden objects, stray anchor points, clipping masks, or items far outside the visible design area.
The Dimensions Keep Shifting in a Weird Direction
Pay attention to the reference point in the Properties panel or Artboard Options. It determines how the artboard expands or contracts.
Final Thoughts
Learning how to change artboard size in Adobe Illustrator is one of those small skills that quietly improves everything else. It helps your exports look cleaner, your layouts feel more intentional, and your files stay organized instead of turning into a maze of mystery margins.
The beauty of Illustrator is that it gives you more than one way to solve the problem. You can resize an artboard manually with the Artboard Tool, enter exact dimensions for precision, or let Illustrator fit the artboard to your artwork automatically. Once you get comfortable with these three methods, you will spend less time fighting the workspace and more time designing.
And honestly, that is the dream. Fewer clicks, fewer weird exports, fewer moments of yelling “why is there extra space?” at a perfectly innocent PDF.
Experience and Practical Lessons From Real Illustrator Workflow
In real-world design work, changing artboard size is not just a beginner trick or a tiny technical task. It comes up constantly. One day you are designing a logo and need the artboard to fit tightly for an SVG export. The next day you are building social media ads and need five versions of the same design in five different dimensions. Then suddenly a client wants a print flyer, an Instagram Story, and a web banner from the same concept, and your artboard strategy becomes the difference between a smooth workflow and a long afternoon.
One of the most useful habits is starting rough and finishing precise. During the concept stage, many designers use the Artboard Tool to resize manually. It is fast, visual, and lets you think creatively without getting trapped in technical details too early. Once the layout is approved, that is the moment to switch to exact dimensions in the Properties panel or Artboard Options. This two-step approach feels natural because it matches the design process itself: first explore, then refine.
Another practical lesson is that oversized artboards can hide problems. A design may look centered and balanced on screen, but if the artboard is too large, the exported file can feel awkward. This happens often with logos and transparent PNGs. The graphic looks fine in Illustrator, but once exported, there is a giant empty moat around it. That is usually a sign that the artboard was never fitted correctly. Using Fit to Selected Art near the end of the project can clean this up quickly.
There is also a strong productivity angle. Designers who work on ad campaigns, presentation graphics, or e-commerce images often keep multiple artboards in one document. That is efficient, but only if the artboards are sized deliberately. When each artboard matches its intended output, the file becomes easier to navigate and export. When artboards are random sizes left over from earlier experiments, the whole document starts to feel chaotic.
Perhaps the biggest takeaway is this: changing artboard size is really about controlling output. It is not just about what looks good on the canvas. It is about what gets exported, shared, printed, and delivered. Once you understand that, resizing artboards stops feeling like a small setting and starts feeling like part of professional design thinking. And that is when Illustrator gets a lot less annoying and a lot more useful.














