
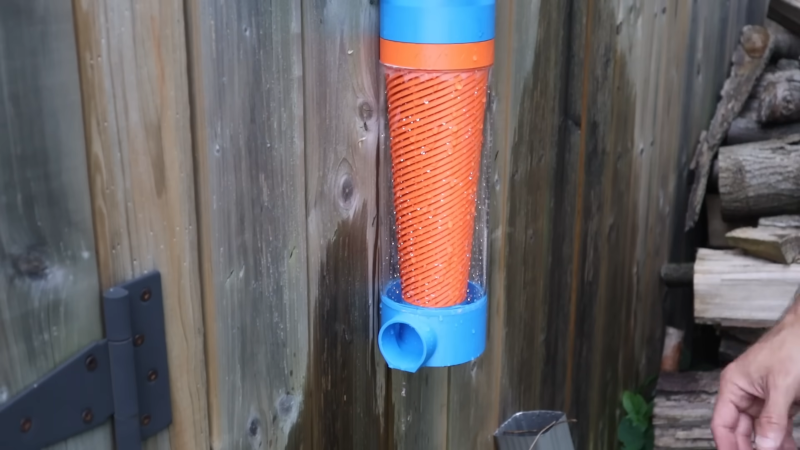
Note: This article is written for educational and editorial publication purposes. A 3D-printed water filter prototype should not be treated as a certified drinking-water purifier unless its materials, performance, and contaminant-reduction claims have been independently tested to recognized standards.
Introduction: When 3D Printing Meets the Kitchen Sink
3D printing a self-cleaning water filter sounds like something a wildly optimistic engineer would sketch on a napkin after drinking too much coffee. Yet the idea is not science fiction. Additive manufacturing is already being explored for water-treatment parts, membrane spacers, porous structures, industrial filtration cartridges, microfluidic channels, and experimental filter housings. The magic is not that a desktop printer suddenly turns muddy water into mountain spring perfection. The real breakthrough is design freedom: 3D printing lets makers build internal channels, swirl chambers, replaceable cartridges, baffles, backwash paths, and turbulence-promoting geometries that are difficult or expensive to manufacture with conventional methods.
A self-cleaning water filter, in simple terms, is a filter designed to fight clogging. Instead of waiting until sediment, biofilm, minerals, and gunk throw a tiny retirement party inside the cartridge, the system uses flow patterns, flushing, backwashing, vibration, air purging, hydrophilic surfaces, or removable pre-filter chambers to keep the filter working longer. In professional water treatment, fouling is one of the biggest headaches. In home projects, it is also the reason many DIY filters start strong and then slowly become sad plastic paperweights.
The best use of 3D printing is not to replace proven filtration media such as activated carbon, ceramic membranes, hollow fiber membranes, or reverse osmosis elements. Instead, 3D printing can create smarter housings and flow paths around those media. Think of it as building the stage, not pretending the stage is the rock star. A well-designed 3D-printed self-cleaning water filter may include a sediment trap, a swirl separator, a removable mesh screen, a backwash valve, a replaceable carbon chamber, and a final polishing cartridge. That combination can make filtration more efficient, more repairable, and, frankly, a lot more fun than buying another anonymous plastic tube online.
What Is a 3D-Printed Self-cleaning Water Filter?
A 3D-printed self-cleaning water filter is a water-filter assembly in which one or more structural components are made with additive manufacturing. The printed parts may include the outer housing, inlet and outlet adapters, internal baffles, mesh holders, turbulence promoters, cartridge frames, sediment collectors, or backwash channels. The “self-cleaning” function usually comes from the design of the water path, not from a magical material that politely washes itself while you make lunch.
There are several realistic designs. A basic version uses a printed swirl chamber that spins incoming water so heavier particles collect at the bottom. A more advanced version uses crossflow filtration, where water moves tangentially across a membrane surface, reducing the buildup of particles directly on the membrane. Another design adds a flush valve so collected sediment can be dumped without disassembling the entire filter. In membrane systems, 3D-printed spacers can be shaped to create controlled turbulence, which helps reduce dead zones and slows fouling.
The key point is that 3D printing allows geometry to do useful work. Traditional filters often rely on straight tubes, simple grids, or molded parts that are cheap to manufacture at scale. A 3D printer, however, can produce spiral channels, lattice supports, angled vanes, honeycomb structures, and custom-fit cartridge sleeves. Those shapes can guide water, increase surface contact, reduce pressure loss, and make cleaning easier.
Why Self-cleaning Matters: The War Against Filter Gunk
Every water filter has an enemy: fouling. Fouling happens when suspended solids, organic matter, microbes, minerals, oils, or scale accumulate on the filter surface or inside the pores. It reduces water flow, increases pressure demand, shortens filter life, and makes the system harder to maintain. In other words, fouling is the villain wearing a tiny cape made of sludge.
Professional filtration systems deal with fouling through backwashing, chemical cleaning, pre-treatment, turbulence, periodic flushing, and membrane replacement. The same principles can inspire smaller 3D-printed designs. For example, if a filter is built with a removable sediment cup, the dirtiest material can be separated before it reaches the fine filter media. If the inlet creates a vortex, heavier grit can fall out of suspension earlier. If the filter includes a reverse-flow path, users can flush trapped particles away from the membrane or screen.
Self-cleaning does not mean zero maintenance. A more honest phrase would be “maintenance-friendly and clog-resistant,” but that does not look as exciting on a project title. Even the best design still needs periodic inspection, media replacement, and sanitation. However, a smart self-cleaning layout can extend service intervals and prevent the classic DIY mistake: building a filter that works beautifully for ten minutes and then slows down like a sleepy garden hose.
How 3D Printing Improves Water Filter Design
1. Custom Flow Channels
Water filtration is not just about what water passes through; it is also about how water moves. Poorly designed channels create stagnant zones where particles settle and microbes can grow. 3D printing lets designers create curved, tapered, or spiral channels that manage flow more intentionally. A printed spiral inlet can create a cyclone effect. Angled vanes can push particles toward a sediment chamber. A widening chamber can slow water just enough to drop heavier debris before it reaches the fine filter.
2. Replaceable Modular Cartridges
One of the most practical advantages of 3D printing is modularity. A printed housing can be designed around replaceable filter media: activated carbon pellets, ceramic discs, stainless steel mesh, polypropylene felt, hollow fiber membranes, or commercially available cartridges. This approach avoids relying on printed plastic as the actual purification medium. The printed part becomes a reusable shell, while the media does the contaminant-reduction work.
3. Built-in Backwash Paths
Backwashing reverses water flow to push trapped particles away from the filter surface. In a 3D-printed system, designers can add a second channel, a diverter valve, or a removable cap that allows reverse flushing. This feature is especially useful for sediment screens and membrane supports. The trick is to design seals carefully, because water is extremely talented at finding tiny leaks and embarrassing your engineering confidence.
4. Turbulence Promoters and Static Mixers
Research on membrane filtration has shown that turbulence-promoting structures can reduce fouling by increasing shear near the membrane surface. 3D printing is a natural fit for these shapes because it can produce twisted tapes, helical inserts, lattice spacers, and custom mixer geometries. In a small water filter, a printed turbulence promoter can help keep particles moving instead of letting them settle permanently on the filter face.
5. Rapid Prototyping
Water-filter design benefits from iteration. Print a housing, test flow rate, discover a leak, say something unprintable, adjust the O-ring groove, and print again. Compared with injection molding, 3D printing makes it easier to test several versions quickly. Makers can experiment with inlet angles, chamber diameter, mesh placement, wall thickness, thread design, and drain-valve location without ordering expensive tooling.
Key Components of a Self-cleaning 3D-Printed Filter
Pre-filter Sediment Chamber
The first stage should handle large debris such as sand, rust flakes, silt, and visible particles. A clear or removable sediment chamber is useful because it lets users see when cleaning is needed. In a 3D-printed design, the chamber can be shaped like a cone or cylinder with a drain plug at the bottom. If the inlet enters tangentially, the water can spin, encouraging heavier particles to settle outward and downward.
Mesh or Screen Insert
A washable mesh screen is a practical self-cleaning feature. Stainless steel mesh, nylon mesh, or commercially made filter screens can be held in a printed frame. The printed part should not be too thin, because pressure and repeated cleaning can crack delicate layers. A removable screen also makes maintenance simple: unscrew the cap, rinse the mesh, reinstall it, and try not to drop the O-ring into the sink like a tiny rubber escape artist.
Activated Carbon Chamber
Activated carbon is widely used to reduce chlorine taste and odor, certain organic compounds, and some chemicals depending on the product and certification. A 3D-printed chamber can hold carbon granules or a carbon block, but the design must prevent channeling. Channeling happens when water finds an easy path through the media and avoids proper contact. Internal diffusers or perforated plates can distribute flow more evenly.
Membrane or Ceramic Stage
For finer filtration, a membrane or ceramic element may be added. This is where safety becomes serious. The printed housing may support the membrane, but the membrane itself should come from a known, tested source if the water is intended for drinking. A membrane can reduce bacteria or particles only if its pore size, sealing, pressure rating, and installation are correct. A tiny bypass gap can defeat the entire system, which is rude but physically accurate.
Flush Valve or Backwash Port
A self-cleaning filter should include a way to remove trapped debris. A bottom flush valve lets users purge sediment from the first chamber. A backwash port lets clean water reverse through the screen or membrane support. Even a simple threaded drain cap can make the difference between a reusable design and a gadget that becomes permanently disgusting after one camping trip.
Choosing Materials: Not All Filaments Belong Near Drinking Water
Material choice is one of the most important parts of 3D printing a water filter. Common filaments such as PLA, PETG, ABS, ASA, nylon, polypropylene, and resin all behave differently in water. PLA is easy to print but can soften under heat and may not be ideal for long-term wet use. PETG is more water-resistant and often used for practical prints, though food-contact safety depends on the specific filament, additives, printer conditions, and post-processing. ABS and ASA are tougher but may involve fumes during printing and are not automatically suitable for water contact. Resin prints can be highly detailed, but many photopolymer resins are not appropriate for drinking-water applications unless specifically rated and fully post-cured according to manufacturer guidance.
The phrase “food safe” also deserves caution. A filament spool marketed as food safe does not guarantee the final printed object is safe for drinking water. Layer lines can trap bacteria. Brass nozzles may contain trace lead. Pigments and additives may not be certified for water contact. Print settings can create micro-gaps. For non-potable prototypes, these risks may be acceptable. For drinking water, they are not details to shrug off.
For a safer prototype, use certified commercial filter media, avoid unknown additives, consider stainless steel hardware, design parts for easy cleaning, and keep printed components out of the final drinking-water path whenever possible. If the goal is serious potable use, third-party testing and recognized certification are not optional decorations; they are the adult supervision.
Design Example: A Practical 3D-Printed Self-cleaning Filter Layout
A useful prototype could be designed in four stages. First, water enters through a tangential inlet into a cylindrical swirl chamber. This creates a vortex that pushes heavier particles outward. At the bottom, a small threaded sediment cup collects grit and can be flushed through a drain valve. Second, water passes upward through a removable stainless steel mesh screen held in a printed cartridge frame. This screen catches remaining larger particles and can be rinsed or backwashed.
Third, the water enters a carbon chamber. Instead of dumping loose carbon into a random cavity and hoping for the best, the chamber uses perforated diffuser plates to spread water evenly across the media. A fine retaining mesh prevents carbon dust from escaping. Fourth, the water passes through a certified final cartridge or membrane element. The printed housing provides structure, but the contaminant-reduction performance comes from the tested media.
The self-cleaning function comes from three features: the swirl separator, the flushable sediment cup, and the backwash path for the mesh screen. The design may also include a transparent inspection window or a removable cap for cleaning. For extra nerd points, the inlet geometry can be printed in several versions and tested with dirty water containing measured amounts of sand or clay. The winning version is not the prettiest one; it is the one with the best flow rate, lowest clogging, and easiest cleaning.
How to Prototype the Filter Step by Step
Step 1: Define the Use Case
Before designing anything, decide what the filter is for. Is it for rain-barrel irrigation water, aquarium pre-filtration, camping gear experiments, graywater pre-treatment, or educational demonstration? A rain-barrel sediment filter has very different requirements from a drinking-water purifier. Do not design first and ask safety questions later. That is how projects get dramatic.
Step 2: Sketch the Flow Path
Draw the route water will take from inlet to outlet. Mark where sediment settles, where media sits, where seals go, and how the system will be cleaned. A good rule is to make dirty stages easy to access and clean stages harder to contaminate. Avoid hidden cavities where water can stagnate. Smooth transitions help reduce pressure loss, while intentional turbulence near screens can reduce buildup.
Step 3: Model the Housing
Use CAD software to model the filter body, caps, threads, O-ring grooves, cartridge frames, and valve ports. Add generous wall thickness for pressure-bearing parts. Use fillets instead of sharp internal corners where possible. Sharp corners concentrate stress and collect dirt. Also, remember that 3D printers do not care about your dreams; they care about tolerances. Leave enough clearance for seals, threads, and removable parts.
Step 4: Print and Leak-Test
Print the prototype with settings that improve layer adhesion. For FDM printing, that may mean higher wall count, appropriate temperature, slower speed, and careful calibration. After printing, test with clean water outdoors or over a sink. Check for leaks, cracks, weak threads, and pressure problems. Never pressurize an untested print aggressively. A failed water print is basically a tiny indoor fountain with commitment issues.
Step 5: Test Cleaning Performance
Use a controlled test mixture such as water with measured fine sand for non-drinking experiments. Record flow rate before and after flushing. Compare versions of the inlet, screen size, and sediment chamber shape. A self-cleaning design should recover a meaningful portion of its flow after flushing or backwashing. If the flow does not recover, the “self-cleaning” part may just be decorative optimism.
What 3D Printing Can and Cannot Remove from Water
It is important to separate structure from filtration chemistry. A printed plastic housing does not automatically remove bacteria, viruses, heavy metals, PFAS, pesticides, dissolved salts, or industrial chemicals. Those jobs require appropriate media or treatment technologies. Activated carbon can improve taste and reduce some chemicals, but it does not remove everything. Ceramic and hollow fiber membranes can reduce many particles and microorganisms, but performance depends on pore size and sealing. Reverse osmosis can reduce many dissolved contaminants, but it requires pressure and careful system design.
Self-cleaning features mainly help with clogging and maintenance. They do not magically certify water quality. If water may contain pathogens, heavy metals, chemical contamination, or unknown pollutants, use certified filtration systems, laboratory testing, or municipal guidance. A 3D-printed prototype can be brilliant for learning, pre-filtration, emergency concept development, and engineering experimentation, but it should not be oversold as a guaranteed safe drinking-water solution.
Safety, Standards, and Responsible Claims
Any article about water filters needs one boring but essential paragraph that keeps people from doing reckless things. Here it is, wearing sensible shoes. Drinking-water filters should be evaluated against recognized standards for the contaminants they claim to reduce. In the United States, NSF/ANSI standards are commonly used for many point-of-use water-treatment products. Different standards apply to different claims, such as aesthetic effects, health-related contaminants, reverse osmosis systems, material safety, and emerging contaminants.
If a 3D-printed filter is a hobby prototype, describe it honestly. Say it is a sediment filter, a pre-filter, an experimental housing, or a self-cleaning concept. Do not claim it removes lead, PFAS, bacteria, viruses, or chemicals unless verified by appropriate testing. Good SEO should attract readers; it should not invite them to drink mystery puddle water with confidence.
Common Problems and How to Fix Them
Problem: The Filter Leaks at the Threads
Printed threads can be rough and inconsistent. Use O-rings, gasket seats, or standard plumbing fittings instead of relying only on printed threads. Increase wall thickness and print resolution around sealing areas. If needed, use threaded metal inserts or off-the-shelf connectors.
Problem: Flow Rate Drops Too Quickly
The pre-filter may be too fine, the sediment chamber may be too small, or the water path may be forcing particles directly into the media. Try a larger swirl chamber, a coarser first-stage mesh, or a tangential inlet. Add a flush valve so debris exits before it compacts.
Problem: Carbon Dust Escapes
Use finer retaining mesh, rinse carbon before installation, and add a settling or polishing stage after the carbon chamber. Avoid loose media designs that allow granules to move freely and grind themselves into dust.
Problem: The Print Smells or Tastes Strange
Do not use questionable printed parts for drinking water. Material odors can come from filament additives, trapped residues, poor cleaning, or unsuitable resin. Replace printed wetted parts with certified components or restrict the prototype to non-potable testing.
Real-World Applications for 3D-Printed Self-cleaning Filters
One practical application is rainwater pre-filtration. A printed swirl separator can remove leaves, grit, and roof debris before water enters a storage barrel or irrigation system. Another application is aquarium maintenance, where a printed pre-filter guard or self-flushing debris trap can protect pumps from clogging. Makers can also use self-cleaning filter prototypes in educational labs to demonstrate fluid dynamics, sedimentation, turbulence, and membrane fouling.
Industrial water treatment is another promising field. Companies and researchers are exploring 3D-printed porous structures, specialty adsorbent supports, and membrane spacers because complex geometry can improve flow distribution and reduce fouling. In these settings, 3D printing is less about cute desktop gadgets and more about precision-engineered components that improve performance, reduce energy use, or recover valuable materials from wastewater streams.
Experiences and Lessons From Building a 3D-Printed Self-cleaning Water Filter
The first lesson from working with a 3D-printed self-cleaning water filter is that water is an unforgiving product tester. Air may politely ignore a small gap, but water will find it, widen it, and announce it on your countertop. During prototyping, the most important experience is not the first successful print; it is the first leak test. That is where the design stops being a pretty CAD model and becomes a real object with opinions.
A common beginner experience is overcomplicating the filter body. It is tempting to add spiral tunnels, internal lattices, snap-fit screens, hidden chambers, and futuristic fins until the model looks like a spaceship part. Then cleaning day arrives, and suddenly every beautiful internal cavity becomes a tiny swamp hotel. The better approach is to design for disassembly. If a chamber collects dirt, it should be easy to open. If a screen catches sediment, it should be easy to remove. If an O-ring seals the cap, it should be visible and replaceable. Maintenance is not a failure of design; it is part of the design.
Another lesson is that self-cleaning works best in stages. A single fine filter element clogs fast when it receives raw dirty water. A staged design performs much better: first spin out heavy grit, then screen larger particles, then use carbon or a membrane for finer treatment. This mirrors the logic of larger water-treatment systems. Do the cheap, rough work first. Save the delicate media for the water that has already been bullied into behaving.
Testing also teaches humility. A swirl chamber that looks dramatic may not separate much if the inlet angle is wrong or the flow is too slow. A mesh screen may clean well under a faucet but clog quickly under real sediment load. A backwash channel may work perfectly until the gasket shifts. The only way to know is to measure. Record starting flow rate, dirty-water flow rate, post-flush recovery, and how much sediment collects in the drain cup. These simple numbers turn guesswork into design improvement.
Material experience matters too. PETG may print a strong housing, but layer adhesion, wall thickness, and print orientation can make or break the part. Resin can create smooth, detailed components, but many resins are unsuitable for water contact, especially drinking-water contact. PLA may be fine for a classroom demonstration, but it is not the best choice for warm, wet, long-term service. The safest experience-based rule is this: use 3D printing for structure, not unverified purification claims.
The most satisfying part of the project is watching the flush valve work. When dirty water has been running for a while and the flow begins to slow, opening a bottom purge and seeing sediment leave the chamber feels like the filter is taking a tiny shower. It is not glamorous, but it is engineering joy. The design becomes less disposable and more serviceable. That is where 3D printing shines: not in pretending to replace every commercial water-treatment technology, but in making smarter, repairable, customizable hardware around proven filtration principles.
For makers, the best final lesson is to be honest about the filter’s purpose. A prototype for rainwater sediment control, lab demonstration, or non-potable pre-filtration can be genuinely useful. A homemade device promoted as a certified purifier is a different matter entirely. Build boldly, test carefully, label clearly, and never let excitement outrun safety. Your 3D printer is a powerful tool, but it is not a public-health laboratory with a nozzle.
Conclusion: A Smarter Filter Starts With Smarter Design
3D printing a self-cleaning water filter is one of those projects that combines practical engineering with just enough futuristic charm to keep makers awake past midnight. The best designs use additive manufacturing where it matters most: custom flow paths, modular housings, sediment traps, backwash channels, and turbulence-promoting structures. These features can help reduce clogging, extend filter life, and make maintenance easier.
Still, the most important takeaway is responsibility. A 3D-printed housing is not the same thing as a certified drinking-water treatment system. Printed parts can support filtration, but proven media and verified testing determine what the filter can safely remove. Used wisely, 3D printing can make water filters more adaptable, repairable, and efficient. Used carelessly, it can make a very fancy tube full of false confidence.
For hobbyists, educators, engineers, and sustainability-minded tinkerers, a 3D-printed self-cleaning water filter is a fantastic project. It teaches fluid dynamics, materials science, filtration principles, and the art of designing for maintenance. It also teaches patience, because leaks happen. But when the design finally flushes sediment, restores flow, and snaps back together cleanly, the result feels like more than a gadget. It feels like a small, printable step toward smarter water technology.












