
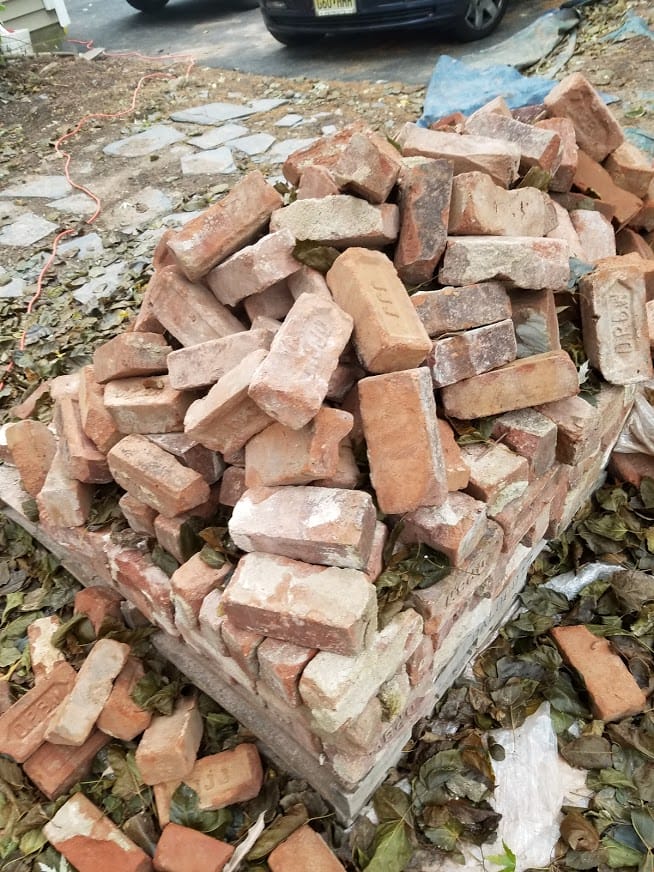
Some backyard makeovers begin with a designer mood board, a dramatic lighting plan, and a budget that needs its own zip code. Others begin with a pile of old bricks, a stubborn patch of dirt, and someone saying, “You know, we could probably do something with those.” This story belongs proudly to the second group.
A new patio made of old brick is one of those rare home projects that feels practical, beautiful, budget-friendly, and slightly heroic. You are rescuing materials from the forgotten corner of the yard, giving your outdoor space a major upgrade, and creating a patio with the kind of character brand-new materials often try very hard to imitate. Old brick brings color variation, softened edges, chips, history, and charm. In other words, it arrives with personality already installed.
For homeowners dreaming of a backyard before and after that actually changes how the space is used, a reclaimed brick patio can be a smart and satisfying project. It can turn a muddy, awkward, or underused area into a place for coffee, grilling, container gardening, family dinners, or simply sitting outside and pretending not to hear the laundry calling your name.
Why Old Brick Makes a Backyard Feel Instantly Better
Old brick has a warmth that is hard to fake. Unlike many new concrete pavers, reclaimed brick often comes with subtle differences in tone: deep red, faded orange, smoky brown, soft rose, and sometimes a little purple if the brick has lived an interesting life. When laid together, those variations create a surface that looks settled into the landscape instead of dropped on top of it.
That is why an old brick patio works beautifully in so many backyard styles. It can feel cottage-like with lavender and creeping thyme, traditional with boxwoods and hydrangeas, rustic with gravel borders and Adirondack chairs, or urban and charming beside a small raised garden bed. The material is flexible without being boring, which is more than we can say for some outdoor rugs.
Using old brick can also support a more sustainable backyard makeover. Reusing durable materials reduces waste and cuts down on the need for newly manufactured products. In a small residential project, that may not sound world-changing, but every reused brick is one less brick headed for a landfill and one more piece of texture added to your home.
The “Before”: A Backyard With Potential, Mud, and Regret
Before the transformation, the typical problem area looks innocent enough. Maybe it is a patch of grass that never really grows because it sits in the shade. Maybe it is a dirt rectangle near the back door where everyone steps, especially after rain. Maybe it is a forgotten corner beside the garage where old bricks have been stacked since someone’s ambitious project from 2009.
The biggest issue is not always ugliness. It is usability. A backyard without a stable surface can be hard to enjoy. Chairs sink into soil. Grill wheels get stuck. Water collects in low spots. Shoes become mud delivery systems. The yard might technically be “outdoor living space,” but only if your idea of living includes wobbling on a folding chair while slowly tilting into a flower bed.
A patio solves that problem by creating a defined, level, durable outdoor room. The old brick gives it soul. Together, they turn a neglected area into a destination.
Planning the Patio: Measure Twice, Trip Never
Every good patio starts with a plan. The first decision is location. Ideally, the patio should connect naturally to how you already move through the backyard. A patio near the kitchen works well for dining and grilling. A patio under a tree may be perfect for reading and shade. A small brick landing near a garden gate can become a beautiful transition between lawn and planting beds.
Once the location is clear, measure the area carefully. A simple rectangle is easiest for beginners, but old brick also looks wonderful in irregular shapes, especially if the backyard has a relaxed garden style. Use stakes and string, marking paint, or even a garden hose to outline the future patio. Then stand back and look at it from the house, the yard, and the neighbor’s viewpoint if you are emotionally prepared for that level of honesty.
Choose a Patio Size That Fits Real Life
A tiny patio can look cute but may not function well. A bistro table and two chairs need less space than a dining table for six. A grill requires safe clearance. A fire pit area needs room for seating and circulation. As a practical rule, plan for furniture first, then add walking space around it. Patios that look generous on paper can feel tight once chairs are pulled out and someone’s uncle starts telling a story with both arms.
Sort the Old Bricks Before Installation
Not every old brick deserves a starring role. Before laying the patio, sort the bricks into categories: full bricks, chipped but usable bricks, half bricks, and pieces better saved for edging, filler, or future garden projects. Remove loose mortar with a hammer and chisel, and brush away dirt. The goal is not perfection. The goal is stable charm.
If you live in a freeze-thaw climate, choose bricks made for paving whenever possible. Some old building bricks are more porous and may crack when moisture freezes inside them. For mild climates or covered areas, the risk may be lower, but it is still worth checking the brick type before committing to a high-traffic patio.
The Foundation: The Part Nobody Sees but Everyone Depends On
The base is the difference between a patio that lasts and a patio that becomes an ankle-twisting archaeological site. Old bricks may be charming, but they still need a serious foundation. Most sand-set patios rely on compacted gravel or crushed stone, a layer of leveling sand, edge restraints, and joint sand between the bricks.
Start by excavating the patio area deep enough to allow for the gravel base, sand layer, and brick thickness. Many patio installations use several inches of compacted base topped with about an inch of sand. The exact depth depends on soil conditions, climate, and intended use. A patio for foot traffic is different from a driveway, and a sandy soil behaves differently from heavy clay.
Drainage Is Not Optional
A patio should slope gently away from the house or any structure. This helps water drain off the surface instead of collecting against foundations or pooling in the middle. The slope does not need to feel like a ski jump; it just needs enough pitch to move water in the right direction. Use string lines and a level to keep the grade consistent as you dig and build the base.
If the backyard already has drainage issues, address them before installing brick. A beautiful patio placed over a water problem is like putting a nice tablecloth over a raccoon. The problem is still there, and eventually it will make itself known.
Compact in Layers
When adding gravel or crushed stone, do not dump it all in at once and hope enthusiasm counts as engineering. Spread the base material in layers, dampen it lightly if needed, and compact each layer firmly. A hand tamper can work for a small patio, while a rented plate compactor can make larger projects faster and more consistent.
After the base is compacted, add the leveling sand. Screed the sand with a straight board over pipes or rails to create an even surface. Avoid walking on the finished sand bed. It is smooth, delicate, and surprisingly good at recording every footprint like a crime scene.
Choosing a Brick Pattern for the Patio
The pattern determines both the look and the installation difficulty. With reclaimed brick, the pattern should work with the material’s irregularity rather than fight it.
Running Bond
Running bond is the classic brick layout, with each row offset by half a brick. It is simple, attractive, and forgiving. It works especially well for rectangular patios and narrow spaces. If your old bricks vary slightly in size, running bond can help hide small inconsistencies.
Basketweave
Basketweave uses pairs of bricks turned horizontally and vertically to create a woven effect. It has an old-world look that pairs beautifully with reclaimed brick. It is also friendly for DIYers because it does not require as many cuts as more complex patterns.
Herringbone
Herringbone is dynamic, elegant, and strong. It can make a patio feel custom and high-end. However, it usually requires more cutting at the edges, so it is better for patient DIYers or anyone who finds geometry relaxing rather than personally insulting.
Laying the Old Brick Patio
Begin at a straight edge, such as a house wall, walkway, or a firmly installed border. Place each brick gently onto the sand bed, keeping the pattern aligned with string lines. Tap bricks into place with a rubber mallet. Check frequently for level and adjust by adding or removing a little sand underneath individual bricks.
Keep joints reasonably consistent, but do not panic if old bricks refuse to behave like factory-perfect pavers. Their tiny differences are part of the look. The key is to maintain a stable walking surface. Beauty matters, but so does not launching guests into the hydrangeas.
Install Strong Edging
Edge restraints help keep the patio from spreading over time. Plastic, metal, concrete, stone, or additional bricks can all work depending on the style and budget. Without edging, bricks can slowly shift outward, especially along the perimeter. Good edging is the quiet bodyguard of a brick patio: not flashy, but absolutely important.
Fill the Joints
Once all the bricks are in place, sweep sand or polymeric sand into the joints. Polymeric sand can help lock the bricks together and reduce weed growth when installed correctly. Follow the product directions carefully, especially when wetting it. Too much water, too little water, or leftover haze on the brick surface can create frustration. Regular joint sand is simpler and easier to refresh, though it may need more maintenance over time.
The “After”: A Backyard That Finally Has a Purpose
After installation, the change is immediate. The messy patch becomes a defined outdoor room. The old brick adds color and texture. Furniture suddenly has a place to belong. A few planters soften the edges. String lights overhead make the patio feel intentional. Even a simple table and two chairs can make the backyard feel like a tiny café, minus the $8 latte and the person loudly taking a video call nearby.
The best part of a backyard before and after like this is that the patio does not need to look brand-new. In fact, it should not. Old brick looks best when it feels settled, slightly imperfect, and connected to the garden. Moss in nearby beds, thyme between wider joints, a weathered bench, and terracotta pots all make the patio feel like it has always been there.
Design Ideas to Make an Old Brick Patio Shine
Add Gravel Borders
A narrow gravel border around the patio can improve drainage, visually frame the brick, and help blend the hardscape into the garden. Pea gravel, crushed granite, or small river rock can all work depending on the style of the yard.
Use Plants to Soften the Edges
Brick and plants are natural friends. Try ornamental grasses, lavender, salvia, boxwood, ferns, hostas, or creeping ground covers depending on sun exposure. Plants soften the lines of the patio and make the space feel less like a construction project and more like a destination.
Bring in Vintage or Natural Furniture
Old brick pairs beautifully with wood, wrought iron, wicker, and powder-coated metal. Choose furniture that fits the scale of the patio. A small space may only need a café set, while a larger one can handle a dining table, lounge chairs, or a sectional.
Light It Like You Mean It
Outdoor lighting transforms the patio after sunset. Use string lights for atmosphere, solar path lights for edges, and lanterns for flexible mood lighting. Good lighting makes the space safer and more inviting, and it gives everyone’s dinner a soft glow that says, “Yes, we planned this.”
Maintenance Tips for a Reclaimed Brick Patio
A brick patio is relatively low-maintenance, but it is not maintenance-free. Sweep it regularly to remove leaves and debris. Rinse dirt when needed. Refresh joint sand if gaps open up. Pull weeds early before they become emotionally attached to the property.
If bricks settle over time, lift the uneven pieces, adjust the sand underneath, and reset them. This is one advantage of a sand-set patio: repairs are usually manageable without demolishing the whole surface. For stains, use gentle cleaning methods first. Harsh chemicals can damage the brick, surrounding plants, or nearby soil.
Common Mistakes to Avoid
Skipping the Base
Laying brick directly on soil may feel faster, but it usually leads to uneven settling. A proper compacted base is the unglamorous secret behind a patio that stays attractive and safe.
Ignoring Water Flow
Water should move away from the house and off the patio. Poor drainage can cause puddles, shifting, mossy slick spots, and long-term structural issues.
Using Every Brick No Matter What
Some bricks are too cracked, soft, or uneven for the main patio surface. Use the best bricks where people walk and save rougher pieces for borders, garden edging, or decorative accents.
Choosing a Pattern That Is Too Complicated
There is no shame in a simple pattern. A clean running bond made with beautiful old brick often looks better than a complicated layout installed with tears, guesswork, and seventeen emergency hardware store trips.
Experience Notes: What a New Patio Made of Old Brick Really Teaches You
Building a backyard patio from old brick teaches patience in a very physical way. At first, the project feels simple: gather bricks, dig a rectangle, put bricks down, become a patio genius. Then reality appears wearing work gloves. The first lesson is that old bricks are not identical. Some are longer, some are thicker, some have old mortar clinging to them like they signed a lifelong contract. Sorting them takes time, but it is worth it. The best bricks should go in the main walking area, while the oddballs can become edge pieces, cuts, or charming little reminders that perfection is overrated.
The second lesson is that the base matters more than the visible surface. This is the part many beginners want to rush because compacted gravel does not make anyone gasp with admiration. Nobody invites friends over and says, “Please admire my uniformly compacted sub-base.” But that hidden work determines whether the finished patio feels solid or starts shifting after a few heavy rains. Taking time to excavate, slope, spread, compact, and screed properly is the difference between a weekend upgrade and a future repair hobby.
The third lesson is that reclaimed materials change the design process. With new pavers, you buy a predictable number and follow a predictable layout. With old brick, the project becomes more creative. You may discover you have enough full bricks for the main field but need a contrasting border. You may mix brick tones intentionally, placing darker bricks near the edges and brighter ones near the center. You may rotate a few chipped bricks so their best faces show. This is not a flaw in the project. It is the personality of the project.
The fourth lesson is that a patio changes behavior. Before the makeover, the backyard may be something you look at through the window while thinking, “We should do something out there.” After the brick patio is finished, the space starts calling you outside. Morning coffee moves outdoors. Dinner becomes more appealing. Potted herbs suddenly make sense. Even small tasks, like watering plants or sweeping leaves, feel more satisfying because the yard has a center.
The final lesson is that old brick rewards restraint. You do not need to overdecorate it. A few chairs, a table, planters, and warm lighting are enough. Let the brick be the texture. Let the plants soften the edges. Let the patio age naturally. The best backyard before and after is not one that erases every sign of the past. It is one that takes what was already there and gives it a better job.
Conclusion
A backyard before and after featuring a new patio made of old brick is more than a cosmetic upgrade. It is a practical transformation that adds usable space, charm, sustainability, and long-term value to the home. The process requires planning, digging, leveling, compacting, and a healthy respect for drainage, but the reward is a patio that feels warm, personal, and deeply connected to the landscape.
Old brick is not perfect, and that is exactly why it works. Its worn edges and color variations bring instant character to a backyard. When installed over a stable base with proper edging and thoughtful design, reclaimed brick can turn an overlooked patch of ground into a favorite outdoor room. The result is a patio with history underfoot and a future full of coffee, dinners, conversations, and quiet evenings outside.














