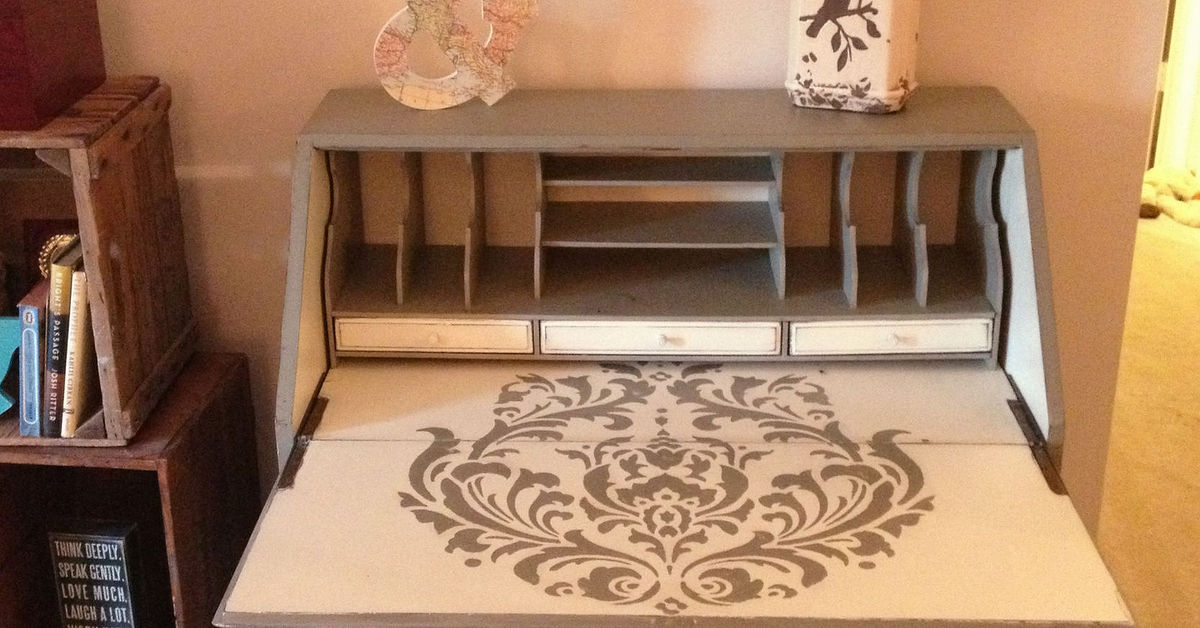
A secretary desk is the furniture equivalent of a well-dressed spy: compact, clever, full of secret compartments, and surprisingly good at hiding chaos. One minute it looks like a graceful vintage cabinet; the next, the drop-front opens andta-dait becomes a workspace, bill station, craft nook, laptop landing pad, or “I swear I’m organized” command center.
That is exactly why a chic secretary desk makeover is one of the most satisfying DIY furniture projects you can tackle. Unlike a giant dresser or dining table, a secretary desk has personality built in. It usually comes with drawers, cubbies, carved details, a fold-down writing surface, and enough vintage charm to make your living room feel like it has read at least three novels. With the right prep, paint, hardware, and styling, even a tired thrift-store find can become a polished statement piece.
This guide walks through the full transformation process: choosing the desk, planning the look, cleaning and repairing the piece, painting or refinishing it, upgrading hardware, styling the interior, and avoiding common DIY mistakes. Whether your style is modern farmhouse, Parisian chic, moody vintage, cottagecore, coastal, or sleek contemporary, the goal is simple: turn an outdated secretary desk into a functional beauty that earns compliments and actually works for your life.
Why Secretary Desks Are Perfect for Makeovers
Secretary desks are having a quiet comeback, especially in homes where space is precious. They are ideal for apartments, bedrooms, living rooms, guest rooms, hallways, and small home offices because they offer storage without shouting, “I brought office furniture into the house.” Close the writing surface, and your laptop, pens, notebooks, bills, and rogue sticky notes vanish like magic.
Their structure also makes them fun to customize. You can paint the exterior one color and the interior another, add peel-and-stick wallpaper to the back panel, swap out old hardware, line drawers, polish the writing surface, or highlight carved trim with a subtle glaze. A flat desk gives you one design moment; a secretary desk gives you layers. It is basically a tiny room makeover disguised as furniture.
Step 1: Choose the Right Secretary Desk
Before you fall in love with the first curvy-legged desk you see on Facebook Marketplace, check the bones. A chic makeover starts with a sturdy piece. Look for solid wood if possible, but do not automatically reject veneer. Many vintage secretary desks have beautiful wood veneer that can be refreshed or painted carefully.
What to Inspect Before Buying
Open and close the drop-front several times. It should move smoothly and feel secure. Check the hinges, drawer tracks, cubbies, legs, and back panel. A little wobble can often be fixed, but severe water damage, missing structural parts, or deep veneer lifting may turn a weekend project into a furniture soap opera.
Also measure your space before bringing the desk home. A secretary desk may look petite, but the fold-down writing surface needs clearance. If you plan to use it with a chair, make sure the height is comfortable and the writing surface is deep enough for your laptop or notebook.
Step 2: Decide on a Chic Design Direction
The word “chic” does not mean one single look. It means the makeover feels intentional, balanced, and polished. A secretary desk can go in many directions, so choose a style before buying paint or hardware.
Classic Black and Brass
Black paint with brass hardware is almost impossible to mess up. It gives a vintage secretary desk a refined, boutique-hotel feel. This look works beautifully in living rooms, bedrooms, entryways, and dramatic home offices. For extra depth, use a satin or eggshell finish rather than a flat black, which can show dust and fingerprints faster than you can say “where did I put the microfiber cloth?”
Soft White or Cream
A warm white, ivory, or cream finish creates a fresh, romantic look. This is perfect for cottage, coastal, French country, and traditional interiors. The key is choosing a warm shade rather than a stark refrigerator white. Pair it with antique brass, ceramic knobs, or glass pulls for a gentle vintage feel.
Moody Green, Blue, or Charcoal
Deep green, navy, slate blue, and charcoal turn a secretary desk into a statement piece. These colors look especially sophisticated when paired with wood accents, gold hardware, or patterned wallpaper inside the cubbies.
Natural Wood With Painted Interior
If the wood is in good condition, consider keeping the exterior stained and painting only the interior. A walnut secretary desk with a soft sage, blush, navy, or cream interior feels custom without erasing the furniture’s original character.
Step 3: Gather Supplies Before You Start
Nothing interrupts DIY joy quite like realizing your paintbrush is crunchy from a project three years ago. Gather your supplies first so the makeover stays smooth.
- Mild soap or degreasing cleaner
- Microfiber cloths and tack cloth
- Screwdriver or drill
- Wood glue and clamps
- Wood filler
- Sandpaper or sanding pads in medium and fine grits
- Painter’s tape
- Drop cloth
- Primer suitable for wood, veneer, or laminate
- Furniture paint or enamel paint
- Quality angled brush and small foam roller
- Clear topcoat, wax, or polyurethane
- New knobs, pulls, or hinges if needed
- Optional wallpaper, drawer liner, or contact paper
Step 4: Clean the Desk Thoroughly
Cleaning is not glamorous, but it is the difference between a finish that lasts and paint that flakes off like a bad sunburn. Vintage furniture collects oils, polish, dust, wax, and mystery grime. Before sanding or painting, remove hardware and clean every surface, including the cubbies and drawer interiors.
Use a mild degreasing cleaner or warm water with gentle soap. Avoid soaking the wood. Wipe, rinse with a damp cloth, and let the desk dry completely. Pay special attention to areas around handles and the writing surface, where hands have touched the furniture for years.
Step 5: Make Repairs Before Painting
A chic secretary desk makeover should look elegant, not like the paint is heroically holding the furniture together. Tighten loose screws, reinforce wobbly legs, glue lifting trim, and fill dents or missing hardware holes with wood filler.
If the drop-front writing surface sags or does not close properly, inspect the hinges and support arms. Replace damaged hardware if necessary. Many older secretary desks rely on small chains, slides, or folding supports, and those pieces need to be secure if you plan to use the desk daily.
Step 6: Sand for a Smooth, Durable Finish
Sanding gives primer and paint something to grip. You do not always need to sand down to bare wood, but you do need to dull glossy finishes and smooth rough areas. Use medium-grit sandpaper for uneven spots, then switch to fine-grit paper for the final pass.
Always sand with care around veneer. Veneer is thin, and aggressive sanding can burn through it quickly. Think of sanding as exfoliation, not archaeology. You are preparing the surface, not trying to discover the desk’s ancestors.
After sanding, remove all dust with a vacuum, microfiber cloth, and tack cloth. Dust left behind can create bumps in the paint and make the finish feel gritty.
Step 7: Prime the Desk
Primer is your makeover insurance policy. It improves adhesion, helps block stains, and creates a more even surface for paint. This is especially important if the desk has a dark stain, glossy finish, laminate areas, old varnish, or reddish wood that may bleed through lighter paint.
Use a brush for corners, cubbies, trim, and carved details. Use a small foam roller for flat areas to reduce brush marks. Let the primer dry according to the product instructions, then lightly sand it with fine-grit sandpaper. Wipe away dust before moving on to paint.
Step 8: Paint Like a Patient Person
The best furniture paint jobs happen in thin coats. Thick coats may seem faster, but they can drip, wrinkle, stay tacky, or hide detail. Apply the first coat lightly and evenly. Let it dry fully, then add a second coat. A third coat may be necessary for deep colors, light colors over dark wood, or high-contrast transformations.
Brush or Roller?
Use both. A high-quality angled brush is great for edges, trim, cubbies, and details. A small foam or microfiber roller creates a smoother finish on flat surfaces. If you see brush marks, lightly sand between coats once the paint is dry.
Do Not Forget the Interior
The interior is where a secretary desk makeover can really shine. Paint the cubbies a contrasting color, add wallpaper to the back panel, or keep the inside natural wood for warmth. A surprise interior makes the piece feel custom and gives the desk a boutique look every time you open it.
Step 9: Add a Protective Topcoat
A secretary desk is meant to be used, especially the fold-down writing surface. That means protection matters. Once the paint has dried, apply a clear topcoat, furniture wax, or polyurethane depending on your paint type and desired finish.
For high-use areas, a water-based polyurethane or durable furniture topcoat is usually a practical choice. Apply thin coats and let each one dry fully. If the writing surface will hold a laptop, coffee mug, planner, or elbows during long email sessions, give the finish enough curing time before heavy use.
Step 10: Upgrade the Hardware
Hardware is jewelry for furniture. Old knobs and pulls can be charming, but sometimes they make the desk look dated in the wrong way. New hardware can instantly change the mood of the piece.
For a chic look, try aged brass cup pulls, slim black handles, glass knobs, unlacquered brass knobs, ceramic floral pulls, or simple modern hardware. If the original hardware is beautiful but dull, clean and polish it. If the hardware holes do not match your new pulls, fill the old holes before painting and drill new ones after the finish cures.
Step 11: Style the Secretary Desk
Once the makeover is complete, styling turns the desk into a finished moment. Keep the surface functional, not crowded. A small lamp, a pretty tray, a notebook, a cup for pens, and one decorative object are usually enough.
Inside the cubbies, use mini baskets, file folders, letter sorters, or small boxes to organize supplies. If the desk sits in a living room, style it with items that blend with the room: a framed photo, a small plant, a vintage book, or a decorative bowl. The goal is to make the desk feel like part of the home, not a runaway office cubicle.
Chic Secretary Desk Makeover Ideas by Style
Modern Farmhouse Secretary Desk
Choose warm white or greige paint, lightly distressed edges, matte black or aged brass hardware, and a natural wood writing surface. Add woven baskets inside the cubbies for a relaxed but organized feel.
Parisian-Inspired Secretary Desk
Use soft black, deep navy, or creamy white paint with brass hardware. Add floral or striped wallpaper inside and style the top with a small lamp, framed art, and a vase of flowers. Bonus points if you drink coffee beside it while pretending your inbox is poetry.
Coastal Secretary Desk
Try a soft blue, sea-glass green, warm white, or pale gray. Use brushed nickel or white ceramic knobs. Keep the interior airy with light wallpaper, natural textures, and simple storage.
Bold Eclectic Secretary Desk
Paint the exterior emerald, coral, mustard, or teal. Add patterned wallpaper inside and mix vintage hardware with modern accessories. This style works well if the rest of the room has personality and the desk is allowed to be the star.
Common Mistakes to Avoid
The biggest mistake is skipping prep. Cleaning, sanding, and priming may not feel exciting, but they are what make the final finish look professional. Another mistake is painting the hinges shut or applying paint too thickly around moving parts. Keep hardware areas clean and test the drop-front as you go.
Also avoid rushing the cure time. Paint may feel dry to the touch long before it is fully hardened. If you stack books, close the writing surface, or place a laptop on it too soon, the finish can dent or stick. Give your makeover time to settle into its new glamorous identity.
How to Make the Desk More Functional
A secretary desk should be beautiful, but it also needs to work. Add a small power strip inside the lower cabinet or behind the desk if you use it for charging devices. Use adhesive cord clips to route cables neatly. Add felt pads under organizers to protect the writing surface. If the desk is used for mail, label cubbies for incoming papers, outgoing mail, receipts, and important documents.
If the interior feels dark, install battery-powered puck lights or a small rechargeable lamp. Good lighting makes the desk feel more inviting and helps the makeover look intentional.
Budget-Friendly Makeover Tips
A secretary desk makeover does not have to be expensive. Shop secondhand for the desk, reuse original hardware when possible, buy sample-size paint for small areas, and use leftover wallpaper or peel-and-stick paper for the interior. Drawer liner, thrifted knobs, and a small lamp can make a big difference without draining the decorating budget.
If you only have time for a mini makeover, clean the desk, polish the wood, replace the hardware, line the drawers, and style the interior. Not every piece needs paint. Sometimes the chicest choice is restraint with better accessories.
Experience Notes: What a Chic Secretary Desk Makeover Teaches You
After working through a secretary desk makeover, one lesson becomes clear: small furniture can have a big attitude. A secretary desk may not take up much floor space, but it has more surfaces, corners, hinges, compartments, drawers, and personality than many larger pieces. That makes the project rewarding, but it also rewards patience.
The first experience many DIYers have is realizing that prep takes longer than painting. Cleaning cubbies, removing dust from tiny corners, labeling hardware, and sanding around trim can feel slow. But once the paint starts going on smoothly, the effort makes sense. A clean, sanded, primed desk accepts paint beautifully, while a rushed desk tends to show every shortcut.
Another useful experience is learning how color changes the entire identity of a piece. A dark brown secretary desk might feel heavy in a small room, but paint it soft cream and suddenly it looks graceful and bright. Paint it black with brass hardware, and it becomes dramatic and grown-up. Paint the interior sage green or dusty blue, and it feels custom every time the writing surface drops open. Secretary desks are wonderful for experimenting because the interior can be playful while the exterior remains elegant.
Hardware also teaches a surprising lesson. A simple knob swap can make an old desk look fresh even before painting. Original hardware often has character, so it is worth testing whether it can be cleaned and reused. However, modern pulls can completely update the silhouette. The best choice depends on the desk itself. Ornate desks often look best with classic hardware, while simple desks can handle sleek modern pulls.
Function is another major takeaway. A beautiful desk that does not support your daily habits becomes a decorative guilt trip. Before styling, think about what the desk needs to hold. If it is a laptop station, leave space for the computer and charger. If it is a bill-paying center, use folders and labels. If it is a writing nook, keep stationery, stamps, pens, and notebooks within reach. The most successful secretary desk makeover is not only pretty in photos; it makes everyday life easier.
Finally, this project teaches that imperfections are not always disasters. Vintage furniture has dents, uneven grain, tiny gaps, and signs of previous lives. A chic makeover does not need to erase every mark. In fact, a few preserved details can make the desk feel authentic rather than factory-perfect. The goal is not to make the desk look brand-new. The goal is to make it look loved, useful, and beautifully updated.
Conclusion
A chic secretary desk makeover is one of the smartest ways to combine style, storage, and small-space function. With thoughtful prep, the right paint or finish, upgraded hardware, and a well-organized interior, an outdated desk can become a standout piece that works in nearly any room. It can serve as a home office, writing station, entryway organizer, bedroom vanity, or hidden command center for everyday paperwork.
The secret is to respect the furniture’s character while giving it a fresh point of view. Clean it well, repair what matters, sand carefully, prime properly, paint patiently, protect the finish, and style it with purpose. Do that, and your secretary desk will not just look chicit will earn its keep. And unlike your junk drawer, it may even make you feel organized.
Note: This article was written for web publication and synthesizes practical furniture refinishing, painting, small-space design, and home organization guidance from reputable U.S.-based DIY and home improvement resources. Source links and citation markers have been intentionally omitted for clean publishing.