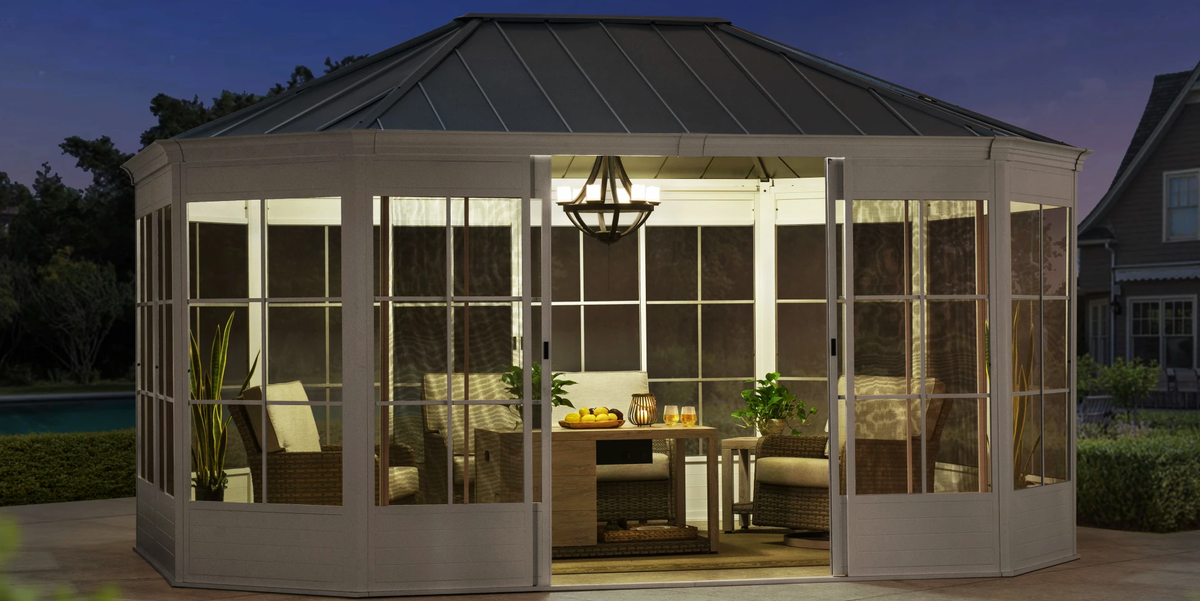
There are two kinds of backyard people: those who casually own “outdoor living spaces,” and the rest of us who drag a folding chair onto the patio, get bitten by one mosquito, and retreat indoors like we have suffered a medieval attack. Costco, being Costco, has entered the chat with a practical solution: a screened-in gazebo setup you can build yourself, turning a plain patio, deck, or backyard slab into a shaded, bug-resistant hangout that feels far fancier than the phrase “weekend assembly project” usually suggests.
The big idea is simple. Costco sells Yardistry hardtop wood gazebos, including popular rectangular models such as the 12-by-14-foot and 12-by-16-foot versions, and also offers compatible mosquito mesh kits for many Yardistry gazebo sizes. Pair the gazebo with the mesh kit, and suddenly your backyard has the personality of a mini screened porchwithout having to build an actual room addition, take out a second mortgage, or explain to your neighbors why you are measuring the patio at 7 a.m. with a cup of coffee and wild ambition.
For homeowners who want shade, structure, and fewer flying dinner guests, a Costco screened-in gazebo kit can be a smart middle ground between a pop-up canopy and a permanent sunroom. It is more substantial than a tent, more weather-ready than fabric shade, and more flexible than a full renovation. But it is still a DIY project, which means planning matters. Let’s look at what Costco is selling, why screened-in gazebos are trending, what to know before building one, and how to make the finished space feel like the backyard upgrade you imaginednot a pile of cedar, screws, and mild regret.
What Is Costco’s Screened-in Gazebo Setup?
Costco’s gazebo lineup often includes Yardistry wood gazebos with hard aluminum roofs. These structures are typically made with wood framing, factory-applied stain, and metal roofing designed to provide long-lasting shade and a more permanent outdoor-room feel than a soft-top canopy. Many Yardistry models sold through Costco are assembly-required kits, meaning the parts arrive pre-cut, pre-drilled, and ready to put together with tools, patience, and ideally at least one friend who can read instructions without saying, “Eh, we’ll figure it out.”
The “screened-in” part usually comes from adding a compatible Yardistry gazebo mosquito mesh kit. Costco’s mosquito mesh kits are designed for multiple Yardistry wood gazebo sizes, including common 12-by-12, 12-by-14, 12-by-16, 12-by-20, and 12-by-24-foot structures. The kit typically includes full-length mesh panels, heavy-duty zippers, and glide tracks on many compatible models. Once installed, the mesh creates a more protected outdoor zone where you can eat, relax, read, or host without donating your ankles to the local mosquito population.
That distinction is important: Costco may sell the gazebo and the mesh kit separately depending on availability, location, and the exact model. So before buying, check compatibility carefully. A 12-by-14 gazebo is not automatically the same as every other 12-by-14 gazebo, especially when item numbers and model generations vary. In gazebo land, “close enough” is how you end up with a screen panel that fits like jeans after Thanksgiving.
Why a Screened-in Gazebo Makes So Much Sense
A screened-in gazebo solves three classic backyard problems at once: sun, bugs, and undefined space. A hardtop roof gives you reliable shade and some protection from rain. Mesh walls help reduce mosquitoes, flies, gnats, and other tiny airborne critics of your potato salad. The structure itself creates a destinationa defined outdoor room where furniture looks intentional instead of randomly abandoned.
Compared with a standard patio umbrella, a gazebo covers a larger area and feels more architectural. Compared with a pergola, a hardtop gazebo provides fuller overhead coverage. Compared with a screened porch, a DIY gazebo kit is usually less invasive and does not require tying a new structure into the house. That makes it especially appealing for people who want a backyard upgrade with a big visual payoff but do not want to live through a full construction project.
It is also useful for entertaining. A 12-by-14-foot gazebo can often fit a dining table, a conversation set, or a grill-adjacent serving area, depending on layout and local safety guidance. Add string lights, an outdoor rug, and a couple of plants, and suddenly the backyard has “boutique vacation rental” energy. The mosquitoes, tragically, are not invited.
Key Features to Look For
Hardtop Roof
The hard aluminum roof is one of the biggest reasons Costco’s Yardistry gazebos stand out. Soft-top gazebos are affordable and lightweight, but fabric can fade, sag, tear, or require seasonal removal. A hardtop roof feels more permanent and can better handle year-round outdoor use when properly installed and maintained. It also gives the gazebo a cleaner, more upscale look.
Wood Frame
Yardistry gazebos commonly use wood framing, often with a stained finish. Wood adds warmth that metal gazebos sometimes lack. It blends well with decks, gardens, fences, and outdoor furniture. The tradeoff is maintenance. Wood needs periodic care, and homeowners should expect natural checking, small cracks, and weathering over time. That is not necessarily a flaw; it is part of owning an outdoor wood structure.
Mosquito Mesh Panels
The mosquito mesh kit is what transforms the structure from “nice shade” to “outdoor room.” Full-length panels help create a bug-resistant enclosure while still allowing airflow. Heavy-duty zippers make it easier to enter and exit without performing a dramatic wrestling match with the screen. Easy-glide tracks, where included, help the panels move more smoothly.
Ready-to-Assemble Design
Costco’s Yardistry gazebos are not tiny Saturday-morning projects, but they are designed for homeowner assembly. Parts are generally pre-cut and pre-drilled, and instructions are provided. Still, “assembly required” should be translated honestly: you will need tools, level ground, time, help lifting roof panels, and a working relationship with patience.
What to Check Before You Buy
Measure the Space Twice
Do not simply measure the furniture footprint. Measure the roof dimensions, post locations, walking clearance, door swing areas, and distance from fences, trees, gutters, and grills. A 12-by-14-foot gazebo can look reasonable online and enormous in a small yard. Cardboard boxes and painter’s tape can help you map the footprint before ordering.
Confirm the Surface
A gazebo should be built on a solid, level surface. Concrete slabs, paver patios, and properly reinforced decks are common options, but each has different anchoring requirements. Surface mounting hardware may not always be included, so budget for appropriate anchors and hardware. If your patio slopes like a ski hill, solve that first.
Look Into Permits and HOA Rules
Many permanent or semi-permanent outdoor structures may require permits, inspections, setback compliance, or HOA approval. Requirements vary widely by city, county, and neighborhood. Before purchasing, check local building codes and any homeowner association rules. It is much easier to ask permission before building than to explain a fully assembled gazebo to a clipboard-wielding official afterward.
Plan Delivery Logistics
Large gazebo kits are heavy and bulky. Some Costco Direct deliveries may be curbside or driveway delivery only, not backyard placement or assembly. That means you may need help moving boxes to the build area. This is the moment when a dolly, work gloves, and a strong friend become more valuable than inspirational Pinterest boards.
How Hard Is It to Build?
Building a Costco Yardistry gazebo is doable for many confident DIYers, but it is not the same as assembling a patio chair. Expect a multi-hour or multi-day project depending on the model, your tool setup, weather, and how many helpers you have. The roof sections can be heavy and awkward, and squaring the frame matters. If the base is not level and square, small errors can snowball into alignment issues later.
Most homeowners should plan for at least two adults, and more help is useful during roof assembly and lifting. Read the manual before starting. Sort hardware into labeled containers. Do not skip the squaring and leveling steps. Wear gloves and safety glasses. Also, resist the classic DIY temptation to “just tighten everything now.” Many kits require partial tightening until major sections are aligned.
If you are not comfortable with ladders, power tools, anchoring, or lifting heavy roof panels, consider hiring a professional assembler. Paying for help can still be cheaper than turning the project into a three-week backyard drama starring you, a cordless drill, and one screw that refuses to line up.
Costco Gazebo vs. Pergola vs. Pop-Up Canopy
A Costco screened-in gazebo sits in a sweet spot between temporary shade and permanent construction. A pop-up canopy is cheaper and portable, but it usually lacks durability, style, and long-term stability. A pergola looks beautiful and defines a space, but unless it has a canopy or louvered roof, it will not block rain or intense sun as effectively. A screened porch offers the most enclosed comfort, but it is a much bigger project and can be significantly more expensive.
The screened-in gazebo works best for homeowners who want a dedicated outdoor room without remodeling the house. It gives you shade, bug control, and a focal point. It can support a dining area, lounge zone, hot tub cover, or outdoor work-from-home spot. Yes, “outdoor office” sounds peaceful until the neighbor starts mowing, but at least the flies will not be invited to the meeting.
Design Ideas for a Costco Screened-in Gazebo
Create an Outdoor Dining Room
Place a weather-resistant dining table under the gazebo and use the mesh panels to protect meals from insects. Add battery-operated candles, washable placemats, and a storage bench for cushions. This setup is perfect for summer dinners, weekend brunch, and pretending you are the kind of person who casually serves lemonade in a glass pitcher.
Build a Lounge Zone
A conversation set with deep cushions can turn the gazebo into the best seat in the house. Choose outdoor fabrics, add side tables, and include a ceiling fan or portable fan if the structure allows safe installation. A rug can soften the space, but make sure it dries quickly and does not trap moisture against wood or decking.
Use It as a Bug-Free Reading Nook
If you want a quieter retreat, furnish the gazebo with two chairs, a small table, plants, and soft lighting. The screen panels make it easier to enjoy evenings outside without constantly swatting. This is especially useful in humid regions where mosquitoes treat sunset like a dinner bell.
Add Privacy Strategically
Mesh screens reduce bugs but do not provide full privacy. If the gazebo faces a neighbor, consider outdoor curtains, roller shades, privacy walls, tall planters, or lattice panels where compatible. Keep airflow in mind; a fully blocked gazebo can get stuffy in hot weather.
Maintenance Tips After Installation
Once your screened-in gazebo is built, maintenance keeps it looking good and functioning well. Clean the roof periodically to remove leaves, pollen, and debris. Check fasteners after storms and seasonal temperature changes. Inspect mesh panels for tears, zipper issues, or track debris. Wash screens gently instead of blasting them with aggressive pressure washing, which can stretch or damage the mesh.
Wood components may need periodic sealing, staining, or touch-ups depending on climate and exposure. If your area gets snow, follow manufacturer guidance about snow removal and load limits. Do not climb onto the roof. Gazebo roofs are not stages, ladders, or places to prove confidence after watching one instructional video.
Also be thoughtful with fire. Wood structures are combustible, so grills, fire pits, chimineas, and patio heaters need safe clearance. Always follow appliance manuals and local fire-safety rules. A cozy backyard setup is great; a surprise barbecue involving the gazebo itself is less ideal.
Who Should Buy This Costco Gazebo?
A Costco screened-in gazebo is a good fit for homeowners who use their outdoor space often but want more comfort, shade, and insect control. It is especially appealing if you already have a patio or deck that feels unfinished. Instead of buying more random outdoor furniture and hoping the space becomes inviting through sheer optimism, the gazebo gives the area structure.
It also makes sense for families who eat outside, people who host often, gardeners who want a shaded resting spot, and anyone who enjoys being outdoors but does not enjoy becoming a mosquito buffet. The DIY aspect is a plus if you like hands-on projects and want to save on installation costs. But it is less ideal for renters, people with very small yards, homeowners with strict HOA limits, or anyone who needs a fully weatherproof room.
Common Mistakes to Avoid
The first mistake is buying before checking compatibility. If you want the screened-in experience, confirm that the mosquito mesh kit fits your exact gazebo model and size. The second mistake is underestimating the build. Make sure you have the right tools, enough helpers, and a realistic timeline. The third mistake is ignoring permits. Even if your neighbor built something similar, your property may have different rules.
Another common mistake is placing the gazebo too close to trees. Shade is nice, but falling branches, sap, leaves, and bird activity can make maintenance annoying. Also think about sun direction. A gazebo blocks overhead sun well, but low afternoon sun can still blast in from the side. That is where curtains, shades, or strategic landscaping can help.
Finally, do not forget furniture scale. A large sectional may fit technically but leave no room to walk. Measure furniture with chairs pulled out, not tucked in like a showroom photo. Outdoor comfort depends on circulation, not just square footage.
Is It Worth It?
For the right homeowner, yes, a Costco screened-in gazebo can be absolutely worth it. It creates a usable outdoor room, improves backyard comfort, and can make a patio feel finished. The combination of a hardtop roof and mosquito mesh panels gives you the two things most people want outside: shade and fewer bugs. Add Costco’s value-focused pricing reputation, and the package becomes even more attractive.
The real value depends on how often you use it. If your patio currently sits empty because it is too hot, too buggy, or too exposed, a screened-in gazebo can dramatically change that. If you only go outside twice a year to retrieve a runaway trash can, maybe start with a chair.
Extra Experience: What It Is Really Like to Live With a DIY Screened-in Gazebo
The best part of a screened-in gazebo is not the day you finish building it. That day, you will mostly feel tired, dusty, and suspiciously proud of every bolt. The real magic happens a week later, when you step outside with coffee in the morning or dinner in the evening and realize the backyard finally has a place to be. It is no longer just “the outside.” It becomes the breakfast room, the reading room, the card-game room, the “please give me ten quiet minutes” room.
In everyday use, the mosquito mesh changes the experience more than people expect. Without screens, outdoor dining can become a defensive sport. You cover the fruit, wave away flies, slap your leg, apologize to guests, and eventually surrender. With mesh panels closed, the space feels calmer. Air still moves through, but bugs are less likely to turn your meal into a public event. It is not magic, and determined insects may still sneak in when people leave the zipper open, but the improvement is noticeable.
The roof also changes how often you use the patio. A hardtop gazebo gives you a reason to stay outside during light rain or intense midday sun. It protects furniture better than open exposure and makes the area feel more reliable. Instead of checking the weather every time you want to sit outside, you start using the space more casually. That is when the investment begins to feel worthwhile.
There are small habits that make ownership easier. Keep a soft broom nearby for leaves and pollen. Use storage bins for cushions if rain blows sideways. Teach guests to zip the mesh panels closed behind them, preferably before the first mosquito enters like it owns the deed. Check the tracks occasionally so the screens glide smoothly. If you have kids, explain that mesh panels are not superhero doors. They do not enjoy being body-slammed.
Lighting makes a huge difference. Warm outdoor string lights, solar path lights, or a weather-rated pendant can make the gazebo feel like a finished room. Avoid lighting that is too harsh, unless your goal is “interrogation patio.” Fans are also worth considering in hot climates, but only use fixtures and electrical setups that are safe for outdoor structures. When in doubt, hire an electrician. Electricity and DIY confidence should not be allowed to arm-wrestle.
Furniture choice matters just as much as the gazebo itself. A dining setup is great for families who eat outside often. A sofa-style lounge is better for relaxing, reading, or hosting drinks. If you want both, choose compact furniture and nesting tables. The goal is comfort, not recreating a furniture showroom where nobody can move without apologizing to an ottoman.
Over time, the gazebo may become the most-used part of the yard. It gives people a natural place to gather and makes outdoor time feel easier. That is the underrated benefit: not just better shade or fewer bugs, but less friction. When a backyard is comfortable, you use it. When you use it, the house feels bigger. And when the house feels bigger without building an addition, that is a win worthy of a very smug lemonade.
Conclusion
Costco’s screened-in gazebo setup is a practical, stylish way to upgrade a backyard without committing to a full renovation. By combining a Yardistry hardtop wood gazebo with a compatible mosquito mesh kit, homeowners can create a shaded, bug-resistant outdoor room for dining, lounging, entertaining, or simply escaping the indoors without becoming insect cuisine.
The key is preparation. Measure carefully, confirm product compatibility, check local rules, plan for delivery, and be honest about the assembly process. This is a build-it-yourself project, but it is not a casual five-minute furniture assembly. With the right tools, helpers, and patience, the result can be a backyard centerpiece that looks polished and gets used often.
If your patio has been waiting for a purpose, this Costco gazebo may be the project that finally turns it into the favorite room you technically do not have to vacuum.
Note: Product availability, pricing, item numbers, shipping terms, and compatible accessories may vary by Costco location, season, and online inventory. Always verify the current model details, local permit requirements, and manufacturer instructions before purchasing or installing a gazebo.