
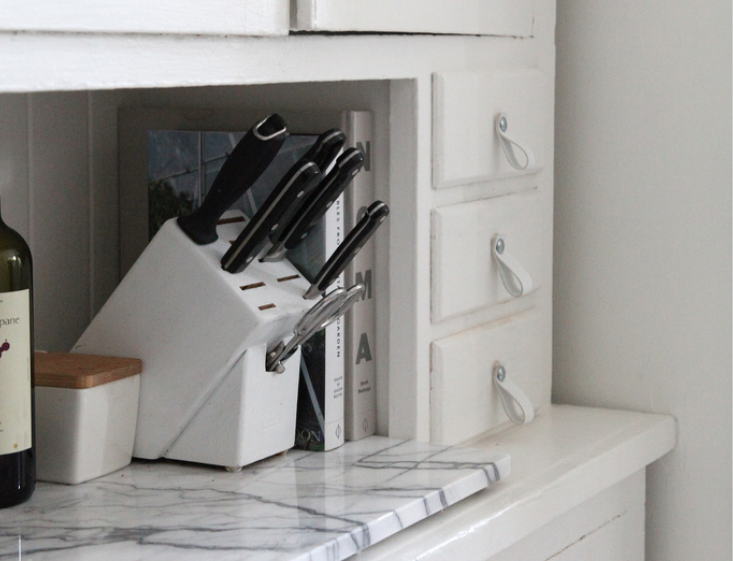
A knife block is one of those kitchen objects that quietly moves in, pays no rent, and somehow becomes part of the family. It holds the chef’s knife you use for everything, the paring knife that disappears into avocados, and at least one mystery slot that nobody can explain. But after a few years on the counter, a plain wood knife block can start to look tired, yellowed, greasy, or just painfully “came with the set.”
Good news: you do not need a full kitchen remodel, a new set of knives, or a dramatic countertop replacement to make your prep area feel fresher. A white-painted knife block is a simple DIY project that turns an old wooden block into a clean, modern kitchen accent. It is affordable, beginner-friendly, and satisfying in the way only small home projects can be. One minute you have a block that looks like it has witnessed every dinner since 2007; a few coats later, it looks like it belongs in a bright, organized kitchen where lemons sit in a bowl just for decoration.
This guide walks you through how to paint a wooden knife block white, from cleaning and sanding to priming, painting, sealing, and maintaining it safely. The goal is not only to make it pretty, but also to make it practical. After all, this object lives beside food, knives, water, crumbs, and real life. Beauty is lovely, but kitchen beauty has to survive garlic hands.
Why Paint a Knife Block White?
White paint has a strangely magical effect on old kitchen accessories. It brightens dark corners, softens dated wood tones, and works with almost every design style: farmhouse, coastal, Scandinavian, cottage, minimalist, transitional, and that very popular aesthetic known as “I cleaned for guests and now I’m a new person.”
A white-painted knife block is especially useful when your kitchen already has white cabinets, marble-look counters, subway tile, stainless steel appliances, or open shelving. It blends in without disappearing completely. Instead of looking like a heavy wooden chunk on the counter, it becomes part of the visual rhythm of the room.
There is also a sustainability angle. Upcycling a knife block keeps a useful object out of the trash and saves money. Many high-quality knife sets come with blocks that are structurally sound but visually dull. If the block is solid, cleanable, and still holds knives securely, paint can give it a second life.
Before You Start: A Few Kitchen-Safety Notes
Because a knife block sits in a food-prep zone, the safest approach is to paint only the outside surfaces. Do not pour paint into the slots. Do not paint any interior surfaces where blades slide. Do not paint your knives. That last one sounds obvious, but the internet has seen things.
Choose a durable paint and sealer for the exterior only, and always let products fully cure according to the manufacturer’s instructions before returning knives to the block. Dry time and cure time are not always the same. Paint may feel dry after a few hours but still be soft underneath for days or even weeks. If you rush, knife handles can stick, paint can dent, and your beautiful white makeover may acquire fingerprints with the enthusiasm of a toddler near frosting.
Also inspect the knife block before committing. If it smells musty, has visible mold inside the slots, feels cracked, or sheds wood fibers, painting will not solve the underlying problem. In that case, replace it or switch to a magnetic strip, in-drawer knife tray, or washable no-slot knife holder.
Materials You Will Need
- Wooden knife block
- Mild dish soap
- Warm water
- Soft sponge or cloth
- Pipe cleaners or small bottle brush for slots
- Fine-grit sandpaper, such as 180- to 220-grit
- Tack cloth or microfiber cloth
- Painter’s tape
- Small angled brush
- Small foam roller or foam brush
- Bonding primer suitable for wood
- White cabinet, trim, furniture, chalk, or mineral paint
- Clear protective topcoat, such as water-based polyurethane or furniture wax
- Drop cloth or scrap cardboard
- Gloves and a dust mask for sanding
You do not need every fancy tool in the paint aisle. The most important tools are a good primer, a smooth brush or foam roller, and patience. Patience is technically free, though it can be difficult to find in stock.
Step 1: Empty and Inspect the Knife Block
Remove all knives and accessories from the block. Shake the block upside down over a trash can. You may discover crumbs, spice dust, and one fossilized piece of parsley from a dinner you have emotionally moved on from. This is normal. Knife blocks collect debris because the slots are narrow, dark, and rarely cleaned.
Look closely at the exterior. Check for dents, sticky patches, peeling finish, logos, decorative grooves, or old labels. If the block has a raised brand mark you dislike, you can either leave it, sand it lightly, cover it with a small decorative plate, or accept that the paint will reduce but not completely erase it. If the logo is deeply embossed, one extra coat of primer and paint may soften its appearance.
Step 2: Clean the Block Thoroughly
Paint does not like grease. It does not like oil, dust, soap film, or the mysterious kitchen residue that appears near stoves. Before sanding or painting, clean the exterior with warm water and mild dish soap. Use a dampnot soakingsponge. Wooden blocks should not be submerged in water because too much moisture can warp or crack the wood.
For the slots, turn the block upside down and tap it gently. Use dry pipe cleaners or a narrow brush to loosen crumbs. If you must use moisture inside the slots, use as little as possible and let the block dry completely for at least 24 hours in a well-ventilated area. Never put wet knives back into a block, because moisture trapped in dark slots can encourage odor and grime.
Step 3: Sand for Better Paint Adhesion
Most knife blocks have a factory finish. That finish may be glossy, oily, or sealed, which means paint may peel if you apply it directly. Light sanding gives primer something to grip. Use fine-grit sandpaper and gently scuff the outside surfaces. You are not trying to remove every bit of finish; you are simply dulling the shine.
Sand with the grain where possible. Use folded sandpaper for corners and edges. Avoid pushing sandpaper into the knife slots, where dust can be difficult to remove. Once finished, wipe the block with a tack cloth or slightly damp microfiber cloth. Let it dry completely before priming.
What If the Block Is Old?
If you are working with a very old painted block or any item that may have been coated decades ago, be cautious before sanding. Old finishes can contain unsafe materials. When in doubt, skip aggressive sanding, use a liquid deglosser according to label directions, or choose a newer unfinished or factory-finished wood block for the project.
Step 4: Tape Off the Slots
Painter’s tape is your friend. Cover the top opening area so paint does not drip into the knife slots. If the block has a separate scissor slot or sharpening-steel opening, tape those too. Press the tape firmly around the edges, but do not jam it deep inside.
This step may feel fussy, but it keeps the project cleaner and safer. The inside of the block should remain as close to its original surface as possible. Your white paint belongs on the outside, where it can look charming and mind its own business.
Step 5: Apply Primer
Primer is the difference between “cute makeover” and “why is this peeling already?” Use a bonding primer suitable for wood or previously finished surfaces. Apply a thin, even coat with a brush or foam roller. Thin coats dry better and look smoother than thick coats. Thick paint is not confidence; it is future sanding.
Brush in the direction of the wood grain when possible. Watch for drips around the angled top and bottom edges. Let the primer dry according to the label. If the surface feels rough, sand very lightly with 220-grit sandpaper and wipe away dust.
For dark or yellow-toned wood, a second coat of primer may help prevent discoloration from bleeding through the white paint. White is honest. It will reveal every shortcut you take. Respect the white.
Step 6: Paint the Knife Block White
Now comes the satisfying part. Apply your first coat of white paint in a thin layer. A small foam roller gives a smooth finish on flat sides, while an angled brush helps around edges and corners. If you prefer a slightly rustic look, chalk paint or mineral paint can work well. If you want a sleeker, more washable finish, cabinet or trim enamel is a strong choice.
Do not panic if the first coat looks streaky. First coats often look like they are questioning your life choices. Let it dry, then apply a second thin coat. Two coats are usually enough over good primer, but some blocks may need a third coat for a crisp, even white.
Choosing the Right White
Not all white paint is the same. A cool white feels crisp and modern. A warm white feels softer and more farmhouse-inspired. A creamy white is forgiving in kitchens with wood floors, beige tile, or warm counters. A bright gallery white looks fantastic in modern kitchens but may show smudges faster.
If your kitchen has white cabinets, compare swatches before choosing paint. A knife block painted in a slightly different white can still look intentional, but a near-match that is just a little “off” may look accidental. When in doubt, choose a soft white rather than a stark one.
Step 7: Add a Protective Topcoat
A knife block is a high-touch kitchen accessory. It gets handled, bumped, wiped, and occasionally attacked by a flying tomato. A clear topcoat helps protect the finish from scuffs and moisture. Use a water-based polyurethane for durability, or choose clear furniture wax for a softer matte look.
Apply the topcoat only to the painted exterior. Use thin coats and let each coat dry fully. Water-based polyurethane is often a good option over white paint because it is less likely to yellow than some oil-based finishes. Still, always test if you are unsure.
If using wax, buff it gently after it sets. Wax creates a lovely hand-rubbed finish, but it may need occasional refreshing. Polyurethane is usually better for a wipeable, family-kitchen surface.
Step 8: Let It Cure
This is the step nobody wants, and everyone needs. Let the painted knife block cure before putting it back into daily service. Follow the paint and sealer labels. Keep the block in a dry, ventilated spot while it cures. Do not return knives too soon, especially if handles rest against painted areas.
When the surface is fully cured, remove the painter’s tape carefully. If any paint has bridged over the tape edge, score lightly with a craft knife before pulling the tape away. This helps prevent peeling.
How to Style a White-Painted Knife Block
A white knife block can look clean and classic on its own, but small styling choices make it feel intentional. Place it near a wooden cutting board for warmth, beside a small crock of utensils for balance, or against a backsplash where the white paint can pop. If your counter is also white, add contrast with a black pepper mill, a small plant, or a warm-toned tray underneath.
For a farmhouse kitchen, pair the block with butcher block counters, linen towels, and matte black hardware. For a coastal kitchen, use soft white paint and nearby accents like pale blue ceramics or woven baskets. For a modern kitchen, choose a crisp white finish and keep the counter uncluttered. The block should look useful, not like it is auditioning for a lifestyle magazine spread where nobody actually cooks.
Optional Design Ideas
Add a Stripe
Use painter’s tape to create a simple stripe around the base or side. Gray, navy, sage green, or black can add contrast without making the block too busy.
Use a Distressed Finish
After painting, lightly sand edges for a worn-in cottage look. This works best with chalk or mineral paint. Keep distressing subtle. You want “charming vintage,” not “survived a raccoon incident.”
Add a Label Plate
A small brass or black metal label holder can cover an old logo and add character. Keep it away from slots and high-contact areas.
Create a Phone Ledge
If the back of the block has room, attach a small painted wood ledge to hold a phone or recipe card. Make sure the block remains stable and does not tip forward.
Common Mistakes to Avoid
The biggest mistake is painting without cleaning first. Kitchen grease is sneaky, and paint over grease will not last. The second mistake is skipping primer, especially on glossy or sealed wood. The third mistake is applying paint too thickly. Thick coats can stay soft, drip, and chip more easily.
Another mistake is painting the slots. Keep paint outside. Knife blades need a smooth, clean path, and painted interiors can chip or trap debris. Finally, do not wash the finished block under running water. Wipe the painted exterior with a damp cloth, then dry it immediately.
How to Clean and Maintain Your Painted Knife Block
Once your white-painted knife block is back in service, keep it looking fresh with simple habits. Always wash and dry knives before placing them into the block. Never store damp blades. Wipe the exterior weekly with a soft, barely damp cloth and mild soap if needed. Dry immediately.
Every so often, remove all knives, turn the block upside down, and shake out crumbs. Use dry pipe cleaners to clean slots. If the painted surface gets a small nick, touch it up with a tiny brush and leftover paint. Let the touch-up cure before heavy use.
White paint may show smudges faster than dark stain, but that is not necessarily a bad thing. It reminds you to clean the block, which is useful in a kitchen. Think of it as a polite little hygiene alarm wearing a cute outfit.
Is a Painted Knife Block Worth It?
Yes, if your block is structurally sound and you enjoy small, affordable DIY upgrades. This project is low-cost, low-risk, and highly visible. It can make a dated kitchen accessory feel fresh without requiring a shopping trip for a whole new knife set.
However, if your knife block is cracked, moldy, unstable, or impossible to clean, paint is not the answer. Start with a safe, clean object. DIY should improve your kitchen, not disguise a problem.
Real-Life Experience: What I Learned From Painting a Knife Block White
The first thing you learn while painting a knife block white is that the block is dirtier than it looks. From three feet away, it may seem like a harmless wooden rectangle. Up close, under decent light, it reveals every oil smudge, coffee splash, and tiny crumb. Cleaning takes longer than expected, but it is the step that makes the paint job feel solid instead of temporary.
I also learned that sanding a knife block is awkward in a very specific way. The angled top, narrow corners, and slot openings make it less straightforward than painting a flat tray or stool. A sanding sponge helps because it bends slightly and reaches edges without gouging the wood. The goal is not perfection. The goal is a dull, clean surface that primer can grip.
Primer made the biggest difference. On one test area, paint over unsanded finish scratched off too easily. Over primer, it bonded much better and looked smoother. White paint also needed more patience than expected. The first coat looked thin and unimpressive, almost like I had rubbed the block with disappointment. The second coat changed everything. By the third touch-up, it had that crisp, clean look that makes the whole counter feel brighter.
The topcoat was another lesson. A matte white finish is beautiful, but kitchens are not gentle environments. A clear protective coat made the surface easier to wipe and gave me more confidence using it near the prep area. I preferred a subtle satin finish because it looked clean without turning shiny. High gloss can be durable, but on a small block it may highlight brush marks.
The most practical lesson was to keep knives dry. A painted exterior does not change the basic care rules for a knife block. Wet knives should never go into slots. Even after the makeover, the block still needs airflow, occasional crumb removal, and common sense. I started leaving washed knives on a towel for a few extra minutes before storing them, and that habit alone made the block feel cleaner.
Design-wise, white paint was more versatile than expected. It made the block disappear a little against a light backsplash, which was exactly the point. Instead of shouting from the counter, it quietly blended in. If your kitchen has lots of wood already, painting only the block can break up the brown tones. If your kitchen is mostly white, a warm white keeps the block from looking too sterile.
Would I do it again? Absolutely. It is not a dramatic renovation, but it is the kind of small visual improvement that makes daily cooking feel nicer. The project is also forgiving. If the paint chips months later, touch it up. If you want a new look, repaint it. If you eventually replace the block, you still learned useful painting skills on a low-stakes object. That is the beauty of a DIY white-painted knife block: it is practical, pretty, and humble enough not to demand a contractor, a spreadsheet, or a nervous call to your bank.
Conclusion
A DIY white-painted knife block is proof that small projects can have a big visual payoff. With careful cleaning, light sanding, the right primer, thin coats of white paint, and a durable protective finish, an ordinary wooden block can become a bright, stylish kitchen accessory. The key is to respect both design and function: paint the outside, keep the slots clean, let the finish cure, and store only dry knives.
This is a weekend project with everyday rewards. It costs little, uses basic supplies, and gives new life to something you already own. In a world of expensive kitchen upgrades, that feels refreshingly sane. Also, it lets you say, “Oh, I painted that,” which is one of the most satisfying sentences in the DIY language.
Note: This article is written for general DIY inspiration. Always follow the instructions on your specific paint, primer, and sealer products, and avoid painting surfaces that directly contact food or knife blades.














