
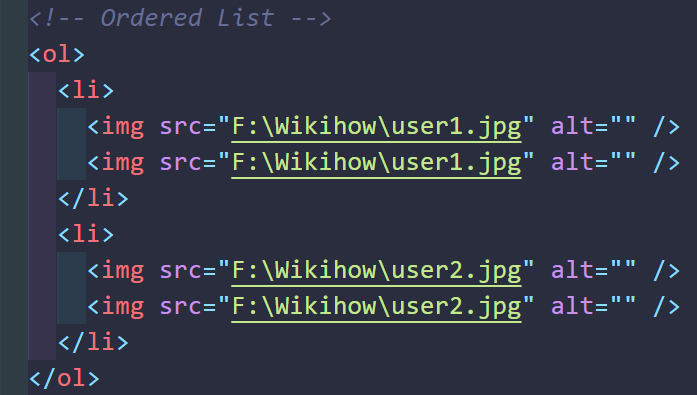
Adding images to an HTML list sounds like one of those tiny web design tasks that should take twelve seconds and one sip of coffee. Then the image stretches like a startled accordion, the bullets run away, and your list looks like it was assembled during a small earthquake. Good news: the actual HTML is simple. The secret is choosing the right structure, writing useful alt text, and using a little CSS so your list behaves like a civilized citizen of the internet.
In this guide, you will learn how to add images to unordered lists, ordered lists, navigation lists, feature lists, product lists, and step-by-step tutorials using clean HTML programming. We will also cover image bullets, accessibility, SEO, responsive design, lazy loading, common mistakes, and real-world examples you can copy, edit, and proudly show to your browser without apologizing.
Why Add Images to an HTML List?
HTML lists are one of the most useful structures in web development. A list can organize steps in a tutorial, display product features, build a menu, compare services, present team members, or show a gallery of resources. Adding images makes the list easier to scan, more visually appealing, and more helpful for users who prefer quick visual cues.
For example, a recipe list with small ingredient photos is easier to understand than a wall of text. A travel packing list with icons feels friendlier. A product feature list with screenshots can help users understand what each feature actually does. In other words, images can turn a plain list from “homework handout” into “useful web content people may actually read.”
From an SEO perspective, images also support context when they are placed near relevant text, named clearly, and given accurate alt attributes. Search engines do not “see” images the same way humans do, so the surrounding HTML, file name, captions, and alternative text help explain what each image represents.
The Basic HTML Structure for Lists With Images
The most common way to add images to a list is to place an <img> element inside each <li> element. In HTML, a list item can contain more than plain text. It can include images, links, paragraphs, headings, buttons, spans, and other flow content. That gives you plenty of flexibility.
Example: Simple Unordered List With Images
This approach is direct, readable, and beginner-friendly. Each list item contains one image and one piece of text. The src attribute tells the browser where the image file is located, while the alt attribute provides a text alternative for users who cannot see the image or when the image fails to load.
Understanding the Key HTML Tags
The <ul> Tag
The <ul> element creates an unordered list. Use it when the order of items does not matter. For example, a list of services, tools, ingredients, benefits, or categories usually belongs in a <ul>. The browser normally displays each item with a bullet marker.
The <ol> Tag
The <ol> element creates an ordered list. Use it when sequence matters. Tutorials, rankings, recipes, installation steps, and instructions usually belong in an ordered list. The browser normally displays each item with a number or letter.
The <li> Tag
The <li> element represents a single list item. Every item inside a <ul> or <ol> should be wrapped in an <li>. Placing images directly inside the parent list without <li> tags is a common beginner mistake. Browsers may still show something, because browsers are forgiving little chaos managers, but your HTML will not be properly structured.
The <img> Tag
The <img> element embeds an image into the page. It does not need a closing tag. A practical image tag usually includes src, alt, width, and height. Width and height help the browser reserve space before the image loads, which can reduce layout shifting and make the page feel smoother.
How to Add Images to an Ordered List
An ordered list with images is perfect for tutorials. The number tells users the sequence, and the image shows them what to look for. This is especially helpful for software guides, cooking instructions, DIY projects, and setup walkthroughs.
This structure is more advanced than the basic example because each list item contains an image, a heading, and a paragraph. That makes the list more useful for readers and easier for search engines to understand. It also gives you better styling options.
Styling Image Lists With CSS
HTML gives your list structure. CSS makes it look like it belongs on a real website instead of a forgotten folder from 2003. Without CSS, your images may be too large, poorly aligned, or awkwardly spaced. A little styling fixes that quickly.
The display: flex; rule places the image and text side by side. The gap property creates space between them. The object-fit: cover; rule helps crop images neatly inside fixed dimensions. The border-radius rule rounds the image corners, because sometimes a list deserves a tiny spa day.
Using Images as Custom List Bullets
Sometimes you do not want a full image inside each list item. You only want a small icon to replace the default bullet. There are two common ways to do this: using CSS list-style-image or using a background image or pseudo-element.
Method 1: Using list-style-image
This method is simple, but it has limitations. Controlling the icon size, alignment, and spacing can be tricky. If you need precise design control, a pseudo-element is usually better.
Method 2: Using a CSS Pseudo-Element
This method gives you much better control over icon size and placement. It is a smart choice for feature lists, benefit lists, pricing tables, and landing pages.
Writing Alt Text for Images in Lists
Alt text is one of the most important parts of adding images to a list using HTML programming. The purpose of alt text is not to say “image of image” or “picture here.” That is like labeling a sandwich “food object.” Technically true, emotionally disappointing.
Good alt text explains the meaning or function of the image. If the image adds useful information, describe that information clearly. If the image is decorative and adds no meaning, use an empty alt attribute: alt="". This tells assistive technology to skip the image instead of reading unnecessary clutter.
Good Alt Text Examples
Keep alt text concise. It should help users understand the list item, not turn into a novel with a plot twist. For image-heavy lists, consistent alt text also improves usability and keeps your page more accessible.
Making Image Lists Responsive
A list with images may look great on a laptop but collapse into a tiny visual traffic jam on a phone. Responsive design makes the list adapt to different screen sizes. The easiest approach is to use flexible widths, avoid fixed oversized images, and adjust the list layout with media queries.
On wider screens, the image and text sit side by side. On smaller screens, the list item stacks vertically, making the content easier to read. This is especially useful for blog posts, product cards, portfolio lists, and educational content.
Improving Performance With Proper Image Attributes
Images can make a page beautiful, but they can also slow it down if they are too large. When adding images to an HTML list, use properly sized files instead of uploading a massive photo and shrinking it with CSS. A 4000-pixel-wide image used as a 48-pixel icon is not optimization; it is a tiny image wearing a giant winter coat.
Use modern image formats when appropriate, compress your files, and include width and height attributes. For images farther down the page, consider browser-level lazy loading with loading="lazy".
The loading="lazy" attribute tells the browser it can wait to load the image until the user gets closer to it. This can improve page speed, especially when your list contains many images.
Adding Clickable Images to a List
You can also make images clickable by wrapping the image in an anchor tag. This is common in navigation menus, product lists, article cards, and galleries.
When an image is inside a link, the alt text should describe the link’s purpose if the image is the only visible content. If the link also includes clear text, the alt text can be shorter or even empty if the image is decorative. The goal is to avoid making screen reader users hear the same information twice.
Using Figures and Captions Inside List Items
For visual lists where each image needs a caption, the <figure> and <figcaption> elements can be helpful. They are useful for galleries, team profiles, product comparisons, and portfolio entries.
Captions are visible to everyone, while alt text is mainly used when the image cannot be seen. Do not simply copy the caption into the alt text unless that is truly the best description. Use each one for its proper job.
Common Mistakes When Adding Images to HTML Lists
Forgetting the Alt Attribute
Every meaningful image should have alt text. Missing alt attributes can create accessibility problems and reduce the usefulness of your content. Even decorative images should include alt="" so assistive technologies know they can skip them.
Using Huge Images for Tiny Icons
Do not use a full-size photograph as a small bullet icon. Resize and compress images before uploading them. Your visitors should not need the patience of a monk just to load a checklist.
Breaking the List Structure
Always place content inside <li> elements. A proper list should look like <ul><li>Item</li></ul> or <ol><li>Step</li></ol>. Clean structure makes your page easier to style, maintain, and understand.
Relying Only on Images
If your list uses icons, include readable text too. Icons can support meaning, but they should not carry the entire message. A tiny gear icon may mean settings, tools, engineering, or “I found this in a free icon pack and panicked.” Text removes the mystery.
Ignoring Mobile Layouts
Always test image lists on small screens. If the image squeezes the text into a narrow column, use responsive CSS to stack the layout.
Best Practices for SEO-Friendly Image Lists
To make your HTML image list better for users and search engines, start with descriptive file names. A file named html-list-example.jpg is more useful than IMG_4829.jpg. Place images near relevant text so the context is obvious. Add concise alt text, use captions where helpful, and avoid keyword stuffing.
For example, do not write alt text like HTML image list HTML programming images in HTML list tutorial HTML list image SEO. That is not optimization; that is a keyword smoothie, and nobody ordered it. A better alt text would be HTML list item containing a thumbnail image and text.
Also consider page speed. Search performance and user experience are closely connected. A beautiful image list that takes forever to load is like a sports car with square wheels: technically interesting, but not ideal for travel.
Complete Example: A Clean HTML List With Images
Here is a complete example that combines structure, accessibility, styling, and responsive behavior. You can paste this into the body of an HTML page and update the image paths to match your project.
Experience-Based Tips for Adding Images to HTML Lists
After working with image lists in real projects, one lesson becomes clear very quickly: the HTML is usually not the hard part. The real challenge is keeping the list clean, fast, accessible, and easy to update later. Anyone can drop an image into a list item. The magic is making sure the list still looks good after the client adds twelve more items, swaps one icon for a giant vacation photo, and asks why the page “feels a little weird on mobile.” Web design builds character.
My first practical tip is to decide the purpose of the image before writing the code. Is the image content, decoration, a clickable thumbnail, a product photo, or a tiny visual marker? That decision affects everything: the HTML structure, alt text, image size, CSS, and even file format. If the image explains something important, use a real <img> element with meaningful alt text. If it is purely decorative, consider using CSS or an empty alt attribute. This small decision prevents a lot of accessibility headaches later.
Second, keep image dimensions consistent within the same list. A list where one image is square, another is panoramic, and another is shaped like it escaped from a banner ad will look messy. You can use CSS properties like width, height, and object-fit to create a consistent layout. This is especially important for product lists, team member lists, article cards, and service feature blocks.
Third, name files like a human who expects to find them again. Use names such as html-list-thumbnail.webp, blue-check-icon.svg, or coding-tutorial-step-one.jpg. Avoid mysterious names like final-final-new2-realfinal.png. We have all done it. We have all regretted it. Clear file names help organization, maintenance, and search context.
Fourth, test with missing images. Temporarily change an image path and see what happens. Does the alt text make sense? Does the layout collapse? Does the list still communicate the main idea? This quick test can reveal whether your content depends too heavily on visuals.
Fifth, watch the balance between design and readability. Images should support the list, not overpower it. If the user came to read a checklist, do not turn every bullet into a billboard. For simple lists, small icons may be enough. For tutorials, larger screenshots may be useful. For galleries, images can take center stage. Match the image size to the purpose of the content.
Finally, build your list as if someone else will maintain it later. Use reusable classes, simple structure, and predictable image sizes. A clean image list is not just nice for users; it is a gift to your future self. And future you deserves nice things, especially after debugging CSS at midnight.
Conclusion
Adding images to a list using HTML programming is simple once you understand the structure. Put each image inside an <li> element, use <ul> for unordered lists, use <ol> for step-by-step lists, and write alt text that explains the image’s purpose. Then use CSS to control spacing, alignment, responsiveness, and visual polish.
For small decorative icons, CSS pseudo-elements may be better than full image tags. For meaningful images, use the <img> element with clear attributes. For performance, resize images properly, include width and height, and use lazy loading when appropriate. For SEO, place images near relevant text, use descriptive file names, and avoid keyword stuffing.
In short, image lists are not just about making a page prettier. They improve clarity, guide the reader, support accessibility, and create a better user experience. Treat your list like a tiny content system, not a dumping ground for random pictures, and your HTML will stay clean, useful, and ready for real-world publishing.
SEO Tags
Note: This article is based on established HTML, CSS, accessibility, image performance, and image SEO best practices from reputable web development and search documentation.












