
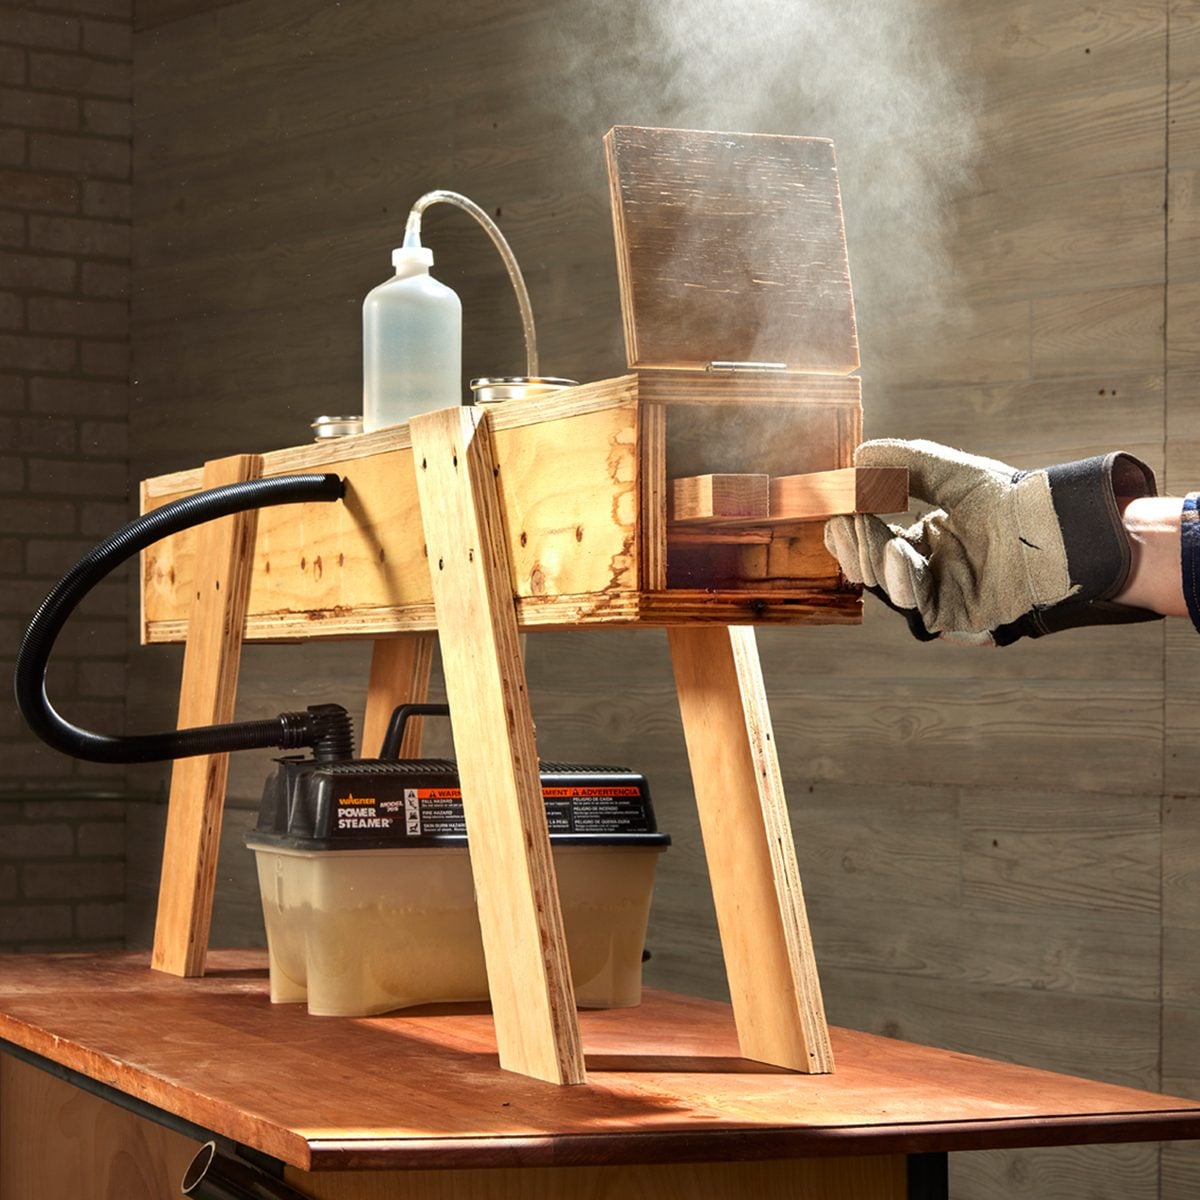
Steam bending wood sounds like a magic trick: take a stubborn board, give it a hot spa day, and suddenly it agrees to curve like it has been practicing yoga. The truth is less mystical but just as satisfying. Steam bending uses heat and moisture to soften the lignin inside wood, allowing the fibers to shift while the piece is clamped around a form. Once the wood cools and dries, it holds much of that new shape.
For DIY woodworkers, steam bending is one of the most rewarding ways to create graceful curves without cutting away half a board or gluing together a stack of thin strips. It is useful for chair backs, coat hooks, boat ribs, curved handles, garden trellises, picture frames, lampshades, and decorative furniture parts. It also teaches humility, because wood has a personality. Some boards cooperate. Some boards snap dramatically like they have been waiting their whole life to audition for a soap opera.
This guide explains how to bend wood with steam at home, how to build a simple steam box, which woods bend best, how long to steam the wood, and how to avoid common beginner mistakes. The goal is not to turn your garage into a furniture factory overnight. The goal is to help you make your first successful bend safely, cleanly, and with fewer broken pieces flying into the “learning experience” pile.
What Is Steam Bending Wood?
Steam bending wood is a traditional woodworking technique that uses hot steam to make solid wood temporarily flexible. The process usually involves placing a workpiece inside a steam chamber, heating it with steady steam, removing it while it is still hot, and clamping it quickly around a bending form.
Unlike kerf bending, which cuts slots into the back of the wood, steam bending keeps the grain mostly continuous. Unlike bent lamination, which glues many thin strips together, steam bending uses a single solid piece. That is why it can produce strong, elegant curves with a natural grain line from end to end.
Why Steam Bending Works
Wood is made of long fibers held together by natural binding material. When heat and moisture enter the wood, the fibers become easier to compress and shift. The outside of the curve stretches slightly, while the inside compresses. Because wood does not like stretching very much, successful steam bending depends heavily on compression, proper grain direction, and fast clamping.
This is why many woodworkers use a compression strap for tighter curves. A metal strap supports the outside face of the bend and helps prevent the wood from tearing apart. For gentle DIY curves, you may get by with a simple form and clamps. For chair parts, boat ribs, and tight bends, a strap can be the difference between “beautiful handmade curve” and “expensive kindling.”
Best Woods for Steam Bending
Not all wood bends equally well. Straight-grained hardwoods are usually the best candidates. White oak is a favorite because it is strong, available, and famous for bending well. Ash, hickory, elm, beech, hackberry, and certain maples can also perform well when the grain is straight and the stock has enough moisture.
Good choices for beginners
If this is your first steam bending project, start with a forgiving hardwood such as white oak, ash, or hickory. These species are commonly used in chairs, tool handles, sporting goods, and curved furniture parts because their long fibers can tolerate bending better than many brittle or knotty woods.
Woods to approach carefully
Softwoods, brittle woods, highly figured lumber, spalted wood, and boards with knots are more likely to fail. That curly maple board may look gorgeous, but wild grain can behave like a toddler in a grocery store: unpredictable, emotional, and likely to cause a scene. Save fancy figure for projects where bending is not the main event.
Air-Dried vs. Kiln-Dried Lumber
Air-dried wood usually bends better than kiln-dried wood. Kiln drying can make the wood less responsive to steam because the fibers and natural binders become more set in place. That does not mean kiln-dried wood is useless, but it may need soaking, extra steaming, and realistic expectations.
For many DIY projects, wood with moderate moisture content is ideal. Very dry lumber can crack. Soaking kiln-dried pieces before steaming can improve your chances, especially for thicker parts. If you can buy air-dried white oak or ash from a local sawyer, you are already giving yourself a head start.
Tools and Materials You Need
You do not need a commercial shop to bend wood with steam, but you do need a safe, organized setup. Steam is hot enough to burn skin quickly, so treat this process with respect. The wood will be hot, the steam box will be hot, and your excitement will be hot too. Only one of those should be allowed to escape freely.
Basic supplies
- Straight-grained hardwood blank
- Steam box or steam tube
- Steam source, such as a wallpaper steamer or purpose-built steam generator
- Heat-resistant hose rated for steam
- Bending form made from plywood, MDF, or solid wood
- Strong clamps
- Heat-resistant gloves
- Eye protection
- Timer
- Scrap pieces for spacers inside the steam box
- Optional compression strap for tighter bends
How to Build a Simple DIY Steam Box
A steam box is simply a chamber that holds wood while steam surrounds it. Many DIY versions are made from exterior-grade plywood, rigid foam board, ABS pipe, or large-diameter PVC pipe. For safety, the box must never be sealed like a pressure vessel. Steam needs an inlet and a small outlet so pressure does not build up.
A basic plywood steam box can be built as a long rectangular tube just large enough for the wood pieces you plan to bend. Inside the box, install dowels or small wood strips as supports so the workpiece is lifted off the bottom. This lets steam circulate around all sides and keeps the board from sitting in condensed water.
Steam box design tips
- Make the box slightly longer than your workpiece.
- Slope the box slightly so condensation drains away.
- Use a loose-fitting door or plug, not an airtight seal.
- Drill a small vent hole near the far end.
- Keep the steam hose connection secure but not pressure-tight.
- Place the steam source lower than the box when possible.
A wallpaper steamer is a popular DIY steam source because it is portable and easy to control. Avoid improvised pressure cookers, sealed boilers, or anything that could create dangerous pressure. You want steady steam, not a backyard volcano with a woodworking hobby.
Make the Bending Form Before You Steam
The bending form is the mold that forces the hot wood into its new shape. Build it before steaming. This is not optional. Once the wood comes out of the steam box, you have a short working window before it cools and stiffens. Searching for a missing clamp at that moment is how good boards become tragic little lessons.
Use plywood, MDF, or stacked scrap wood to create a form that matches the curve you want. For many projects, the form should be slightly tighter than the final desired curve because the wood will spring back after it is released. Springback varies by species, thickness, moisture content, and bend severity, so testing is part of the process.
Form-building checklist
- Draw the curve full size on paper or directly on plywood.
- Cut the form smoothly and sand away bumps.
- Add extra length at both ends of the workpiece for clamping leverage.
- Mark clamp locations before steaming.
- Test your clamping sequence with a dry run.
How Long Should You Steam Wood?
A common rule of thumb is about one hour of steaming per inch of wood thickness. A half-inch piece may need around 30 minutes, while a one-inch chair part may need about an hour. Some woodworkers use slightly shorter or longer times depending on species, moisture content, and the tightness of the bend.
More steam time is not always better. Oversteaming can weaken the wood or make it mushy. Understeaming can make the board refuse the curve and break. Keep notes on every test: species, thickness, moisture condition, steam time, bend radius, and result. Your future self will thank you, probably while holding fewer broken pieces.
Step-by-Step: How to Bend Wood with Steam
Step 1: Choose and prepare the wood
Select straight-grained stock with no knots, cracks, checks, or dramatic grain runout. Cut the piece longer than the final size so you have extra material for clamping and trimming. If the lumber is kiln-dried, consider soaking it before steaming, especially for tighter bends.
Step 2: Build and test the steam setup
Set the steam box on a stable surface in a ventilated area. Connect the steam source, check that steam can flow through the box, and confirm there is a vent. Do not place your face near the door or vent while steam is running. Steam burns are fast and deeply unpleasant.
Step 3: Prepare the bending form and clamps
Place every clamp within reach. Arrange the form on a sturdy workbench. Practice the bending sequence with a dry board or scrap piece so you know where your hands, clamps, and helper will go. If you are using a compression strap, attach it before the hot wood goes into the form.
Step 4: Steam the wood
Place the wood on supports inside the steam box and close the end. Start the timer when the box is producing steady steam. Check the steam source regularly so it does not run dry. Maintain a steady flow of steam for the required time.
Step 5: Bend immediately
Put on heat-resistant gloves and eye protection. Open the steam box carefully, standing clear of the first blast of steam. Remove the wood and move quickly to the form. Bend steadily, not violently. Clamp from one end to the other, keeping pressure controlled and even.
Step 6: Let the wood cool and dry on the form
Leave the bent piece clamped until it cools and dries. For small parts, several hours may be enough before handling, but overnight is safer. For thicker or more demanding pieces, leave the wood in the form longer. The more completely the piece dries in position, the better it will hold the curve.
Common Steam Bending Mistakes
Using the wrong wood
Knots, short grain, cracks, and severe grain runout are bend killers. Steam does not fix bad stock. It simply warms it up before it fails more dramatically.
Waiting too long after steaming
Hot wood cools quickly. If your form is across the shop, buried under a cordless drill, or guarded by a sleeping dog, your timing will suffer. Set up the bending station beside the steam box.
Forgetting springback
Most bent wood relaxes a bit after release. Make your form slightly tighter than the final curve, and test before committing to expensive stock.
Clamping too aggressively
Fast does not mean frantic. Bend with steady movement. Jerky pressure increases breakage, especially on tight curves.
Creating a sealed steam chamber
A steam box should not build pressure. Always include a vent. The goal is moist heat, not an accidental boiler experiment.
Steam Bending Safety Tips
Steam bending is beginner-friendly when handled carefully, but it is still hot work. Wear gloves, long sleeves, and eye protection. Keep children and pets away from the setup. Use equipment on a stable surface. Do not leave the steamer unattended. Make sure cords, hoses, and clamps are arranged so nobody trips during the critical bending moment.
Never seal the steam box tightly. Never aim steam at your body. Never open the box with your face over the door. And never assume a board is cool just because it looks innocent. Hot wood has no warning label, which is rude, but true.
Project Ideas for First-Time Steam Bending
Start small. A simple coat hook, curved shelf bracket, plant hanger, or decorative handle is much easier than a Windsor chair arm. Thin pieces are less intimidating, heat faster, and cost less when one breaks. Once you understand the process, you can move on to more serious projects like chair rails, stool stretchers, boat ribs, curved drawer pulls, and sculptural home decor.
A great beginner project is a set of steam-bent wall hooks. Use half-inch white oak or ash, build a gentle form, and bend several identical blanks. Make more pieces than you need. Even experienced woodworkers prepare extras because steam bending is part craft, part science, and part negotiation with a tree that is no longer taking meetings.
Troubleshooting: Why Did My Wood Break?
If your wood snapped, check the grain first. Grain runout is one of the biggest causes of failure. Next, consider whether the wood was too dry, the bend was too tight, the steaming time was too short, or the clamping pressure was uneven. Also check whether the outside face of the curve needed support from a compression strap.
If the wood bent but sprang back too far, your form may need a tighter radius, the piece may need more drying time on the form, or the wood may not have been steamed long enough. If the surface wrinkled on the inside curve, the bend may have been too severe or the compression was not controlled.
Steam Bending vs. Bent Lamination vs. Kerf Bending
Steam bending is best when you want a solid piece with continuous grain and strong visual flow. Bent lamination is better when you need predictable curves, complex shapes, or very stable parts. Kerf bending is useful for hidden structural parts, quick curves, or projects where the slotted back will not show.
In other words, steam bending is the romantic traditional method, bent lamination is the reliable engineer, and kerf bending is the practical friend who shows up with a circular saw and says, “We can make this work.” All three methods have a place. Choose the one that fits your project, timeline, tools, and tolerance for surprises.
Extra Experience Notes: Lessons from Real DIY Steam Bending
The first practical lesson of steam bending is that preparation matters more than bravery. Many beginners focus on the dramatic moment when the hot board comes out of the steam box, but the success of that moment is decided earlier. The wood was selected earlier. The form was built earlier. The clamps were staged earlier. The path from steam box to form was cleared earlier. A smooth bend often feels calm because all the chaos was removed before the steam ever started.
One useful habit is to perform a complete rehearsal. Put a cold board into the empty steam box, pretend to remove it, carry it to the form, and clamp it exactly as you plan to do with the real piece. This may feel silly, but it reveals problems immediately. Maybe one clamp is too short. Maybe the form slides on the bench. Maybe the hose is in the way. Maybe you need a helper. Discovering those issues during a dry run is mildly annoying. Discovering them while holding a steaming piece of oak is a tiny woodworking horror movie.
Another hard-earned lesson is to make extra blanks. If the project needs four curved parts, prepare six or seven. This is not pessimism; it is professional realism wearing a flannel shirt. Even with good technique, wood varies from board to board. One piece may bend perfectly, while another from the same stack may crack because the grain wandered near the edge. Extras allow you to keep the project moving instead of stopping to mill new stock while your enthusiasm leaks out of the shop.
Pay close attention to grain direction. Straight grain is not just a nice feature; it is the backbone of the bend. When grain runs off the edge, the fibers are shorter and weaker. During bending, that weak area becomes the place where failure starts. For tight bends, split stock can be better than sawn stock because splitting follows the natural grain. That is why traditional chairmakers and boatbuilders care so much about riven or carefully selected bending stock.
Moisture is another area where experience teaches balance. Very dry wood tends to resist bending and crack. Wood that is too wet can bend but may take longer to dry and may move later. Air-dried lumber often feels like the sweet spot for steam bending. If you only have kiln-dried lumber, soaking can help, but it is not a magic reset button. Treat kiln-dried stock as more experimental and give yourself a wider margin for failure.
Clamping strategy also improves with practice. Beginners often clamp wherever there is room. A better approach is to plan clamp positions so pressure follows the curve progressively. Clamp the starting point securely, then work along the bend in a controlled sequence. Do not crush the wood with clamp pressure. The goal is firm contact with the form, not revenge.
Finally, keep records. Write down the species, thickness, steam time, bend radius, moisture condition, and result. Add a quick note about what failed or worked. After a few attempts, your notes become a personal bending chart for your shop, your lumber, and your tools. That knowledge is more useful than any universal rule because steam bending always includes local variables. The best woodworkers are not the ones who never break parts. They are the ones who learn something every time a part breaks, then quietly make the next bend better.
Conclusion
Learning how to bend wood with steam opens a new design language for DIY woodworking. Instead of building everything from straight lines and square corners, you can create curves that look natural, strong, and custom-made. The process is simple in concept: choose straight-grained wood, steam it long enough, bend it quickly around a prepared form, and let it dry in place. The craft is in the details: species selection, moisture, timing, clamp placement, springback, and safety.
Start with a small project, use forgiving wood, build a reliable steam box, and expect a few broken test pieces along the way. Every snapped board teaches you something about grain, pressure, heat, and patience. Once you get your first clean bend, you will understand why woodworkers keep returning to this old technique. It feels a little like convincing nature to sign off on your designand when it works, the result is beautiful.












