
Installing a fence post looks simple from a distance: dig a hole, drop in a post, add concrete, admire your handiwork, and casually tell everyone, “Yep, I built that.” But anyone who has ever watched a fence slowly lean like it is trying to eavesdrop on the neighbor’s barbecue knows the truth: the post is the whole game.
A fence is only as strong as the posts holding it up. Panels, rails, pickets, wire, and gates all depend on posts that are straight, deep, well-drained, and firmly set. Whether you are building a wood privacy fence, replacing a rotted post, installing a chain link terminal post, or setting posts for a garden fence, the method matters. A properly installed fence post can stand firm for years. A rushed one may wobble before the concrete dust has left your shoes.
This guide walks you through how to install a fence post the right way, including planning, digging, measuring, setting, bracing, concrete options, drainage tips, and common mistakes to avoid. Grab your gloves. Your future fence is about to develop a backbone.
Why Fence Post Installation Matters
The fence post carries the weight, tension, and wind load of the entire fence section. In a privacy fence, the panels act almost like sails during a storm. In a chain link fence, corner and terminal posts must resist the pull of stretched fabric. In a gate opening, posts deal with constant movement, weight, and the occasional dramatic slam from someone who insists they “didn’t shut it that hard.”
Good fence post installation prevents leaning, sagging gates, loose rails, cracked concrete, frost heave, and premature wood rot. Most post problems start below ground, where nobody can see the shortcuts until the fence starts advertising them.
Tools and Materials You Will Need
Basic Tools
- Post hole digger or power auger
- Shovel and digging bar
- Tape measure
- Level or post level
- Mason’s string
- Wood stakes
- Tamper or scrap 2×4
- Wheelbarrow or mixing tub, if mixing concrete first
- Drill or hammer for temporary braces
- Work gloves, eye protection, and dust mask
Materials
- Fence post, such as pressure-treated wood, metal, vinyl sleeve, or composite post
- Fast-setting concrete or standard concrete mix
- Gravel or crushed stone for drainage
- Temporary bracing boards
- Stakes or marking paint
- Water for concrete
For wood fences, use ground-contact-rated pressure-treated lumber or naturally durable wood approved for outdoor burial. For metal and chain link fences, choose posts sized for the height and style of fence. Gate posts should usually be heavier and deeper than line posts because gates are basically fence posts with a gym membership.
Step 1: Check Property Lines, Permits, and Utilities
Before digging, confirm where the fence can legally go. Check your property survey, local building rules, homeowners association requirements, and setback restrictions. Fence height, location, and style may be regulated, especially in front yards, corner lots, pool areas, and neighborhoods with design rules.
Next, contact 811 before you dig. This is not optional “nice-to-have” advice. Buried utilities may include electric, gas, water, communications, and irrigation lines. A fence post hole is small, but hitting the wrong line can be expensive and dangerous. Wait until utility markings are complete, then dig carefully around marked areas.
Step 2: Plan the Fence Layout
Start with the end posts, corner posts, and gate posts. These are the anchor points of the fence. Drive stakes into the ground at key locations, then run mason’s string between them to create a straight guide line.
For many wood privacy fences, posts are commonly spaced 6 to 8 feet apart on center. Chain link fence line posts may be spaced farther apart depending on the fence system, but always follow the manufacturer’s recommendation. Gates require special attention because the opening must match the gate hardware and swing clearance.
Keep the string line tight and level enough to guide alignment. The string should show the outside face of the post line, not necessarily the center of the hole. This small detail prevents a fence that looks straight in theory but wavy in real life.
Step 3: Decide How Deep the Fence Post Should Be
A common rule is to bury one-third to one-half of the above-ground post height. For many 6-foot fences, that means a post hole around 2 to 3 feet deep, plus extra depth for gravel at the bottom. In cold regions, local frost depth may require deeper holes so the post footing sits below the frost line and resists frost heave.
For example, if you are installing a 6-foot wood privacy fence, a 2-foot-deep post setting may work in many mild climates, but a taller fence, windy site, loose soil, or gate post may need more depth. When local codes or fence manufacturers specify a depth, follow those requirements first.
Step 4: Dig the Post Hole
Dig the hole straight down, keeping the sides as vertical as possible. A typical guideline is to make the hole about three times the width of the post. For a 4×4 wood post, that usually means a hole around 12 inches wide. For smaller metal posts, follow the fence system instructions.
A narrow hole does not leave enough room for concrete to lock around the post. A wildly oversized hole wastes concrete and energy. Think “strong footing,” not “archaeological excavation.”
Use a post hole digger for small projects or a power auger for long fence lines. If using an auger, go slowly and stay alert for roots, rocks, and sudden stops. A digging bar helps loosen compacted soil and break through clay. Remove loose dirt from the bottom so the post rests on a firm base.
Step 5: Add Gravel for Drainage
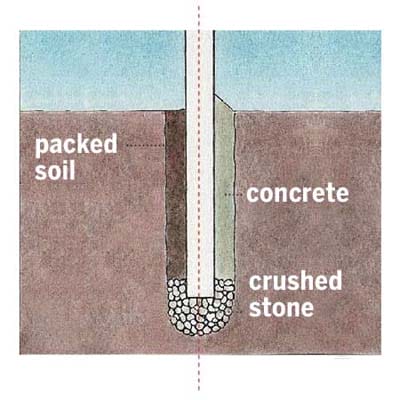
Pour 4 to 6 inches of gravel or crushed stone into the bottom of the hole, then tamp it firmly. This drainage layer helps water move away from the bottom of the post. That is especially important for wood posts, because standing moisture is one of the main reasons fence posts rot.
Gravel also gives you a stable base for fine-tuning post height. If a hole is slightly too deep, add and compact more gravel until the post reaches the correct elevation.
Step 6: Set the Post in the Hole
Place the fence post in the center of the hole on top of the compacted gravel. Check that the post aligns with the string line and sits at the correct height. Use a level on two adjacent sides to make sure the post is plumb.
If you are installing a wood fence, make sure the post face is oriented correctly for rails and panels. If you are installing a chain link fence, terminal posts, corner posts, and line posts must be positioned correctly for fittings, tension bands, and rails. With vinyl or composite systems, post orientation may determine whether panels slide into routed openings.
Step 7: Brace the Post
Once the post is plumb, brace it with temporary 2×4 boards attached to stakes in the ground. Bracing keeps the post from shifting while you add concrete. Do not trust your hands, your knees, or your “pretty sure it will stay” instincts. Wet concrete has a mischievous personality.
Check the post again after bracing. A tiny lean at the bottom becomes very noticeable at the top, especially on tall privacy fences. Stand back and look down the fence line before the concrete sets.
Step 8: Add Concrete
You have two common options: mix concrete with water before pouring, or use fast-setting post concrete that can be poured dry into the hole and hydrated in place. Always follow the instructions on the bag because products vary.
Option A: Pre-Mixed Concrete Method
Mix concrete in a wheelbarrow or mixing tub until it reaches a thick, workable consistency. Pour it around the post in stages, using a stick or scrap board to work the mix down and remove air pockets. Fill the hole to just above ground level or slightly below the surface, depending on the fence type and manufacturer instructions.
Option B: Fast-Setting Concrete Method
Some fast-setting products are designed for no-mix post installation. Usually, you add water to the hole, pour the dry mix around the post, then add more water as directed. This method is popular for DIY fence projects because it is quick and reduces mixing labor.
Wear eye protection, gloves, and a dust mask when handling dry concrete. Cement dust is not the kind of seasoning your lungs requested.
Step 9: Shape the Concrete Top
Shape the top of the concrete so it slopes slightly away from the post. This helps shed water instead of letting it pool around the base. For wood posts, this small detail can add years of life. For metal posts, it helps reduce corrosion risk around the base.
Do not create a bowl-shaped depression around the post unless you are trying to build a tiny birdbath with structural regrets. Water should move away from the post, not gather around it.
Step 10: Let the Concrete Set
Leave the braces in place while the concrete sets. Fast-setting concrete may firm up quickly, but that does not always mean the post is ready for full fence load. Follow the manufacturer’s cure time before attaching heavy panels, stretching chain link fabric, or hanging a gate.
Gates deserve extra patience. A gate post that shifts even slightly can cause a latch that misses, hinges that bind, or a gate that swings open like it has somewhere better to be.
How To Install Different Types of Fence Posts
Wood Fence Posts
Wood posts are common for privacy fences, picket fences, and farm-style fences. Use ground-contact-rated posts and add a gravel base for drainage. Concrete provides excellent stability, especially for taller fences and gate posts. For extra rot resistance, keep soil from piling directly against the post and shape concrete to drain water away.
Metal Fence Posts
Metal posts are common for chain link, ornamental steel, aluminum, and some modern wood fences. They are strong, straight, and less vulnerable to rot. Set them plumb, align them carefully, and make sure fittings or rail holes face the correct direction before the concrete sets.
Vinyl Fence Posts
Vinyl fence posts often work as sleeves around internal supports or as routed posts for panels. Many systems require concrete around the post, and some gate posts need reinforcement inside the vinyl sleeve. Follow the product instructions closely because vinyl fence systems are less forgiving when spacing is off.
Chain Link Fence Posts
For chain link fencing, terminal posts, corner posts, and gate posts are the strongest points. These posts carry tension from the fence fabric, so they must be set firmly. Line posts support the top rail and fabric between terminal posts. Accurate spacing, height, and alignment make the final fence easier to stretch and finish.
Common Fence Post Installation Mistakes
Digging Too Shallow
A shallow post may look fine on day one, then lean after rain, wind, or freeze-thaw cycles. Depth is stability. When in doubt, check local requirements and consider soil conditions.
Skipping Gravel
Skipping gravel saves five minutes and may cost years of post life. Gravel improves drainage and helps prevent water from sitting at the bottom of the post.
Not Checking Plumb Often Enough
Posts move while concrete is being added. Check plumb before, during, and after pouring. Your level should be used more than your optimism.
Attaching Fence Panels Too Soon
Concrete needs time to gain strength. Attaching heavy panels or hanging gates too early can pull posts out of alignment.
Ignoring Soil Conditions
Sandy soil, clay soil, rocky soil, and wet soil all behave differently. Loose soil may require wider holes or tube forms. Clay may hold water and need extra drainage attention. Rocky ground may require patience, a digging bar, and possibly a snack break for morale.
How Much Concrete Do You Need Per Post?
The amount of concrete depends on the hole diameter, hole depth, post size, and gravel depth. Many DIY fence posts use one or two bags of concrete per hole, but gate posts and larger holes may require more. Concrete calculators from manufacturers are useful because they account for hole volume and post displacement.
As a practical example, a 4×4 post set in a 12-inch-wide hole that is 30 inches deep will require more concrete than a smaller metal post in an 8-inch-wide hole. Always buy a little extra. Running out of concrete with one half-filled hole is a special kind of DIY comedy, and nobody laughs until later.
Should You Use Concrete or Gravel Only?
Concrete provides strong support and is usually best for privacy fences, gate posts, corner posts, terminal posts, and areas with wind load. Gravel-only setting can work for some farm, garden, or temporary fencing situations, especially when drainage and future removal matter. However, gravel must be added in compacted layers, not dumped in all at once.
For most residential fence post installations, concrete remains the most reliable choice. The key is to combine concrete stability with gravel drainage and a sloped concrete cap.
Maintenance Tips After Installing Fence Posts
After the fence is complete, inspect posts at least once a year. Look for movement, cracks in concrete, soil erosion, rot at the base, rust on metal posts, and loose hardware. Keep mulch, wet leaves, and soil from piling against wood posts. Adjust gate hardware before a small sag becomes a major repair.
If a post begins to lean, fix it early. Sometimes the solution is adding support, resetting the post, or replacing damaged concrete. Waiting usually makes the repair bigger, messier, and more expensive. Fences are like teeth in that way: maintenance beats emergency surgery.
Extra Experience: Lessons Learned From Installing Fence Posts
After working through enough fence post projects, one lesson becomes obvious: the digging phase decides almost everything. Many people want to rush to the visible part of the fencethe panels, pickets, rails, or chain link fabricbecause that is when the yard starts looking transformed. But the quiet, muddy work below ground is what determines whether the fence still looks good after the first storm.
One practical experience is to mark every post location before digging the first hole. It is tempting to dig one hole, set one post, and keep moving. That can work on a short repair, but for a full fence line it often leads to spacing problems near the end. A better approach is to lay out the entire run with stakes and string, confirm gate openings, check corners, and measure twice. The last panel should not become a weird custom puzzle because the first five posts were spaced by “vibes.”
Another real-world tip is to sort out water before concrete. Many leaning and rotting post problems come from drainage, not from weak concrete. If the bottom of the hole is muddy, loose, or holding water, the post will not have a solid foundation. Adding compacted gravel, shaping the concrete top, and keeping soil from collecting at the post base are small habits that make a big difference.
Bracing is also more important than beginners expect. A post may look perfectly straight while you are holding it, then shift as concrete fills the hole. Wind, vibration, and even the pressure of wet mix can move it. Temporary braces are cheap insurance. Use two braces at right angles whenever possible, and check the post with a level after every major adjustment. The best time to correct a leaning post is before the concrete hardens. The second-best time involves regret, a shovel, and much less joy.
Gate posts deserve special respect. A regular line post mainly supports fence panels, but a gate post supports movement. It carries the weight of the gate and handles repeated pulling, pushing, and slamming. For that reason, gate posts often need deeper holes, more concrete, stronger material, and careful alignment. If the gate opening is wrong, the mistake announces itself every single time someone uses the gate.
Weather matters too. Installing posts in extreme heat can dry concrete too quickly, while freezing weather can interfere with proper curing. Wet soil may collapse into the hole, and dry clay can be tough enough to make a post hole digger feel like a medieval workout device. Choose a reasonable weather window when possible, and keep materials covered until use.
Finally, patience is part of the job. Let concrete set before loading the post. Clean up excess concrete before it hardens. Label your measurements. Step back often and look down the fence line. Fence post installation is not complicated, but it rewards careful work. A straight, solid post is not flashy. It will not get applause from passing cars. But years later, when the fence is still standing straight while the neighbor’s fence is practicing yoga, you will know it was worth doing right.
Conclusion
Learning how to install a fence post is one of the most valuable skills in fence building. The process comes down to planning carefully, calling before you dig, laying out a straight line, digging deep enough, adding gravel for drainage, setting the post plumb, bracing it firmly, and using concrete correctly. Each step is simple, but skipping one can turn a sturdy fence into a leaning landmark.
Whether you are building a backyard privacy fence, repairing a broken post, installing a garden enclosure, or preparing for a chain link fence, start with the post. A strong fence begins underground, where good work quietly holds everything together.














