
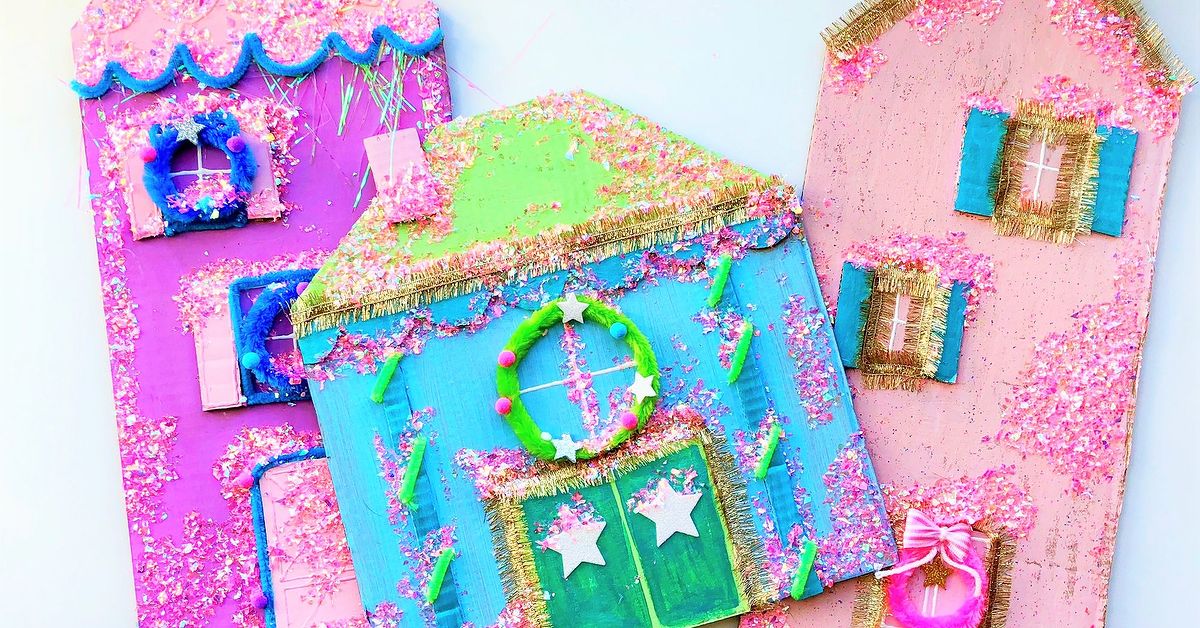
Sapo: Turn plain shipping boxes into a glowing, snow-dusted holiday display with this beginner-friendly DIY cardboard Christmas village tutorial. With simple templates, safe LED lighting, paint, paper scraps, and a little festive courage, you can build charming miniature houses for your mantel, bookshelf, windowsill, or dining table centerpiece.
Why a DIY Cardboard Christmas Village Is the Holiday Project Your Home Needs
A DIY cardboard Christmas village is the kind of project that makes you look around your home and think, “Wait, this empty cereal box has potential.” And honestly, it does. Cardboard is sturdy enough to become tiny cottages, churches, shops, barns, and snowy rooftops, yet flexible enough for beginners, kids, and adults who have not touched a craft knife since a questionable school project in seventh grade.
The beauty of making a cardboard Christmas village is that it combines three things people love during the holidays: saving money, decorating creatively, and turning ordinary clutter into something magical. Instead of buying an expensive ceramic village, you can create a custom winter scene using recycled cardboard, craft paint, glue, paper, and battery-operated LED tea lights. The result can look rustic, Scandinavian, farmhouse, vintage, gingerbread-inspired, or full-on “Santa opened a boutique hotel chain.”
This project is also highly flexible. You can make a tiny village with three houses for a narrow mantel or build a whole snowy town with streets, trees, fences, a post office, and a bakery that absolutely sells imaginary cinnamon rolls. Best of all, cardboard houses are lightweight, easy to store, and simple to repair if one roof gets smooshed by a holiday storage bin labeled “Definitely Not Fragile.”
Supplies You Need to Make a Cardboard Christmas Village
You do not need a professional craft studio to start. A clean table, a few basic tools, and a willingness to get paint on your fingers will do nicely.
Basic Materials
- Recycled cardboard boxes, cereal boxes, shipping boxes, or chipboard
- Pencil and ruler
- Scissors
- Craft knife for adults or older supervised crafters
- Cutting mat or thick scrap cardboard to protect your table
- Hot glue gun or strong craft glue
- White acrylic paint, chalk paint, or washable craft paint
- Paintbrushes or sponge brushes
- White paint pen for windows, doors, rooflines, and trim
- Battery-operated LED tea lights or micro string lights
- Vellum, tissue paper, parchment paper, or tracing paper for glowing windows
- Faux snow, cotton batting, white felt, or quilt batting for the ground
Optional Decorative Extras
- Mini bottle brush trees
- Twine, ribbon, tiny wreaths, and small bells
- Glitter, mica flakes, or iridescent paper snow
- Scrapbook paper for roofs and doors
- Wood beads or buttons for doorknobs
- Small cardboard strips for fences and shutters
- Foam board or a tray for the village base
If you are crafting with children, choose washable paint, pre-cut the cardboard pieces when necessary, and skip sharp tools during the decorating stage. Kids can paint, glue paper windows, add snow, and decide which tiny house belongs to Santa’s accountant.
Step 1: Plan Your Christmas Village Before Cutting
Before you start slicing cardboard like a festive architect, decide where your village will live. A mantel village should be shallow and wide. A tabletop centerpiece can be arranged in a circle or layered scene. A windowsill village should have narrow houses that stand securely without blocking too much light.
Measure your display area and sketch a rough layout. For example, a 36-inch mantel might fit seven small houses, three bottle brush trees, and a short cardboard fence. A 12-inch shelf might only need three taller buildings. This planning step prevents the classic DIY problem known as “I accidentally built a cardboard suburb.”
Easy House Shapes to Start With
Begin with simple silhouettes. A basic cardboard Christmas house can be made from a rectangle with a triangle roof peak. Once you feel confident, add dormers, chimneys, porches, steeples, storefront windows, or layered rooftops. Mixing shapes makes the village look more natural and charming.
Try these starter sizes:
- Small cottage: 3 inches wide by 5 inches tall
- Tall townhouse: 2.5 inches wide by 7 inches tall
- Village shop: 4 inches wide by 5.5 inches tall
- Church or chapel: 4 inches wide by 8 inches tall with a steeple
Step 2: Draw Templates for the Cardboard Houses
You can make your own templates with a pencil, ruler, and plain paper. Start by drawing the front of the house. Add a roof peak, windows, and a door. Then draw side walls and a roof panel if you want a three-dimensional building. If you prefer the fastest version, create flat village facades instead of full 3D houses. Facades are perfect for mantels because you can backlight them with LED strips or fairy lights.
Flat Facade Method
The flat facade method is simple: draw a row of connected houses on a long piece of cardboard, cut around the top roofline, cut out selected windows, and paint details on the front. Place lights behind the row and you have an instant glowing village. This style is excellent for beginners and anyone who wants maximum holiday effect with minimum engineering.
3D House Method
For a 3D cardboard house, draw a front wall, back wall, two side walls, and two roof panels. Keep the shapes simple and use tabs if you want cleaner glue seams. Tabs are small extra strips along the edges that fold inward and help connect walls. They are not glamorous, but neither is a roof falling off during dessert.
Step 3: Cut the Cardboard Carefully
Cutting is where your Christmas village starts to feel real. Use scissors for thin cereal-box cardboard and a craft knife for thicker shipping cardboard. Always cut on a mat or protected surface. Adults should handle craft knives, especially when cutting tiny windows and doors.
For clean windows, draw them first, poke a small starter hole in the center, then cut toward the corners. Rectangular windows are easiest, but arched windows look beautiful on churches, bakeries, and “fancy houses where tiny people own velvet curtains.”
Window-Cutting Tip
Do not cut every window open. A mix of cut-out windows and painted windows creates depth without turning your cardboard into lace. Cut a few larger windows for light, then use a white paint pen to draw smaller windows, shutters, roof shingles, and door details.
Step 4: Assemble the Houses
Now it is time to build. Fold along the wall edges and roof lines before gluing. If your cardboard is thick, lightly score the fold lines with the back of a craft knife or the tip of scissors. Scoring helps the cardboard bend neatly instead of cracking like a dramatic holiday cookie.
Use hot glue for fast assembly or craft glue for a slower, kid-friendlier process. Hold each seam for a few seconds until it sets. If the house wobbles, glue a small rectangle of cardboard inside the base as a brace. For taller buildings, add a hidden vertical strip inside the back wall for support.
Should You Add a Bottom?
If you plan to place LED tea lights inside the houses, leave the bottom open. This makes it easy to lift the house over the light. If your houses are purely decorative, you can add a bottom panel for strength. For string lights, cut a small notch in the back wall so the wire can pass through without tipping the building.
Step 5: Paint the Village
White paint is the classic choice for a cardboard Christmas village because it creates a snowy, clean, wintery look. It also hides cardboard printing, tape marks, and the suspicious logo from the box that once carried bulk paper towels. Apply one thin coat, let it dry, then add a second coat if needed.
For a gingerbread village look, leave the cardboard brown and paint the trim white. This creates the appearance of icing on gingerbread houses, but without the structural risk of actual cookies near children, pets, or adults with no self-control around dessert.
Popular Color Styles
- Scandinavian village: white houses, simple black windows, natural wood accents
- Gingerbread village: brown cardboard, white painted “icing,” red doors
- Farmhouse village: white paint, kraft paper roofs, twine wreaths
- Vintage glitter village: pastel paint, glitter roofs, mica-style snow
- Modern minimalist village: matte white houses with clean geometric windows
Step 6: Add Windows, Doors, Roofs, and Tiny Details
Details are what turn cardboard boxes into a Christmas village with personality. Use a white paint pen to draw roof shingles, window frames, snow caps, brick lines, shutters, garlands, and little doormats. Add tiny wreaths cut from green paper or use small loops of twine.
To make glowing windows, glue vellum, tissue paper, parchment paper, or tracing paper behind the cut-out windows. This diffuses LED light so the houses glow softly instead of blasting tiny rectangles of light like a miniature airport runway.
Easy Detail Ideas
- Cut a small cardboard chimney and glue it to the roof.
- Add strips of paper as snowy roof trim.
- Use a toothpick dipped in paint for tiny dots, berries, and lights.
- Draw a bakery sign, toy shop sign, or post office sign.
- Add a cardboard fence around one cottage.
- Glue paper shutters beside windows for a cozy cottage look.
Give each house a role. One can be the bakery, one can be the schoolhouse, one can be the town hall, and one can be the mysterious house at the end of the lane where the lights are always on and someone is definitely wrapping presents at midnight.
Step 7: Light the Village Safely
Lighting is the magic moment. Place battery-operated LED tea lights inside individual houses or run micro string lights behind a row of facades. Use warm white lights for a cozy vintage glow or cool white lights for a snowy winter look.
Important safety note: Never use real candles, open flames, or high-heat bulbs inside or near cardboard houses. Cardboard is paper-based and flammable, so stick with battery-powered LED lights. Turn off lights before leaving home or going to bed, and keep wires neat so the village does not become a tiny festive trip hazard.
Best Lighting Options
- LED tea lights: Best for individual 3D houses
- Micro fairy lights: Best for flat village facades
- LED puck lights: Best for larger buildings or deep displays
- Battery string lights: Best for mantels, shelves, and tabletop scenes
Step 8: Build a Snowy Base
A base helps your cardboard Christmas village look intentional instead of like several tiny houses wandered onto the mantel and got lost. Use a wooden tray, foam board, cardboard sheet, cake stand, shallow basket, or long plank as the foundation.
Cover the base with white felt, quilt batting, cotton batting, or faux snow. Add paths with kraft paper, tiny pebbles, or painted cardboard strips. Place taller houses in the back and smaller houses in the front. Tuck bottle brush trees between buildings to create depth.
Village Layout Example
For a balanced mantel display, place a tall chapel or townhouse near the center, then arrange smaller cottages on both sides. Add trees in odd numbers, such as three or five. Put lights behind the houses, not directly in front, so the scene glows from within. Finish with a few pinecones, evergreen clippings, or a strand of wooden beads for texture.
Step 9: Make the Village Look More Expensive Than It Is
The secret to an elegant DIY cardboard Christmas village is restraint. That does not mean boring. It means choosing a clear color palette and repeating it. White, kraft brown, gold, and evergreen is a beautiful combination. So is white, silver, and pale blue. Red and white creates a cheerful candy-cane feeling, while black and white gives the village a modern Nordic mood.
Use matte paint for a softer look. Add glitter only to rooftops, trees, or snow edges so the whole village does not look like it lost a fight with a craft-store aisle. Repeat small details, such as the same window shape or roof trim, to make the village feel cohesive.
Designer Tricks for Better Results
- Vary building heights to avoid a flat skyline.
- Use odd numbers of houses for a natural arrangement.
- Layer houses at different depths instead of lining them up perfectly.
- Hide battery packs behind trees, cotton snow, or larger houses.
- Add one standout building, such as a chapel, clock tower, or bakery.
Step 10: Store Your DIY Cardboard Christmas Village
If you want to reuse your village next year, storage matters. Cardboard can bend if it is crushed, so avoid tossing your houses into a crowded holiday bin under heavy ornaments. Wrap each building loosely in tissue paper and place them in a shallow box. Store LED lights separately so wires do not snag on roofs or chimneys.
Flat facades are the easiest to store because they can slide behind a closet shelf or inside a large envelope. For 3D houses, nest smaller buildings inside larger ones only if they fit comfortably. Label the box clearly so future you does not mistake it for recycling and send your handmade village on a tragic journey to the curb.
Creative Variations for Your Cardboard Christmas Village
Gingerbread Cardboard Village
Use brown cardboard as the base and decorate with white paint pen “icing.” Add peppermint-style paper circles, candy-cane doors, and scalloped roof trim. This style is especially charming for kitchens, breakfast nooks, and family rooms.
All-White Winter Village
Paint every house white and use warm LED lights behind vellum windows. Add white felt snow and pale wooden trees. This version looks clean, peaceful, and surprisingly high-end, even if it began life as a shipping box that delivered socks.
Kids’ Colorful Christmas Town
Let children paint houses in red, green, blue, pink, and gold. Add stickers, pom-poms, paper trees, and hand-drawn signs. The result may not be minimalist, but it will be joyful, personal, and probably more fun than anything from a catalog.
Advent Countdown Village
Make 24 small cardboard houses and number each one. Hide a note, activity card, or small treat inside each house. Activities can include “watch a Christmas movie,” “make cocoa,” “donate a toy,” or “call a grandparent.” This turns the village into a holiday tradition instead of just decor.
Bookcase Christmas Village
Place houses across multiple shelves to create a vertical village. Add lights behind the houses and small trees between books. This is perfect for small apartments because it uses space you already have.
Common Mistakes to Avoid
Using Cardboard That Is Too Flimsy
Thin cardboard works for small houses, but larger buildings need sturdier material. If a wall bends too easily, glue a second layer behind it.
Skipping the Drying Time
Paint and glue need time to dry. Rushing can cause smudges, warped walls, and roofs that slide around like they are auditioning for a holiday slapstick routine.
Cutting Too Many Tiny Windows
Tiny windows look cute until you are cutting the thirty-seventh one and questioning every decision that led you here. Mix cut windows with painted windows to save time.
Using Real Candles
Cardboard and flame do not belong together. Use battery-operated LEDs only. This is the one rule that is not negotiable, no matter how cozy a real candle looks.
Overdecorating Every House
Let some houses stay simple. A village needs quiet cottages as much as it needs a show-off bakery with glitter on the roof.
My Best Experience-Based Tips for Making a DIY Cardboard Christmas Village
After making a cardboard Christmas village, you quickly learn that the project is less about perfection and more about rhythm. The first house is usually the awkward one. Maybe the roof is crooked. Maybe the windows look like they were installed during a snowstorm by a raccoon with a ruler. That is completely normal. By the third house, your hands understand the process, and suddenly you are designing a tiny post office like you have been appointed mayor of Cardboardville.
One of the best practical lessons is to work in batches. Instead of completing one house from start to finish, draw all your houses first, then cut them, then paint them, then decorate them. This keeps the project moving smoothly and helps the whole village look consistent. It also means you only have to clean paintbrushes once, which is the kind of holiday efficiency we should all applaud.
Another experience-based tip is to make more houses than you think you need, but decorate fewer at first. Extra blank houses are useful when you start arranging the village and realize one corner looks empty. They are also handy if a child, pet, or enthusiastic elbow damages a building. A spare cottage can save the day without requiring a dramatic late-night crafting session.
Lighting is where the village truly comes alive, but it is also where planning matters most. Before gluing everything permanently to a base, test the lights in a dark room. Some windows may glow beautifully, while others may need vellum to soften the brightness. You may discover that one building blocks the light from another, or that the battery pack is sitting in plain view like an uninvited guest. Move things around before committing.
For a more polished look, I recommend choosing one main finish and one accent finish. For example, use matte white paint on all houses and add kraft paper roofs. Or keep the cardboard brown and use only white paint pen details. Too many colors can look busy fast, especially in a small display. A simple palette lets the shapes, windows, and warm lights do the work.
If you want the village to feel personal, add tiny story details. A little “Bakery” sign makes one house feel alive. A cardboard sled leaning against a wall adds charm. A crooked chimney can become a feature, not a flaw. The best handmade Christmas decorations often have a little wonkiness. That is how people know they were made by human hands and not by a factory machine with suspiciously perfect snowflakes.
When crafting with kids, prepare the hard parts ahead of time. Cut the houses, windows, and roofs before inviting them to decorate. Then let them paint, glue, sprinkle faux snow, and name the buildings. You may end up with a purple church, a green bakery, and a house covered in 42 pom-poms. This is not a problem. This is memory-making with glitter.
Finally, do not wait until the night before guests arrive. A cardboard Christmas village is easy, but it is more enjoyable when you can take your time. Make it over a weekend, add details during a movie night, and adjust the display once the lights are on. The slow process is part of the charm. By the time your village is glowing on the mantel, you will not just have holiday decor. You will have a handmade little world built from boxes, imagination, and a healthy amount of glue.
Conclusion: Build a Village, Start a Tradition
Making a DIY cardboard Christmas village is one of the most rewarding holiday crafts because it is affordable, customizable, and surprisingly beautiful. With recycled cardboard, paint, safe LED lights, and a few decorative details, you can create a winter display that feels warm, personal, and completely original.
Whether your style is rustic gingerbread, snowy farmhouse, vintage glitter, or modern white village, the process is simple enough for beginners and creative enough for experienced crafters. Start with basic house shapes, add glowing windows, layer the scene with trees and faux snow, and let every little building tell a story. The finished village will brighten your home, impress your guests, and give you one more reason to save that next cardboard box.
Note: For safety, use only battery-operated LED lights with cardboard decorations. Do not place real candles, open flames, or high-heat bulbs inside or near your cardboard Christmas village.














