
Note: This guide is written for modern Minecraft Java and Bedrock gameplay and focuses on the simplest survival-friendly water elevator method using soul sand, kelp, source water, and bubble columns.
Introduction: Because Stairs Are So Last Century
Learning how to make a water elevator in Minecraft is one of those small upgrades that makes your entire base feel instantly smarter. One minute you are hopping up a staircase like a tired mountain goat, and the next you are shooting through a glass tube like a very blocky superhero. Whether you are building a sky base, a deep mine entrance, an ocean home, a mob farm, or a storage tower, a Minecraft water elevator is one of the easiest ways to move vertically without redstone, pistons, slime blocks, or emotional damage.
The easiest method uses a simple mechanic: bubble columns. In Minecraft, soul sand creates upward bubbles when placed under source water blocks, while magma blocks create downward bubbles. That means soul sand sends players, mobs, and items up, and magma pulls them down. Add kelp to convert flowing water into source blocks, surround everything with glass or another solid block, and you have a clean, fast, low-cost elevator that works beautifully in most survival worlds.
This guide explains the fastest and most beginner-friendly way to build a water elevator in Minecraft, including the materials you need, step-by-step instructions, common mistakes, Java and Bedrock notes, design ideas, and practical building experience from real gameplay. No engineering degree required. No redstone PhD. Just water, kelp, soul sand, and a dream.
What Is a Minecraft Water Elevator?
A Minecraft water elevator is a vertical water shaft that moves players up or down using bubble columns. It is different from a ladder, staircase, scaffolding tower, or piston elevator because it relies on water physics instead of mechanical parts. The result is fast, smooth, compact, and surprisingly stylish if you build it with glass.
The most common version is a one-block-wide elevator shaft. You step into the water, the bubbles grab you, and you travel vertically. If the bottom block is soul sand, you go up. If the bottom block is magma, you go down. The trick is that every water block in the elevator shaft must be a source block. If even one block is flowing water instead of source water, the bubble column may stop, break, or act like it has forgotten its job description.
Materials Needed for the Easiest Water Elevator
For a simple upward water elevator, gather these items:
- 1 soul sand block
- 1 water bucket, though 2 buckets are more convenient
- Kelp, enough to reach the full height of the elevator
- Building blocks or glass for the elevator shaft
- Signs, doors, trapdoors, or fence gates to stop water from spilling out
- A temporary block such as dirt, sand, or stone for the bottom during setup
For a downward elevator, replace soul sand with a magma block. Many players build two side-by-side shafts: one soul sand elevator going up and one magma block elevator going down. This is usually easier than creating a complicated switchable elevator, especially if you are building in survival mode and would rather spend your evening playing Minecraft instead of arguing with redstone dust.
How the Water Elevator Works
Soul Sand Makes You Go Up
When soul sand sits underneath a column of source water blocks, it creates an upward bubble column. Step into it, and you are pushed toward the top. This makes soul sand the key ingredient for an upward Minecraft water elevator. It is perfect for mine exits, tower bases, ocean builds, and cliffside homes where climbing manually gets old faster than a wooden pickaxe.
Magma Blocks Pull You Down
A magma block creates a downward bubble column. This is useful for descending quickly, especially in tall bases or deep mines. However, magma blocks can damage players who stand directly on them, so design your entrance carefully. You can use a landing space, crouch when needed, or place the magma block so players are pulled down without spending too much time standing on the block itself.
Kelp Turns Flowing Water Into Source Water
This is the secret sauce. If you pour water from the top of a tall shaft, the water flows downward, but flowing water alone will not create a full bubble column. Kelp solves this problem. When you place kelp from the bottom to the top of the shaft, it converts the water blocks into source blocks. After that, you break the kelp, replace the bottom block with soul sand or magma, and the elevator starts working.
Step-by-Step: How to Make a Water Elevator in Minecraft
Step 1: Choose the Elevator Height
First, decide where your elevator starts and where it ends. A water elevator can be short, like a basement lift, or extremely tall, like a sky base launcher. For beginners, try building a 10 to 20 block tall elevator first. Once you understand the method, you can scale it up to ridiculous heights. Minecraft will not judge you. Your friends might, but only because they are jealous.
Step 2: Build the Elevator Shaft
Build a vertical tube using glass, stone, deepslate, wood, or any solid block you like. A one-block-wide shaft is enough for a basic player elevator. Glass is popular because you can see the bubbles, the scenery, and occasionally your own poor decisions while zooming upward.
Make sure the shaft is fully enclosed on all sides so water does not spill everywhere. Leave an opening at the bottom for entry and an opening at the top for exit. If you are building inside a house, tower, or cave, check that the elevator does not accidentally flood your storage room. Nothing says “professional builder” like watching your chests float in chaos.
Step 3: Add a Door, Sign, or Trapdoor at the Entrance
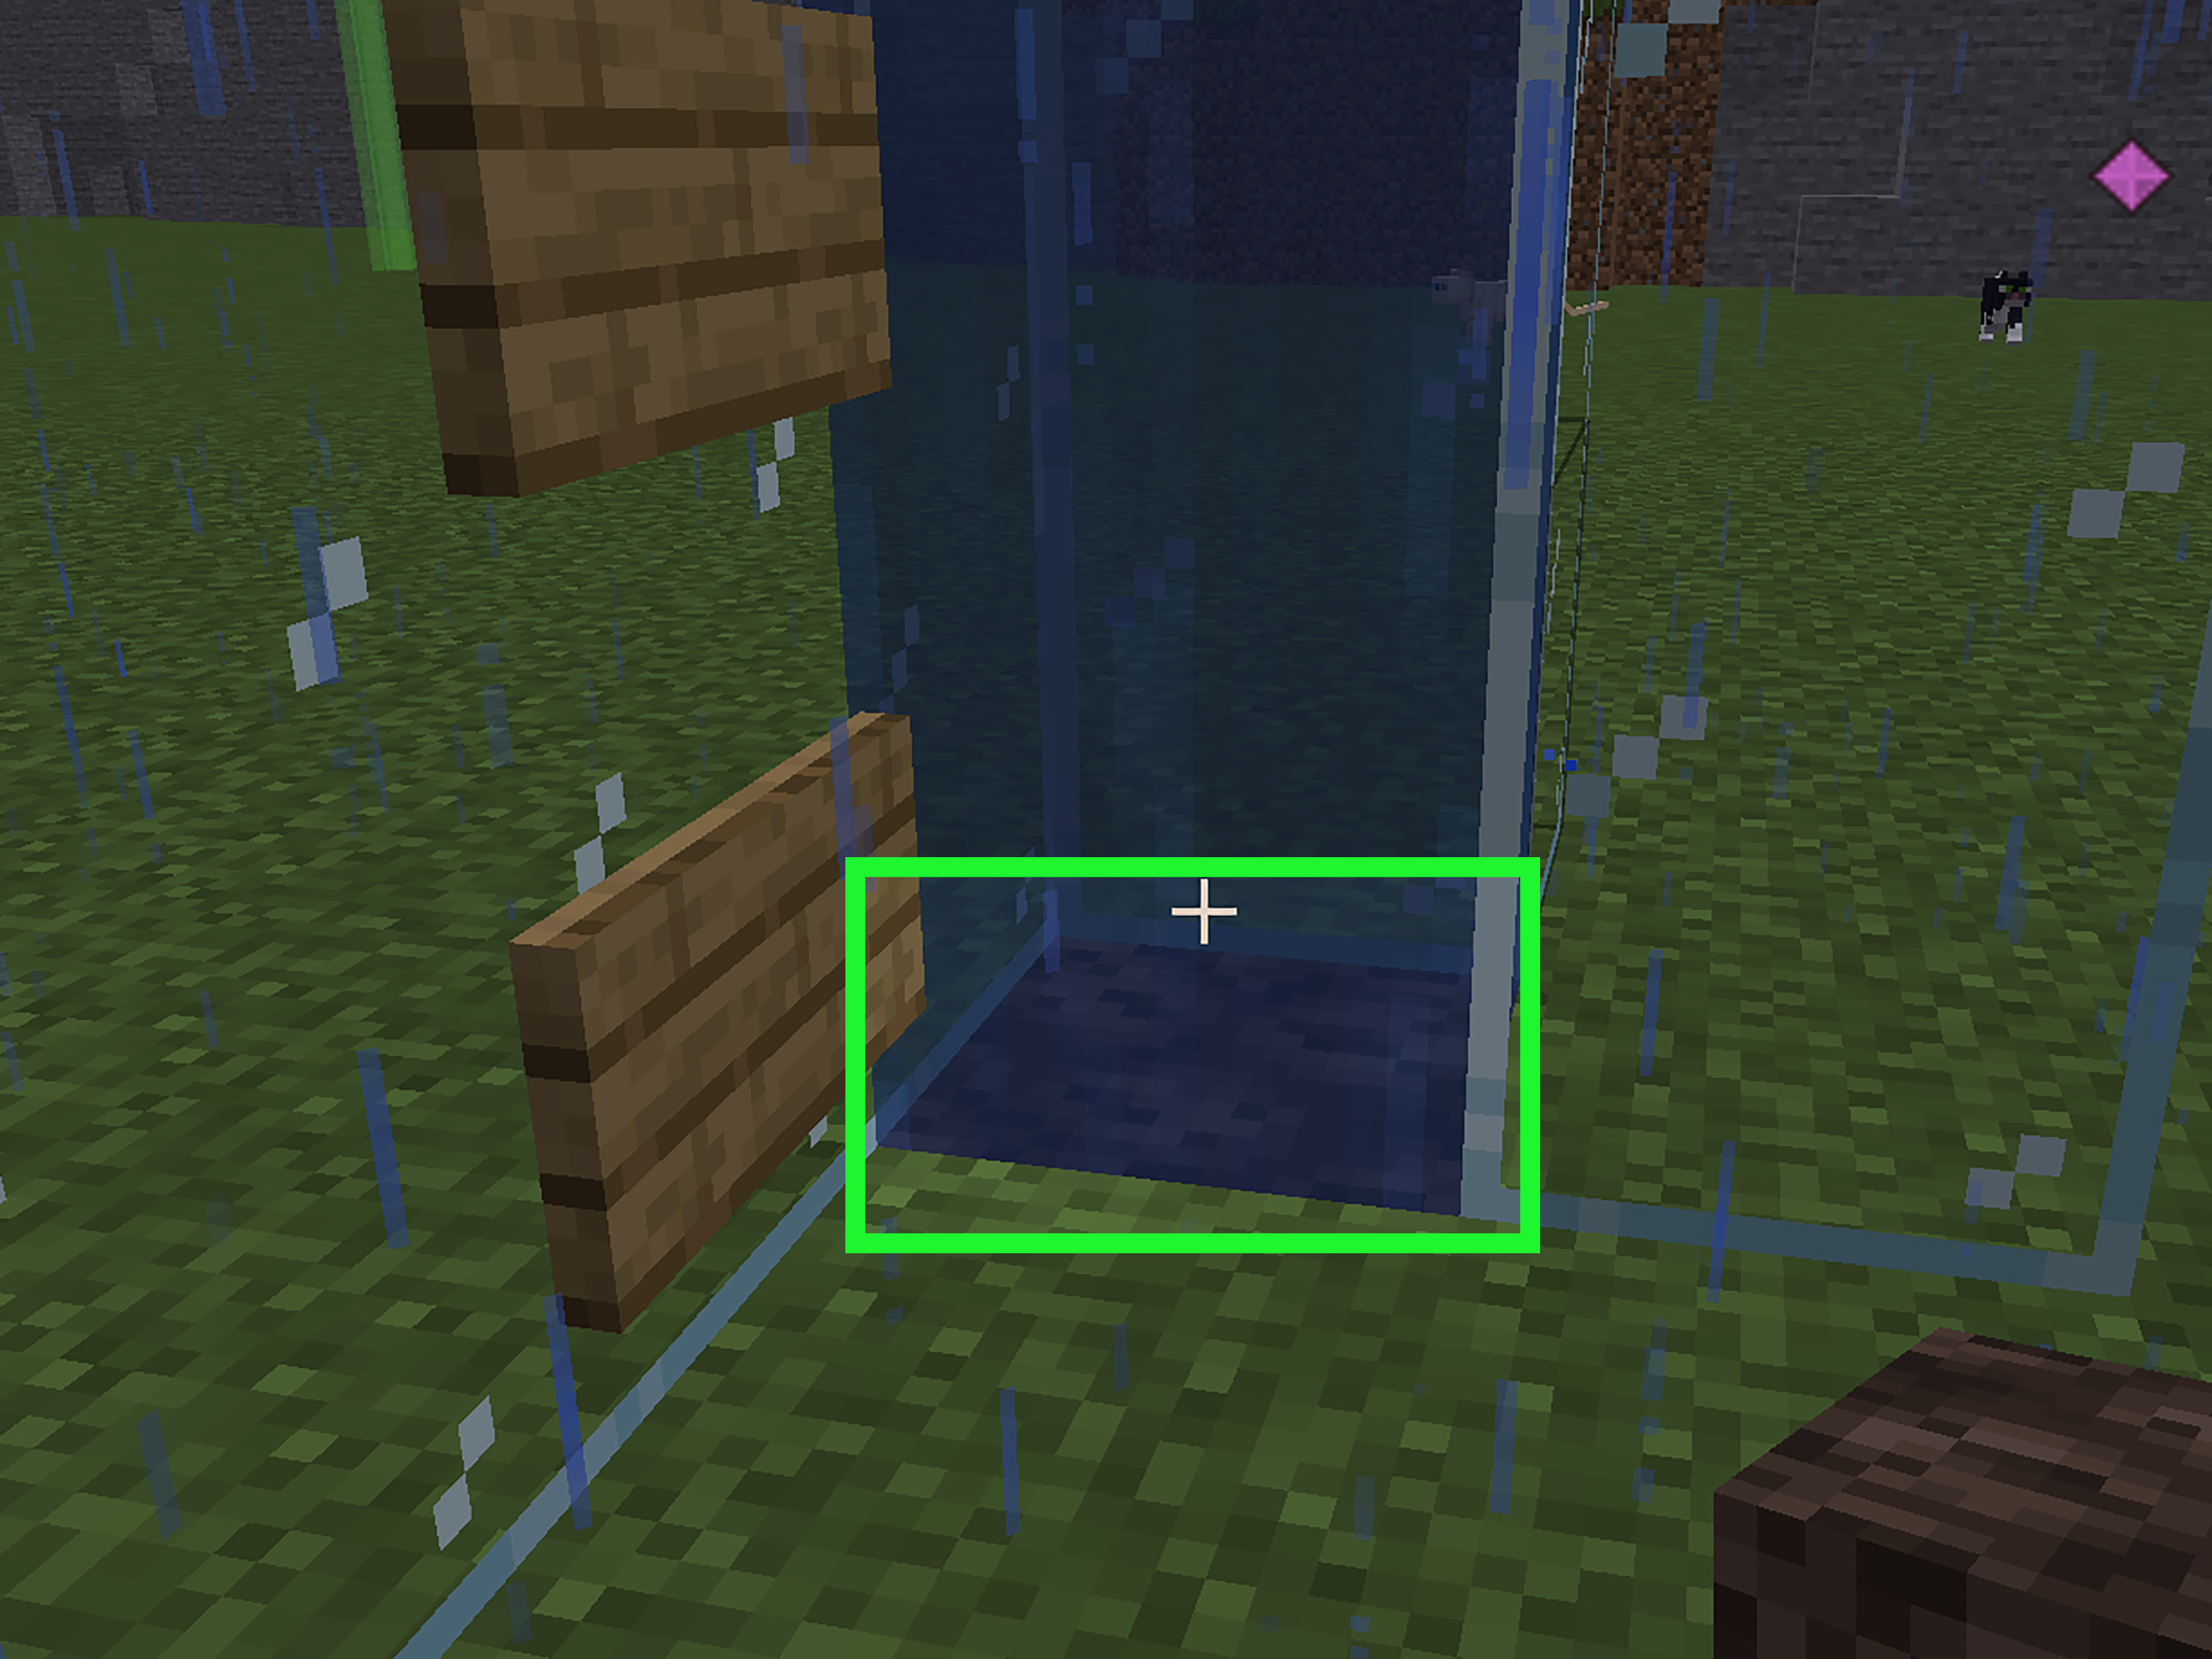
At the bottom entrance, place a door, sign, trapdoor, or fence gate to hold the water inside the shaft. These blocks help create a dry entry point so you can walk into the elevator without turning your entire hallway into a public swimming pool.
In many versions, doors are especially easy for player entrances. Signs are also useful for compact builds. The goal is simple: keep water in the shaft and out of the room. If water leaks, the elevator can still work, but your base will look like it lost a fight with a fish tank.
Step 4: Place a Temporary Block at the Bottom
Before adding kelp, place a temporary block at the bottom of the elevator shaft. Dirt, sand, stone, or any simple block works. Do not place soul sand yet if you need to grow or stack kelp, because kelp placement can be awkward or impossible depending on the setup. The temporary block gives kelp a normal starting point.
Step 5: Pour Water From the Top
Go to the top of the elevator and pour water into the shaft. The water should flow all the way down to the bottom. If it does not reach the bottom, your shaft may be blocked, too tall for the way you placed it, or interrupted by a missing space.
For tall elevators, you do not need to place water with a bucket at every level. That is the beauty of the kelp method. Pouring water from the top is enough to fill the shaft with flowing water, and kelp will handle the source-block conversion next.
Step 6: Stack Kelp From Bottom to Top
Enter the shaft and place kelp on the temporary bottom block. Keep placing kelp upward until it reaches the top of the elevator. You can swim upward while placing kelp, or build from inside the shaft as you go. Every block of water touched by kelp becomes a source water block.
This step is where most broken water elevators are fixed. If your soul sand is not making bubbles, the problem is usually that the water blocks are not all source blocks. Kelp is the easiest solution. It is cheap, renewable, and much less annoying than placing individual water buckets on every level.
Step 7: Break the Kelp
Once the kelp reaches the top, break the kelp at the bottom. The whole kelp stack should pop off, leaving source water blocks behind. Collect the kelp if you want, because Minecraft players never truly throw anything away. That random kelp may become fuel, compost, decoration, or proof that you have a storage problem.
Step 8: Replace the Bottom Block With Soul Sand
Now remove the temporary bottom block and place soul sand in its spot. If the water column is full of source blocks, bubbles should appear immediately and rush upward. Step into the shaft, and the elevator should carry you to the top.
If nothing happens, do not panic. The game is not personally insulting you. It usually means one of three things: the soul sand is not directly under the water column, the water blocks are not all source blocks, or something is blocking the shaft. Recheck the column, repeat the kelp step if needed, and make sure the shaft is continuous from bottom to top.
How to Make a Downward Water Elevator
To make a downward water elevator, follow the same steps but use a magma block instead of soul sand. The magma block creates downward bubbles that pull you toward the bottom. This is handy when traveling from a tower, mountain base, or mob farm platform back to ground level.
For safety, place the exit so you are not forced to stand on the magma block for long. You can also create a small side exit at the bottom, use signs to manage water flow, or build a small landing chamber. If you are transporting mobs or items, test the design before connecting it to anything important. A poorly placed magma block can turn your elevator into a very dramatic mistake generator.
Best Design: Two-Shaft Water Elevator
The easiest practical design is a two-shaft system. Build one shaft with soul sand for going up and one shaft with magma for going down. Put them side by side, label them if needed, and decorate the outside to match your base.
This design is simple, reliable, and easy to repair. It also avoids the need for redstone block swappers or complicated toggles. Switchable elevators are cool, but for most players, two separate shafts are faster to build and easier to understand. In survival mode, simplicity is a feature, not a weakness.
Common Mistakes and How to Fix Them
The Bubbles Do Not Appear
This almost always means the water is not made of source blocks. Run kelp from bottom to top again, break it, and replace the bottom block with soul sand. Also confirm that the soul sand is directly below the water column, not one block off to the side like it is trying to avoid responsibility.
The Elevator Stops Halfway
If bubbles stop partway up, one or more water blocks in the shaft are flowing water instead of source water. Add kelp all the way through the problem area. For best results, redo the full kelp column from bottom to top.
Water Spills Into the Room
Use signs, doors, trapdoors, or fence gates at the entrance and exit. Also check for missing wall blocks. One missing glass block can turn a neat elevator into an indoor river, which is only charming if you meant to build a lazy river.
You Take Damage at the Bottom
If you are using a magma block for a downward elevator, redesign the bottom exit so you can step away quickly. Add a side opening, landing platform, or separate water space. Magma is useful, but it is not known for its hospitality.
Java vs. Bedrock: Does This Work in Both?
Yes, the basic soul sand and magma block water elevator works in both Minecraft Java Edition and Bedrock Edition, as long as the column uses source water blocks. Small behavior differences may appear between editions, especially with doors, signs, waterlogging, and certain entrance designs. However, the core method remains the same: build a shaft, fill it with water, use kelp to create source blocks, then place soul sand or magma at the bottom.
If a design from a video does not work in your version, simplify it. Use a straight one-block-wide shaft, a normal entrance, source water, and soul sand. The simpler the design, the fewer edition-specific quirks you need to wrestle with.
Where to Use a Water Elevator in Minecraft
A water elevator is useful almost anywhere vertical travel matters. In a mine, it gives you a fast route from deep underground back to your base. In a sky base, it becomes a clean transportation tube. In an ocean monument build, it fits naturally with the aquatic theme. In a mob farm, bubble columns can move mobs or items to another level. In a storage system, item elevators can help move drops upward without using a noisy chain of droppers.
For home bases, a glass water elevator can become a centerpiece. Place sea lanterns, glowstone, froglights, or lanterns around the shaft to make it glow. Add dark prismarine for an ocean feel, polished blackstone for a modern look, or quartz for a clean futuristic style. A functional elevator does not have to look like a plumbing accident.
Pro Tips for a Better Water Elevator
Use Glass for Visibility
Glass makes it easy to see whether the bubble column is working. It also looks great in towers, underwater bases, and modern builds. Tinted glass can create a sleek design, while stained glass lets you color-code up and down shafts.
Add Signs or Item Frames
If you build two shafts, label them clearly. Use signs, item frames, colored blocks, or banners. When you are running from hostile mobs at night, you do not want to accidentally jump into the down elevator while trying to escape upward.
Light the Shaft
Lighting makes the elevator easier to find and safer to use. Sea lanterns and glowstone work well in aquatic builds. Lanterns and chains look good in medieval builds. Froglights are excellent if you enjoy colorful lighting and have survived the process of obtaining them.
Keep a Backup Exit
For very tall elevators, consider adding emergency exits or side platforms. Water elevators are reliable, but smart builders always plan for accidents, lag, mobs, and that one friend who presses every button just to see what happens.
Survival Mode Resource Tips
Soul sand and magma blocks are usually gathered from the Nether, so prepare before going in. Bring decent armor, food, building blocks, and a healthy respect for lava. Kelp is found in oceans and can be farmed easily once you bring some home. Glass requires sand and a furnace, while signs require wood. In other words, most of the materials are cheap after your first Nether trip.
If you are early in the game and do not have soul sand yet, you can still build the shaft and prepare the water column. Later, after visiting the Nether, swap in the soul sand and activate the elevator. Planning ahead saves time, especially if your base is already becoming tall enough to need air traffic control.
Experience Section: What Building Water Elevators Teaches You
After building several Minecraft water elevators in different worlds, one lesson becomes clear: the elevator itself is easy, but the planning around it matters. The first time many players build one, they focus only on the bubble column. They make the shaft, add water, place soul sand, and celebrate when the bubbles appear. Then they realize the entrance floods the hallway, the top exit throws them into a wall, or the down shaft drops them onto a magma block with the warmth and kindness of a cactus.
The best experience comes from thinking of the water elevator as part of the base, not just a transportation trick. In a mine base, it helps to place the elevator close to storage, furnaces, and a bed. That way, after a long mining trip, you can shoot upward, dump ores, repair tools, and head back down quickly. A down elevator beside the up elevator makes the whole system feel like a subway for people who carry pickaxes.
In ocean bases, water elevators feel especially natural. A glass tube rising through the water looks impressive from the outside, and the bubbles add movement to the build. The challenge is making the entrance clean. Doors and signs can help, but the surrounding structure matters too. A small airlock room makes the elevator feel intentional instead of improvised. Add sea lanterns, prismarine, and maybe a few decorative coral blocks nearby, and suddenly the elevator becomes part of the architecture.
For mountain bases or cliff houses, a water elevator can completely change how the build plays. Before adding one, you may spend half your time climbing stairs or scaffolding. After adding one, the base feels connected. You can keep farms at the bottom, storage in the middle, and a bedroom or enchanting room near the top. Travel becomes instant enough that you stop avoiding certain parts of your own build.
The most common frustration is still the missing source block problem. Many players pour water from the top, place soul sand, and wonder why nothing happens. The answer is usually kelp. Once you understand that kelp converts the column into source water, water elevators become much less mysterious. In fact, the kelp trick is one of those Minecraft mechanics that feels like wizardry until you use it twice, and then it becomes second nature.
Another useful lesson is to test elevators before decorating them. Build the basic shaft first. Add water, kelp, and soul sand. Ride it several times. Check the entrance and exit. Make sure you do not bump your head at the top or get pushed into a corner. Only after the elevator works should you add glass patterns, lighting, walls, signs, and fancy trim. Decorating first and troubleshooting later is how builders develop trust issues.
In multiplayer, water elevators become even more valuable. Players can move quickly through shared bases without needing everyone to master parkour or remember which staircase leads where. They are also safer than open ladder shafts because the water slows movement and reduces the chance of falling damage in many designs. If your server has a central storage tower, a mob farm, or a shared mine, a two-shaft water elevator is one of the best quality-of-life upgrades you can build.
The final experience-based tip is to keep the design readable. A beautiful elevator is great, but a confusing elevator will annoy everyone who uses it. Color-code the upward shaft with blue or light blocks and the downward shaft with red, black, or magma-themed blocks. Add signs near entrances. Leave enough room at the top so players can step out smoothly. A good Minecraft water elevator should feel fast, obvious, and safe. If someone has to read a manual before using it, the build may be a little too ambitious.
Conclusion: The Easiest Minecraft Elevator Is Also One of the Best
Making a water elevator in Minecraft is simple once you understand the three key ingredients: source water, kelp, and bubble blocks. Soul sand creates an upward elevator, magma creates a downward elevator, and kelp makes the water column work properly by turning flowing water into source blocks. With a one-block shaft, a clean entrance, and a little decoration, you can create a fast, reliable elevator for mines, towers, ocean bases, farms, and multiplayer hubs.
The easiest method is also one of the most practical because it avoids redstone and uses affordable materials. Build the shaft, pour water from the top, stack kelp, break the kelp, place soul sand, and ride the bubbles. That is the whole magic trick. Minecraft may be full of complex machines, but sometimes the best solution is just a tube of water with a weird block at the bottom. Elegant? Yes. Slightly soggy? Also yes.














